You’ve spent all week surviving on hastily thrown-together 30-minute meals, sheer willpower, and entirely too much caffeine. But the weekend is finally here. This is your time. Your kitchen is no longer a chaotic weekday battleground; it is a sanctuary for culinary perfectionism. You decide you are going to tackle a project that terrifies most home cooks: making caramel from scratch. You combine your sugar and water, you turn on the heat, and you watch with bated breath. Everything looks gorgeous. You have a bubbling, golden syrup. And then, in the blink of an eye, your liquid gold seizes into a grainy, crystallized brick of absolute despair. You panic. You stir frantically. It only gets worse.
Let’s get one thing straight right now: you do not need a pastry degree from a pretentious culinary institute to master sugar work. You just need to understand the chemistry of the diva you are dealing with. Sugar is notoriously temperamental, but it is also entirely predictable once you know the rules. Today, we are going to dive deep into the exact food science behind why homemade caramel suddenly seizes into a gritty mess, and you are going to learn the foolproof, scientifically backed techniques to keep it silky smooth every single time.
More importantly, we are going to turn this notoriously frustrating kitchen task into a relaxed, interactive dessert gathering. Because setting up a gorgeous, DIY dessert station is the absolute secret to mastering the art of effortless hosting. Grab your favorite heavy-bottomed saucepan, pour yourself a glass of wine, and let’s conquer the chemistry of caramel.
The Chemistry of Chaos: Why Caramel Seizes
To defeat your enemy, you must first understand your enemy. The white granulated stuff sitting in your pantry is sucrose. Sucrose is a disaccharide, meaning it is essentially two simpler monosaccharides—fructose and glucose—chemically bonded together. In its natural state, sucrose is a crystal. And here is the most important thing you need to know about sugar: it desperately, aggressively wants to remain a crystal.
When you add heat and water to sugar, you force those crystals to dissolve and break apart. But the moment the water begins to boil off, the sugar molecules start looking for any excuse to link back together. Just like when your melted chocolate turns clumpy due to a stray drop of water, a seized caramel is a chemical rebellion triggered by the smallest of catalysts.
The Seed Crystal and the Chain Reaction
The primary culprit behind grainy caramel is something food scientists call a “seed crystal.” When you are boiling your sugar syrup, a tiny, microscopic splash of liquid might land on the cool upper wall of your saucepan. The water evaporates, leaving behind a single, solitary, solid sugar crystal.
If that single crystal falls back into your boiling syrup, it acts as a structural template. It signals all the other dissolved, highly volatile sugar molecules in the pot to immediately organize themselves back into a crystalline structure. A violent chain reaction occurs, and within seconds, your smooth syrup crystallizes into an opaque, gritty nightmare. This is why vigilance is your best friend when working with boiling sugar.
The Anatomy of Caramelization
It is vital to understand that caramelization is not the same thing as the Maillard reaction. The Maillard reaction requires amino acids (proteins) to brown your steaks and bake your bread. Caramelization, however, is a strictly pyrolytic reaction—meaning it is driven entirely by the thermal decomposition of sugar without the presence of proteins.
Food science legend Harold McGee notes that true caramelization occurs when pure sugar is heated to the point that its molecules literally begin to break apart. This destruction triggers a remarkable cascade of chemical events, generating hundreds of new and highly complex flavor, color, and aromatic compounds. Pure sucrose typically begins this magical transformation when it reaches 338°F. At this temperature, the simple sweetness of the sugar gives way to the deep, nutty, buttery, and slightly bitter notes that we associate with a masterfully crafted caramel.
The Holy Trinity of Foolproof Caramel
Now that we know why sugar wants to crystalize, how do we stop it? In the professional pastry kitchen, we rely on a holy trinity of scientific safeguards to keep our caramel smooth.
Invert Sugars: Your Chemical Bodyguards
The most common and effective precaution to prevent crystallization is introducing an invert sugar to your sucrose. Corn syrup, glucose syrup, and honey are all forms of invert sugar. These syrups contain long, complex chains of glucose molecules.
When you add a tablespoon of corn syrup to your granulated sugar and water, those long glucose chains act as physical interfering agents. Think of them as giant, muscular bouncers at a nightclub. They physically stand in between the dissolved sucrose molecules, blocking them from linking back together and forming crystals. Even if a rogue seed crystal falls into the pot, the invert sugar provides a massive buffer, giving you a significantly higher margin of error.
The Acid Test: Lemon Juice and Cream of Tartar
If you refuse to use corn syrup, you can achieve a similar interfering effect using acid. Adding a small splash of fresh lemon juice or a pinch of cream of tartar to your sugar mixture introduces an acidic environment.
When you heat sucrose in the presence of an acid, a chemical process called “inversion” occurs. The acid actively breaks the glycosidic bonds holding the sucrose together, splitting it into free fructose and free glucose before the caramelization process even begins. These free monosaccharides act as their own interfering agents. Whether your pie crust is always tough or your sugar constantly seizes, understanding how to manipulate ingredients with acid is an absolute game-changer for the home cook.
Temperature Control: The Danger Zones of Sugar Work
Candy making is a science of exact temperatures. As water boils out of your sugar syrup, the concentration of sugar increases, and the boiling point of the mixture rises.
For a perfectly chewy, dippable caramel that will coat an apple without sliding off or breaking your teeth, you need to cook your initial sugar, butter, and dairy mixture to the “soft-ball stage.” This stage occurs precisely between 235°F and 240°F. If you pull it off the heat at 225°F, your caramel will be a runny sauce. If you let it reach 250°F (the hard-ball stage), you will end up with rock-hard candy.
If you suspect your meat thermometer is lying to you, you must calibrate it before you begin. Bring a pot of water to a rolling boil; your thermometer should read exactly 212°F (assuming you are at sea level). If it is off by a few degrees, you must mentally adjust your target temperature accordingly.
Equipment: Don’t Sabotage Yourself with Cheap Gear
You can have the best technique in the world, but if your equipment is garbage, your caramel will fail. Sugar work is unforgiving to bad kitchenware.
The Pan: Heavy-Bottomed Stainless Steel or Copper
I am a broken record when it comes to banishing toxic kitchen gear, but cooking sugar in a cheap, peeling non-stick pan is a recipe for absolute disaster. First and foremost, non-stick coatings are dark, making it physically impossible to judge the subtle color changes of your caramel as it browns. By the time it looks dark in a black pan, it is already burnt and acrid.
Secondly, thin, cheap pans lack thermal mass. They heat unevenly, creating severe hot spots that will scorch the sugar on one side of the pot while the other side hasn’t even begun to melt. Furthermore, heating standard PTFE non-stick coatings to candy-making temperatures is incredibly dangerous and can degrade the coating.
You need a high-quality, heavy-bottomed pan with a light-colored interior. Tri-ply clad stainless steel is excellent, as the aluminum core provides even heat distribution. If you want to feel like a true French pastry chef, unlined copper is the absolute gold standard for sugar work due to its rapid thermal conductivity and responsiveness.
The Tools: Heat-Resistant Spatulas and Pastry Brushes
Throw away your wooden spoon. I mean it. Wood is a highly porous material. Over time, wooden spoons harbor microscopic sugar residue deep within their grain from previous cooking sessions. The moment you stir a fresh batch of boiling sugar with that wooden spoon, you are instantly introducing thousands of microscopic seed crystals into your pot.
You must use a seamless, high-heat silicone spatula. However, a word of caution: if your silicone spatulas taste like soap, they are holding onto residual oils, strong food odors, and harsh dishwasher detergents. These chemical residues will actively disrupt your sugar’s chemistry. Keep one pristine silicone spatula dedicated exclusively to sweet baking. You will also need a clean, natural-bristle pastry brush and a small bowl of water.
The Wet Method vs. The Dry Method
There are two primary ways to caramelize sugar: the dry method and the wet method.
The Dry Method: Fast, Furious, and Risky
The dry method involves putting pure, dry granulated sugar directly into a hot pan. As the sugar hits the heat, it melts and caramelizes almost instantly. You have to constantly drag the melting liquid sugar over the dry sugar to prevent burning. It is fast, it is furious, and it is incredibly risky for beginners. The margin between perfectly amber caramel and a smoking, bitter disaster is about three seconds.
The Wet Method: The Beginner’s Best Friend
The wet method is what we are using today. You combine your sugar with a splash of water until it resembles wet sand. The water dissolves the sugar, giving you a liquid syrup to start with. As the mixture boils, the water slowly evaporates. Only when all the water is gone can the temperature rise above 212°F and begin the caramelization process. This method takes longer, but it gives you a massive window of control and a much larger margin of error.
Step-by-Step Masterclass: The Sassy Sous-Chef’s Silky Caramel
Let’s walk through the exact process of making a flawless, rich, chewy caramel perfect for dipping apples or drizzling over an elaborate dessert board.
Phase 1: The Setup and Dissolution
In your heavy-bottomed stainless steel saucepan, combine 2 cups of granulated white sugar, 1/2 cup of water, and 2 tablespoons of corn syrup (your chemical bodyguard). Before you turn on the stove, use your silicone spatula to gently stir the mixture until every grain of sugar is moistened and it looks like wet sand.
Now, place the pot on medium-high heat. Take your spatula, wash it off, and step away from the pot. Do not touch it. Stirring your sugar after it begins to boil is one of those classic beginner cooking mistakes that guarantees a grainy mess. Agitation at high temperatures creates turbulence that encourages the sugar molecules to aggressively collide and form crystal bonds. Let the heat do the work.
Phase 2: The Boil and The Brush-Down
As the syrup comes to a rolling boil, you will notice sugar crystals clinging to the inner walls of the saucepan. As the water evaporates, these crystals dry out and threaten to fall back into your syrup, which would trigger the dreaded crystallization chain reaction.
Take your natural-bristle pastry brush, dip it into your bowl of clean water, and gently wash down the inside walls of the pot. The water will dissolve the rogue sugar crystals and wash them safely back into the boiling syrup. Do this two or three times during the boiling process to ensure the walls of your pan remain completely clean.
Phase 3: The Color Transformation
Once the water boils away, the temperature of the sugar will rapidly climb past 300°F. Watch the pot like a hawk. The clear bubbling syrup will begin to take on a champagne hue, then a light golden color, and finally a rich, deep amber. The smell will shift from a simple, flat sweetness to a complex, intoxicating, toasted aroma.
Phase 4: The Dairy Addition (Emulsification)
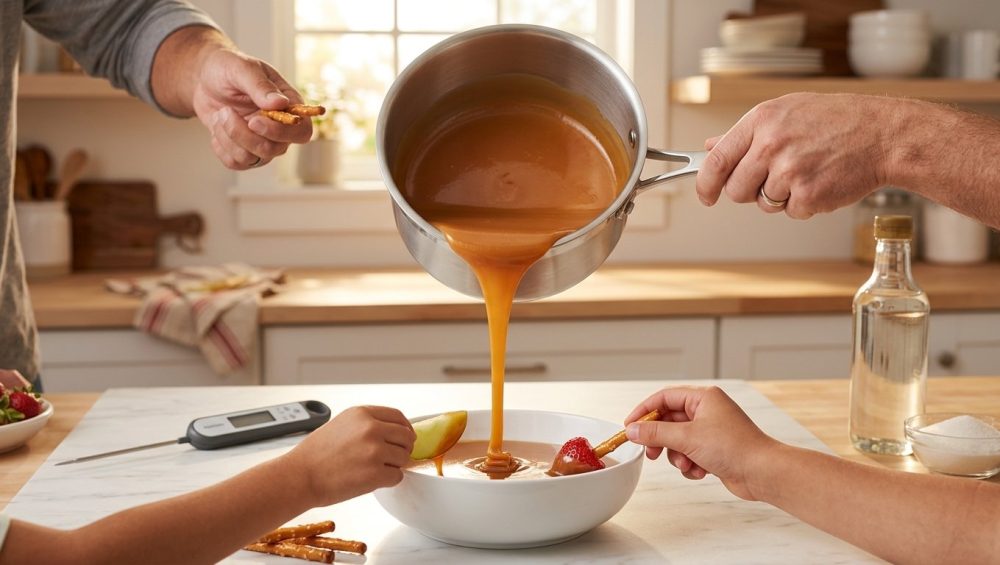
Once your sugar reaches a deep amber color (around 340°F to 350°F), immediately remove the pot from the heat. It is time to add your dairy. You will need 1 cup of heavy cream (preferably warmed slightly in the microwave) and 4 tablespoons of unsalted butter.
When you pour the cream into the 350°F sugar, the mixture will violently bubble, steam, and quadruple in volume. Stand back and let it rage for a moment. Once the bubbling subsides slightly, whisk vigorously to emulsify the fat from the dairy into the water and sugar syrup. Place the pot back on medium-low heat, attach your candy thermometer, and cook the mixture, stirring constantly, until it reaches the soft-ball stage of 235°F to 240°F. Remove from heat, stir in a heavy pinch of flaky sea salt and a splash of vanilla extract. You have just made perfect caramel.
Troubleshooting: Can You Save Grainy Caramel?
Let’s address the elephant in the room. What happens if you look away for ten seconds, a seed crystal falls in, and your beautiful syrup turns into a cloudy, grainy, crystallized brick? Can it be saved?
The harsh truth is that heavily crystallized caramel rarely returns to a perfectly smooth texture. However, if you catch it early, you can attempt the water rescue method. Add two to three tablespoons of water to the crystallized mess and place it back over very low heat. You must have extreme patience here. Slowly heat the mixture for 15 to 25 minutes, allowing the water to slowly break apart the crystal structures and dissolve the sugar back into a liquid state.
If the batch is completely beyond saving, do not mourn it. Sugar is cheap; your sanity is not. Toss the batch and start over. And please, instead of endlessly scrubbing stainless steel pans until your arms fall off, simply fill the ruined, sugar-caked pot with tap water and boil it on the stove. The rock-hard crystallized sugar will effortlessly dissolve into the boiling water, leaving your pan perfectly clean and ready for round two.
Hosting a Mindful Caramel Apple Bar
Now that you have conquered the chemistry of sugar, it is time to reap the rewards. A DIY Caramel Apple Bar is the ultimate interactive dessert for autumn gatherings. It removes the stress of plating individual desserts and allows your guests to participate in the culinary experience.
Prepping the Apples: The Wax Problem
You cannot just buy apples from the grocery store, stick a skewer in them, and dip them in caramel. If you do, the caramel will slide right off the skin and pool sadly at the bottom of the plate.
Why? Because apples naturally secrete a protective wax covering to retain moisture, and commercial farmers often add an additional layer of food-grade wax (like carnauba) to keep the fruit shiny and appealing during transport. Caramel is water-based and fat-based; it will absolutely not adhere to a waxy surface.
To remove the wax, you have two scientifically proven options. The quickest method is the boiling water dip. Bring a large pot of water to a rolling boil. Using a slotted spoon, submerge each apple in the boiling water for exactly 10 seconds. Remove the apple and immediately buff it vigorously with a coarse, clean towel to wipe away the melted wax.
If you prefer not to use boiling water, you can use the acid and abrasive method. Fill a bowl with lukewarm water, add a generous splash of white vinegar or lemon juice, and a tablespoon of baking soda. The baking soda acts as a mild abrasive, while the acidic vinegar helps break down the wax. Scrub the apples thoroughly with a produce brush.
Whichever method you choose, ensure your apples (Granny Smith are best, as their tartness beautifully cuts the rich sweetness of the caramel) are completely dry and brought back to room temperature before dipping.
The Temperature Game: Keeping Caramel Dippable
Just as you need to stop baking flat cookies by rigorously respecting the resting temperature of your dough, you must respect the holding temperature of your caramel.
If your caramel is too hot, it will be too thin and run right off the apple. If it is too cold, it will be impossibly thick and pull the stick right out of the fruit. The scientifically ideal dipping temperature for caramel is between 180°F and 200°F.
To maintain this perfect temperature during a party, do not leave the pot on the stove. Transfer your finished caramel into a small ceramic slow cooker set to the “warm” setting, or use a high-quality electric fondue pot. This ensures the caramel remains perfectly fluid and dippable for hours, allowing your guests to graze at their leisure without the caramel seizing up into a solid block.
The Topping Matrix: Texture and Flavor Balancing
A mindful gathering is all about abundance and variety. Set up your topping station in distinct flavor zones. You want contrasting textures to offset the sticky chew of the caramel.
Create a “Crunch Zone” featuring bowls of heavily toasted chopped pecans, crushed salted pretzels, and graham cracker crumbs. Create a “Sweet Zone” with mini dark chocolate chips, toasted shredded coconut, and crushed toffee bits. And most importantly, create a “Salt Zone” featuring a bowl of high-quality, flaky Maldon sea salt. A pinch of flaky salt applied directly to the warm caramel elevates the flavor profile exponentially, cutting through the intense sweetness and highlighting the deep, buttery notes of the caramelized sugar.
When your guests finish dipping and decorating their apples, they need a place to let them set. If your cheap baking sheets keep warping and buckling under the slightest temperature change, they will send your perfectly crafted apples sliding into each other, ruining the beautiful coatings. Invest in heavy-duty, commercial-grade aluminum half-sheet pans. Line them generously with high-quality parchment paper or a silicone baking mat. Do not use wax paper, as the residual heat from the 180°F caramel will instantly melt the wax right onto the bottom of your dessert.
Mastering caramel doesn’t require magic, and it certainly doesn’t require a professional kitchen. It requires a basic understanding of sucrose, a refusal to use terrible cookware, and the patience to let the heat do its job. So grab your thermometer, banish your wooden spoons, and go show that sugar who is boss. Your weekend dessert bar awaits.


