Picture this: It is 7:15 AM on a Tuesday. You are standing in your kitchen, half-awake, holding a spatula like a weapon, and staring down into a frying pan full of what can only be described as a culinary tragedy. You wanted a luxurious, café-quality breakfast to start your day. Instead, you are looking at a pile of pale, rubbery, yellow sponges sitting in a sad, unappetizing puddle of murky water. You sigh, scrape the tragic mass onto a piece of toast, and chew your way through another disappointing morning.
Listen to me: you do not have to live like this. You do not need a degree from Le Cordon Bleu, and you certainly do not need to spend forty-five minutes whisking eggs over a double boiler while whispering sweet nothings to them. You are a busy home cook, and your time is precious. You need a method that delivers mind-blowing, ultra-creamy, velvety eggs in under five minutes. You need a failsafe, a biological cheat code, a kitchen hack that actually works.
The secret to stop your eggs from leaking and turning into bouncy balls does not lie in a pretentious technique. It lies in a humble, fifty-cent box of cornstarch sitting in the back of your pantry. Today, we are going to tear down the myths, dive deep into the fascinating food science of protein coagulation, and permanently upgrade your morning routine. Grab your coffee, pull up a stool, and let’s get to work.
The Science of the Scramble: Why Your Eggs Are Currently Ruining Your Morning
To understand why your eggs are misbehaving, we have to look under the hood. Cooking is not magic; it is applied chemistry and thermodynamics. When you throw a beaten egg into a hot pan, you are initiating a complex cascade of molecular events. If you do not control those events, they will control you.
The Anatomy of an Egg
An egg is a marvel of natural engineering. It is composed of roughly 74% water, 12% protein, and 11% fat, alongside various vitamins and minerals. But for our purposes, we only care about the proteins.
The egg white (albumen) is a complex matrix containing about forty different proteins. The heavy hitters are ovalbumin, which makes up a staggering 54% of the egg white, and ovotransferrin, which makes up about 12%. Here is where the trouble begins: these proteins do not cook at the same temperature. Ovotransferrin is the delicate flower of the bunch; it begins to set and coagulate at around 140°F (60°C). Ovalbumin, on the other hand, is stubborn. It does not begin to set until it hits roughly 185°F (85°C).
Meanwhile, the egg yolk is a completely different beast. It is packed with fats and lipoproteins that begin to thicken at 150°F (65°C) and fully set into a solid at 158°F (70°C). When you scramble an egg, you are violently mixing these vastly different components together and demanding that they all cook perfectly at the exact same time. It is a thermodynamic nightmare.
The Coagulation Conundrum
In their raw state, egg proteins look like tiny, tightly wound balls of yarn floating peacefully in water. They are perfectly content. But when you introduce heat, you ruin their peaceful existence. The heat energy causes these proteins to freak out, denature, and uncoil.
As they uncoil, they expose their reactive ends to one another. Suddenly, they start grabbing onto each other, forming a massive, interconnected three-dimensional web. This process is called coagulation. When the proteins link up, they trap the water and fat from the egg inside their web, turning the liquid egg into a soft, tender solid.
If you stop the cooking process right at this moment, you achieve absolute perfection. The web is loose, the water is trapped, and the eggs are soft and creamy. But the window for perfection is incredibly narrow. We are talking a matter of seconds.
The Weeping Effect (Syneresis)
If you leave the eggs in the pan for even a moment too long, or if your heat is just a fraction too high, disaster strikes. The protein web continues to tighten. The bonds between the proteins grow stronger and more aggressive.
Imagine taking a soaking wet kitchen sponge and squeezing it in your fist. What happens? The physical structure of the sponge collapses, and all the water is violently forced out. This exact same phenomenon happens in your frying pan. As the protein matrix tightens, it literally wrings itself out, squeezing all the trapped water out of the curds.
In the culinary science world, this heartbreaking process is known as syneresis. You are left with tough, rubbery, overcooked protein curds floating in a pool of their own expelled water. It is unappetizing, it ruins your toast, and it is the primary reason people hate making scrambled eggs at home. We need a way to stop this aggressive protein bonding without having to rely on the nerve-wracking, hyper-precise temperature control of a professional kitchen.
Enter the Magic Ingredient: The Cornstarch Slurry
This is where we introduce our biological buffer. By adding a tiny amount of cornstarch mixed with liquid to your beaten eggs, you completely change the rules of engagement. You are no longer at the mercy of the proteins. You are in control.
What Exactly is a Slurry?
Let’s strip away the pretentious recipe jargon. A slurry is nothing more than a starch—in this case, cornstarch—suspended in a cold liquid. You have likely used a slurry to thicken a pan sauce, a gravy, or a stir-fry. But using it in scrambled eggs is a relatively modern, brilliant application of food science that completely revolutionizes the cooking process.
You cannot simply dump dry cornstarch directly into your raw eggs. Cornstarch is infamous for clumping when it hits moisture. If you try to whisk dry cornstarch into eggs, you will end up with tiny, unappetizing bullets of raw starch hidden inside your breakfast. You must dissolve the cornstarch in a liquid first, creating a smooth, milky suspension.
How Cornstarch Hacks the Protein Matrix
So, what exactly happens when this slurry hits the hot pan with your eggs? It is a two-part scientific miracle.
First, cornstarch is composed of two types of complex carbohydrates: amylose and amylopectin. When these starch granules are heated in the presence of water (from the eggs and the milk), they undergo a process called gelatinization. Somewhere around 150°F to 160°F, the starch granules absorb moisture, swell up like tiny balloons, and eventually burst, releasing a thick, gel-like network into the mixture.
Notice the temperature? 150°F to 160°F. This is the exact same temperature range where the egg proteins are beginning to uncoil and aggressively bond.
The gelatinized cornstarch acts as a physical barrier. It literally gets in the way. It coats the uncoiled egg proteins and physically prevents them from linking up too tightly. Even if you accidentally leave the pan on the heat for an extra thirty seconds, the cornstarch buffer stops the proteins from wringing out the water. Syneresis is halted in its tracks. The eggs remain soft, tender, and completely free of weeping water.
Dilution: The Role of the Liquid
The second part of the miracle is the liquid itself. By adding milk, cream, or water to the eggs, you are actively diluting the protein concentration. You are increasing the physical distance between the protein molecules, making it harder for them to find each other and bond.
Furthermore, adding liquid raises the overall temperature required for the proteins to coagulate. You are buying yourself time. You are widening that incredibly narrow window of perfection, turning a stressful, high-wire kitchen act into a relaxed, foolproof morning routine.
The Sassy Sous-Chef’s Foolproof Slurry Method
Now that we understand the intricate thermodynamics and chemistry at play, it is time to put it into practice. This method is rigorous, efficient, and designed specifically for the busy home cook who refuses to compromise on quality.
The Golden Ratio
Baking is a science, but cooking is usually an art. In this specific case, however, we must respect the chemistry. If you use too little cornstarch, the buffer will fail, and your eggs will weep. If you use too much cornstarch, your eggs will take on a bizarre, chalky, pudding-like texture that will ruin your morning just as thoroughly as rubbery eggs would.
Here is the non-negotiable Golden Ratio for the perfect scramble:
For every three large eggs, you need exactly 1/2 teaspoon of cornstarch and 1.5 tablespoons of cold liquid (whole milk, heavy cream, or even water if you are in a pinch).
If you are cooking for a crowd and using six eggs, you scale it up: 1 full teaspoon of cornstarch and 3 tablespoons of liquid. Do not eyeball this. Use your measuring spoons. Respect the ratio.
Whisking Like You Mean It
Step one: In a small bowl, aggressively whisk the cold liquid and the cornstarch together until the mixture is completely smooth and no lumps remain. You have just created your slurry.
Step two: Crack your eggs into a separate, larger mixing bowl. Pour the slurry over the eggs. Now, it is time to whisk.
Do not just lazily stir the eggs with a fork. You need to homogenize the yolks and the whites completely. You want a uniform, pale yellow liquid. If you see distinct streaks of clear egg white, you have not whisked enough. If you are struggling because you are using a bent, leaky wire whisk from a dollar store, do yourself a favor and invest in a proper balloon whisk.
Whisking also introduces microscopic air bubbles into the mixture. As the eggs cook, these air bubbles will expand, contributing to a lighter, fluffier final texture.
The Pre-Salting Rule
We need to address a pervasive, incredibly stubborn culinary myth. For decades, celebrity chefs have barked at home cooks, telling them never to salt their eggs until they are cooked and on the plate. They claim that salt draws out moisture and causes the eggs to become watery.
This is categorically, scientifically false. In fact, the exact opposite is true.
When you add salt to raw eggs, the sodium and chloride ions break down and dissolve into the liquid. These ions attach themselves to the egg proteins, subtly altering their electrical charge. This shift in charge weakens the proteins’ ability to bond tightly together. Salt actually acts as a secondary buffer, working alongside the cornstarch to prevent syneresis.
salting your eggs early—ideally 10 to 15 minutes before you cook them—gives the salt time to fully dissolve and work its chemical magic. It is an insurance policy against tough eggs. Season your raw egg mixture generously with kosher salt before you even turn on the stove.
Heat Control and the “No-Go” Rule on Toxic Cookware
You can have the perfect slurry, the perfect whisking technique, and the finest farm-fresh eggs in the world, but if you cook them in a toxic, degraded piece of garbage pan, you are going to fail. As your Sassy Sous-Chef, I have a strict, zero-tolerance policy when it comes to dangerous kitchenware.
Ditch the Poison Pans
Let’s have a brutally honest conversation about that cheap non-stick pan sitting in your cabinet. You know the one. The coating is scratched, peeling at the edges, and it hasn’t actually been “non-stick” since 2019.
Traditional non-stick pans are coated with a synthetic fluoropolymer called polytetrafluoroethylene (PTFE), most commonly known by the brand name Teflon. When these pans are new and used at low temperatures, they are relatively stable. But home cooks are notoriously bad at heat management.
When a PTFE-coated pan is heated above 500°F (260°C)—which can happen in literally two minutes if you leave an empty pan on a high burner—the chemical bonds begin to break down and decompose. As the coating degrades, it releases a horrifying cocktail of toxic, invisible fumes. These fumes are so lethal that they will instantly kill pet birds kept in the same house. In humans, inhaling these fumes causes a condition known as “polymer fume fever” or “Teflon flu,” characterized by severe chills, headaches, chest tightness, and fevers.
Furthermore, when the coating gets scratched by metal utensils, you are actively ingesting microplastics with your breakfast. I am fully dedicated to banishing toxic kitchen gear from your home. Throw that peeling pan in the trash. And while you are at it, throw away those losing their slippery coating aerosol sprays. The soy lecithin in cheap cooking sprays polymerizes onto the surface of non-stick pans, creating an invisible, sticky lacquer that permanently ruins the pan.
What to Buy Instead
You do not need toxic chemicals to cook eggs without sticking. You need proper metallurgy and heat control.
Your best option is a properly seasoned carbon steel skillet. Carbon steel is the unsung hero of the professional kitchen. When you heat oil in a carbon steel pan, the fat polymerizes, bonding with the metal to create a naturally slick, incredibly durable, 100% non-toxic non-stick surface. It handles eggs beautifully and will literally last for generations.
Alternatively, you can use a high-quality, heavy-bottomed stainless steel skillet. Yes, you can cook eggs in stainless steel without them sticking like superglue. The secret is utilizing the Leidenfrost effect. Heat the dry stainless pan over medium heat. Flick a few drops of water into the pan. If the water sizzles and instantly evaporates, the pan is too cold. If the water forms a perfect, cohesive bead that dances and glides across the surface of the metal like mercury, you have achieved the simple water drop test perfectly. The pan is now ready for fat and eggs.
The Cooking Process
Place your chosen, non-toxic skillet over medium-low heat. We are not searing a steak; we are gently coaxing proteins.
Add a generous knob of unsalted butter to the pan. Let it melt until it foams. The water in the butter will evaporate, and the milk solids will begin to lightly toast. If you want to elevate the flavor profile to an absurdly delicious level, let the butter go a few seconds longer until it smells nutty and fragrant, utilizing the magic of toasted brown butter as your cooking fat.
Pour your cornstarch-slurry-laced, pre-salted eggs into the center of the foaming butter. Do not touch them immediately. Let them sit for about five to ten seconds until you see a very thin layer of cooked egg form around the absolute edge of the pan.
Now, take a heat-resistant silicone spatula and begin to gently sweep the eggs from the outside edge of the pan toward the center. You are not aggressively chopping the eggs; you are folding them. As you push the cooked curds into the center, the raw liquid egg will flow back out to the edges to make contact with the hot metal.
Keep sweeping and folding. Because you have the cornstarch buffer protecting your proteins, you do not need to panic. The eggs will cook gently and evenly. They will form gorgeous, large, velvety curds.
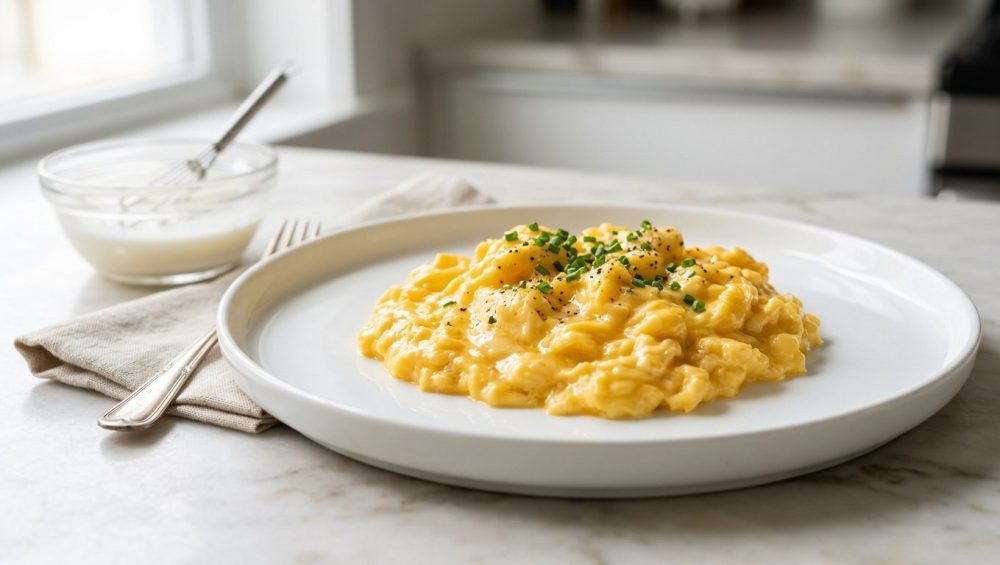
The most critical moment of the entire process is knowing when to stop. You must remove the pan from the heat before the eggs look completely done. They should still look slightly wet, glossy, and a little bit loose. The residual heat stored in the heavy metal of the pan, combined with the internal heat of the eggs themselves, will continue to cook the eggs for another thirty to sixty seconds after they leave the stove. If you wait until they look perfectly dry in the pan, they will be overcooked by the time they hit your plate.
Troubleshooting: When Good Eggs Go Bad
Even with the magic of cornstarch, human error can occasionally rear its ugly head. If your morning scramble didn’t turn out like a glossy magazine cover, consult this brutally honest troubleshooting matrix.
Why Are My Eggs Still Weeping?
If you used the slurry and your eggs are still sitting in a puddle of water on your plate, you committed one of two cardinal sins.
First, you may have ignored my warning about carryover cooking. You left the eggs in the pan until they looked completely dry and solid. By doing so, you forced the internal temperature of the eggs so high that even the cornstarch buffer could not save them. The proteins seized, the syneresis occurred, and the water was expelled. Next time, pull them off the heat thirty seconds earlier.
Second, you may have added too much liquid. The Golden Ratio calls for 1.5 tablespoons of milk per three eggs. If you haphazardly splashed a quarter cup of milk into the bowl, you overwhelmed the matrix. The eggs simply cannot hold that much extra hydration, and the excess water bled out. Measure your liquids.
Why Do My Eggs Taste Grainy or Chalky?
You messed up the slurry. Either you used way too much cornstarch (perhaps you used a tablespoon instead of a half-teaspoon), or you failed to whisk the slurry properly before adding it to the eggs. If the cornstarch was not fully dissolved in the cold milk, it formed dry, starchy clumps that cooked into unpleasant, grainy bullets in your eggs.
Why Do My Eggs Have a Gray or Green Tint?
This is a classic sign of severe thermal abuse. When eggs are subjected to high heat for an extended period, a chemical reaction occurs between the iron naturally present in the egg yolk and the sulfur compounds present in the egg white. This reaction creates ferrous sulfide, which imparts a highly unappetizing grayish-green tint to the eggs and gives them a distinct, sulfurous, “rotten” smell.
If your eggs are turning green, your heat is drastically too high. Turn your burner down to medium-low and practice patience.
Why Are My Eggs Sticking to the Pan?
If you are using a stainless steel pan, you failed the water drop test and added the eggs before the pan was properly heated, causing the proteins to bond directly with the porous metal. If you are using a carbon steel pan, your seasoning layer is weak or degraded. Stop using harsh detergents on your carbon steel, and whatever you do, never use aerosol cooking sprays that leave a gummy residue and ruin the non-stick patina. Always use real butter, ghee, or a high-quality neutral oil.
Elevating Your Slurry Scramble: Beyond the Basics
Once you have mastered the foundational technique of the cornstarch scramble, you have unlocked a blank culinary canvas. Because the cornstarch stabilizes the protein matrix so beautifully, these eggs are incredibly resilient and can handle heavy mix-ins without breaking or weeping.
Cheese Integration
Adding cheese to scrambled eggs is an art form. If you add a heavy, greasy cheese too early in the cooking process, the fat from the cheese will melt out, separate, and turn your eggs into a greasy, oily mess.
Because our eggs are stabilized, we can integrate cheese seamlessly, provided we do it at the right time. The key is to add the cheese completely off the heat. When the eggs are 90% cooked and you have removed the pan from the burner, sprinkle in a handful of finely grated Gruyère, sharp white cheddar, or crumbled goat cheese. The gentle, residual carryover heat of the eggs will melt the cheese perfectly into the curds without causing the butterfat to separate.
Herbs and Aromatics
Fresh herbs are the difference between a Tuesday morning breakfast and a Sunday brunch masterpiece. However, delicate herbs like chives, tarragon, and parsley contain volatile essential oils that are destroyed by high heat.
Never add your fresh herbs to the raw egg mixture before cooking. The heat of the pan will completely mute their bright, grassy flavors. Instead, finely mince your herbs and fold them into the eggs at the exact same time you add your cheese—off the heat, in the final ten seconds of cooking. The gentle warmth will release the aromatic oils of the herbs, perfuming the eggs beautifully right as they hit the plate.
If you want to incorporate heartier aromatics, like diced shallots or garlic, you must sauté them in the butter until they are fully softened and translucent before you pour the egg mixture into the pan. Raw onions folded into soft eggs provide a jarring, unpleasant crunch that ruins the velvety texture we worked so hard to achieve.
Plating and Presentation
You have just engineered the perfect, scientifically backed scrambled eggs. Do not disrespect them by dumping them onto a cold, flimsy paper plate.
Warm your serving plates in the oven on the lowest setting for a few minutes. Cold porcelain will instantly sap the heat from your eggs, causing the butter to congeal. Serve the eggs alongside a thick slice of toasted, high-quality sourdough bread that has been aggressively rubbed with a raw clove of garlic and drizzled with good olive oil. Finish the eggs with a final pinch of flaky sea salt (like Maldon) and a few grinds of fresh black pepper.
The Final Whisk: Reclaiming Your Morning
Cooking does not have to be a source of anxiety. You do not need to be intimidated by the chemistry happening in your frying pan. By understanding the simple biology of ovalbumin and ovotransferrin, and by utilizing the brilliant, stabilizing magic of a cornstarch slurry, you have taken complete control of your kitchen.
You have banished the weeping, rubbery sponges of your past. You have permanently ditched the toxic, peeling pans that were secretly poisoning your food. You have armed yourself with the knowledge, the technique, and the sass required to execute professional-level eggs on a random weekday morning.
The next time someone tells you that making the perfect soft scramble requires a culinary degree, a double boiler, and forty minutes of whisking, you can just smile, reach for your little box of cornstarch, and prove them wrong in under five minutes. Now, go make yourself some breakfast. You’ve earned it.