Let’s cut right to the chase: brown butter makes everything better. Whether you are baking a batch of weekend chocolate chip cookies or desperately trying to make a Tuesday night plate of broccoli edible, it is the ultimate culinary cheat code. But if you have ever stood over a stove, whisking a melting stick of butter and waiting for that magical transformation, you have probably experienced the great disappointment. You melt a whole stick of butter, it foams, it sputters, and when the smoke finally clears, you are left with a measly, pathetic teaspoon of brown specks at the bottom of the pan. Is that it? Is that all the flavor we get?
Look, I love a fancy French culinary term as much as the next snob, but if you want to decode pretentious recipe jargon, beurre noisette is literally just toasted butter. It is not magic; it is chemistry. And like any chemical reaction, it can be hacked, manipulated, and supercharged. You do not need a culinary degree to pull this off. You just need to understand what is actually happening in that pan.
The secret to exponentially increasing those flavor-packed brown bits without drowning your food in extra grease? Milk powder. Adding a simple scoop of dry milk powder to your melting butter fundamentally alters the ratio of milk solids to fat, delivering a vastly more intense, nutty flavor profile. It is the cheapest, smartest pantry hack you will ever use, and it will permanently change the way you cook.
The Anatomy of Butter: Why We Need to Hack It
Before we start throwing powders into hot fat, we need to understand the baseline. What exactly are you looking at when you unwrap a stick of butter?
Breaking Down the Stick
In the United States, commercial butter is legally required to be at least 80% butterfat. The remaining 20% is composed of water (roughly 15% to 18%) and milk solids (a mere 1% to 2%). In European-style butters, the fat content might creep up to 82% or 84%, but the fundamental ratio remains largely the same.
When you drop that stick into a hot skillet, the first thing that happens is a loud, aggressive sizzling. That is the water content boiling off. Because water evaporates at 212°F (100°C), the temperature of the butter cannot rise significantly above that point until every last drop of moisture has turned into steam [1]. This is the foaming phase.
Once the water is entirely gone, the sizzling quiets down. This auditory cue is critical. The temperature of the remaining fat and milk solids now rapidly shoots up. It is right here, in this suddenly quiet, intensely hot environment, that the magic happens. The tiny fraction of milk solids—that measly 1% to 2%—begins to toast.
The Maillard Reaction: Not Just for Steaks
The browning of those milk solids is driven by the Maillard reaction. This is the exact same complex chemical process that gives a seared steak its crust, a loaf of bread its golden exterior, and roasted coffee its depth.
The Maillard reaction occurs when amino acids (the building blocks of proteins) react with reducing sugars under high heat. In the case of butter, the proteins are casein and whey, and the sugar is lactose. When the temperature of the butterfat hits the sweet spot between 250°F and 300°F (121°C to 149°C) [1, 2], these proteins and sugars violently rearrange themselves into hundreds of new, highly aromatic flavor compounds. We are talking about molecules like furaneol (which tastes like caramel), methional (which adds a savory, cooked depth), and 2-acetyl-1-pyrroline (the compound responsible for that intoxicating roasted nut aroma) [3].
But here is the structural flaw in standard butter: the fat itself does not brown. The fat is merely the cooking medium that conducts the heat to the solids. Since standard butter only contains 1% to 2% milk solids, your flavor potential is severely bottlenecked. You are relying on a microscopic amount of protein and sugar to flavor a massive pool of fat.
The Magic Bullet: Why Milk Powder Changes Everything
If the brown bits are the only part of the butter that actually tastes like brown butter, the logical solution is to simply add more of them. This is where dry milk powder enters the chat.
What Actually Is Milk Powder?
Milk powder is exactly what it sounds like: liquid milk that has been pasteurized and then dehydrated, typically via a spray-drying process, until all the moisture is removed. What you are left with is a highly concentrated, shelf-stable powder made entirely of milk proteins (casein and whey) and milk sugars (lactose).
By whisking a scoop of dry milk powder into your melting butter, you are artificially introducing a massive surplus of the exact raw materials required for the Maillard reaction [4]. You are effectively boosting the milk solid percentage from a pathetic 2% to a robust 10%, 15%, or even 20%, depending on how heavy-handed you want to be.
The Science of the Surplus Solids
When you introduce this surplus of casein and lactose into the hot butterfat, you exponentially increase the number of chemical collisions happening in the pan. More protein and more sugar reacting at 250°F (121°C) means a staggering increase in the production of those nutty, caramel-scented flavor compounds [1].
Furthermore, the added milk powder acts as a buffer. Because there are significantly more solids absorbing the heat, the overall browning process happens slightly more evenly, giving you a wider margin of error before the solids cross the threshold from “beautifully toasted” to “bitter and burnt.” It is a foolproof method that belongs in every essential kitchen survival guide. You get ten times the flavor without having to use ten times the butter.
Gear Check: Ditch the Toxic Non-Stick
Before I give you the step-by-step instructions, we need to have a serious talk about your cookware. As an advocate for the home cook, I refuse to let you ruin this technique—or your health—by using garbage equipment. If you are planning to make this in that scratched, peeling, ten-year-old non-stick skillet you bought at a discount store, stop right now.
The “No-Go” Rule on Forever Chemicals
I have absolutely zero patience for cheap, toxic kitchenware. Browning butter requires bringing fat up to temperatures approaching 300°F (149°C) [1, 5]. When you heat cheap Teflon or mystery-metal non-stick coatings to these temperatures, especially as they age and degrade, they can begin to off-gas and leach per- and polyfluoroalkyl substances (PFAS)—often referred to as “forever chemicals”—straight into your food.
Not only is it a health hazard, but it is also a culinary disaster. Dark non-stick pans make it physically impossible to accurately judge the color of your butter. The difference between perfectly toasted amber solids and acrid, burnt carbon is a matter of seconds. If the bottom of your pan is charcoal black, you are flying blind. Furthermore, thin, cheap pans are notorious for hot spots, meaning half your milk powder will scorch before the other half even begins to toast.
If you are serious about banishing toxic kitchen gear from your life, invest in a heavy-bottomed, light-colored stainless steel skillet or a light-enameled cast-iron pan. The heavy bottom ensures even heat distribution, and the light-colored interior allows you to monitor the exact shade of your milk solids in real time. And if you are wondering why your cookware fails you, it is probably the heat; high temperatures are exactly why your keep losing their slip in the first place.
The Sassy Sous-Chef’s Foolproof Method for Milk Powder Brown Butter
Alright, you have the right pan, you have your ingredients, and you understand the science. Here is exactly how to execute the ultimate supercharged brown butter.
The Golden Ratio
For every one stick (1/2 cup, or 113 grams) of unsalted butter, you will need exactly 2 tablespoons (about 14 grams) of dry milk powder [6]. You can scale this up infinitely. If you are making a massive batch for the week, use four sticks of butter and a half-cup of milk powder.
The Step-by-Step Process
Step 1: The Melt
Place your stainless steel skillet over medium-low heat. Do not rush this by cranking the dial to high. Add your butter (cutting it into tablespoons first helps it melt evenly, but if you are lazy, just toss the whole stick in).
Step 2: The Whisk-In
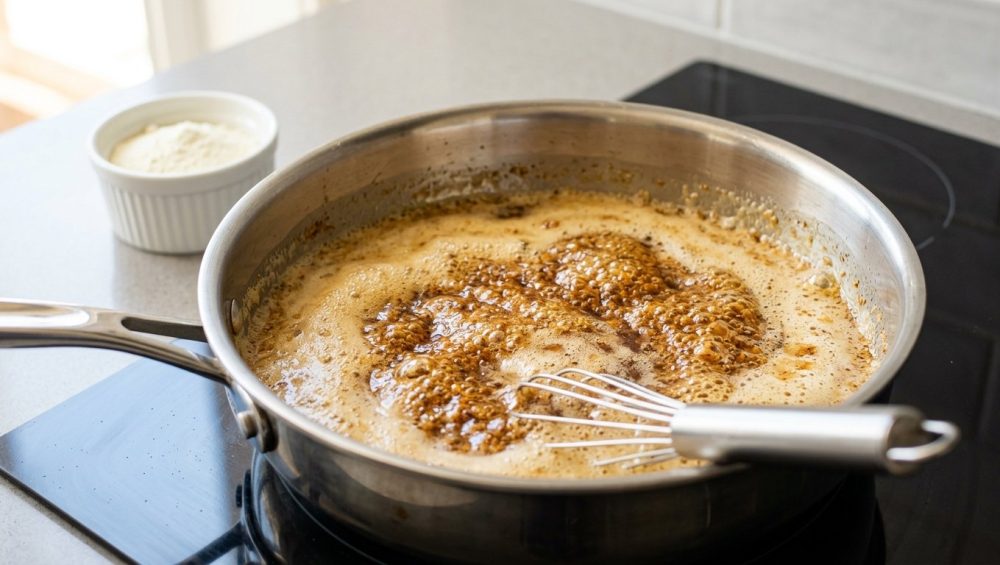
As soon as the butter is mostly melted but before it starts aggressively bubbling, sprinkle your milk powder evenly over the surface. Grab a wire whisk. Do not use a cheap plastic spatula that will melt, and definitely do not use one of those colorful tools that make your food taste like chemicals—we all know the horror of discovering your silicone spatulas taste like soap. Whisk vigorously to break up any clumps of milk powder. It will look cloudy and slightly gritty at first. That is normal.
Step 3: The Foaming and Sputtering
As the temperature rises, the water in the butter will begin to boil. The mixture will foam up significantly, and it will sound like a tiny, aggressive deep-fryer. Keep whisking continuously. You need to keep those milk solids moving so they do not settle in one spot and scorch.
Step 4: The Quiet Phase and The Color Change
After 3 to 5 minutes, the aggressive sputtering will suddenly stop. The bubbles will become smaller, tighter, and quieter. This means the water is gone, and the temperature is rocketing past 212°F (100°C) [5]. Pay close attention now. The foam will part slightly, and you will see the solids at the bottom of the pan transforming from pale yellow to light gold, and finally to a deep, rich amber.
Step 5: The Olfactory Cue
Your nose is just as important as your eyes here. The moment the butter hits that perfect Maillard stage, your kitchen will suddenly smell like toasted hazelnuts and warm caramel.
Step 6: The Emergency Pull
The second you see that deep amber color and smell the toasted nuts, immediately remove the pan from the heat. Do not just turn off the burner—move the pan entirely. Have a heat-proof bowl standing by and pour the entire contents (butter and toasted solids) into the bowl. The residual heat of the pan will continue cooking the solids if you leave them in there, pushing them from toasted to burnt in less than thirty seconds.
Troubleshooting: How Not to Ruin Your Liquid Gold
Even with a foolproof method, things can go sideways if you lose focus. Here is how to navigate the common pitfalls.
The Clumping Crisis
If your milk powder immediately turns into stubborn, gummy lumps the second it hits the butter, you either added it when the butter was too hot, or you didn’t whisk fast enough. The water in the butter can cause the milk powder to hydrate unevenly. To fix this, just keep whisking aggressively. As the water boils off, the clumps will naturally break down and separate into fine, sandy grains.
Scorched Earth: When You’ve Gone Too Far
Browning occurs in a very tight thermal window. The Maillard reaction thrives between 250°F and 300°F (121°C to 149°C) [1, 2]. However, the moment the temperature exceeds 302°F (150°C), a new chemical process takes over: pyrolysis [5]. Pyrolysis is the thermal decomposition of organic material. In layman’s terms: it is burning.
If your solids turn black and the smell shifts from “toasted hazelnuts” to “acrid campfire,” you have ruined it. There is no saving burnt butter. Throw it away, scrub the pan, and start over. This is exactly why you must transfer the butter to a cool bowl immediately. If you leave it in the hot pan, the carryover cooking will ruin your batch faster than you can say “ruined dinner.”
Sweet Applications: Upgrading Your Weekend Baking Game
Weekends are when we have the luxury of time to be absolute perfectionists. And when it comes to baking, supercharged milk powder brown butter is the ultimate secret weapon.
The Ultimate Chocolate Chip Cookie
Every decent chocolate chip cookie recipe on the internet calls for brown butter. But when you use the milk powder hack, you are adding an intense layer of butterscotch and toffee notes that standard brown butter simply cannot achieve. Because the extra milk solids absorb some of the moisture, it also alters the texture, giving you a cookie with incredibly chewy centers and perfectly crisp edges.
Frostings, Blondies, and Beyond
Try replacing standard butter with your supercharged brown butter in your next batch of cream cheese frosting. The savory, roasted notes cut through the cloying sweetness of the powdered sugar perfectly. It is also a game-changer in rice krispies treats, blondies, and even brushed over a stack of perfectly fluffy pancakes on a Sunday morning.
Savory Applications: Weeknight Dinners That Taste Like a Michelin Star
While I love a weekend baking project, my weekday philosophy is simple: time is money. You need maximum flavor with minimum effort. Having a jar of supercharged brown butter in the fridge is the ultimate way to master simple weeknight dinners.
Pasta Nights Will Never Be the Same
Boil some cheese tortellini or ravioli. In a skillet, gently reheat a few tablespoons of your milk powder brown butter with a splash of the starchy pasta water to create a quick emulsion. Toss the pasta in the sauce, hit it with some fresh sage and a mountain of grated Parmigiano-Reggiano. It takes ten minutes and tastes like a $30 dish at a high-end Italian restaurant.
Rescuing Sad Vegetables and Proteins
Nothing saves a bland weeknight side dish quite like toasted milk solids. Drizzle it over steamed asparagus, toss it with green beans, or use it to finish a tray of the crispiest roasted potatoes.
It is also a miracle worker for proteins. If you are pan-searing white fish or scallops, basting them in this intensely nutty fat will give them a gorgeous, flavorful crust. Just remember that the solids are already toasted, so add the brown butter at the very end of the cooking process so they do not burn. If you are making a rich, savory side and notice your mashed potatoes are gluey or bland, folding in a spoonful of this liquid gold will instantly rescue the flavor profile.
The Powder Hierarchy: Nonfat vs. Whole Milk Powder
If you walk down the baking aisle of your local grocery store, you will likely encounter two options: nonfat dry milk powder and whole milk powder. Does it matter which one you use? Yes, and no.
Nonfat Dry Milk Powder: The Reliable Workhorse
Nonfat dry milk is by far the most common and accessible option. Because the fat has been removed before dehydration, what remains is almost entirely protein (about 36%) and lactose (about 52%). This high concentration of proteins and sugars makes it an absolute powerhouse for the Maillard reaction. It toasts incredibly evenly, delivers a sharp, pronounced nutty flavor, and has a practically indefinite shelf life because there are no volatile fats to go rancid.
Whole Milk Powder: The Rich Alternative
Whole milk powder retains the butterfat from the original milk (usually around 26% fat). When you toast whole milk powder, you are adding extra dairy fat into your butter. This results in a slightly richer, more luxurious mouthfeel, which is fantastic for baking applications where moisture retention is key [6, 7].
However, whole milk powder has a few drawbacks. The extra fat makes it more prone to clumping when it hits the hot liquid. Furthermore, because it contains dairy fat, it has a much shorter shelf life and can go rancid if left in a warm pantry for too long.
The Verdict: For the vast majority of home cooks, nonfat dry milk powder is the superior choice. It is cheaper, easier to find, easier to store, and delivers a cleaner, more intense toasted flavor.
Storage and Shelf Life of Your Supercharged Brown Butter
Because adding milk powder is such a brilliant, time-saving hack, I highly recommend making a large batch of this on a Sunday afternoon so you have it ready to deploy throughout the week.
Once you have browned the butter and poured it into a heat-proof bowl, let it cool to room temperature. The toasted milk solids will naturally settle to the bottom. Give it a good stir right before it fully solidifies so the solids are evenly distributed throughout the fat.
Transfer the butter to an airtight glass jar (never store hot fats in cheap plastic containers that can warp or leach chemicals). You can store it in the refrigerator for up to two weeks. The cold environment will solidify the butter, so you will need to scoop it out with a spoon when you are ready to use it.
If you want to play the long game, you can freeze it. Pour the liquid brown butter into silicone ice cube trays. Once frozen solid, pop the cubes out and store them in a heavy-duty freezer bag. They will keep for up to three months. When you are making a quick pan sauce or a batch of cookies, just grab a cube or two and toss them straight into the pan or the mixing bowl. And if you have ever dealt with cheap metal pans warping in the freezer or oven, you know exactly why your baking sheets keep warping—always use high-quality, temperature-stable storage and bakeware.
Conclusion: Go Forth and Toast
Cooking does not have to be a stressful chore, and you do not need to spend hours in the kitchen to produce food that tastes incredibly complex. By understanding the basic chemistry of the Maillard reaction and utilizing the surplus proteins and sugars found in dry milk powder, you can completely transform your culinary repertoire.
This simple pantry hack solves the age-old frustration of yielding too few flavor-packed brown bits when browning butter. It is a precise, foolproof method that maximizes flavor, minimizes effort, and proves once again that a little bit of science is a home cook’s best friend. So grab a stainless steel pan, ditch the toxic non-stick, and go turn a cheap stick of butter into liquid gold. Your weekend cookies and your weeknight vegetables will never be the same.


