Listen, we need to have a serious intervention about what you are doing to your weeknight chili. I see you. You’re standing over a simmering pot of ground beef and beans, you pop open a tiny six-ounce can of tomato paste, and you just… plop it right into the liquid. A sad, raw, crimson cylinder of concentrated tomato sludge slowly dissolving into your hard work.
Stop it. Just stop.
You are leaving an embarrassing amount of flavor on the table, and frankly, you are doing a disservice to your own palate. I know you are tired. I know it is a Tuesday night and you are desperately trying to get dinner on the table without ordering takeout. But skipping this one crucial, three-minute step is the exact reason why your homemade stews, ragùs, and chilis taste like they came out of a Chef Boyardee can instead of a rustic Tuscan kitchen.
We are talking about pincage (pronounced pin-SAHJ). It is a classic French culinary technique that sounds infinitely more pretentious than it actually is. In plain English: you need to fry your tomato paste in fat before you add any liquid to the pan.
In this exhaustive masterclass, we are going to break down the exact culinary science behind why raw tomato paste ruins your dinner, how the Maillard reaction transforms it into an umami bomb, the biochemical magic of fat-soluble flavor compounds, and why the cookware you use to do this is a matter of absolute kitchen safety. Grab a glass of wine, pull up a stool, and let’s fix your food.
The Raw Truth About Your Weeknight Tomato Sauce
Before we can fix the crime, we have to understand the victim. Tomato paste is not just thick tomato sauce. It is a highly engineered, aggressively concentrated reduction of tomatoes that has been stripped of its water content. And understanding how it gets that way is the first step to understanding why you absolutely cannot eat it raw.
What is Tomato Paste, Anyway?
In the commercial food manufacturing world, tomato paste is categorized by its “Brix” level. The Brix scale (°Bx) is a scientific measurement used to determine the percentage of total soluble solids in a liquid—primarily sugars, but also organic acids, amino acids, and minerals. Fresh, off-the-vine tomatoes are mostly water, clocking in at a measly 4 to 6 degrees Brix.
To make that tiny can of paste sitting in your pantry, manufacturers take fresh tomatoes and subject them to a rigorous evaporation process under vacuum conditions. The standard tomato paste you buy at the grocery store is usually a “cold break” or “hot break” paste concentrated down to anywhere between 24 and 30 degrees Brix. If you are buying premium “double concentrated” paste in a fancy Italian tube, you are looking at 28 to 32 degrees Brix, and “triple concentrated” can hit up to 38 degrees Brix.
This means that a single tablespoon of tomato paste contains the concentrated sugars, acids, and glutamates of several whole tomatoes. It is a dense, tightly packed matrix of potential energy. But here is the catch: that concentration process also concentrates the raw, sharp, metallic acidity of the fruit.
The “Tin Can” Taste: Why Raw Paste Ruins Dinner
When you dump raw tomato paste directly into a wet environment—like a pot of simmering broth, crushed tomatoes, or water—it simply dissolves. The temperature of boiling water maxes out at 212°F (100°C). At this temperature, the sugars and proteins in the tomato paste cannot undergo any significant chemical transformation.
The result? Your sauce tastes metallic, sharp, and flat. The raw paste brings a harsh, astringent acidity that aggressively coats the tongue and masks the subtle flavors of your aromatics and meats. You might try to compensate by dumping in a handful of white sugar (a cardinal sin) or simmering the sauce for six hours hoping the harshness cooks out.
But time is money, my friends. We are focused on conquering weeknight cooking anxiety, which means we do not have six hours to wait for a ragù to mellow out. We need professional-level depth of flavor in thirty minutes. And the only way to achieve that is by introducing the paste to high, dry heat.
Enter Pincage: The Three-Minute French Secret
The French term pincage historically refers to the browning of a tomato product, usually by adding it to a sautéing mirepoix (the classic aromatic base of onions, carrots, and celery) when building a brown stock or a classic Espagnole sauce. The goal is to cook the paste until it turns a dark, rusty, brick-red color and emits a sweet, deeply savory aroma.
You don’t need a culinary degree to pull this off. You just need to understand what is happening on a molecular level when that red sludge hits hot oil.
The Culinary Science of Caramelizing Paste
There are two primary forms of non-enzymatic browning that occur when you fry tomato paste: caramelization and the Maillard reaction.
Caramelization is the pyrolysis (thermal decomposition) of sugars. Because tomato paste has a high Brix level, it is packed with naturally occurring fructose and glucose. When exposed to the direct heat of a skillet (which easily exceeds 300°F or 150°C), these concentrated sugars begin to break down, melt, and recombine into hundreds of new, complex aromatic compounds. The sharp, tart bite of the raw tomato is instantly replaced by a deep, mellow sweetness. This is why you don’t need to add refined sugar to a properly cooked tomato sauce.
The Maillard Reaction in Tomatoes
But the real magic—the phenomenon that makes your eyes roll back in your head when you taste a restaurant-quality sauce—is the Maillard reaction.
The Maillard reaction occurs when amino acids (the building blocks of proteins) react with reducing sugars under high heat. Now, you might be thinking, “Wait, tomatoes aren’t meat. Where are the proteins?”
Tomatoes are actually one of the most abundant botanical sources of naturally occurring glutamic acid (glutamate). Glutamate is the exact amino acid responsible for the sensation of umami—that rich, savory, mouth-watering depth that we usually associate with seared steaks, aged parmesan, and soy sauce. Because tomato paste is highly concentrated, it is essentially a dense brick of pure umami potential.
When you fry the paste in oil, the high heat triggers the Maillard reaction between the natural sugars and the high levels of glutamate. This creates melanoidins (which turn the paste a dark rust color) and hundreds of volatile flavor compounds that trick your brain into perceiving a deep, meaty savoriness, even if there isn’t an ounce of meat in the pan.
Fat-Soluble Flavors: Why Oil is Non-Negotiable
Here is a non-negotiable rule of my kitchen: you cannot dry-toast tomato paste. You must fry it in fat.
Flavor compounds in food generally fall into two categories: water-soluble and fat-soluble. If you just boil tomato paste in water, you are only accessing the water-soluble flavors. To unlock the full spectrum of the tomato’s aromatic profile, you need a lipid carrier. This concept is virtually identical to blooming them in oil when working with raw spices for a curry. The fat acts as a solvent, extracting the essential oils and volatile compounds and distributing them evenly throughout your dish.
Unlocking Lycopene and Umami Compounds
Let’s talk about lycopene. Lycopene is the carotenoid pigment responsible for the bright red color of tomatoes, and it is a powerhouse antioxidant. Recent nutritional science and clinical studies have repeatedly demonstrated that the bioavailability of lycopene goes through the roof when tomatoes are thermally processed and consumed with fat.
Because lycopene is a lipid-soluble compound, it dissolves in fat. A study from Ohio State University found that consuming tomatoes with a healthy fat source (like avocado or olive oil) can increase the absorption of lycopene by over 400%. So, by frying your tomato paste in olive oil, you are not just building a massive flavor profile; you are actively unlocking and maximizing the nutritional benefits of the ingredient. It is a win-win scenario.
Choosing the Right Fat
The fat you choose for your pincage will dictate the foundational flavor of your entire dish.
- Extra Virgin Olive Oil: The gold standard for Italian and Mediterranean dishes. It adds a fruity, peppery backbone that perfectly complements the sweetness of the caramelized paste. Always store your good oil in an opaque dispenser to protect it from light degradation.
- Butter: Excellent for French-inspired pan sauces and creamy tomato soups. The milk solids in the butter will also undergo the Maillard reaction, doubling down on the browning effect.
- Animal Fats (Bacon Grease, Tallow, Schmaltz): If you are making a Texas chili, a beef stew, or a hearty ragù, frying your tomato paste in rendered animal fat is a cheat code for unparalleled savory depth.
The Cookware Warning: Don’t Fry Acid in Toxic Pans
We need to take a brief, brutally honest detour here, because this is where a lot of weekend hobbyists ruin their food and ingest microplastics. I am a relentless advocate for banishing toxic kitchen gear from your home, and the pincage technique is exactly why.
Tomato paste is highly acidic. When you fry a highly acidic ingredient at high temperatures, it will react aggressively with whatever surface it is touching.
The Danger of Scratched Non-Stick Coatings
Do not, under any circumstances, perform a high-heat pincage in a cheap, scratched, Teflon-coated non-stick pan. The acidity of the tomatoes combined with the friction of your spatula and the high heat of the burner will degrade the polytetrafluoroethylene (PTFE) coating. You will end up scraping toxic forever-chemicals directly into your family’s dinner. Furthermore, non-stick pans are terrible at conducting the high, even heat necessary to properly trigger the Maillard reaction. You will end up steaming the paste instead of frying it.
Safe Alternatives: Stainless Steel and Enameled Cast Iron
To execute this technique properly, you need heavy-bottomed, reactive-safe cookware.
- Fully Clad Stainless Steel: This is your best friend. A high-quality stainless steel skillet or sauté pan can handle the high heat required for caramelization, it will not react with the acid, and it allows for the development of a “fond” (the sticky, browned bits on the bottom of the pan) which we will deglaze later.
- Enameled Cast Iron: A heavy enameled Dutch oven is perfect for chilis and stews. The glass-like enamel protects the iron from the acidic tomatoes. Note: Do not use raw, unenameled cast iron for this. Unlike when you are seasoning cast iron to build a polymerized non-stick layer, simmering acidic tomatoes will strip that hard-earned seasoning right off the pan and leach a metallic, rusty flavor into your food.
The Step-by-Step Masterclass: How to Fry Tomato Paste Like a Pro
Alright, enough theory. Let’s get our hands dirty. Here is the exact, foolproof method for executing a perfect pincage on a busy weeknight. You don’t need a professional kitchen, but having the essential tools every beginner needs—like a sturdy wooden spoon and a heavy-bottomed stainless pan—will make this effortless.
Step 1: The Aromatic Foundation
You rarely fry tomato paste in an empty pan. The pincage usually happens after you have sautéed your aromatics.
Heat your fat of choice over medium-high heat. Add your diced onions, carrots, and celery (your mirepoix). Sauté them until the onions are translucent and the vegetables have released their moisture. If you are using garlic, add it in the last thirty seconds so it doesn’t burn. If you are browning ground meat for a chili, do that first, let the water evaporate, and leave the rendered fat in the pan.
Step 2: The Sizzle and Spread
Push your aromatics or meat to the edges of the pan, exposing the hot center. If the pan looks dry, add another tablespoon of olive oil.
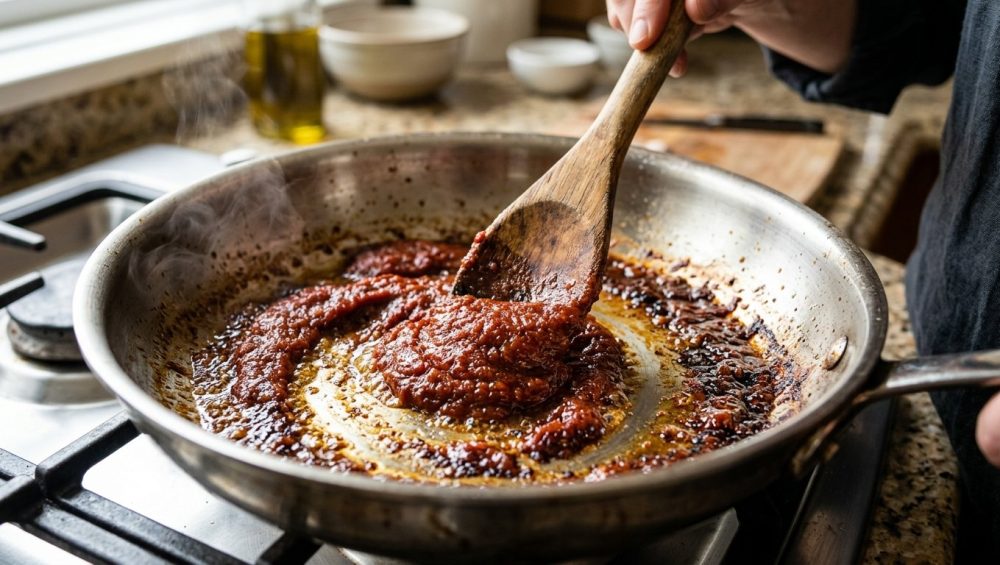
Squeeze or spoon your raw tomato paste directly onto the hot, oiled surface. You should immediately hear a sharp sizzle. Using a wooden spoon or a heat-safe silicone spatula, aggressively smash and smear the paste into the bottom of the pan. You want to maximize the surface area contact between the paste and the hot metal. Do not just gently stir it; work it into the pan.
Step 3: Reading the Color Change
This is where you earn your chef stripes. You must use your eyes and your nose.
Stir and scrape the paste continuously to prevent it from scorching. Watch the color closely. It will start as a bright, vibrant, stop-sign red. Over the next two to three minutes, as the sugars caramelize and the Maillard reaction takes hold, the color will dramatically shift. It will darken into a deep, opaque, rusty brick-red, bordering on mahogany.
Simultaneously, the smell will change. The sharp, acidic tang that hits the back of your throat will mellow out, replaced by a rich, sweet, deeply savory aroma that smells almost like roasted meat or sun-dried tomatoes. Once you hit that rust color and sweet smell, the pincage is complete.
Step 4: The Deglaze
As the paste fries, it will inevitably stick to the bottom of your stainless steel or enameled pan, creating a dark, sticky layer known as the fond. This is culinary gold. Do not let it burn.
Immediately pour in a cold liquid to deglaze the pan. This could be a splash of dry red or white wine, beef stock, chicken broth, or even just water. The cold liquid hitting the hot pan will create a violent burst of steam. Use your wooden spoon to aggressively scrape the bottom of the pan, lifting all of that caramelized tomato goodness and dissolving it into the liquid.
Congratulations. You have just built a bulletproof flavor foundation. From here, you can add your crushed tomatoes, beans, or braising liquids, and proceed with your recipe.
Weeknight Applications: Where Pincage Makes the Biggest Impact
Now that you possess this knowledge, you will start seeing opportunities to use it everywhere. This three-minute technique is the ultimate weeknight flavor hack.
Elevating Quick Chilis and Stews
When you are simmering a chili for eight hours on a Sunday, the flavors have time to slowly meld and develop. But on a Tuesday night, you need a shortcut. By frying a generous squirt of tomato paste in the rendered beef fat before adding your beans and broth, you artificially age the flavor profile of the chili. It will taste like it has been simmering all day, delivering a profound, dark, savory depth in just thirty minutes. Sometimes your dinner actually needs acid to balance the richness, so finish the chili with a squeeze of fresh lime juice right before serving.
Pan Sauces and Braises
Making a quick pan sauce after searing chicken thighs or pork chops? After you remove the meat from the skillet, drop a teaspoon of tomato paste into the leftover rendered fat. Fry it until it turns brick red, then deglaze with a splash of white wine and chicken stock. Whisk in a knob of cold butter at the end. You have just created a glossy, restaurant-tier sauce that took less than five minutes. It works on the same principle as the magic of dry brining—you are front-loading the flavor development so the actual cooking process is effortless.
The “Secret Ingredient” Vegetarian Umami Bomb
If you are cooking plant-based meals, you are often fighting an uphill battle to replicate the savory depth of meat. Frying tomato paste is your secret weapon. When making a vegetarian lentil stew, a mushroom bourguignon, or a simple vegetable soup, start by aggressively caramelizing two tablespoons of tomato paste in olive oil with your onions and garlic. The massive concentration of glutamates will provide a rich, meaty backbone to the dish that will leave your guests begging for the recipe.
Troubleshooting the Technique: What Went Wrong?
Even the simplest techniques require a bit of finesse. If you tried this and your dinner ended up tasting like a campfire or a wet sponge, you likely made one of two rookie mistakes.
Burnt vs. Caramelized: Finding the Sweet Spot
There is a very fine line between a beautiful, mahogany pincage and a bitter, scorched disaster. Because tomato paste is packed with concentrated sugars, it will burn quickly if left unattended.
If your paste turns black instead of brick-red, or if it smells acrid and smoky instead of sweet and savory, you have gone too far. You have pushed past caramelization into pyrolysis (burning). Burnt tomato paste cannot be rescued. It will ruin the entire pot. If this happens, you must swallow your pride, scrape the pan into the trash, wash it, and start over. To prevent this, keep the paste moving constantly with your spatula, and have your deglazing liquid pre-measured and sitting right next to the stove so you can halt the cooking process the exact second it reaches the perfect color.
The Heat Was Too Low
On the opposite end of the spectrum, if you add your tomato paste to a pan that is crowded with watery vegetables, or if your burner is set too low, the paste will never fry. It will simply steam in the vegetable juices.
The Maillard reaction requires temperatures well above the boiling point of water (around 280°F to 330°F or 140°C to 165°C). If there is liquid pooling in your pan, the temperature is stuck at 212°F (100°C).
To fix this, ensure your aromatics have fully released their moisture and the pan is relatively dry before adding the paste. If necessary, push the veggies to the side and let the paste fry on a bare, oiled hot spot in the center of the skillet.
Stop Wasting the Leftovers: How to Store Open Tomato Paste
Let’s address the elephant in the room. Most recipes only call for one or two tablespoons of tomato paste, leaving you with a half-empty can that inevitably gets shoved into the back of the fridge, where it grows a luxurious coat of white mold two weeks later.
Stop throwing your money in the garbage. Tomato paste is highly perishable once exposed to air, but it preserves beautifully if handled correctly.
The Ice Cube Tray Hack
The absolute best way to store leftover canned tomato paste is to freeze it. Line a small baking sheet with parchment paper, or grab a silicone ice cube tray. Portion the remaining paste into one-tablespoon dollops. Freeze them until solid, then pop the frozen tomato paste cubes into a heavy-duty ziplock bag. The next time you are making a soup or a pan sauce, you can pull out exactly what you need and drop the frozen cube directly into the hot oil. It will thaw and fry simultaneously.
The Olive Oil Seal Method
If you bought your tomato paste in a glass jar and want to keep it in the fridge, you must protect it from oxygen. Oxygen is the enemy; it causes oxidation and mold growth.
Use a spoon to smooth the surface of the leftover paste in the jar so it is completely flat. Then, pour a thin layer of good extra virgin olive oil over the top, just enough to completely cover the paste and seal it off from the air. Screw the lid on tightly and store it in the fridge. The oil acts as an airtight barrier, extending the life of the paste by several weeks. Just remember to pour off the oil (or use it to start your pincage!) before scooping out your next tablespoon.
The Final Word: Work Smarter, Not Harder
Cooking at home shouldn’t be a chore, and it certainly shouldn’t result in bland, metallic-tasting food. The difference between an amateur home cook and a seasoned culinary veteran usually comes down to mastering a handful of tiny, foundational techniques.
Frying your tomato paste is one of those techniques. It costs absolutely nothing. It takes exactly three minutes. It requires no special equipment other than a decent pan and a wooden spoon. Yet, it fundamentally alters the biochemistry of your ingredients, unlocking a treasure trove of fat-soluble antioxidants, caramelizing natural sugars, and triggering a cascade of umami-rich Maillard reactions.
The next time you are standing at the stove, exhausted from a long day, do not give in to the temptation to just dump that raw red sludge into your chili. Take a breath. Add a splash of olive oil. Smear that paste into the hot metal. Watch it turn from stop-sign red to a beautiful, rustic brick. Breathe in that sweet, savory aroma.
You are not just making dinner anymore; you are practicing the art of the kitchen. Now go deglaze that pan and show your weeknight meals who is boss.


