It is 6:30 PM on a random Tuesday. You are exhausted, your patience is thinner than a cheap paper towel, and you just want to get some tacos on the table before you completely lose your mind. You rip open a package of supermarket ground beef, toss it into your frying pan, and eagerly wait for that glorious, restaurant-quality sizzle.
But instead of a sharp, aggressive crackle, you hear a depressing, wet hiss.
Within seconds, your ground beef has released a massive, murky puddle of grayish liquid. The meat is no longer searing; it is boiling in a hot tub of its own juices. By the time that stubborn liquid finally evaporates, your beef is gray, rubbery, and tastes like sadness. You sigh, dump in a packet of store-bought taco seasoning to hide the evidence, and accept your mediocre fate.
I am your Sassy Sous-Chef, and I am here to tell you that we are putting an end to this culinary tragedy today. I firmly believe that absolutely anyone can cook like a seasoned expert without setting foot in a culinary school, but you have to stop fighting basic physics. If you are tired of eating pale, watery meat, you are in the right place. We are going to dive deep into the science of why your meat refuses to brown, why your equipment might be sabotaging you, and how conquering weeknight cooking anxiety is entirely possible with just a few simple tweaks to your routine.
Grab a glass of wine, pull up a stool, and let’s fix your food.
The Science of the Sizzle: Why Browning Actually Matters
Before we can fix the problem, we need to understand what browning actually is. In the culinary world, we do not just brown meat because it looks pretty. We do it because browning equals flavor.
When you sear a piece of meat, you are triggering something called the Maillard reaction. Named after the French chemist Louis-Camille Maillard, who discovered it in 1912, this is a highly complex chemical reaction that occurs between amino acids (the building blocks of proteins) and reducing sugars when they are exposed to high heat.
When this reaction kicks off, it doesn’t just change the color of your food. It literally creates hundreds of brand-new, highly complex flavor compounds. It is the exact same magical process that turns pale dough into a crusty loaf of bread, raw beans into roasted coffee, and a bland potato into a glorious French fry. It provides that deep, savory, roasted, umami-rich flavor that makes you want to go back for seconds.
But here is the catch, and it is the most important rule of the kitchen: The Maillard reaction requires a very specific temperature threshold to occur rapidly. It generally kicks into high gear between 285°F and 330°F (140°C to 165°C).
And what is the natural enemy of high heat? Water.
Water physically cannot exceed 212°F (100°C) at sea level. When liquid water is present in your frying pan, all the thermal energy from your stove goes into the latent heat of vaporization—meaning the heat is being used to turn that liquid water into steam. As long as there is a puddle of water in your pan, the surface temperature of your meat will never, ever surpass 212°F. It is scientifically impossible. Therefore, your meat cannot brown. It will simply boil and steam until every last drop of moisture has evaporated. By the time the pan is finally dry enough to exceed 212°F and start the browning process, your ground beef has been cooking for ten minutes and has the texture of a pencil eraser. Understanding this thermal threshold is the first step to fixing common beginner cooking mistakes that ruin perfectly good groceries.
The Four Horsemen of Soggy Ground Beef
So, where is all this water coming from, and why is it ruining your dinner? There are four primary culprits working against you.
Culprit 1: The Cold Pan Catastrophe
Time is money, I get it. You are in a rush, so you turn on the stove, immediately throw the meat into the cold pan, and hope for the best. This is a disaster.
When you drop cold meat into a cold pan, the meat and the pan heat up together slowly. As the meat warms up, the proteins begin to gently denature and squeeze out their internal moisture. Because the pan is not hot enough to instantly evaporate that moisture on contact, the water just pools at the bottom. By the time the pan reaches a cooking temperature, it is already flooded. Preheating your pan is an absolutely non-negotiable step if you want a proper sear.
Culprit 2: The Overcrowded Steam Trap
Let’s say you actually preheated your pan. Good for you! But then, you take a massive, two-pound brick of ground beef and smash it all into a standard 10-inch skillet.
When meat hits a hot pan, it immediately releases some moisture. If there is empty space in the pan, that moisture hits the exposed hot metal, turns into steam, and harmlessly escapes into the air. But if you have covered every single square millimeter of the pan’s surface with meat, the moisture has nowhere to go. It gets trapped underneath the beef, lifting the meat off the hot metal and creating a boiling layer of water. You must leave negative space in your pan for evaporation to occur. If you are cooking a massive batch of chili, you need to sear the meat in batches. Yes, it takes five extra minutes. Yes, it is worth it.
Culprit 3: The Supermarket Water Weight
Sometimes, the meat itself is setting you up for failure. All raw meat naturally contains a high percentage of water—cows are roughly 60% water, just like we are. When the muscle fibers (myosin and actin) are subjected to heat, they contract. Imagine twisting a wet sponge; the tighter you twist it, the more water pours out. When ground beef hits the heat, those proteins violently contract, wringing out their natural juices directly into your pan.
Furthermore, the grind and fat ratio matter. If you are buying ultra-lean 90/10 or 93/7 ground beef, you are going to have a terrible time browning it. Fat is essential for frying. When you use an 80/20 blend (which you always should for tacos, burgers, and sauces), the fat renders out and acts as a frying medium, conducting heat beautifully and aiding in the crust formation. Lean beef just dumps water and dries out.
Culprit 4: Flimsy, Toxic Cookware (My Personal Nightmare)
We need to have a serious talk about the pans you are using. If you are trying to sear meat in a $15 lightweight aluminum pan coated in mystery non-stick chemicals that have been peeling off into your food for the last three years, I am officially staging an intervention.
I have a strict “no-go” rule on toxic gear. Cheap non-stick pans are an absolute menace. Not only are scratched Teflon coatings a health hazard, but these pans are physically incapable of holding heat. Aluminum is a highly conductive metal, meaning it heats up fast, but it also loses heat instantly. When you drop a cold pound of beef into a thin aluminum pan, the temperature of the pan plummets by hundreds of degrees in a fraction of a second. It cannot recover fast enough to sear the meat, resulting in immediate steaming.
It is time to start banishing toxic kitchen gear from your life. You do not need a kitchen full of expensive copper, but you do need pans with high thermal mass. Thermal mass is a material’s ability to absorb and store heat energy. When a pan with high thermal mass gets hot, it stays hot, even when you introduce a cold ingredient.
If you want a sear, you need heavy-bottomed cookware. Cast iron is the undisputed heavyweight champion of the world; it takes a while to heat up, but once it gets going, it holds onto heat like a vault. Carbon steel is another phenomenal option used in professional kitchens because it offers the heat retention of cast iron but is slightly lighter and more responsive. If you are tired of wondering why your pans keep losing their slip after six months of use, it is because non-stick coatings degrade under the high heat required for browning. Switch to a properly seasoned cast iron or a heavy-duty tri-ply stainless steel skillet, and you will never look back.
The Masterclass Secrets: How to Force the Maillard Reaction
Alright, we know the enemy. We know the science. Now, how do we actually fix it? As a busy professional who values time, I am not going to tell you to individually sear tiny clumps of ground beef with tweezers. We are going to use science to work smarter, not harder.
The Ultimate Secret Weapon: The Baking Soda Spa Treatment
This is the single greatest cooking hack you will ever learn for ground meat, heavily popularized by the culinary scientists over at America’s Test Kitchen. If you want to guarantee deeply browned, incredibly tender ground beef that refuses to release its water, you need to use baking soda.
Wait, what? Baking soda? Yes.
Here is the chemistry breakdown: Meat naturally has a slightly acidic pH level. When you introduce a small amount of baking soda (sodium bicarbonate) to raw ground beef, you raise the pH level of the meat, making it slightly more alkaline.
Why does this matter? Because of how proteins react to heat. In an acidic or neutral environment, the proteins in the meat are highly attracted to one another. When they hit the hot pan, they aggressively bond together, squeezing tight and wringing out all their internal moisture into the pan. But in an alkaline environment, those proteins are chemically altered so they repel each other slightly. Because they cannot bond as tightly, they do not contract as violently.
If the proteins do not contract tightly, they hold onto their water. If the water stays inside the meat, your pan stays bone dry. If your pan stays dry, the temperature remains above 300°F. If the temperature stays high, the Maillard reaction happens instantly.
The result? Ground beef that browns beautifully in minutes, while remaining astonishingly tender and juicy on the inside. Understanding the thermodynamics of carbon steel pans is great, but pairing a heavy pan with alkaline-treated meat is what truly creates culinary magic.
The Golden Ratio:
For every 1 pound of ground beef, mix 1/4 to 1/2 teaspoon of baking soda with 1 tablespoon of water in a small bowl. Pour this slurry over your raw ground beef and gently toss it with your hands until it is evenly distributed. Let the meat sit on the counter for exactly 15 minutes while you chop your onions or prep your taco toppings. Do not use more than 1/2 teaspoon per pound, or your meat will start to taste faintly metallic and soapy.
This single trick will change your weeknight cooking forever. Learning how baking soda transforms your stir-fries and ground meat dishes is the closest thing to real magic in the culinary arts.
The Overachiever’s Hack: The Milk Powder Boost
If you want to take your browning to a level that will make professional chefs weep, combine the baking soda trick with dry milk powder.
Remember how the Maillard reaction requires amino acids (proteins) and reducing sugars? Well, dry milk powder is absolutely loaded with milk proteins and lactose, which is a highly reactive reducing sugar. By sprinkling a tablespoon of dry milk powder into your raw ground beef right before it hits the pan, you are essentially providing the meat with extra fuel for the Maillard reaction. The lactose caramelizes and browns at a rapid pace, creating a crust that is unbelievably savory and deeply colored. This is a phenomenal trick for making weeknight Bolognese sauces taste like they have been simmering on an Italian grandmother’s stove for eight hours.
The Step-by-Step Execution: Cooking Ground Beef Like a Pro
We have prepped the meat. We have the right pan. Now, let’s walk through the exact physical execution of cooking the beef. Put down your spatula and pay attention, because your stirring habit is about to be broken.
Step 1: The Proper Preheat
Place your heavy-bottomed cast iron, carbon steel, or stainless steel skillet on the stove over medium-high heat. Let it sit there for a solid 3 to 5 minutes. You need the metal to absorb enough thermal energy to withstand the cold meat.
If you are using stainless steel, you can test the heat using the water drop test to ensure you prevent protein adhesion to the bottom of the pan. Flick a few drops of water into the skillet. If the water instantly aggressively fizzles and evaporates, the pan is too cold. If the water forms into perfect little mercury-like beads that glide and dance effortlessly across the surface of the metal without evaporating, you have achieved the Leidenfrost effect. Your pan is perfectly preheated and ready for action. Add a tiny drizzle of high-heat oil (like avocado or canola oil) just to coat the bottom.
Step 2: The Smash and Ignore
Take your baking soda-treated ground beef and place it into the center of the hot pan. Using a heavy spatula, immediately smash the beef down into a single, flat, even layer that covers the bottom of the pan—like you are making one giant, pan-sized hamburger patty.
Now, here is the hardest part for most home cooks: Back away from the stove.
Do not touch it. Do not poke it. Do not stir it. Do not constantly flip it to check the bottom.
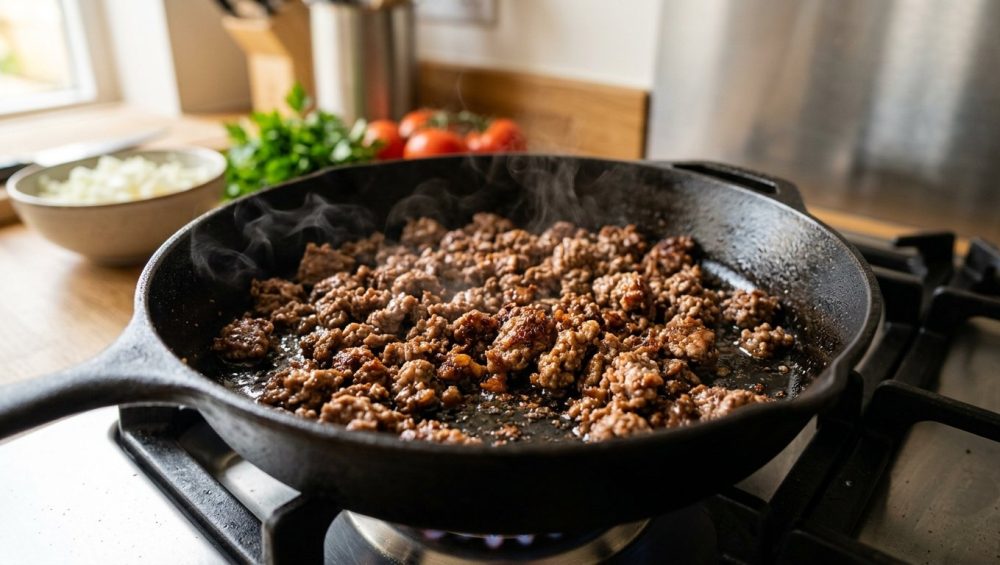
If you want to master simple weeknight dinners, you have to learn restraint. Constant stirring is the enemy of browning. Every time you move the meat, you are breaking its contact with the hot metal and cooling it down. You need to let the meat sit completely undisturbed for at least 3 to 4 solid minutes. You will hear a violent, aggressive sizzle. You will see the edges of the giant patty start to turn a deep, crusty brown. Let it happen.
Step 3: The Flip and the Crumble
Once a gorgeous, dark brown crust has formed on the entire bottom of the meat patty, use your spatula to section it into quarters, and flip the large pieces over.
Only now should you start breaking the meat apart into smaller crumbles. Because you let it sear as a solid mass first, you have guaranteed that at least 50% of the surface area of your beef has a perfect Maillard crust. As you break it apart, the raw interior will quickly cook through in the high heat. Because you used the baking soda trick, you will notice an absolute absence of murky water in your pan. The meat will be sizzling in its own clear, rendered beef fat.
Step 4: Fat Management
Once the meat is fully cooked and crumbled, you have a choice to make regarding the rendered fat in the pan.
Please, for the love of all things culinary, do not ever dump your cooked ground beef into a colander and rinse it under the kitchen sink. A viral social media video once suggested doing this to “remove the grease,” and I nearly threw my phone into the ocean. Rinsing your meat washes away all the water-soluble flavor compounds, the salt, and the fond (the beautiful brown bits stuck to the pan).
If there is an excessive amount of fat, simply tilt the pan and use a spoon to scoop out the excess liquid gold. Leave a little bit in the pan, because fat carries flavor. If you are adding aromatics like diced onions, garlic, or taco spices, that residual beef fat is exactly what you want to bloom your spices in.
Step 5: Strategic Seasoning
Notice how I have not mentioned salt yet? That is completely intentional.
Salt is a desiccant. Through the process of osmosis, salt actively draws moisture out of whatever it touches. If you aggressively salt your raw ground beef right before or right as it goes into the pan, you are encouraging the meat to dump its water, which is exactly what we are trying to prevent.
Always season your ground beef after it has developed its crust. Once the Maillard reaction has occurred and the exterior of the meat is sealed with a beautiful sear, you can generously add your kosher salt, freshly cracked black pepper, and spices.
And while we are talking about seasoning, remember why your dinner needs acid to taste complete. Ground beef is heavy, fatty, and rich. A tiny squeeze of fresh lime juice on your taco meat, or a splash of red wine vinegar in your meat sauce right at the end of cooking, will cut through the richness and elevate the savory notes of the beef to a professional level.
Troubleshooting Your Weeknight Staples
Let’s look at how this masterclass technique directly applies to the meals you are already making on a busy Tuesday night.
Upgrading Taco Night
Standard homemade tacos usually consist of boiled, gray meat coated in a dusty, sodium-bomb seasoning packet. By using the baking soda trick and the “smash and ignore” method, your taco meat will have crispy, caramelized edges similar to what you find at an authentic street taqueria. Once the meat is browned and crumbled, push it to the side of the pan. Drop your spices directly into the hot rendered beef fat in the center for 30 seconds to bloom them (which releases their essential oils), then toss everything together with a splash of beef broth to create a rich, clinging sauce.
Revolutionizing Weeknight Chili
When making chili, the biggest mistake home cooks make is dumping raw meat directly into a pot of simmering tomatoes and beans. You are literally boiling the meat. To truly transform your daily meals, you must build flavor in layers. Sear your baking-soda-treated ground beef in a heavy skillet first to develop that deep, roasted crust. Once it is beautifully browned, transfer the meat to your chili pot. Deglaze the searing skillet with a splash of beer or broth, scraping up all the brown bits (the fond) stuck to the bottom, and pour that liquid gold into your chili. The depth of flavor will be astronomical.
The Ultimate Meat Sauce (Bolognese Shortcut)
A traditional Italian Bolognese takes hours of gentle simmering to break down the meat and develop complex flavors. On a weeknight, you don’t have hours. By utilizing the milk powder hack alongside the baking soda trick, you can fast-track the Maillard reaction. The milk powder mimics the traditional Italian technique of simmering meat in milk, providing lactose that rapidly caramelizes and creates a deeply savory, slightly sweet profile that usually takes hours to achieve.
The Bottom Line
Cooking is not about possessing a magical, innate talent. It is about understanding the basic rules of the kitchen and refusing to accept mediocre results. You do not need to settle for gray, soggy, steaming ground beef ever again.
By simply preheating a heavy-bottomed pan, treating your meat with a pinch of baking soda to alter its pH, giving it the space it needs to evaporate moisture, and having the patience to leave it alone while it sears, you are taking complete control of the chemistry in your kitchen.
You are no longer just heating up food; you are cooking. Now go pour yourself another glass of wine, throw out that peeling Teflon pan, and go sear some beef like the absolute boss you are. Dinner is going to be amazing tonight.


