Pour yourself a glass of whatever gets you through a Tuesday evening, grab your favorite chef’s knife, and gather ’round the cutting board. We need to have a serious, intervention-style conversation about one of the most universally butchered ingredients in the modern home kitchen: the humble, misunderstood mushroom.
If you are tired of serving up grey, rubbery, oil-logged sponges that squeak against your teeth like a cheap dog toy, I want you to know that you are not alone. In fact, your frustration is entirely justified. For decades, culinary school textbooks, glossy food magazines, and pretentious television chefs have peddled a set of strict, inflexible, and frankly terrifying rules about how to treat fungi.
“Never wash them under running water!” they shrieked, warning that your mushrooms would instantly turn to mush. “Brush them gently with a dry pastry brush!” they demanded, as if you have an extra forty-five minutes on a weekday to give each individual cremini a bespoke spa treatment. And then, of course, there is the most famous, anxiety-inducing commandment of all, courtesy of the great Julia Child herself: “Don’t crowd the mushrooms!”
Well, as your resident sassy sous-chef, I am here to tell you that this conventional wisdom is complete and utter garbage. It is outdated, scientifically flawed, and the primary reason why you dread cooking them. But do not worry. I am going to teach you a counterintuitive, foolproof, science-backed secret that will instantly cure your weeknight cooking anxiety and transform your vegetable prep forever. The secret? We are going to boil them. Yes, you read that correctly. We are going to intentionally drown them in water before we sear them.
The Great Sautéing Fallacy: Why Your Current Method is Ruining Dinner
Let us take a brutally honest look at what happens when you follow the traditional sautéing method. You place a skillet on the stove, heat it up, and add a generous, shimmering glug of expensive extra-virgin olive oil. You carefully arrange your meticulously dry-brushed mushrooms in a single, uncrowded layer. For the first ten seconds, everything sounds spectacular. The sizzle is intoxicating. You feel like a culinary genius.
But then, tragedy strikes. The sizzling stops. You look down, and your pan is bone dry. The oil has completely vanished. Panicking, you grab the bottle and add another heavy pour of oil. Within seconds, the mushrooms swallow that, too. You are now trapped in a vicious cycle, feeding an insatiable fungal black hole.
Eventually, the intense heat penetrates the cellular walls of the mushrooms, and they begin to release their own internal moisture. Suddenly, your pan is flooded with a murky, grayish-brown liquid. Your expensive olive oil is floating on top of this swamp water, and your mushrooms are essentially boiling in a greasy puddle. They shrink into sad, shriveled little buttons, devoid of any golden-brown crust.
This tragic sequence of events is one of the most common beginner cooking mistakes that plagues home cooks everywhere. We have all been there, standing over the stove, furiously poking at a pan full of slimy, unappetizing fungi, wondering where it all went wrong. The problem is not your heat level, and it is certainly not your cooking skills. The problem lies in the fundamental biological structure of the mushroom itself.
The Anatomy of a Mushroom: A Science Lesson (Minus the Pretentious Chef-Speak)
To understand why the traditional oil-first method is a guaranteed disaster, we need to strip away the culinary jargon and dive into a little bit of kitchen science. Do not worry; there will not be a pop quiz at the end, but understanding the anatomy of your food is the absolute key to mastering it.
First and foremost, mushrooms are not vegetables. They are fungi, which means they operate under a completely different set of biological rules. While leafy greens and root vegetables derive their structural integrity from cellulose, mushrooms are built from an entirely different polymer called chitin. If that word sounds vaguely familiar, it is because chitin is a long-chain polymer of N-acetylglucosamine—the exact same tough, rigid carbohydrate that makes up the exoskeletons of crustaceans like crabs and lobsters, as well as the outer shells of insects,.
This structural quirk is incredibly important for cooks to understand for one massive reason: chitin is virtually indestructible in the kitchen. Unlike the cellulose in broccoli or spinach, which breaks down and turns to mush if you look at it for too long, the chitin in a mushroom is highly heat-stable. The fine bundles of chitin are held together by incredibly strong hydrogen bonds, making them remarkably durable. This means that, from a purely biological standpoint, you literally cannot overcook a mushroom. Whether you sauté them for five minutes or simmer them in a heavy stew for five hours, they will retain their dense, meaty texture,.
But here is the catch. While the structural walls are made of bulletproof chitin, the internal flesh of the mushroom is composed of microscopic, thread-like fibers called hyphae. These hyphae are absolutely loaded with moisture, making up roughly 85 to 92 percent of the mushroom’s total weight,.
Even more importantly, the spaces between these water-logged hyphae are filled with tiny, microscopic air pockets. When you drop a raw, dry mushroom into a pan of hot oil, those air pockets act exactly like a dry kitchen sponge. The heat creates a vacuum effect, and the mushroom instantly sucks the oil deep into its core, trapping it inside those microscopic chambers. This is why your pan goes dry in ten seconds, and this is why your finished dish tastes like a mouthful of heavy grease.
The “Water-First” Revolution: How Simmering Changes Everything
So, how do we defeat the dreaded sponge effect? The answer comes to us courtesy of modern culinary science and brilliant minds like Jim Fuller, a fine-dining chef who spent over a decade working as a mycologist (a fancy word for a mushroom scientist),. Fuller, along with the rigorous testing teams at culinary institutions like America’s Test Kitchen, popularized a technique that completely flips the script on traditional cooking.
Instead of starting with fat, you start with water.
When you place your sliced mushrooms into a cold pan, add a splash of water, and turn on the heat, magic happens. As the water comes to a simmer, the heat penetrates the mushrooms gently and evenly. This simmering process does two critical things. First, it forces the hyphae to release their tightly bound internal moisture. Second, and most importantly, as the water cooks out, those microscopic air pockets physically collapse.
By the time the water in your pan fully evaporates, the internal structure of the mushroom has been completely transformed. The sponge has been crushed. The air pockets are gone. The mushroom is now perfectly tender and, crucially, it is physically incapable of absorbing oil.
When you finally introduce your butter, olive oil, or bacon fat to the dry pan, the fat stays exactly where it belongs: on the outside of the mushroom. This allows the exterior to fry beautifully, developing a spectacular, golden-brown crust while the interior remains juicy, meaty, and intensely flavorful. It is a shockingly simple technique, yet it is the ultimate way to master simple weeknight dinners without constantly babysitting a smoking, oil-starved pan.
The Step-by-Step Masterclass: The Sassy Sous-Chef’s Foolproof Method
Theory is great, but execution is everything. Let us break this down into a foolproof, step-by-step masterclass. Grab your creminis, your portobellos, or your shiitakes, and let us get to work.
Step 1: The Great Wash
Forget the delicate pastry brushes. Put down the damp paper towels. Throw your mushrooms into a colander and blast them under cold running water. Give them a vigorous toss to knock off the dirt. The idea that a quick rinse will instantly waterlog a mushroom is a persistent myth. Since they are already up to 92 percent water, a quick shower is not going to hurt them. Plus, since our very next step is to intentionally boil them anyway, a little extra surface moisture is completely irrelevant.
And here is a bonus tip: if you find some shriveled, slightly sad-looking specimens hiding in the back of your crisper drawer, do not toss them in the compost. This water-heavy cooking method will instantly rehydrate them and bring them back to life, saving you a frustrating trip to the grocery store.
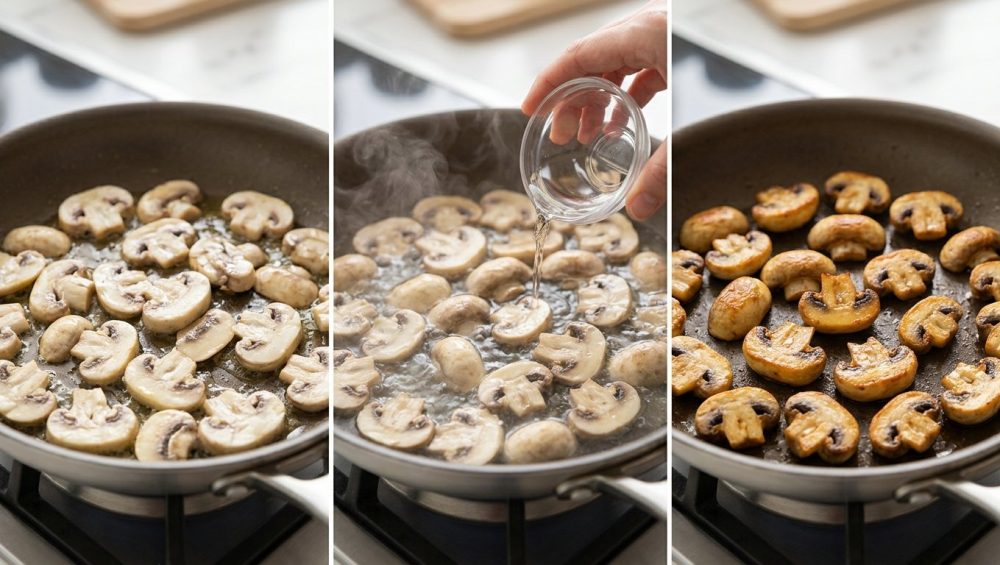
Step 2: The Crowded Simmer
Slice your mushrooms to your desired thickness. Place them into a wide skillet. And here is where we gleefully break Julia Child’s golden rule: go ahead and crowd the pan. Pile them high. Because we are starting with a wet cooking method, the initial steam will help break down the volume quickly, and they will shrink as they release their own juices. Add about a quarter cup of water to the pan (or up to half a cup if you are cooking a massive mountain of fungi). Turn the heat to medium-high and let it bubble. You can even throw a lid on the pan for the first minute to trap the steam and accelerate the cellular breakdown.
Step 3: The Evaporation Phase
As the water simmers, you will notice the mushrooms releasing their own dark, deeply flavorful juices into the pan. The mixture will temporarily look like a murky soup. Do not panic; trust the process. Keep the heat steady and let the water boil away. You are waiting for a very specific auditory cue: the sound will shift from a rolling, wet, bubbling boil to a sharp, aggressive, crackling sizzle. This means the water has fully evaporated, and only the concentrated mushroom flavor remains in the pan,.
Step 4: The Golden Sear
Now that the pan is completely dry and the internal air pockets have collapsed, it is time to build your crust. Push the tender mushrooms to the edges of the pan and drop in your fat of choice. A combination of a high-smoke-point oil (like avocado or refined grapeseed) and a knob of unsalted butter is pure perfection. Toss the mushrooms in the bubbling fat. Because they can no longer absorb the oil, they will immediately begin to fry. Let them sit undisturbed for a full minute or two to develop a deep, caramelized sear.
Step 5: The Aromatic Finish
In the final thirty seconds of cooking, toss in your minced garlic, finely diced shallots, or fresh thyme leaves. If you add these aromatics too early, they will burn and turn acrid, but adding them at the very end allows their volatile oils to bloom perfectly in the hot fat. Finally, deglaze the pan with a splash of dry white wine, dry sherry, or even a squeeze of fresh lemon juice. A rich, umami-heavy dish like this can feel overwhelmingly heavy on the palate, and a bright splash of citrus or vinegar is the perfect way to prove that your dinner actually needs acid, elevating the dish from merely good to restaurant-quality.
The Maillard Reaction: Unlocking Maximum Umami
Why do we care so much about getting that hard, aggressive sear at the end of the cooking process? It all comes down to a miraculous chemical process known as the Maillard reaction. This is the complex, non-enzymatic browning process that occurs when amino acids and reducing sugars are subjected to high heat,. It is the exact same reaction that gives a seared ribeye steak its crust, turns pale dough into a golden loaf of bread, and makes roasted coffee beans taste so complex.
When mushrooms undergo the Maillard reaction, they produce hundreds of distinct, highly desirable flavor compounds, most notably furans, pyrazines, and thiophenes,. These specific chemical compounds are responsible for delivering that deep, savory, almost meat-like umami flavor that makes a properly cooked mushroom so incredibly satisfying,. In fact, scientific studies analyzing mushroom hydrolysates have shown that optimal flavor development and the generation of these meat-like attributes peak when the surface temperature exceeds 250°F (121°C).
However, the Maillard reaction has a strict thermal threshold. Water, as we know from high school physics, boils and turns to steam at 212°F (100°C). Therefore, as long as there is liquid water in your pan, the surface temperature cannot rise high enough to trigger the browning process. This is the fatal flaw of the traditional dry-sauté method. When the mushrooms dump their internal water halfway through cooking, the pan temperature plummets, the Maillard reaction halts entirely, and you are left with steamed, grey sadness. By boiling the water off first, we clear the runway for the temperature to spike, allowing the fat to achieve the extreme heat necessary for a flawless, flavor-packed crust.
Equipment Matters: The “No-Go” Rule on Toxic Gear
Now, we need to have a very serious conversation about the hardware you are using to execute this technique. As an advocate for the everyday home cook, I have zero patience for pretentious, overpriced kitchen gadgets that only serve to clutter your drawers. However, I have a strict, uncompromising “No-Go” rule when it comes to cheap, toxic cookware.
If you are attempting to achieve a high-heat sear in a flimsy, scratched, bargain-bin non-stick skillet, you are setting yourself up for culinary failure and potential health risks. Traditional non-stick coatings, particularly older Teflon pans manufactured with PFAS chemicals, are simply not designed to handle the intense, dry heat required for a proper Maillard reaction. When these pans are subjected to high temperatures, the synthetic coatings can begin to break down, releasing noxious fumes and leaching mystery chemicals into your food. If your pans are visibly scratched, peeling, or mysteriously losing their slip, it is time to throw them directly into the garbage bin.
There is simply no excuse for keeping hazardous materials in your home, and banishing toxic kitchen gear is the first and most important step toward becoming a confident, capable cook who actually enjoys spending time at the stove.
So, what should you use instead? To achieve a professional-level sear, you need a pan with exceptional thermal mass—a pan that can hold onto its heat when a pile of wet ingredients is dropped into it, and recover quickly once the water evaporates.
My absolute top recommendation for this technique is a heavy-gauge carbon steel skillet. Carbon steel is the unsung workhorse of professional restaurant kitchens. It heats up incredibly fast, can withstand scorching temperatures without warping, and, when properly seasoned, develops a natural, chemical-free non-stick surface. Understanding the thermodynamics of carbon steel will completely revolutionize the way you cook vegetables and proteins alike, providing you with the intense, sustained heat necessary to evaporate water quickly and brown food deeply.
If you prefer a slightly lower-maintenance option, a high-quality, fully clad stainless steel skillet is your next best bet. While stainless steel has an unfair reputation for causing food to stick, this is almost entirely an issue of user error and poor temperature control. By allowing your pan to heat up properly before adding your oil, you can utilize the Leidenfrost effect to create a microscopic vapor barrier that allows for flawless, stick-free searing on stainless steel. Either of these options will outlive you, outperform any cheap non-stick pan on the market, and guarantee that your mushrooms get the aggressive heat they need to shine.
Troubleshooting & Advanced Tips for the Home Cook
Even with a scientifically foolproof method, questions always arise when you are standing in front of a hot stove. Let us clear up a few common concerns so you can cook with absolute confidence.
What if I add too much water at the beginning?
Do not panic. Remember the golden rule of chitin: you cannot overcook a mushroom. If you accidentally dump a whole cup of water into the pan instead of a quarter cup, you have not ruined your dinner. You simply have to wait a little longer for the water to evaporate. Pour yourself another splash of wine, stir the pan occasionally, and let the stove do the heavy lifting. The mushrooms will be perfectly fine.
Does this technique work for all mushroom varieties?
Absolutely. This simmer-first technique works absolute wonders on standard white button mushrooms, earthy creminis, massive dense portobellos, and meaty shiitakes. However, if you are working with extremely delicate, thin-fleshed wild varieties like chanterelles, oyster mushrooms, or maitake (hen of the woods), you may want to use slightly less water. Their delicate, frilly structures break down and release their internal moisture much faster than a dense button mushroom.
Can I use broth instead of water?
Yes, and you highly should! If you want to inject even more flavor into the cellular structure of the fungi, try simmering them in a splash of high-quality chicken stock, rich beef bone broth, or even a splash of soy sauce mixed with water. As the liquid reduces and evaporates, those deeply savory flavor compounds will coat the exterior of the mushrooms, amplifying the umami profile exponentially before you even add the oil to sear them.
What about roasting them in the oven?
You can absolutely roast mushrooms, but the same biological rules apply. If you toss raw mushrooms in oil and throw them on a sheet pan, they will still act like sponges, and they will still dump their water onto the pan, essentially steaming themselves in the oven. If you want perfectly roasted mushrooms, you can actually par-boil them on the stove for a few minutes first, drain them well, toss them in oil, and then roast them in a scorching hot oven. The air pockets will already be collapsed, ensuring a crispy, roasted exterior.
Conclusion: Reclaiming Your Kitchen Confidence
Cooking should never be a source of stress, and you certainly do not need a degree from a prestigious culinary institute to make mind-blowing, restaurant-quality food in your own home. By simply ignoring outdated culinary dogma and leaning into a little bit of basic food science, you can eliminate the frustration of soggy, greasy side dishes forever.
The next time you are prepping for an elaborate weekend dinner party or just throwing together a quick, desperate Tuesday night meal, remember the water-first rule. Embrace the simmer. Let the air pockets collapse. Wait for that aggressive, sizzling sear. By investing in safe, high-quality cookware and stocking your space with the essential tools required for a beautifully organized dream kitchen, you are setting yourself up for a lifetime of culinary victories.
Now, go wash your mushrooms without fear, turn up the heat, and prepare to taste the most perfectly golden, deeply savory fungi of your life. You have got this, and I am cheering you on from the sidelines. Bon appétit!


