Let’s talk about the elephant in the kitchen: that mangled, shredded, completely disrespected piece of chicken breast currently superglued to the bottom of your expensive stainless steel skillet. You bought that shiny, heavy-bottomed pan because you wanted to cook like a professional, but instead, you’re spending your Tuesday night chipping away at carbonized poultry with a wooden spoon, questioning all of your life choices.
I see you. I’ve been you. And I am here to tell you that you do not need a culinary degree to fix this. You just need a basic understanding of thermodynamics.
Welcome to the masterclass. Today, we are going to dive deep into the physics of your cookware. We are going to completely eliminate the guesswork from your searing process. By the end of this exhaustively researched guide, you will understand exactly how to exploit a neat little trick of physics called the Leidenfrost effect to turn that terrifying stainless steel skillet into a naturally non-stick powerhouse. No more torn fish fillets. No more panic. Just perfect, golden-brown crusts every single time.
The Great Stainless Steel Struggle (And Why You’re Failing)
Before we can fix the problem, we need to address why you are struggling in the first place. The truth is, most weekend culinary hobbyists are terrified of uncoated cookware. We have been brainwashed by decades of marketing into believing that cooking requires a chemical crutch.
The Toxic Trap of Cheap Non-Stick Pans
Let me be brutally honest: I absolutely despise cheap, toxic non-stick pans. You know the ones I’m talking about. They are lightweight, flimsy, and coated in a dark, mysterious layer that inevitably starts peeling off into your scrambled eggs after six months of use.
For decades, traditional non-stick cookware has relied on polytetrafluoroethylene (PTFE), better known by the brand name Teflon. Historically, this stuff was manufactured using perfluorooctanoic acid (PFOA), a chemical so persistent in the environment and human body that it earned the terrifying moniker “forever chemical”. While PFOA was largely phased out in the United States, the industry simply pivoted to using other structurally similar PFAS chemicals, like GenX, which carry their own host of alarming health concerns.
The science on this is not just concerning; it is downright dystopian. When you heat a traditional PTFE-coated pan past 260°C (500°F)—a temperature incredibly easy to reach if you accidentally leave an empty pan on a high burner—the coating begins to degrade, releasing toxic fumes. Furthermore, when that coating inevitably scratches, you aren’t just losing your non-stick surface; studies have shown that damaged PTFE pans can release millions of microplastics and nanoplastics directly into your food. The health risks associated with chronic PFAS exposure are extensive, with research linking these chemicals to elevated cholesterol, thyroid disease, and an increased risk of certain cancers. The backlash has become so severe that as of January 1, 2025, Minnesota became the first U.S. state to outright ban PFAS in cookware.
If you are serious about banishing toxic kitchen gear from your home, the peeling non-stick pan has to go. It is not saving you time; it is a liability.
Why We Fear the Stainless Steel Skillet
So, you responsibly throw away the scratched Teflon and invest in a beautiful, heavy, multi-clad stainless steel skillet. You take it home, drop a cold piece of salmon into it, and watch in horror as the fish instantly welds itself to the metal.
Why does this happen? Because you are treating a high-performance tool like a cheap disposable toy. Stainless steel is not inherently non-stick. It requires technique. It demands that you respect the relationship between heat, fat, and protein. When you fail to manage these three elements, physics turns against you. But when you understand the mechanics of the pan, you can manipulate those same laws of physics to your advantage.
The Science of Sticking: A Thermodynamic Nightmare
To defeat the enemy, you must understand the enemy. And in the kitchen, the enemy is chemical adhesion. Let’s look at what is actually happening on a microscopic level when food hits hot metal.
The Microscopic Mountains in Your Pan
To the naked eye, your stainless steel skillet looks perfectly smooth. It has a mirror-like finish that gleams under your kitchen lights. But if you were to look at that same surface under a powerful microscope, you would see a rugged, jagged landscape.
At a microscopic level, stainless steel is porous. It is covered in tiny hills, valleys, crevices, and caves. When you place food into a cold or improperly heated pan, the moisture and proteins from that food seep down into those microscopic valleys. As the pan heats up, the food is literally anchored into the topography of the metal.
But here is the brilliant part: metal expands when it gets hot. As you preheat your stainless steel pan, those microscopic pores begin to close, and the jagged valleys smooth out. The hotter the pan gets, the smoother the physical cooking surface becomes. This is the first critical step in demystifying modern recipes that call for “ripping hot” skillets.
Protein Adhesion: The Chemical Bond of Doom
The physical entrapment of food in microscopic pores is only half the battle. The real nightmare is chemical.
When you cook high-protein foods like chicken, steak, or eggs, the heat causes the proteins to denature. Their intricate three-dimensional structures unravel, exposing reactive amino groups and side chains. These unraveled proteins are desperately looking for something to bond with.
Stainless steel, while less reactive than pure cast iron, still contains plenty of available metal atoms (specifically iron) on its surface. When the denatured proteins in your food come into direct contact with these metal atoms, they form actual chemical bonds—ranging from relatively weak van der Waals forces to incredibly stubborn covalent bonds.
This isn’t just food resting on a pan; this is food chemically fusing with the pan. This is why scraping it off requires the brute force of a metal spatula and a string of expletives. You are literally trying to break chemical bonds with sheer physical force. Therefore, the entire game of preventing protein adhesion relies on ensuring that your food never actually touches the bare metal.
Enter the Leidenfrost Effect: Your Culinary Savior
This brings us to the hero of our story, a principle of physics discovered in 1756 by a German physician named Johann Gottlob Leidenfrost. He wasn’t a chef, but he accidentally gave us the greatest cooking hack in culinary history.
What Exactly is the Leidenfrost Effect?
The Leidenfrost effect is a physical phenomenon that occurs when a liquid comes into contact with a mass that is significantly hotter than the liquid’s boiling point.
Normally, when water hits a hot surface (say, 100°C or 212°F), it immediately boils and evaporates into steam. But when the surface is much hotter than the boiling point, something magical happens. The very bottom layer of the water droplet vaporizes so instantly that it creates a microscopic, insulating cushion of steam between the hot surface and the rest of the water droplet.
Because steam is a poor conductor of heat compared to direct metal contact, this vapor cushion insulates the rest of the droplet, preventing it from boiling away immediately. The droplet is literally levitating on its own steam, allowing it to glide around the pan completely frictionless, like a puck on an air hockey table.
If you want to decode pretentious recipe jargon, just know that when chefs talk about a “dancing water droplet,” they are talking about applied fluid dynamics.
The Magic Number: 193°C (379°F)
So, how does this apply to your Tuesday night salmon?
When you place a piece of raw protein into a pan, the surface of that food contains moisture. If the pan is heated to the exact temperature required to trigger the Leidenfrost effect, the moisture on the surface of the food instantly vaporizes, creating a microscopic steam barrier between the protein and the metal.
The food is no longer touching the metal atoms; it is floating on a cushion of its own steam. No contact means no covalent bonds. No covalent bonds means no sticking.
The precise temperature threshold for this phenomenon in a standard stainless steel skillet is approximately 193°C (379°F). At this exact thermal sweet spot, the metal has expanded enough to close its microscopic pores, and the heat is intense enough to create the vapor barrier. This is the promised land of uncoated cooking.
The Masterclass: Activating the Leidenfrost Effect in Your Kitchen
Understanding the physics is great, but executing it on a busy weeknight when you’re starving is what actually matters. Let’s break down the foolproof, step-by-step methodology to achieve a frictionless surface. If you want to survive the kitchen without setting off the smoke detector, follow these steps religiously.
Step 1: The Naked Preheat
The biggest mistake rookies make is pouring cold oil into a cold pan and turning the burner to high. Do not do this.
Start with a completely clean, dry, naked stainless steel skillet. Place it on your stove over medium heat. Not high heat. Medium. High heat will cause the pan to heat unevenly, potentially warping the metal and creating localized hot spots that will burn your oil later.
Allow the dry pan to heat up for approximately 2 to 3 minutes. You are giving the metal time to expand, smoothing out those microscopic valleys we talked about earlier. A high-quality, multi-clad pan (one with an aluminum or copper core sandwiched between stainless steel) is one of the essential tools every beginner needs because it will distribute this heat evenly across the entire cooking surface.
Step 2: The Mercury Water Drop Test
After a few minutes, it is time to test the thermodynamics of your pan. You are going to perform the water drop test (also known as the mercury-ball test).
Dip your fingers in a glass of water, or use a 1/4 teaspoon measuring spoon, and flick a few drops of water into the center of the dry pan.
Watch carefully.
- If the water sits there and gently bubbles, the pan is too cold.
- If the water aggressively sizzles, spits, and rapidly evaporates into nothing, the pan is still too cold (it is above 100°C/212°F, but below the Leidenfrost threshold of 193°C/379°F).
- If the water immediately splatters into dozens of tiny, violent micro-beads that shoot across the kitchen, the pan is too hot.
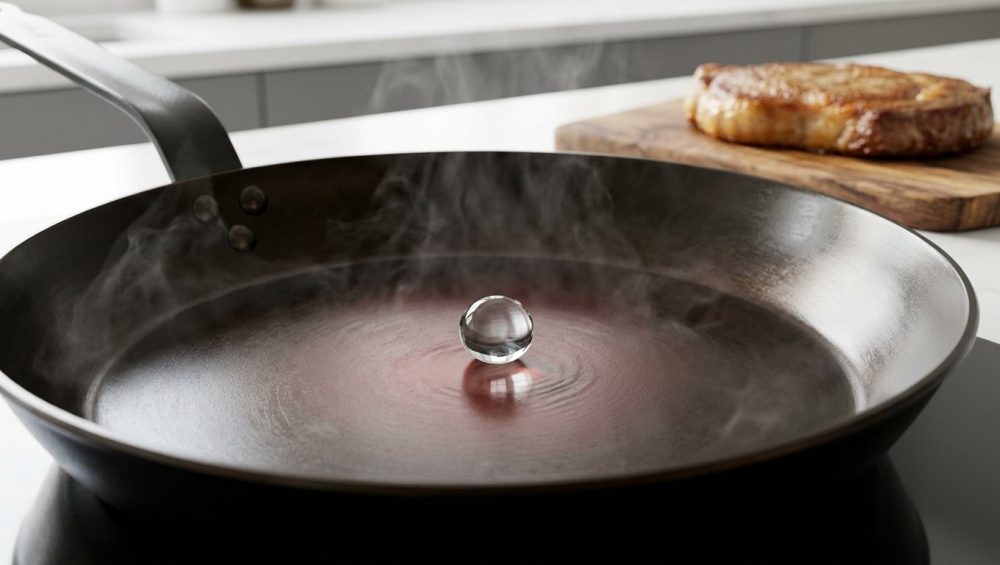
You are looking for the “Goldilocks” reaction. When the pan hits the exact Leidenfrost point, the water droplet will remain intact, forming a perfect, cohesive sphere that looks exactly like a bead of liquid mercury. It will dart and glide effortlessly across the surface of the pan without evaporating.
When you see that dancing mercury ball, congratulations. You have successfully manipulated physics. Your pan is now temporarily non-stick.
Step 3: The Oil Buffer
Now that the pan is at the correct temperature, wipe out the water droplet with a paper towel (or just let it eventually boil off if it’s small enough).
Immediately add your cooking fat. This is the famous “hot pan, cold fat” technique.
Why do we add the oil now? Two reasons. First, heating oil from cold for a long time degrades it and brings it closer to its smoke point prematurely. Second, when the cold oil hits the hot, expanded metal, its viscosity drops instantly. It becomes incredibly thin and fluid, rushing into any remaining microscopic imperfections on the pan’s surface and creating a perfectly smooth, protective polymer barrier.
You must use an oil with a high smoke point for this. Avocado oil, grapeseed oil, ghee, or refined canola oil are excellent choices. If you drop extra virgin olive oil or whole butter into a 193°C (379°F) pan, the milk solids and unrefined particles will instantly burn, turning your kitchen into a toxic smoke machine.
Swirl the oil to coat the bottom of the pan. It should shimmer immediately and perhaps release a tiny wisp of smoke. You are now ready to cook.
Step 4: The Protein Introduction (and Patience)
Here is where human error usually ruins the physics. You have a perfectly heated pan and a shimmering layer of oil. Now, you must introduce the protein correctly.
First, your protein cannot be soaking wet. If you drop a dripping wet piece of chicken into the pan, the excess surface water will rapidly boil, violently dropping the temperature of the pan below the Leidenfrost threshold. The steam barrier will fail, and the meat will stick. Always pat your proteins aggressively dry with a paper towel before cooking.
Second, gently lay the protein into the pan, laying it away from you so hot oil doesn’t splash onto your wrists.
Now comes the hardest part of the entire process: Step away from the stove. Do not touch it. Do not poke it. Do not try to lift the edge with your tongs to see how it looks.
When the cold protein hits the hot pan, the temperature of the metal drops slightly. The proteins will initially grab onto the metal. However, as the heat recovers and the Maillard reaction begins (the complex chemical process where amino acids and reducing sugars brown and create flavor), the moisture escaping from the food will reinforce that steam cushion. Furthermore, as the proteins cook and tighten, they naturally release their chemical grip on the metal.
If you try to move the food too early, you will tear the flesh. If you wait until the crust has properly formed, the food will release itself naturally. It will literally let go of the pan when it is ready.
Troubleshooting the Mercury Drop: When Things Go Wrong
Even with a perfect understanding of the science, things can go sideways. If you find yourself needing to save ruined meals on a regular basis, you are likely misinterpreting the physical cues of the pan. Let’s troubleshoot the most common failures.
The Sizzling Smear (Too Cold)
You flicked the water, it sizzled, and you impatiently threw the oil and the steak in anyway. What happens?
Because the pan is below the 193°C (379°F) Leidenfrost threshold, the moisture in the meat doesn’t vaporize fast enough to create a steam cushion. Instead, the denatured proteins sink directly into the metal pores and form strong covalent bonds. Your food is now permanently welded to the skillet. You will rip the crust off when you try to flip it, leaving a pale, sad piece of meat and a pan covered in burnt fond.
Patience is mandatory. Wait for the dancing bead.
The Shattering Explosion (Too Hot)
You got distracted by an email, left the pan on the burner for ten minutes, and then flicked water into it. The water instantly shatters into a hundred microscopic droplets that aggressively ping-pong around the metal.
The pan is now vastly exceeding the ideal temperature zone (likely pushing past 260°C/500°F). If you add oil now, it will instantly hit its smoke point, polymerize into a sticky, gummy mess, and fill your house with acrid, bitter smoke. If you add food, the outside will instantly incinerate into bitter carbon before the inside has even begun to warm up.
If your pan is too hot, take it completely off the heat for 60 seconds. Let the thermal energy dissipate, place it back on the burner, and test again.
The False Positive (Uneven Heating)
You did the water test in the exact center of the pan, and the bead danced perfectly. But when you added a large fish fillet, the ends of the fish stuck stubbornly to the outer edges of the pan.
This is a thermal distribution failure. If you are using a cheap, thin, single-ply stainless steel pan, the heat from the burner stays concentrated directly over the flame. The center of the pan might be 200°C, but the outer edges might only be 120°C. The Leidenfrost effect is localized, not uniform.
This is why investing in fully clad cookware (where the conductive aluminum core extends all the way up the sides of the pan) is non-negotiable. It ensures edge-to-edge thermal consistency.
Beyond the Drop: Heat Capacity and Thermal Mass
To truly master the thermodynamics of your kitchen, we need to look beyond the surface temperature and discuss what happens after the food hits the pan. This is where the concept of thermal mass comes into play.
Why Your Pan Choice Matters
Every metal in your kitchen behaves differently under a flame.
Stainless steel is highly conductive (thanks to its aluminum or copper core) but relatively low in thermal mass. This means it heats up quickly and responds instantly when you turn the dial down. It is the sports car of the kitchen: agile, responsive, and precise.
Cast iron, on the other hand, is a terrible conductor but has massive thermal mass. It takes forever to heat up, but once it gets hot, it holds onto that thermal energy like a vault. It is the freight train of the kitchen.
If you are mastering the Maillard reaction for a massive, two-inch-thick ribeye steak, cast iron is often the superior choice because its sheer mass prevents the pan’s temperature from dropping when the cold meat is introduced. But for everyday cooking—chicken breasts, delicate fish, sautéed vegetables, and pan sauces—the responsiveness of a multi-clad stainless steel pan is vastly superior.
The Cold Steak Phenomenon
The biggest threat to your carefully established Leidenfrost barrier is thermal shock.
If you take a massive, fridge-cold piece of meat and drop it into your perfectly heated 193°C (379°F) stainless steel pan, the massive temperature differential will act like a heat sink. The cold meat will rapidly absorb the thermal energy from the thin metal, causing the pan’s surface temperature to plummet below the Leidenfrost threshold.
The steam barrier collapses. The pores of the metal reopen. The proteins bond. The food sticks.
To prevent this, you must manage the temperature of your ingredients. While you don’t need to leave meat out for hours (a food safety hazard), letting your proteins sit at room temperature for 15 to 20 minutes before cooking takes the harsh chill off the exterior. Combine this with patting the surface bone-dry, and you minimize the thermal shock, ensuring the pan maintains its critical temperature.
The Cleanup: Restoring Your Stainless Steel Glory
Even when you perfectly execute the Leidenfrost effect, you will likely be left with a pan that looks a bit messy. There will be browned bits of protein stuck to the bottom, and perhaps a ring of polymerized oil around the edges.
Do not panic, and absolutely do not reach for a harsh abrasive steel wool pad that will scratch your beautiful mirror finish.
Deglazing: The Tasty Cleanup
Those brown bits stuck to the bottom of the pan are called fond. They are not a mistake; they are a culinary goldmine. Fond is the concentrated result of the Maillard reaction, packed with intense, savory flavor.
The easiest way to clean your pan is to eat the mess. While the pan is still hot (but off the high heat), pour in a splash of liquid—wine, chicken stock, or even just water. The liquid will instantly boil, releasing a cloud of steam that physically lifts the fond off the metal. Use a wooden spoon to scrape the bottom gently.
You have just deglazed the pan. Reduce that liquid, swirl in a knob of cold butter, and you have a professional-grade pan sauce. This technique is a staple in foolproof modern recipes because it simultaneously elevates your meal and does 90% of your dishwashing for you.
Bar Keepers Friend: The Secret Weapon
If you accidentally overheated your oil and created a stubborn, sticky yellow or brown polymerized oil stain on the sidewalls of your pan, normal dish soap will not save you. Dish soap is designed for liquid grease, not baked-on carbon polymers.
Your secret weapon is a powdered cleanser called Bar Keepers Friend. It contains oxalic acid, a compound that breaks down at a molecular level the tough, polymerized bonds of burnt oil and mineral deposits without scratching the stainless steel.
Sprinkle a little powder into the wet pan, make a paste, let it sit for sixty seconds, and wipe it away with a non-abrasive sponge. Your pan will look like it just came out of the display box.
Reclaiming Your Kitchen Confidence
Cooking should not be a source of stress. You shouldn’t have to hold your breath every time you try to flip a piece of fish, praying that half of it doesn’t stay glued to the metal.
The transition from toxic, disposable non-stick pans to professional-grade stainless steel can feel intimidating. But it is entirely manageable once you stop treating cooking like magic and start treating it like physics. By understanding the microscopic topography of your pan, respecting the chemical nature of proteins, and utilizing the 193°C (379°F) Leidenfrost threshold, you take complete control of the process.
You now possess the knowledge to execute a flawless sear. You know how to read the dancing water droplet. You understand the critical importance of a dry, room-temperature protein. And most importantly, you know that you never have to eat a meal laced with peeling forever chemicals ever again.
Take this knowledge. Go into your kitchen tonight. Heat that skillet, flick that water, and watch the physics work for you. Once you master this single technique, you will naturally cure cooking anxiety and unlock a completely new level of culinary freedom. The days of the mangled chicken breast are officially over. Now go cook something amazing.


