The Gummy, Sticky Elephant in the Room
Let us set the scene. You invite a few close friends over for dinner. You want to be the effortlessly chic, relaxed host who casually throws together a vibrant, interactive meal. You buy a pack of rice paper, meticulously chop a mountain of fresh vegetables, and think, “This will be so fun!” Fast forward forty-five minutes, and you are sweating profusely over a bowl of scalding water while your guests awkwardly try to peel translucent, gummy blobs off their plates. The wrappers are tearing, the shrimp is escaping, and your kitchen looks like a tapioca factory exploded.
I have been there. I learned to cook through trial, error, and setting off the smoke detector a few too many times. During the week, I am all about ruthless efficiency. Time is money, and I survive on clever, time-saving hacks that get dinner on the table before I lose my mind. But the weekend? The weekend is when we slow down, pour a generously sized glass of wine, and tackle something beautiful. And believe me, a DIY spring roll night can be a beautiful, interactive, and entirely stress-free way to host—if you understand the physics behind it.
You do not need a culinary degree to make restaurant-quality food at home. You just need to stop listening to terrible advice. We are going to decode pretentious recipe jargon so you can understand exactly what is happening to your food on a molecular level. The reason your rice paper tears is not because you lack some innate, magical chef’s touch. It is because you are accidentally triggering premature starch gelatinization. We’ve all had those nights where the wrappers tear and you end up eating a deconstructed salad out of pure frustration. Surviving kitchen disasters is practically a rite of passage for home cooks, but tonight, we are breaking the cycle. Grab your cutting board, pour that wine, and let’s get to work.
Why We’re Doing This: The Ultimate Hands-Off Gathering
Eliminating the Host Bottleneck
The true art of effortless hosting isn’t about running yourself ragged while your guests have all the fun in the other room; it’s about creating systems that do the heavy lifting for you. The traditional dinner party format is deeply flawed. The host is trapped in the kitchen, frantically trying to time the protein, the sides, and the sauce, while the guests sit in the dining room wondering if they should offer to help.
A DIY spring roll night completely dismantles this dynamic. By shifting the assembly process from the kitchen counter to the dining table, you create a tactile, interactive environment that naturally fosters meaningful moments together. You do all the prep work in advance—slicing the vegetables, mixing the dipping sauces, and arranging the platters—so that when your guests arrive, your only job is to sit down and pass the mint leaves.
The Psychology of Slow-Paced Dining
If you want to host a genuinely relaxed dinner party, you need a menu that inherently forces people to slow down and participate. Spring rolls cannot be rushed. The act of dipping the paper, layering the ingredients, and rolling it up demands a certain level of focus and pacing. This completely changes the psychology of the meal. Instead of inhaling a plate of food in ten minutes, your guests will spend an hour or two slowly building their own bites, talking, laughing, and comparing their rolling techniques. It is mindful eating disguised as an interactive game.
The “No-Go” Rule: Setting Up a Safe, Non-Toxic Prep Station
The Dangers of Cheap Plastic and Peeling Non-Stick
Before we even talk about slicing vegetables or heating water, let’s have a serious chat about your prep surface. I have a strict, non-negotiable rule when it comes to kitchen equipment: I absolutely despise cheap, toxic kitchenware. If you are prepping your fresh, vibrant spring roll ingredients on a deeply scarred, mystery-metal-coated tray or a cheap plastic cutting board that’s actively shedding microplastics into your food, we have a major problem.
Banishing toxic kitchen gear from your home is step one of taking your cooking seriously. Those flimsy plastic cutting boards do not just dull your knives; they harbor bacteria in their deep grooves and flake off microscopic plastic shards directly into your bell peppers. And do not even get me started on peeling non-stick pans or weird chemical-leaching plastic serving trays. We are making fresh, vibrant, wholesome food here, not a chemical cocktail.
The Only Safe Surfaces You Should Use
You don’t need a massive collection of single-use gadgets to pull this off. In fact, a sharp chef’s knife, a solid cutting board, and a reliable digital thermometer are the true beginner cooking essentials that will serve you infinitely better than a drawer full of plastic junk.
For prepping and rolling your rice paper, you need a completely smooth, non-porous, and food-safe surface. A high-quality, solid hardwood cutting board (like maple or walnut) is phenomenal. Alternatively, a medical-grade, food-safe silicone baking mat placed over your table works wonders. If you are serving the rolls on a platter, opt for high-quality stainless steel, ceramic, or tempered glass. Your tools should work for you, not poison you.
Decoding the Wrapper: What the Heck is Rice Paper, Anyway?
The Golden Ratio: Rice Flour vs. Tapioca Starch
To stop tearing your wrappers, you first have to understand what they are made of. Standard Vietnamese rice paper (bánh tráng) is not just mashed-up rice. It is a highly engineered composite film. According to materials science analysis, traditional rice paper consists of roughly 70–75% milled rice flour, 20–25% tapioca starch, and a minimal 3–5% water content.
However, modern premium brands have optimized this formula. You will frequently find high-quality wrappers utilizing an exact 95% rice flour to 5% tapioca starch ratio to eliminate brittleness. Why this specific blend? The structural integrity of the paper relies entirely on the interplay between these two starches. Rice flour provides the rigid structure and the opaque, white appearance. Tapioca starch, which is exceptionally high in amylopectin, acts as the ultimate flexibility agent. It is the magic ingredient that gives the wrapper its elasticity, allowing it to stretch around a rogue piece of carrot without shattering.
Why 100% Tapioca Wrappers Are a Trap
When you are at the grocery store, you might see wrappers labeled as 100% tapioca. Avoid them unless you enjoy unnecessary suffering. While tapioca provides stretch, wrappers made entirely of tapioca starch are notoriously finicky, overly translucent, and prone to turning into a sticky, unmanageable mess the second they hit the water. You want that blend. The rice flour gives you the backbone; the tapioca gives you the bend. A standard rice paper wrapper is incredibly light—containing a mere 20 to 35 calories—and boasts very low sodium levels, usually around 20 to 40 milligrams, making it a much lighter option than wheat-based egg roll wrappers.
The Science of Starch Hydration: Plasticization vs. Gelatinization
What Actually Happens When Starch Gets Wet
Understanding the actual physics of your ingredients is the absolute fastest way to cure cooking anxiety. When you know why something happens, you stop fearing it. When a dry, brittle sheet of rice paper enters water, two distinct chemical processes are fighting for dominance: plasticization and gelatinization.
Plasticization is what we want. This is the process where water molecules penetrate the starch granules, acting as a plasticizer. The water disrupts the intermolecular hydrogen bonds between the starch chains, allowing them to uncoil just enough to become flexible and pliable, while still maintaining their structural integrity.
Gelatinization is the enemy. This occurs when the starch granules absorb too much water and too much heat. The granules swell up like balloons and literally burst open, releasing their internal amylose chains into the surrounding water. This creates a sticky, glue-like paste. If your rice paper turns into a gummy blob that glues itself to your fingers, you have achieved premature gelatinization.
The Hydration Hysteresis Phenomenon
Most rookie kitchen woes stem from treating cooking like a mysterious art form instead of a predictable science. One of the biggest mistakes home cooks make is leaving the wrapper in the water until it feels completely soft. This is a catastrophic error due to a phenomenon known as hydration hysteresis.
There is a time delay between when the paper absorbs the water and when the physical structure of the paper actually relaxes. If you leave the paper in the water until it feels soft in your hands, it has already absorbed way too much moisture. By the time you transfer it to your plate, the starch granules will continue to swell beyond their optimal capacity, leading to irreversible microfractures. In fact, scanning electron microscope (SEM) imaging has shown that soaking wrappers for just 12 seconds instead of the optimal 6 seconds creates three times as many surface microfractures.
The 105-110°F Sweet Spot: Temperature is Everything
Why Cold Water is a Myth and Boiling Water is a Tragedy
If you search the internet for rice paper advice, you will find wildly conflicting information. Some people swear by ice-cold water; others tell you to use boiling water. Both are leading you astray if you are using standard grocery store wrappers. Taking your weekend meals from basic to brilliant doesn’t require a culinary degree; it just takes a few simple steps to culinary artistry, starting with respecting the science of your ingredients.
Here is the definitive truth: the ideal dipping water temperature for standard rice/tapioca composite wrappers is exactly 105-110°F (roughly 40-43°C).
Why? It comes down to thermal energy. If you use cold or room-temperature water (around 70°F), the plasticization process is agonizingly slow. Because it takes so long for the paper to soften, you are tempted to leave it in the water longer. This leads to uneven hydration—the edges turn to mush while the center remains a brittle disc.
If you use boiling water (212°F), you instantly surpass the starch’s peak gelatinization viscosity threshold, which occurs around 144–149°F (62–65°C). The moment the paper hits the boiling water, the starch granules burst, and your wrapper instantly turns to glue.
At 105-110°F, the water is comfortably warm to the touch (think of a soothing bath). At this precise temperature, there is enough thermal energy to rapidly uncoil the amylose chains for flexibility, but it is safely below the 144°F gelatinization threshold. You get rapid, even plasticization without melting the paper.
The 6-Second Rule: Dip, Don’t Drown
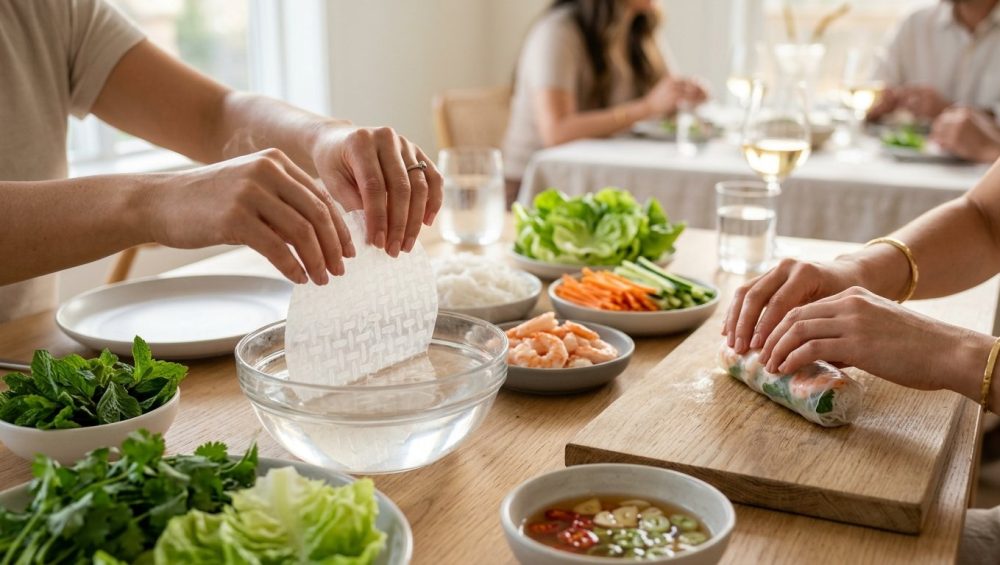
Because we are using 105-110°F water, the hydration process is incredibly fast. You do not soak the paper; you dip it.
Fill a wide, shallow bowl (a pie dish works perfectly) with your 105-110°F filtered water. Take one sheet of rice paper, submerge it completely, and gently rotate it for exactly 3 to 6 seconds. No more. No less. At this temperature and duration, the rice starch hydrates to a 58–62% moisture content—the absolute mathematical sweet spot for maximum flexibility and tensile strength.
When you pull it out after 6 seconds, it will still feel relatively stiff. Do not panic. Do not put it back in the water. Shake off the excess drips and lay it flat on your prep surface. Over the next 30 to 60 seconds, the hydration hysteresis effect will catch up, and the paper will magically transform into a perfectly pliable, slightly tacky, structurally sound wrapper.
The Damp Towel Lie and the “Capillary Rebound” Effect
Why Traditional Advice Fails You
One of the most persistent and damaging myths in home cooking is the advice to roll your spring rolls on a damp kitchen towel. I violently oppose this method.
When you lay a freshly hydrated, delicate sheet of rice paper onto a damp, porous cotton towel, you trigger a physics nightmare called “Capillary Rebound”. The towel acts as a wick. It creates capillary adhesion, where the moisture from the paper is drawn into the towel, and the microscopic fibers of the towel embed themselves into the sticky surface of the starch. When you try to lift the wrapper, it tears, leaving half your spring roll permanently bonded to your dishcloth.
Always roll on a dry, smooth, non-porous surface. A clean hardwood board, a silicone mat, or a dry ceramic plate is mandatory.
The Chilled Platter Trick (Thermal Inertia Transfer)
If you are prepping a large platter of rolls before your guests arrive (instead of doing the DIY table method), you face a new enemy: retrogradation. As the hydrated starch sits at room temperature, the amylopectin molecules begin to realign into rigid crystalline structures, causing the rolls to dry out, harden, and split open.
To combat this, utilize thermal inertia transfer. Place your clean, dry serving platter in the freezer for 90 seconds before you start rolling. This cools the surface of the platter to a crisp 39–43°F (4–6°C). Why does this matter? Cold surfaces drastically slow down the starch retrogradation process. Accelerated shelf-life testing in food labs has proven that spring rolls assembled and stored on chilled platters retain up to 94% of their initial snap and elasticity after 45 minutes, compared to a dismal 61% retention on room-temperature platters.
The Prep: Slicing, Dicing, and Staging Your Fillings
Moisture Control: The Enemy of the Wrapper
Your rice paper is a delicate moisture-management system. If you fill it with soggy, dripping ingredients, the internal moisture will continue to hydrate the wrapper from the inside out until it disintegrates.
When prepping your fillings, ruthlessly eliminate excess water.
- Vegetables: If you are using cucumbers, slice them, scoop out the watery seeds, and only use the firm outer flesh.
- Noodles: If you are using vermicelli rice noodles, boil them until al dente, drain them immediately, and rinse them under cold water to stop the cooking process. More importantly, let them sit in a colander and actively pat them dry with a clean paper towel. Wet noodles equal blown-out wrappers.
- Proteins: Whether you are using poached shrimp, seared tofu, or leftover roast chicken, ensure the protein is patted completely dry before it touches the paper.
Preventing Enzymatic Browning on Make-Ahead Platters
If you are setting up a beautiful DIY platter for your guests, you want the ingredients to look vibrant, not oxidized and sad. Ingredients like avocado, apples, or certain radishes are highly susceptible to enzymatic browning when exposed to oxygen.
To prevent this, create a mild acidulated water bath (one cup of water to one tablespoon of fresh lemon or lime juice). Briefly dip your prone-to-browning ingredients in this solution. The citric acid denatures the polyphenol oxidase enzymes on the surface of the food, halting the oxidation process entirely. Your avocado slices will remain a stunning, vibrant green for hours on the table.
Step-by-Step: The Foolproof Dipping and Rolling Technique
The Geometric Architecture of a Perfect Roll
Rolling a spring roll is an exercise in structural engineering. You are building a cylinder that needs to withstand gravity, dipping sauce, and human teeth.
- The Setup: Place your dry, non-porous rolling surface in front of you. Have your 105-110°F water bowl directly adjacent. Ensure all your dry, prepped fillings are within arm’s reach.
- The Dip: Submerge the wrapper in the warm water for exactly 3 to 6 seconds. Remove it, let the excess water drip off for one second, and lay it flat on your surface.
- The Wait: Wait 30 seconds. Watch as the rigid paper relaxes into a pliable sheet.
- The Placement: Visualize the circular wrapper. Place your fillings in the lower third of the circle (the side closest to you).
- The Layering: Start with the softest ingredients first (like a bed of dry lettuce or noodles) to act as a buffer. Place your sharpest ingredients (like julienned carrots or crispy tofu edges) in the center of the bundle so they don’t puncture the paper. If you want shrimp to show through the final roll beautifully, lay the shrimp halves cut-side up in the middle of the wrapper, slightly above your main filling pile.
The Tension and Tuck Method
Now comes the mechanics of the roll. Do not wrap it loosely. A loose roll will fall apart the second it hits the peanut sauce. You need tension.
- Lift the bottom edge of the wrapper (closest to you) and pull it up and tightly over the main pile of filling.
- Using your fingers, physically tuck the edge of the wrapper underneath the filling pile, pulling the whole bundle slightly back towards you to create a tight, compact log.
- Fold the left side of the wrapper cleanly over the center.
- Fold the right side of the wrapper cleanly over the center. (It should now look like an open envelope).
- Maintain the tension and roll the tightly packed cylinder forward, rolling it over the shrimp (if using) and sealing it at the top edge. The natural tackiness of the hydrated starch will seal the roll perfectly.
Troubleshooting Your Spring Roll Nightmares
Even with the science on your side, the kitchen can occasionally throw you a curveball. Here is how to diagnose and fix the most common issues on the fly.
Problem: The Wrapper Shattered
If you are trying to fold the wrapper and it cracks or shatters like glass, you have a hydration deficit. This usually means your water temperature dropped too low (well below the 105°F mark), or you didn’t wait the required 30 seconds after dipping for the plasticization to fully occur.
- The Fix: Dump your dipping bowl and refill it with fresh 105-110°F water. Be patient and let the wrapper rest on the board before folding. If you are using thicker, 100% brown rice wrappers, they naturally contain less tapioca starch and more fiber, meaning they require a slightly longer dip—around 7.5 seconds—to achieve the same flexibility.
Problem: The Wrapper is Too Chewy
If your final roll feels like you are chewing on a rubber band, you are dealing with starch retrogradation. This happens when the rolls were made too far in advance and left exposed to the ambient air, causing the moisture to evaporate and the starch to crystallize.
- The Fix: Rice paper rolls are meant to be eaten fresh. If you absolutely must make them ahead of time, you must protect the moisture barrier. Wrap each completed roll individually in plastic wrap, or store them in an airtight container draped with a very slightly damp (not dripping) paper towel, and keep them at room temperature. Never put finished rolls in the refrigerator; the cold air accelerates starch retrogradation, turning the wrappers into hard plastic.
Problem: The Rolls Stuck Together on the Serving Plate
Because the exterior of a perfectly hydrated wrapper is inherently tacky, two rolls placed touching each other will permanently fuse together. When you try to pull them apart, the wrappers will tear, spilling the contents everywhere.
- The Fix: Social distancing for spring rolls. When plating, leave a distinct gap between each roll. If you are stacking them on a platter, you must use a barrier. Lay down a piece of green leaf lettuce or a strip of parchment paper between the layers. Alternatively, lightly brush the exterior of each finished roll with a microscopic drop of toasted sesame oil. The lipid barrier prevents the starch molecules from cross-linking with neighboring rolls.
The Sassy Sous-Chef’s Final Verdict
Listen to me very carefully: you are entirely capable of pulling this off. The difference between a chaotic, messy kitchen failure and a stunning, interactive dinner party is simply a matter of temperature control and timing. By respecting the 105-110°F sweet spot, ditching the toxic plastic cutting boards, and understanding the basic physics of starch hydration, you have just eliminated 99% of the frustration associated with rice paper.
So, this weekend, skip the complicated, multi-course menu that keeps you chained to the stove. Prep your beautiful, vibrant ingredients in the afternoon. Chill your serving platters. Set the table with your best solid wood boards and a bowl of perfectly warm water. Pour the wine, invite your friends to sit down, and let them build their own masterpiece. You have mastered the science; now it is time to enjoy the meal.


