Let’s get one thing straight right out of the gate: you do not need a culinary degree, a Michelin-starred kitchen, or a trust fund to cook mind-blowing food. What you do need is a basic understanding of kitchen science and the willingness to stop repeating the same rookie kitchen mistakes that result in sad, gray, boiled-looking meat.
We have all been there. You buy a beautiful, expensive cut of protein. You drop it into a hot pan, eagerly anticipating that glorious, golden-brown crust. Instead, the meat immediately releases a puddle of water, the temperature of your pan plummets, and your expensive dinner proceeds to steam itself into a tough, flavorless state of depression. It is infuriating. But rather than ordering takeout in defeat, we are going to fix this using basic chemistry.
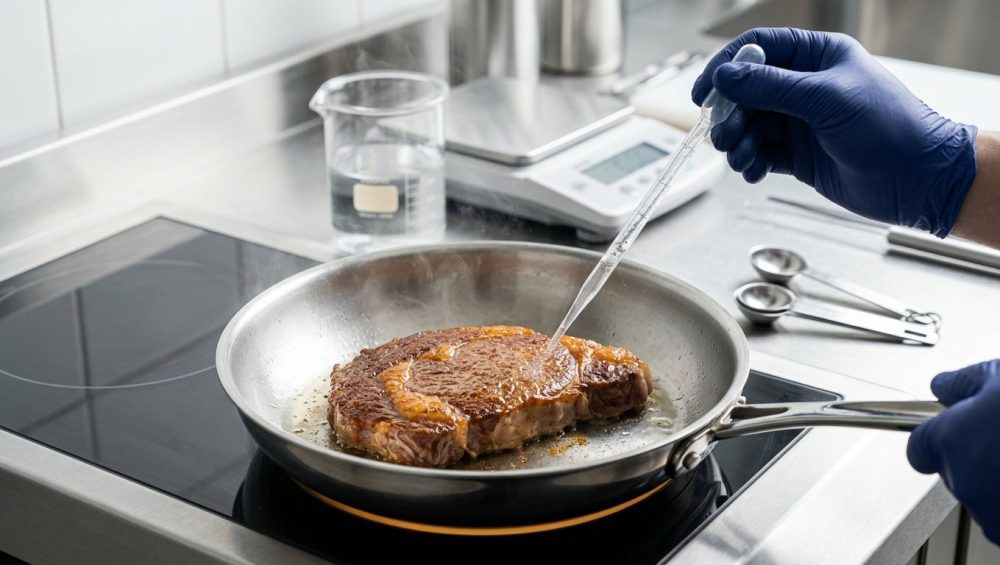
Today, we are diving deep into the scientific mechanics of surface browning. We are going to decode pretentious recipe jargon and look at an objective, highly effective method for accelerating the Maillard reaction using a precise 0.5% sodium bicarbonate (baking soda) wash. This isn’t just a fun party trick; it is a fundamental structural transformation that solves the dual pain points of poor searing and excessive moisture loss. Grab a glass of wine, pull up a stool, and let’s turn your kitchen into a laboratory.
The Thermodynamics of the Sear: Why Your Meat Looks Sad and Gray
To understand how to fix the problem, you first have to understand the enemy. When we talk about achieving a beautiful, flavorful crust on food, we are talking about the Maillard reaction. Named after French chemist Louis-Camille Maillard, who first described it in 1912, this is a complex cascade of chemical reactions between amino acids (the building blocks of proteins) and reducing sugars. When exposed to heat, these compounds rearrange themselves into hundreds of new flavor molecules, creating that deeply savory, roasted, complex profile we associate with expertly cooked food.
However, the Maillard reaction is exceptionally picky about its working environment. It operates on a strict temperature threshold. While very slow browning can technically occur at lower temperatures over long periods, the rapid, aggressive Maillard reaction we need for searing kicks into high gear between 280°F and 330°F (140°C to 165°C). If you push the heat too far past 355°F (175°C), you exit the Maillard zone and enter pyrolysis—otherwise known as burning, which yields acrid, bitter flavors.
The primary roadblock to reaching that magical 280°F to 330°F sweet spot is water. Water is a thermodynamic bully. Because water boils and evaporates at 212°F (100°C), any surface moisture on your meat acts as an energy sink. As long as there is liquid water on the surface of your steak or chicken, the temperature of that surface cannot physically exceed 212°F. The heat energy from your burner is entirely consumed by the phase change of turning liquid water into steam, leaving your meat stranded at a temperature far too low for the Maillard reaction to occur.
This is why throwing wet meat into a pan is a guaranteed recipe for surviving kitchen disasters. By the time the water finally boils off and the surface temperature climbs to 280°F, the interior of your protein is vastly overcooked. We need a way to make the Maillard reaction happen faster, at a lower activation threshold, so we can get that crust and get the meat out of the pan before it turns into shoe leather.
The pH Hack: Enter the 0.5% Sodium Bicarbonate Wash
Here is where the science gets incredibly cool. The rate at which the Maillard reaction occurs is heavily influenced by the pH level of the food’s surface. Most meat is naturally slightly acidic, typically hovering around a pH of 5.5 to 6.0. In an acidic environment, the amino groups in the proteins are protonated (meaning they hold onto an extra hydrogen ion). This makes them less nucleophilic, meaning they are chemically lazy and less likely to attack the carbonyl groups of the reducing sugars.
The very first step of the Maillard reaction—the formation of a Schiff base—is the biological bottleneck. It is the slowest part of the process. But if we artificially raise the pH of the meat’s surface, making it more alkaline, we deprotonate those amino groups. Suddenly, the nitrogen becomes highly nucleophilic and aggressive. The chemical bottleneck vanishes. The amino acids and sugars react at warp speed, and the activation energy required for browning drops significantly.
This is where sodium bicarbonate (NaHCO3), commonly known as baking soda, enters the chat. Baking soda is a weak base. By applying a highly controlled, dilute solution of baking soda to the surface of our protein, we can temporarily raise the surface pH from an acidic 5.5 to an alkaline 8.2 to 8.4. This mimics the electrostatic effects of commercial food additives like sodium tripolyphosphate (STPP), but uses a completely safe, common pantry ingredient.
Why exactly 0.5%? Why not just aggressively rub baking soda all over your chicken? Because chemistry requires precision. If you use too much baking soda (anything over a 1% concentration), you will push the pH too high. Extreme alkalinity causes the rapid saponification of fats—literally turning the fat into soap. It also over-denatures the proteins, resulting in a slimy, mushy surface texture and a harsh, metallic, soapy aftertaste. The 0.5% ratio is the scientifically proven sweet spot: it is just enough to supercharge the Maillard reaction without compromising the flavor or structural integrity of the meat.
The Exact 0.5% Baking Soda Formula and Application
I am a massive advocate for the home cook, and I firmly believe that art of the kitchen relies on practical, replicable formulas rather than vague handfuls of ingredients. To execute this technique flawlessly, you need to treat it like a lab experiment.
The Master Ratio
To create the optimal alkaline wash, you need a 0.5% concentration of sodium bicarbonate relative to the water volume, paired with a 1.5% concentration of kosher salt. The salt is critical here; it buffers the pH to keep it in that safe 8.2–8.4 range and provides the necessary ionic strength to help the muscle fibers retain internal water.
For a standard home batch (enough to treat a few chicken breasts, pork chops, or a large steak), the metric measurements are:
- Water: 1,000 grams (1 liter)
- Kosher Salt: 15 grams (roughly 1 tablespoon)
- Sodium Bicarbonate (Baking Soda): 5 grams (roughly 1 teaspoon)
The Execution Protocol
- Whisk and Dissolve: Thoroughly dissolve the salt and baking soda into the cold water.
- The Submersion: Submerge your protein in the solution. You only need to soak the meat for 45 to 90 minutes. This is not a multi-day marinade. The goal is surface alteration, not deep tissue penetration.
- The Critical Rinse and Dry: This is where most people fail. Once the time is up, remove the meat and gently rinse it to remove any excess surface alkalinity. Then, you must pat it obsessively dry with paper towels. Remember our thermodynamics lesson? Water is the enemy. If you leave alkaline water on the surface, the water will still stall the heat transfer, and the residual alkalinity will inhibit the reaction.
- Air Drying (Optional but Recommended): For absolute perfection, place the dried meat on a wire rack in the fridge for an hour. The circulating air will dehydrate the pellicle (the very outer layer of the meat), ensuring an explosive Maillard reaction the second it hits the pan.
The Moisture Loss Dilemma Solved by Speed
Let’s talk about why this technique doesn’t just improve the color of your food, but actually results in a juicier, more tender final product. It all comes down to the brutal physics of moisture loss.
Raw meat is approximately 75% water. As you apply heat, the proteins in the muscle fibers (specifically myosin and actin) begin to denature and contract. Think of muscle fibers like tiny sponges filled with water. As they heat up, they squeeze tightly, expelling both intramyofibrillar water (water inside the muscle cells) and extramyofibrillar water (water between the cells).
According to USDA data, it is completely standard for meat to lose 25% to 30% of its total weight and volume during the cooking process due to this moisture expulsion. The higher the internal temperature climbs, the more violent the protein contraction becomes. At 127°F (53°C), moisture loss is moderate. But once the internal temperature crosses 154°F (68°C) and pushes toward 194°F (90°C), the shrinkage and water loss become severe.
Here is the brilliant part of the baking soda hack: by manipulating the surface pH to accelerate the Maillard reaction, we drastically reduce the amount of time the meat needs to spend in the hot pan. If your chicken breast takes 12 minutes to brown in a standard environment, the internal temperature has 12 long minutes to climb, causing the muscle fibers to forcefully wring themselves out. But if the 0.5% alkaline wash allows you to achieve a perfect, deep mahogany crust in just 5 minutes, you can pull the meat from the heat significantly faster.
Less time in the pan equals less ambient heat transferring to the center of the meat. Lower internal temperatures equal less protein contraction, which directly translates to less moisture loss. You are essentially using chemistry to outrun the physics of dehydration. This is the ultimate secret to conquering weeknight cooking anxiety: fast, efficient, scientifically sound methods that guarantee a juicy interior and a crispy exterior every single time.
Ditching the Toxic Gear: Proper Cookware for the Perfect Sear
Now, I need to pause the chemistry lesson for a brief, highly necessary reality check. All the pH manipulation in the world will not save your dinner if you are cooking on cheap, toxic, peeling non-stick cookware. I have zero patience for disposable kitchenware, and if you are still trying to sear steaks in a scratched Teflon pan, we need to have a serious talk about banishing toxic kitchen gear from your life.
The Danger of PFAS and PTFE
Most conventional non-stick pans are coated with polytetrafluoroethylene (PTFE), commonly known by the brand name Teflon. PTFE is a type of PFAS (per- and polyfluoroalkyl substances), notoriously known as “forever chemicals” because they do not break down in the environment or the human body.
Despite decades of health warnings, a massive 2020 study by the Ecology Center found that a staggering 79% of tested non-stick cooking pans were still coated with PTFE. When these pans are heated above 400°F to 500°F (temperatures easily reached during searing), the coating begins to degrade, releasing hazardous, invisible chemical fumes into your kitchen air and microplastics into your food. The Norwegian Institute for Air Research has documented that the incomplete destruction of PTFE creates secondary fluorinated chemicals of deeply concerning toxicity.
Furthermore, these chemicals are linked to a horrifying laundry list of health issues, including elevated cholesterol, abnormal thyroid function, weakened immune responses, and an increased risk of kidney and testicular cancers. While states like New Jersey have seen a 55% drop in PFAS levels in their drinking water due to strict environmental regulations, millions of consumers are still willingly heating these chemicals on their stoves every night.
The Superior Alternatives
Beyond the severe health risks, non-stick pans are thermodynamically terrible for searing. They are usually made of thin aluminum, meaning they lack thermal mass. The moment you drop a cold piece of meat into a thin non-stick pan, the pan’s temperature crashes, ruining your Maillard reaction.
If you want to cook like a pro, you must invest in the essential tools every beginner needs. You need cookware that holds onto heat like a vault.
- Carbon Steel: The darling of professional restaurant kitchens. It is relatively lightweight, builds a natural, non-toxic non-stick patina over time, and can handle blistering heat without warping or off-gassing.
- Cast Iron: The undisputed king of thermal mass. It takes a while to heat up, but once it is hot, it stays hot, delivering a devastatingly perfect, uninterrupted sear.
- Heavy-Clad Stainless Steel: Indestructible, non-toxic, and perfect for building a fond (the caramelized brown bits left in the pan) to make pan sauces.
Throw the scratched Teflon in the garbage. Your health, and your steaks, deserve better.
Step-by-Step Execution: Searing Like a Pro in a Home Kitchen
Alright, you have your 0.5% baking soda-washed, thoroughly dried protein. You have a heavy, non-toxic pan. Let’s put the theory into practice and master simple weeknight dinners with ruthless efficiency.
1. Temperature Control and the Leidenfrost Effect
Place your stainless steel or carbon steel skillet on the burner over medium-high heat. Do not add oil yet. Let the dry pan heat up for about two to three minutes. To test if it is ready, flick a few drops of water into the pan. If the water sizzles and immediately evaporates, the pan is too cold. If the water forms into perfect little mercury-like beads that glide and dance across the surface without evaporating, you have achieved the Leidenfrost effect. The pan is perfectly heated (usually around 350°F to 375°F). This is how a complete newbie stopped burning dinner and started controlling heat like a chef.
2. The Right Lipid
Now, add your fat. Because we are cooking at high temperatures, you must use an oil with a high smoke point. Extra virgin olive oil will burn, smoke out your kitchen, and taste like battery acid. Instead, use avocado oil, grapeseed oil, or clarified butter (ghee). You only need enough to lightly coat the bottom of the pan—we are searing, not deep frying.
3. The Drop and the Patience
Carefully lay your meat into the pan, laying it away from you so any hot oil splatters toward the back of the stove, not onto your shirt. Once the meat is down, do not touch it. Do not poke it, do not prod it, and for the love of all things holy, do not press down on it with a spatula (you are just squeezing out the juices!).
Because you used the 0.5% baking soda wash, the alkaline surface will rapidly accelerate the Maillard reaction. You will notice the edges turning golden brown much faster than usual. After 2 to 3 minutes, gently slide a thin metal spatula under the edge. If it releases easily and reveals a deep, mahogany crust, flip it. If it feels stuck, give it another 30 seconds; meat naturally releases from the pan once the crust is fully formed.
Advanced Applications: Vegetables, Baking, and Beyond
The beauty of understanding the chemistry of the Maillard reaction is that it applies to almost everything in the kitchen, not just meat. Once you grasp the power of pH manipulation, you can use it to speed up incredibly tedious kitchen tasks.
Take caramelized onions, for example. Traditional caramelized onions require 45 to 60 minutes of low-and-slow babysitting to allow the natural sugars to break down and brown. But if you add a tiny pinch (about 1/4 teaspoon per pound of onions) of baking soda to the pan, the alkaline environment accelerates the breakdown of the pectin in the onion walls and supercharges the Maillard reaction. You can achieve deeply sweet, jammy, dark brown onions in half the time. Just be careful not to add too much, or they will turn to mush.
This alkaline science is also the secret behind traditional baking techniques. Why do pretzels and authentic bagels have that distinct, dark brown, glossy, chewy crust? Because before baking, the dough is boiled in an alkaline bath. Commercial bakeries use food-grade lye (sodium hydroxide, which is highly basic), but home bakers can achieve a very similar result by boiling their dough in water heavily spiked with baking soda. The high pH of the bath alters the surface of the dough, allowing the proteins and sugars to react violently in the oven, creating that iconic color and flavor.
Whether you are trying to impress your family or figure out how to host a meaningful dinner party without spending eight hours chained to the stove, understanding these scientific shortcuts gives you absolute control over your timing and results.
Common Pitfalls and the “Metallic Taste” Warning
Before I set you loose to experiment, I need to reiterate the boundaries of this technique. Science is only magic when you follow the rules.
Do Not Confuse Baking Soda with Baking Powder:
This is a fatal error. Baking soda (sodium bicarbonate) is a pure base. Baking powder is a mixture of baking soda, cornstarch, and a powdered acid (like cream of tartar or monocalcium phosphate). If you use baking powder, the acid will neutralize the base the moment it hits the water, rendering the entire pH-altering process completely useless. You will just be soaking your meat in salty, starchy water.
Do Not Skip the Rinse and Dry:
I mentioned this earlier, but it bears repeating. The baking soda is a catalyst, not a seasoning. If you leave a heavy concentration of alkaline water on the meat, it will taste like you accidentally dropped a battery in your skillet. Rinse it lightly, dry it aggressively.
Respect the Ratios:
If 0.5% works well, 2% does not work better. More is not more in chemistry. Pushing the pH too high will aggressively denature the proteins on the surface, dissolving them into a slimy paste. Stick to the math. 5 grams of baking soda per 1,000 grams of water.
The Bottom Line
Cooking is not an innate, magical talent bestowed upon a lucky few; it is applied physics, thermodynamics, and chemistry wrapped up in an apron. By understanding that the Maillard reaction demands a specific temperature (280°F – 330°F), that water is the ultimate enemy of heat transfer, and that a precise 0.5% alkaline wash can artificially lower the activation energy required for browning, you completely remove the guesswork from your cooking.
You no longer have to cross your fingers and hope for a good crust. You don’t have to suffer through dry, overcooked chicken because you were desperately waiting for it to brown. Armed with a little bit of baking soda, a heavy pan, and a respect for the science, you can manipulate the structural reality of your food. So throw out the peeling Teflon, mix up your alkaline brine, and go show your kitchen who is boss. Happy cooking.


