
Let us get one thing straight right out of the gate: you do not need a culinary degree, a commercial flat-top griddle, or a Wagyu beef budget to make a mind-blowing burger in your own kitchen. What you do need is a basic understanding of physics and a willingness to stop making the same rookie mistakes that turn your dinner into a structural disaster.
We have all been there. You spend your hard-earned money on a beautiful blend of ground beef. You meticulously form perfectly flat, picturesque discs. You gently lay them into a screaming hot skillet, dreaming of that perfect diner-style crust. But within three minutes, a horrifying transformation occurs. The edges seize up, the center balloons toward the ceiling, and your beautiful flat patty has suddenly morphed into a bloated, swollen meatball.
This convex anomaly is a logistical nightmare. It ruins your meat-to-bun ratio. It turns the simple act of stacking toppings into a balancing act, where your tomato slices and pickles inevitably slide off the domed peak of the meat and crash onto your plate. If you are tired of watching your beautifully formed burgers always shrink into thick pucks the moment they hit the heat, you are in the right place.
Today, we are going to dive deep into the biological tug-of-war that happens when raw meat meets high heat. More importantly, I am going to teach you a foolproof, zero-cost physical prep trick—the magic of a simple thumbprint—that will permanently eliminate this kitchen frustration. Pour yourself a glass of wine, grab your ground chuck, and let us fix your burgers once and for all.
The Science of the Swell: Why Flat Patties Turn Into Meatballs
To understand why the thumbprint trick works, we first have to understand why your burger is rebelling against you in the first place. Cooking is not just an art; it is applied thermodynamics and biochemistry. When you place a raw patty into a hot pan or onto a grill, you are initiating a violent chain reaction within the cellular structure of the meat.
The Breakdown of Muscle Proteins
Ground beef is primarily composed of muscle tissue, which consists of water, fat, and two highly reactive proteins: myosin and actin. These proteins are wrapped in sheaths of connective tissue known as collagen. When these components are subjected to heat, they do not just sit there passively—they react, denature, and contract.
Around 120°F (50°C), the protein myosin begins to denature and unfold. This is the stage where your meat transitions from a translucent red to an opaque pinkish-gray. At this point, the meat is still relatively tender and holds onto its moisture.
However, the real chaos begins when the internal temperature crosses the 150°F (65°C) threshold. At this exact temperature, the second protein, actin, begins to break down. This triggers a violent, irreversible contraction of the muscle fibers. The proteins tightly coil and shrink, acting like a sponge being ruthlessly wrung out, which forces the internal moisture and rendered fat to flee the structure.
The “Tightening Belt” Effect
Here is where the geometry of your burger patty becomes your worst enemy. Heat transfer is not instantaneous across the entire mass of the meat. Whether you are cooking in a skillet or on a backyard grill, the heat attacks the exterior of the patty first. The outer perimeter of your burger reaches that critical 150°F threshold much faster than the insulated, raw center.
As the edges of the patty cook, those actin proteins violently contract. The perimeter of the burger literally tightens like a belt being pulled two notches too far. Because the center of the patty is still relatively raw, pliable, and full of expanding juices, it has to go somewhere. With the edges constricting inward, the path of least resistance for the center of the meat is straight up. The tightening edges force the middle to bulge, resulting in that dreaded, swollen meatball shape.
This effect is actually magnified when you cook on a grill or in an oven. In a skillet, the heat is primarily conductive, coming strictly from the bottom. On a grill, the ambient convection heat cooks the sides of the burger simultaneously with the bottom, accelerating the edge-shrinkage and making the center puff up even faster.
The Magic of the Thumbprint: Engineering a Structural Void
So, how do we outsmart the biological contraction of muscle proteins? We use basic engineering. You cannot stop the edges of the meat from cooking faster than the center, and you cannot stop the proteins from contracting. But you can control where that displaced meat goes.
Enter the thumbprint trick.
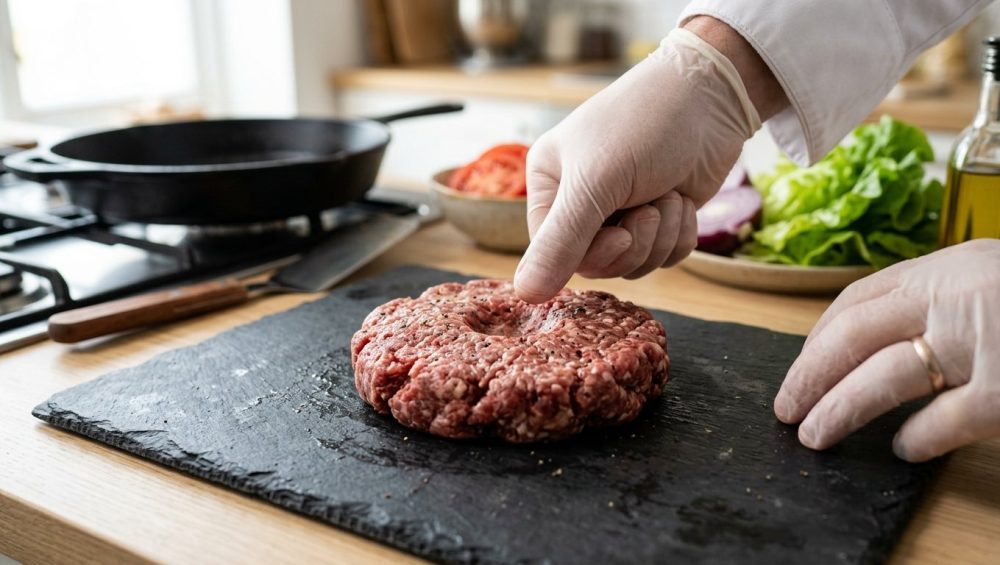
By pressing a distinct dimple into the exact center of your raw burger patty, you are intentionally creating a structural void. You are removing mass from the very place where the meat wants to bulge.
When the patty hits the heat and the perimeter begins its inevitable tightening process, the raw meat in the center is still forced inward and upward. However, instead of protruding above the equator of the burger and creating a dome, the migrating meat simply fills in the dimple you created. The swelling perfectly compensates for the indentation. By the time the burger reaches a beautiful medium or medium-well, the top surface will have leveled out completely, leaving you with a mathematically flat patty that is practically begging to be blanketed in melted cheese.
The Exact Dimensions of the Perfect Dimple
Do not just aggressively poke a hole through your meat like a donut; that will ruin the structural integrity of the patty. You want a gentle, sloping crater.
For a standard half-pound or third-pound pub-style burger, use your thumb (or the back of a measuring spoon if you are squeamish about touching raw meat) to press a wide, shallow depression into the center. The dimple should be about 1.5 inches wide and roughly 1/4 to 1/2 inch deep. The surrounding edges of the patty should look slightly raised, resembling a shallow bowl. It will look ridiculous on your cutting board, but trust the process. The heat will correct the shape entirely.
Meat Selection: The Foundation of a Flat Burger
Before we get to the step-by-step cooking masterclass, we need to have a serious talk about your ingredients. The thumbprint trick is a mechanical fix, but it cannot save you if you are using the wrong meat.
The 80/20 Rule is Non-Negotiable
If you are buying 90/10 or 93/7 lean ground beef to make burgers, I need you to stop immediately. You are setting yourself up for dry, crumbly, flavorless hockey pucks.
Fat is the lifeblood of a good burger. Not only does it provide the rich, beefy flavor we all crave, but it also acts as a crucial internal lubricant during the cooking process. When those muscle fibers contract at 150°F, they need melting fat to coat them and keep the texture tender. If you use ultra-lean beef, the protein contraction is incredibly harsh, and the shrinkage is severely magnified. You will end up with a tiny, dense, chewy puck.
Always buy 80/20 ground chuck. The 20 percent fat ratio is the culinary golden mean. It provides enough fat to render out and create a gorgeous, crispy crust in the pan, while leaving enough internal moisture to keep the burger juicy. If you want to get truly advanced, ask your butcher to grind a custom blend of chuck, short rib, and brisket. The addition of short rib adds an incredibly rich, buttery flavor, while brisket brings a deep, beefy funk.
Temperature Control and Handling: The Cold Hard Truth
The way you handle your ground beef before it ever sees a pan will dictate the final texture of your meal. Ground beef is highly sensitive to both heat and mechanical agitation.
Keep It Ice Cold
The fat in your ground beef needs to stay solid until the exact moment it hits the hot cooking surface. If you let your ground beef sit on the counter for an hour, the ambient temperature of your kitchen (and the heat from your hands as you form the patties) will cause the fat to soften and smear. Smeared fat melts instantly and leaks out into the pan, leaving your burger dry. Keep the meat in the refrigerator until the very second you are ready to form the patties.
Do Not Overwork the Meat
Ground beef is not bread dough. Do not knead it, squeeze it, or aggressively pack it together. Every time you manipulate the meat, you are causing the proteins to cross-link and bind together. If you overwork the beef, you will end up with a dense, bouncy texture that eats more like a breakfast sausage than a tender burger.
Gently scoop up your portion of meat and lightly toss it back and forth between your hands just enough to form a loose ball. Place it on a piece of parchment paper and gently press it into a disc. The edges should look slightly jagged and rustic, not perfectly smooth and machine-pressed.
The Salt Warning
Never mix salt directly into your raw ground beef before forming the patties. We have discussed why salting ground beef too early is a cardinal sin in the kitchen. Salt dissolves muscle proteins, specifically myosin. If you mix salt into the raw meat and let it sit, those dissolved proteins will act like meat glue, binding the patty together into a tough, springy block. You should only season the exterior of the patty, and you should do it mere seconds before the meat hits the hot pan.
The Step-by-Step Masterclass: Forming the Perfect Patty
Let us put it all together into a flawless, repeatable prep routine.
- Portion the Meat: For a classic, thick pub burger, you want about 5 to 6 ounces of meat per patty. Use a digital kitchen scale if you have one. Consistency in size ensures that all your burgers will finish cooking at the exact same time.
- The Gentle Shape: Working quickly with cold hands, gently form the meat into a loose ball, then press it out onto a flat surface lined with parchment or wax paper. Aim for a patty that is roughly 3/4 of an inch thick and about half an inch wider than your hamburger buns. (Remember, even with the thumbprint, the overall diameter of the burger will shrink slightly as the fat renders).
- The Magic Dimple: Press your thumb directly into the center of the patty to create a 1/2-inch deep crater.
- The Chill: If your kitchen is warm or your hands took too long, place the formed patties back in the fridge for ten minutes to firm up the fat.
- The Cleanup: Raw meat prep is messy. Always use a bench scraper to clean your cutting board and gather up any stray bits of fat. If you don’t have one, you desperately need a bench scraper in your life to maintain a sanitary and efficient workspace.
The Searing Phase: Thermodynamics in the Pan
You have engineered the perfect, dimpled patty. Now it is time to cook. This is where I have to strictly enforce my kitchen rules regarding your cookware.
If you are planning to cook these gorgeous, 80/20 chuck patties in a lightweight, scratched, peeling Teflon pan, we cannot be friends. It is time for a brutally honest conversation about banishing toxic kitchen gear from your house. Non-stick pans are chemically incapable of safely reaching the temperatures required to properly sear a burger. If you heat Teflon past 500°F, the coating degrades and releases toxic fumes. Furthermore, they lack the thermal mass required to hold heat.
To get a mind-blowing, restaurant-quality crust, you need the Maillard reaction. This is the chemical process where amino acids and reducing sugars brown under high heat, creating hundreds of complex, savory flavor compounds. To achieve this, you must use a heavy cast-iron skillet, a carbon steel pan, or a high-quality multi-clad stainless steel skillet. These materials hold massive amounts of thermal energy and will not drop in temperature when the cold meat hits the surface.
Prepping the Pan
Place your cast-iron or stainless steel skillet over medium-high heat and let it preheat thoroughly. Do not use aerosol cooking sprays. The chemical propellants in aerosol cooking spray is the enemy of a good sear, as they polymerize onto the edges of your pan and create an un-scrubbable, sticky brown residue. Instead, use a teaspoon of high-smoke-point oil, like avocado oil, beef tallow, or clarified butter.
If you are using stainless steel, perform the water drop test to ensure your pan is perfectly preheated. Flick a tiny drop of water into the skillet. If it sizzles and evaporates instantly, the pan is too cold. If it shatters into a dozen tiny beads, it is too hot. If the water forms a single, perfect bead of mercury that glides effortlessly across the surface (the Leidenfrost effect), your pan is ready.
The Sizzle of Sadness: Do Not Press Your Burgers!
Once your pan is screaming hot, season the top side of your dimpled patty generously with kosher salt and freshly cracked black pepper. Gently lay the patty into the pan, seasoned side down. Immediately season the top side facing you.
Now, step back and do absolutely nothing.
The single biggest, most tragic mistake home cooks make is taking a spatula and pressing down hard on the top of the cooking burger. People hear the aggressive sizzle that follows the press and they think they are doing something right. I call this the Sizzle of Sadness. That sound is not magic happening; it is the sound of your burger’s precious internal moisture and rendered fat violently boiling away into the atmosphere. You are literally wringing the flavor out of your dinner and leaving it on the bottom of the pan.
If you used the thumbprint trick, you will never feel the urge to press the burger to flatten it, because the dimple is already doing the work for you. Let the heat do its job.
The Smashburger Exception: When the Dimple Does Not Apply
Before we move on to flipping, I must address the elephant in the room: the smashburger.
Everything I have taught you today applies to thick, pub-style burgers (anything thicker than half an inch). If you are making smashburgers—where you place a round ball of meat into a blazing hot skillet and use a heavy trowel to obliterate it into a paper-thin lacey disc—you do not need a thumbprint.
Why? Because the mechanics of a smashburger completely bypass the “tightening belt” effect. When you smash a burger down to a quarter-inch thickness, the heat transfers through the entire mass of the meat almost instantaneously. There is no thick, insulated, raw center left to be pushed upward by contracting edges. The entire patty cooks in about 90 seconds, rendering the dimple trick completely unnecessary. But for those weekend backyard grill-outs where you want a thick, juicy, medium-rare pub burger, the thumbprint is mandatory.
Managing the Flip and Controlling the Heat
After about three to four minutes, you should see a deep, mahogany-brown crust forming around the bottom edge of the patty. It is time to flip.
When choosing your weapon, leave the floppy tools in the baking drawer. While I love a good odor-free silicone spatula for folding delicate cake batters, keep it far away from your burger pan. You need a stiff, heavy-duty metal spatula with a beveled edge. You want to scrape underneath the patty with authority, ensuring you do not leave that beautiful Maillard crust stuck to the iron.
Flip the burger exactly once.
If you are cooking for a crowd, be incredibly careful not to overcrowd your skillet. If you cram four massive half-pound burgers into a single 10-inch pan, the sheer volume of cold meat will instantly drop the temperature of the pan, meaning your ground beef steams instead of developing a crust. You will be left with gray, boiled meat sitting in a puddle of its own juices. Cook in batches if necessary, and let the pan recover its heat between rounds.
The Cheese Melt and Final Assembly
Your burger is flipped. The dimple has miraculously vanished, leaving you with a perfectly flat, structurally sound patty. You are roughly one minute away from burger perfection. It is time for the cheese.
Please, for the love of all things culinary, avoid the hidden trap of pre-shredded cheese, which is coated in cellulose powder and anti-caking agents. Those starches prevent the cheese from melting smoothly and will leave a grainy, oily texture on top of your beautiful burger. Use a high-quality slice of American cheese (which is unrivaled for its melting capabilities thanks to sodium citrate), sharp cheddar, or pepper jack sliced fresh from the block.
Place the cheese on the flat top of your burger. To get that perfect, gooey, enrobed melt that you see in restaurant commercials, you need steam. Splash a tablespoon of water directly onto the hot surface of the pan (away from the meat) and immediately cover the burger. You absolutely need a stainless steel melting dome to trap the steam, which will melt the cheese into a glossy blanket in exactly 30 seconds without overcooking the beef below it.
Finally, pull the burger from the pan and let it rest for two minutes on a wire rack. Just like a steak, the muscle fibers need a moment to relax and reabsorb their juices. While the meat rests, toast your buns in the leftover beef fat in the skillet. A perfectly flat, juicy burger deserves a sturdy, toasted foundation.
Troubleshooting Your Burger Disasters
Even with the thumbprint trick, things can occasionally go sideways if you ignore the fundamentals. Here is a quick diagnostic guide to fixing common burger failures:
“My burger still puffed up!”
If your patty still turned into a meatball, your dimple was not deep enough, or you formed your patty too thick. A 1-inch thick patty needs a very pronounced, 1/2-inch deep crater. Next time, press a little harder. Do not be shy.
“My burger cracked and fell apart in the pan!”
This is a classic sign of two possible errors. Either your pan was too cold, causing the meat to stick and tear when you tried to flip it, or you flipped it too early before the crust could fully form and bind the bottom together. Alternatively, your meat mix was too lean. Remember: 80/20 chuck.
“My burger is tough and chewy!”
You overworked the meat. If you tightly packed the ground beef like you were packing a snowball for a winter war, you cross-linked the proteins. Next time, use a lighter touch. Form the patty just enough so it holds together, and let the heat do the rest.
“How do I know when it is actually done without cutting it open?”
Never cut your burger open in the pan to check the color! You will bleed out all the juices. Invest in a high-quality, instant-read digital meat thermometer. Insert the probe horizontally into the side of the patty to reach the dead center. The FDA recommends cooking ground beef to 160°F (71°C) for instant bacterial death. However, if you are grinding your own fresh, high-quality whole cuts of beef at home and practicing impeccable sanitation, many chefs prefer to pull their burgers at 135°F (57°C) for a juicy medium-rare. The choice is yours, but use a thermometer to make it an informed one.
Cooking an incredible burger at home does not require expensive gadgets or a culinary degree. It requires respecting the ingredients, understanding how heat interacts with protein, and using simple, smart techniques like the thumbprint to outsmart the physics of the pan. Now get off the internet, go preheat your cast-iron skillet, and make the best burger of your life. You’ve got this.






