
Picture this: It is a beautiful Saturday afternoon. You have done everything right. You went to the specialty grocer and dropped an embarrassing amount of money on a wedge of authentic, aged Parmigiano-Reggiano. You secured a pristine bunch of sweet, fragrant basil that practically smells like an Italian summer. You shelled out for the good pine nuts—the ones that require a small personal loan—and you proudly unscrewed a bottle of premium, cold-pressed extra virgin olive oil.
You toss all of these glorious, expensive ingredients into your trusty food processor. You hit the pulse button. The machine roars to life, violently spinning at 20,000 revolutions per minute. In ten seconds flat, you have a bright green sauce. You dip a spoon in, bring it to your lips, and taste it.
It is incredibly, overwhelmingly, aggressively bitter. It tastes sharp, metallic, and vaguely reminiscent of battery acid.
You stare at the machine in betrayal. You didn’t burn anything. You followed the recipe to the letter. So why does your expensive homemade sauce taste like a culinary disaster?
Let’s skip the poetic waxing about my summer in Genoa and get straight to the food science. You didn’t do anything wrong with your ingredients, but your equipment betrayed you. The modern food processor is a violent, indiscriminate machine that absolutely destroys the delicate chemical structures of fresh herbs and high-quality oils.
If you want to stop ruining your weekend cooking projects and actually extract the sweet, floral, mind-blowing flavors that these ingredients are capable of producing, it is time to unplug the machine. It is time to talk about the unmatched, scientifically superior magic of a heavy, unpolished granite mortar and pestle.
The Food Science of Bitter Pesto: What the Blender Does to Extra Virgin Olive Oil
To understand why your sauce turned into a bitter sludge, we have to put extra virgin olive oil (EVOO) under a microscope.
Unlike neutral cooking fats such as canola or vegetable oil, extra virgin olive oil is essentially a fresh, unrefined fruit juice. Because it is cold-pressed and untreated by chemical solvents, it retains a massive payload of natural antioxidants known as polyphenols. The two most prominent polyphenols in EVOO are oleuropein and oleocanthal. These compounds are incredibly healthy—they possess potent anti-inflammatory properties and protect the oil from spoiling.
There is just one problem: polyphenols taste absolutely awful. They are highly astringent and aggressively bitter.
So, why doesn’t high-quality olive oil taste bitter when you pour it directly out of the bottle and dip a piece of bread into it? In its natural, undisturbed state, the bitter polyphenols are safely suspended inside tiny microscopic bubbles, completely coated and shielded by protective fatty acids. When you eat the oil, these fatty acids coat your tongue, effectively masking the bitter compounds from your taste receptors.
Enter the high-speed food processor. This machine is the hidden trap of the blender because of how it physically interacts with liquids. When you turn on a blender or food processor, the metal blades do not just mix the ingredients; they subject the olive oil to extreme mechanical shearing. The blades violently rip the oil droplets apart, breaking them down into millions of microscopic fragments.
This hyper-agitation completely strips away the protective fatty acid coatings, ejecting the naked, bitter polyphenols directly into your sauce. The smaller the oil droplets become, the more surface area is exposed, and the more overwhelmingly bitter the final emulsion tastes.
Furthermore, the vortex created by the spinning blades acts like a tornado, whipping massive amounts of oxygen directly into the oil and the herbs. This rapid aeration triggers an immediate oxidative cascade, causing the oil to degrade and develop harsh, metallic off-notes that mimic early rancidity. You aren’t just making a sauce; you are chemically degrading your expensive ingredients in real-time.
The Anatomy of Basil: Slicing vs. Crushing
The olive oil is only half of the tragedy. We also need to examine what the food processor does to your fresh basil.
Basil is a highly delicate herb belonging to the mint family. Its iconic flavor—a complex, intoxicating blend of sweet, peppery, anise, and clove notes—comes from a specific cocktail of volatile essential oils, primarily linalool, eugenol, and methyl chavicol. These essential oils are securely locked away inside the microscopic cellular walls of the plant’s leaves.
When you use a food processor, the razor-sharp metal blades cleanly slice and chop the basil leaves. While this might seem efficient, slicing cleanly severs the cell walls, causing the plant to rapidly hemorrhage an enzyme called polyphenol oxidase. When this enzyme meets the oxygen being whipped into the bowl by the blender’s vortex, it triggers rapid enzymatic browning. Your bright, vibrant green leaves almost instantly oxidize into a dull, swampy, brownish-green sludge.
But the tragedy doesn’t stop at the color. Because the blades slice rather than press, those precious, volatile essential oils (the linalool and eugenol) are aggressively aerosolized. They evaporate into the air inside the blender jar rather than binding to the sauce. You get a kitchen that smells fantastic, but a sauce that tastes surprisingly flat and grassy. This is the exact same reason why you might notice your kitchen knives get dull when you aggressively chop herbs on a hard bamboo board; improper slicing mechanics destroy both the tool and the ingredient’s cellular integrity.
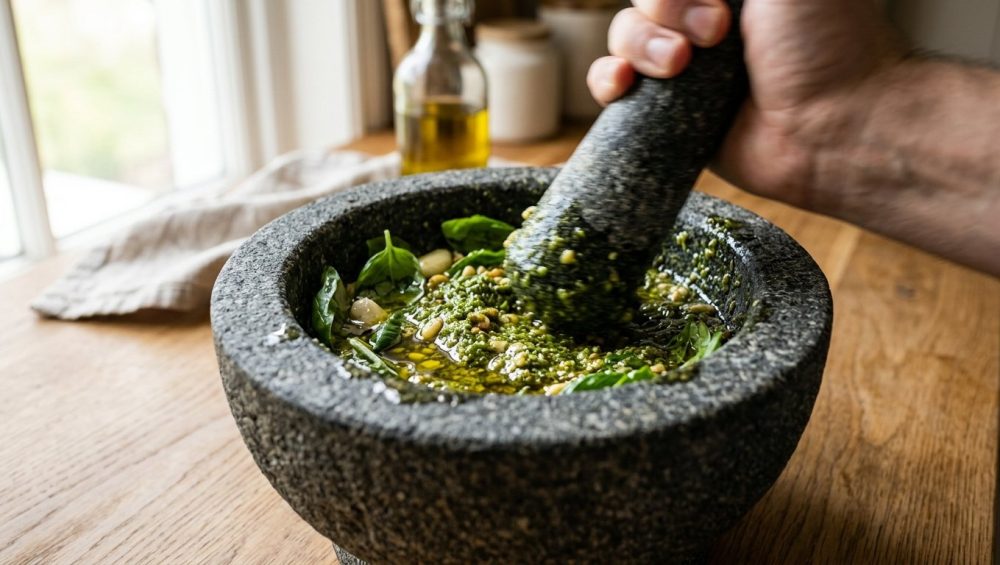
When you use a mortar and pestle, however, you are not slicing. You are crushing, bruising, and grinding. The heavy, abrasive stone gently bursts the plant cells open, massaging the essential oils directly out of the leaves and trapping them in the surrounding fat (the pine nuts and cheese). This grinding motion prevents the rapid oxidation caused by metal shearing, preserving the vibrant, electric green color of the basil and keeping the sweet, floral flavors locked directly into the paste.
Why the Granite Mortar and Pestle is Scientifically Superior
If you want to extract the maximum amount of flavor from your ingredients without chemically destroying them, you must rely on friction and gravity rather than high-speed motorized shearing. This is why a heavy, unpolished granite mortar and pestle is one of the essential tools every beginner needs to transition from a stressed-out cook to a confident kitchen artisan.
The mortar and pestle is arguably the oldest culinary tool in human history, dating back to 35,000 BC. But we don’t use it just because it looks rustic and authentic; we use it because the physics of the tool are flawless.
When you pound and grind ingredients between two pieces of heavy stone, you are breaking them down at the cellular level. The sheer weight of a solid granite pestle does the majority of the work for you. You do not need to exert exhausting physical force; you simply let gravity and the mass of the stone crush the ingredients.
But why granite specifically? The secret lies in the texture. Unpolished granite is incredibly dense and has a naturally coarse, abrasive interior. This micro-texture acts like thousands of tiny, microscopic teeth. When you drag a garlic clove or a basil leaf across this rough surface, the friction effortlessly shreds the ingredient into a fine, creamy paste.
Furthermore, granite is highly impermeable. Unlike softer stones or wood, high-quality granite will not absorb the pungent oils of garlic or the intense pigments of fresh herbs. Once properly cleaned, it resets completely, ensuring that your delicate pine nut and basil emulsion doesn’t taste like the spicy cumin rub you ground up three days prior.
The “No-Go” Zone: Kitchenware You Need to Throw Away
As a home cook, your time and your ingredients are too valuable to waste on terrible equipment. I have a strict, zero-tolerance policy when it comes to banishing toxic kitchen gear and useless novelty tools from the kitchen. If you are going to invest in a mortar and pestle, you must avoid the following traps at all costs:
1. Cheap, Polished Marble
During the pandemic, aesthetic, bright white polished marble mortar and pestle sets flooded the market. They look beautiful on a kitchen island, but they are functionally terrible for serious cooking. Polished marble is far too smooth inside; ingredients will simply slide and chase each other around the bowl rather than catching and grinding. Furthermore, marble is a soft, highly reactive stone. If you grind anything acidic in it (like lemon juice or tomatoes), the acid will literally eat away at the calcium carbonate in the marble, causing severe pitting, etching, and eventual cracking.
2. Wooden Mortars
Wooden mortars are beautiful, but wood is a highly porous, organic material. It acts like a sponge. If you pound garlic, chilies, or heavily spiced curry pastes into a wooden mortar, those volatile oils will permanently embed themselves into the grain. Unless you want every single thing you make to taste like a confusing, muddy blend of last month’s dinners, keep wood out of the equation.
3. Stainless Steel
Stainless steel mortars are incredibly durable, but they suffer from the exact same problem as polished marble: zero friction. You will spend twenty minutes angrily chasing a single peppercorn around the shiny bowl. It is an exercise in utter futility.
4. The Garlic Press
While we are discussing tools that ruin your food, let’s address the elephant in the room. The garlic press makes food bitter for the exact same scientific reason that the food processor ruins basil. When you force a raw garlic clove through the tiny metal extruders of a press, you are violently crushing and tearing the cell walls, which causes a massive, instantaneous release of allicin—the defense compound that gives garlic its sharp, burning, acrid flavor. By gently pounding garlic with coarse salt in a granite mortar, you coax out a sweet, mellow, deeply aromatic paste that melts seamlessly into your sauce.
The Masterclass: How to Make Authentic Pesto in a Mortar and Pestle
The word pesto literally translates to “pound” or “crush” in Italian. It is not a recipe; it is a technique. Once you understand the mechanics of building this sauce step-by-step, you will realize that it is an incredibly forgiving, deeply satisfying process.
Do not be intimidated by the elbow grease. The entire process takes about ten minutes, and the sensory experience—the smell of the blooming basil, the creamy texture of the nuts, the rich aroma of the cheese—is worth every single second.
Step 1: The Abrasive Base (Garlic and Salt)
Begin by dropping one or two peeled garlic cloves into your heavy granite mortar. Add a generous pinch of coarse sea salt. Do not use fine table salt; you need the large, jagged crystals of the sea salt to act as a grinding abrasive.
Take your pestle and firmly pound the garlic with an up-and-down motion. The salt will catch the garlic against the rough granite, tearing it down. Within thirty seconds, the garlic and salt will transform into a sticky, translucent, highly aromatic paste.
Step 2: The Creamy Binder (Pine Nuts)
Next, add a handful of pine nuts. (Note: While we highly recommend blooming them in oil or dry-toasting them in a skillet for other dishes to enhance their nutty flavor, traditional Genovese pesto often relies on raw, sweet pine nuts to provide a creamy, buttery base. You can lightly toast them if you prefer a deeper flavor, but let them cool completely before grinding).
Using a circular, grinding motion, crush the pine nuts into the garlic paste. Press the pestle firmly against the sides of the bowl. The natural fats in the nuts will release, binding with the garlic to create a rich, beige cream.
Step 3: The Green Gold (Basil)
Now comes the star of the show. Make sure your basil leaves are completely dry; excess water is the enemy of a good emulsion and will cause your fresh herbs turn to slime before they even hit the bowl.
Add the basil leaves a handful at a time. Crucial Rule: Do not pound the basil. Pounding will just bruise it into a watery mess. Instead, press the nose of the pestle firmly against the bottom of the bowl and grind in a continuous, sweeping circular motion against the abrasive granite walls.
You are smearing the leaves against the stone, gently tearing the cell walls open. You will immediately notice the intoxicating, sweet aroma filling your kitchen—that is the linalool and eugenol releasing into the paste, rather than evaporating into the air. Keep grinding until the leaves break down into a vibrant, electric green paste. Repeat this process until all your basil is incorporated. This methodical, unhurried process is how you actively avoid the rookie kitchen mistakes that result in separated, watery sauces.
Step 4: The Umami (Cheese)
Once your basil is fully broken down, it is time to add the cheese. Traditional recipes call for a blend of aged Parmigiano-Reggiano and a sharper, saltier Pecorino (like Fiore Sardo or Romano). The cheese acts as a sponge, soaking up the essential oils and providing the structural backbone of the sauce.
Grate the cheese as finely as possible before adding it to the mortar. Use the pestle to gently fold and stir the cheese into the green paste until it is completely homogenized.
Step 5: The Liquid Gold (Olive Oil)
The final step is the most critical. You must add the extra virgin olive oil slowly. Drizzle a small amount into the mortar and use the pestle to gently stir and fold the mixture together.
Because you are using a gentle stirring motion rather than high-speed motorized shearing, the oil droplets remain intact. The bitter polyphenols stay safely locked inside their fatty acid shields. The oil seamlessly emulsifies with the crushed pine nuts and cheese, creating a thick, luxurious, velvety sauce that is sweet, herbaceous, and entirely devoid of bitterness.
(And as a quick aside: please ensure you are using fresh, high-quality EVOO. If your oil is rancid before you even start, no amount of technique will save it. Stop ruining your olive oil by storing it in a clear glass bottle directly next to the heat of your stove. Light and heat are the enemies of good oil).
Care, Maintenance, and Curing Your Granite
If you have finally decided to invest in a heavy, unpolished granite mortar and pestle, you cannot simply take it out of the box and start making dinner. Because the interior is unpolished, a brand-new granite mortar is covered in microscopic stone dust and loose grit from the manufacturing process. If you skip the curing process, your first batch of food will be unpleasantly gritty.
The Curing Process
To cure your new tool, pour a handful of dry, raw white rice into the bowl. (Do not use brown rice or parboiled rice; it must be hard, raw white rice). Use the pestle to forcefully grind the rice into a fine powder.
As you grind, the abrasive rice will act like sandpaper, knocking off any loose stone particles and smoothing out the harshest irregularities in the granite. When you check the rice powder, you will likely notice that it has turned a dull, ashy gray color. That gray color is the stone dust. Dump the powder out, wipe the bowl with a dry cloth, and repeat the process with a fresh handful of rice. Continue doing this until the ground rice powder remains stark, pure white.
Once the rice powder is white, your mortar is cured. Give it a final rinse, and it is ready for a lifetime of use.
Cleaning Your Granite (The Golden Rule)
Never, under any circumstances, use soap to clean your unpolished granite mortar and pestle.
Granite is a porous stone. If you scrub it with dish detergent, the stone will absorb the chemical perfumes and surfactants. The next time you try to grind fresh herbs, your sauce will taste distinctly like artificial lemon and soap.
To clean the mortar, simply rinse it under warm water immediately after use. Use a stiff-bristled kitchen brush (kept specifically for this purpose, free of soap) to scrub away any stuck-on bits of food. If you have ground something particularly pungent, like a heavy garlic and chili paste, you can grind a small handful of dry white rice to pull the residual oils out of the stone, or scrub the interior with a paste of warm water and baking soda.
Always thoroughly towel-dry the mortar and let it sit out on the counter to air-dry completely before storing it away. Trapped moisture inside the porous stone can lead to mold and mildew.
The Ultimate Dinner Party Trick
Cooking should not always be about rushing to get food on the table in record time. While weekday meals require efficiency, the weekend is a time to slow down, pour a glass of wine, and actually enjoy the tactile, sensory experience of preparing a meal from scratch.
Bringing a massive, heavy stone mortar out onto the kitchen island is an incredible conversation starter. It is the absolute perfect way to host a mindful pesto night. When you have guests over, pour some drinks, set out the ingredients, and let everyone take a five-minute turn at the pestle. Not only does it save your arm from doing all the work, but it transforms the act of cooking into a communal, engaging event. Your guests will be infinitely more invested in the meal when they have physically helped crush the basil and release those incredible aromas into the room.
The Final Word
Yes, using a granite mortar and pestle takes ten minutes of manual labor, whereas a food processor takes ten seconds. But the difference in flavor, texture, and color is not just noticeable; it is a profound culinary revelation.
By understanding the basic food science of how high-speed metal blades shear the polyphenols in olive oil and vaporize the essential oils in fresh basil, you empower yourself to make better choices in the kitchen. You do not need a Michelin star or a degree from Le Cordon Bleu to make mind-blowing, world-class food in your own home. You just need to respect the ingredients, ditch the aggressive machinery, and let the heavy stone do what it has been doing perfectly for thousands of years.
Grab your basil, grab your garlic, and get to grinding. Your pasta will thank you.






