
Listen up, weekend culinary warriors. I need you to put down that plastic jar of dusty, pre-ground cumin and step away from the simmering pot of watery chili. We need to have a very serious, brutally honest conversation about a literal crime against flavor that is happening in your kitchen right now. As a busy professional who has burned more than her fair share of dinners learning the ropes, I have zero patience for wasted time and ruined ingredients. I firmly believe that anyone can cook like a seasoned expert without a pretentious culinary degree, but to do that, you have to stop making rookie mistakes that sabotage your meals before they even hit the plate.
Today, we are going to dive deep into a transformative, 60-second cooking hack that will completely change the trajectory of your weeknight dinners and your elaborate weekend feasts. We are going to talk about the hard science of blooming your spices in hot oil.
The Crime Against Flavor Occurring in Your Kitchen Right Now
Picture this entirely too common scenario: You are making a weeknight chicken stew or a hearty vegetarian chili. You spend thirty minutes meticulously chopping onions, mincing garlic, and browning your proteins. You pour in your crushed tomatoes or your chicken broth, bring the whole pot to a gentle simmer, and then you reach for your spice rack. You measure out a tablespoon of curry powder, a dash of paprika, and a pinch of cayenne, and you dump those raw, dry powders straight into the bubbling liquid. You stir it in, pat yourself on the back for cooking at home, and wait twenty minutes.
But when you finally sit down at the table and take that first bite, the flavor is just… flat. It tastes like tomato sauce with a hint of spicy sawdust. The dish is entirely one-dimensional. This is exactly why your spices taste bland despite you following the recipe’s measurements to the absolute letter. You have fundamentally misunderstood how flavor molecules operate.
The Anatomy of a Sad, Watery Curry
When you add dry, raw spices directly to a water-based liquid, you are essentially trapping their potential in a watery grave. Water is an incredibly poor solvent for the vast majority of aromatic compounds found in culinary spices. Furthermore, water boils at 212°F (100°C). While that might seem hot enough to cook your food, it is nowhere near hot enough to shatter the tough, microscopic cellulose structures of plant cells or fully volatilize the essential oils locked inside.
It is the culinary equivalent of trying to dissolve a thick wax candle in a glass of cold tap water. It physically cannot work. The spices just hydrate into a gritty paste, leaving you with a dish that tastes muddy and raw.
Why Your Spice Rack Deserves Better
Spices are incredibly expensive. If you are going to spend your hard-earned money on high-quality cardamom pods, smoked paprika, and turmeric, you owe it to yourself to extract every single ounce of flavor from them. And let’s be real for a second: most of you have jars of spices sitting in your pantry from three apartments ago. If they sit on that shelf long enough to turn into hard bricks, you have already lost the battle. But even with relatively fresh, high-quality spices, failing to bloom them means you are leaving up to 90% of their flavor locked tightly inside the jar. As a home cook who values efficiency, I consider that a massive, unforgivable waste of both time and money.
The Hard Science Behind Fat-Soluble Flavor Compounds
If you want to cook like a pro, you need to understand the basic science of your ingredients. We are going to get a little nerdy for a second, because understanding the “why” behind the food is what separates the clueless from the confident.
Water-Soluble vs. Fat-Soluble: A Chemistry Lesson for Hungry People
The unique flavor profiles of your favorite spices are determined by very specific, complex chemical compounds. For example, curcumin is the organic chemical that gives turmeric its earthy flavor and vibrant, staining yellow color. Cuminaldehyde gives cumin its warm, nutty, taco-night aroma. Piperine provides the sharp, pungent bite in black pepper, and capsaicin delivers the fiery heat in chili powders.
Here is the critical, mind-blowing piece of information that most recipes fail to mention: almost all of these essential flavor compounds are lipophilic, which is a fancy scientific term meaning they are fat-soluble, not water-soluble.
What does this mean for your Tuesday night dinner? It means these molecules physically cannot dissolve, disperse, or express themselves effectively in a water-based medium like broth or crushed tomatoes. In fact, clinical medical studies on the bioavailability of curcumin have shown that when it is ingested orally without the presence of a fat or an emulsifier, up to 90% of it is simply excreted by the human body because it cannot be absorbed into the bloodstream.
However, when you introduce these spices to hot fat—like olive oil, ghee, or avocado oil—the lipid molecules instantly bind to the flavor compounds. The hot fat acts as a master key, unlocking the essential oils from the plant fibers and carrying them evenly throughout your entire dish.
The Thermodynamics of Essential Oils
Temperature plays an equally vital role in this flavor extraction process. As I mentioned earlier, water caps out at 212°F (100°C) before it turns into steam. Cooking fats and oils, on the other hand, can easily be heated to 350°F (175°C) or higher without breaking a sweat.
When dry spices hit hot, shimmering oil, the intense thermal energy rapidly expands the volatile essential oils trapped within the spice particles. This sudden blast of heat causes the plant’s cell walls to literally burst open, flooding the surrounding lipid matrix with pure, highly concentrated flavor. This thermodynamic process also volatilizes the aromatic compounds into the air, which is the exact reason why your kitchen instantly smells like a five-star restaurant the second your spices hit the hot oil.
The Maillard Reaction’s Cousin: Toasting vs. Blooming
You have probably heard chefs obsess over the Maillard reaction—the complex chemical browning process that makes a seared steak or a toasted marshmallow taste so incredibly savory and deep. Well, spices undergo a very similar transformation when exposed to high heat.
There is a distinct difference between dry toasting and oil blooming. Dry toasting (heating whole spices in a dry skillet with no fat) relies on direct heat to cause Maillard-type browning reactions on the surface of the spice, altering the flavor profile to be more nutty and smoky. However, while dry toasting creates new flavors, it lacks the lipid carrier needed to distribute those flavors into your food. Blooming in hot oil achieves both: the high heat triggers the browning reactions to create hundreds of brand-new, complex flavor molecules, while the fat simultaneously extracts and traps those molecules so they can coat your ingredients.
What Exactly is “Blooming” (And Why Has Nobody Told You)?
While the term “blooming” might sound like trendy, modern chef-speak, this technique is not new. It has been the absolute backbone of global culinary traditions for centuries. If you have been skipping this step, you have been missing out on a world of flavor.
The Global History of Tempering Spices (Tadka, Chhonk, and Sofrito)
In India, this process is known as tempering, and it is the undisputed soul of the cuisine. Depending on the specific region and dialect, this technique goes by many names: tadka or chhonk in North India, thalimpu in Tamil Nadu, vaaghar in Gujarat, and phoron in West Bengal.
In a traditional Indian tadka, whole spices like black mustard seeds, cumin seeds, dried red chilies, and curry leaves are briefly sizzled in hot ghee or oil until they pop, crackle, and release their intense aromas. This highly flavored, aromatic fat is then poured directly over a finished dish, like a pot of simmering dal (lentils), instantly transforming it from a bowl of bland mush into a complex, deeply satisfying culinary masterpiece. The technique is so fundamental that a proper tadka is considered the defining characteristic of authentic Indian home cooking. In Bengali cuisine, a specific five-spice blend called panch phoron (consisting of cumin, brown mustard, fenugreek, nigella, and fennel seeds) is tempered in mustard oil to create an unmistakable, pungent flavor profile.
But it is not just Indian cuisine that utilizes this science. Latin American cooking relies heavily on sofrito—a base of aromatics and spices cooked down slowly in oil to extract fat-soluble flavors. Middle Eastern and Mediterranean cooks routinely sizzle their za’atar, coriander, or Aleppo pepper in olive oil before dressing a dish. The world has known this scientific secret for generations. It is time your home kitchen caught up to the facts.
Whole Spices vs. Ground Spices: The Rules of Engagement
Before we get to the exact methodology, we need to establish the rules of engagement, because not all spices are created equal.
Whole Spices: These are your heavy artillery. Cumin seeds, coriander seeds, whole cardamom pods, cinnamon sticks, cloves, and mustard seeds. Because their physical surface area is much smaller and their volatile oils are protected by an intact, hard outer shell, they can withstand much higher heat and longer cooking times. You can sizzle them in hot oil for 30 to 60 seconds until they literally pop, crackle, or dance in the pan. If you want the absolute best, most vibrant flavor possible, buy whole spices and grind them yourself using a heavy mortar and pestle or a high-quality burr pepper grinder just moments before you intend to bloom them.
Ground Spices: These are your delicate, fragile ingredients. Pre-ground paprika, turmeric, ground cumin, and cayenne pepper have a massive, exposed surface area and are essentially just flavorful dust. If you drop ground spices into screaming hot oil and walk away to check your phone, they will burn, turn black, and become bitterly acrid in a matter of seconds. Ground spices only need a very quick 15 to 30-second swim in warm (not smoking) oil to release their magic.
The Masterclass: How to Bloom Spices Like a Professional (Without the Culinary Degree)
Alright, aprons on. Here is the step-by-step, foolproof method for blooming spices in your own kitchen. This is the ultimate weeknight cooking hack because it takes virtually zero extra time but pays massive, exponential dividends in the final flavor of your food.
Step 1: Choosing the Right Fat (And Ditching the Toxic Pans)
The fat you choose is your flavor carrier, so choose wisely. For traditional Indian dishes, ghee (clarified butter) is the undisputed king because its milk solids have been completely removed, giving it a very high smoke point and a rich, deeply nutty flavor. For Mexican, Mediterranean, or Middle Eastern dishes, a neutral oil like avocado oil, or a robust extra-virgin olive oil works beautifully. Do not use standard, unclarified butter for high-heat blooming; the high water content will cause it to sputter violently, and the milk solids will burn and turn bitter almost instantly.
And let me be brutally, unapologetically clear about your cookware: you cannot execute precision techniques in cheap, scratched, mystery-metal pans. I am extremely passionate about banishing toxic kitchen gear from your home. Heating cheap Teflon or peeling non-stick coatings to the high temperatures required for blooming releases toxic fumes and flakes “forever chemicals” (PFAS) directly into your family’s food. Use a heavy-bottomed, high-quality stainless steel skillet, a carbon steel pan, or a bare cast iron skillet.
Step 2: Temperature Control (The Line Between Bloomed and Burned)
Place your safe, non-toxic pan over medium heat. Add your chosen fat (usually 1 to 2 tablespoons is plenty for a standard family-sized recipe). You are looking for the oil to shimmer—not smoke. If the oil is actively smoking, it is far too hot, and your spices will instantly incinerate on contact. If the oil is completely cold, the spices will just sit there, absorb the oil, and become greasy without extracting any flavor. The sweet spot is a gentle, steady, shimmering heat.
Step 3: Timing the Drop
If you are using whole spices, drop them into the shimmering oil first. Mustard seeds will literally pop like tiny popcorn kernels. Cumin seeds will violently sizzle and turn a shade darker. This usually takes about 30 to 60 seconds.
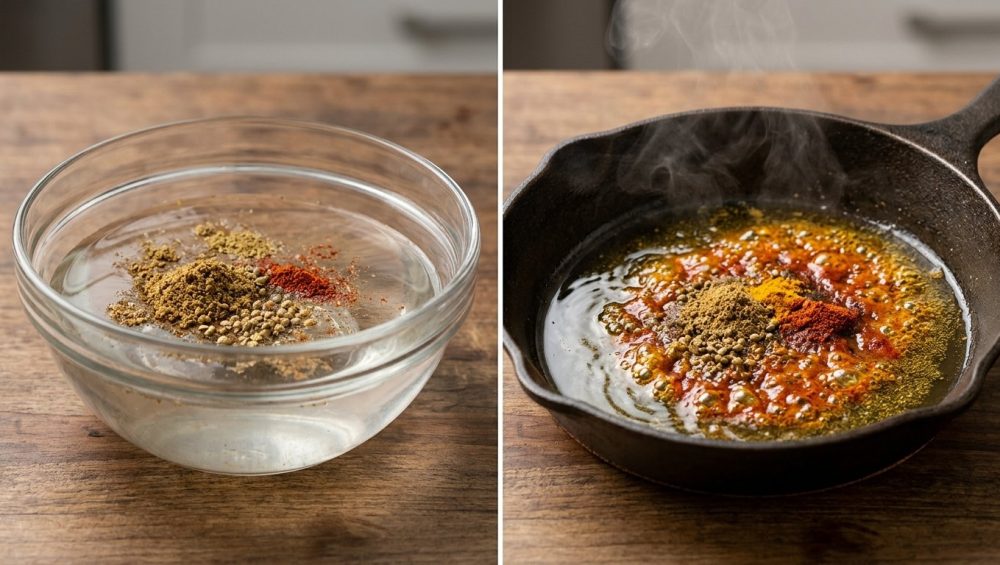
Once your whole spices are fully bloomed, or if you are only using delicate ground spices, pull the pan off the heat for a brief moment, or turn the burner down to medium-low. Add your ground spices (paprika, turmeric, chili powder). Stir constantly with a wooden spoon. You will immediately see the oil take on the vibrant, saturated color of the spices, and your kitchen will smell incredible. This delicate process only takes 15 to 30 seconds.
Step 4: The Quench (Stopping the Cooking Process)
This is the most critical, make-or-break step. Spices can go from perfectly toasted to bitterly burnt in the blink of an eye. You must “quench” the spices to rapidly drop the temperature of the pan and stop the cooking process dead in its tracks.
How do you do this? By immediately adding your moisture-rich aromatics or liquids. This is the exact moment to dump in your diced onions, crushed tomatoes, coconut milk, or broth. The water content in these ingredients instantly lowers the temperature of the oil, saving your spices from burning while simultaneously deglazing all that incredible flavor from the bottom of the pan.
A quick, sassy note on aromatics: please, for the love of all that is holy, stop adding garlic first. Minced garlic burns incredibly fast. Bloom your whole spices, add your onions to quench the pan, let the onions soften for a few minutes, and then add your minced garlic and ground spices right before you add your main liquids.
The “When” and “Where”: Applying the Technique to Your Weeknight Dinners
Now that you understand the chemistry and the physical technique, let’s talk about real-world application. I promise you, once you start incorporating this 60-second step, you will never go back to dumping raw spices into water.
Elevating Monday Night Chilis and Stews
The next time you make a batch of quick weeknight chili, do not just dump your chili powder, ground cumin, and dried oregano into the simmering tomato sauce. Instead, after you have browned your ground beef and sautéed your onions, clear a little hot spot in the center of your heavy pot. Add a tiny splash of oil, dump your dry spices directly into that hot oil puddle, and let them sizzle and foam for 30 seconds before stirring them into the rest of the chili base. The depth, warmth, and complexity of flavor you will achieve is going to blow your mind.
Transforming Basic Curries and Soups
If you are making a quick weeknight curry using a store-bought yellow curry powder or a jarred Thai curry paste, blooming is absolutely mandatory. Heat a tablespoon of coconut oil in your skillet, sizzle the curry powder or paste until it becomes deeply fragrant, slightly darkened, and begins to separate from the oil, and then whisk in your canned coconut milk. The hot fat will extract the fat-soluble curcumin from the turmeric and the piperine from the black pepper, resulting in a rich, velvety, restaurant-quality curry instead of a sad, watery, yellow soup.
The Magic of Blooming for Marinades and Dressings
You do not just have to bloom spices for hot, simmered dishes. If you are making a homemade vinaigrette or a meat marinade, heating your dried spices (like dried oregano, cumin, or red pepper flakes) in the olive oil before whisking it with your vinegar changes the entire molecular profile of the dressing. By blooming them in oil first, you extract the essential oils, creating a deeply infused, incredibly flavorful fat that acts as the robust backbone of your dressing, rather than just having gritty pieces of raw herbs floating in your salad.
The Gear You Need (And the Toxic Junk You Must Throw Away)
As your sassy, fiercely protective culinary guide, I would be failing you if I did not address the massive elephant in the room: your cookware. You cannot execute high-heat, precision cooking techniques like blooming spices in garbage pans.
Ditch the Peeling Non-Stick Nightmares
If you have a lightweight aluminum non-stick pan with a peeling, scratched Teflon coating, throw it in the trash right now. I have absolutely zero patience for cheap cookware that actively poisons your food. When heated past 500°F (which can happen quickly when preheating a pan for blooming), traditional PTFE coatings break down and release toxic polymer fumes.
Furthermore, if you are using those pressurized, aerosol cooking sprays on your non-stick pans, you are completely ruining your nonstick pans. The chemical emulsifiers (like soy lecithin) in those aerosol sprays bake onto the surface at high heat, creating an impenetrable, sticky, polymerized residue that permanently destroys the non-stick properties of the pan. Stop using them.
The Case for Stainless Steel and Carbon Steel Skillets
For blooming spices safely and effectively, you want cookware that offers excellent thermal conductivity, heavy mass to prevent scorching, and a safe, non-toxic cooking surface. A heavy-bottomed, fully clad (tri-ply or 5-ply) stainless steel skillet is absolutely perfect. If you struggle with food sticking to your stainless steel, you do not need a new pan; you just need to learn how to properly preheat it by mastering the water drop test to gauge the correct Leidenfrost temperature.
Alternatively, a well-seasoned, authentic carbon steel wok or skillet is magnificent for blooming spices. The dark, naturally polymerized surface of carbon steel can effortlessly handle the high heat required to pop mustard seeds and sizzle cumin without degrading or releasing toxic fumes. The complex thermal physics and chemistry behind seasoning cast iron and carbon steel is a deep topic for another day, but just know that a natural, baked-on layer of polymerized cooking oil is infinitely superior to synthetic Teflon coatings.
Troubleshooting Your Spice Blooming Disasters
Even with the best intentions and the highest quality spices, things can occasionally go sideways in the kitchen. Here is how to diagnose and fix the most common beginner mistakes when learning to bloom.
“My Spices Turned Black and Bitter!”
You had the heat way too high, or you walked away from the stove to check your Instagram. Ground spices, in particular, will burn in less than 30 seconds if the oil is too hot. If your spices turn pitch black and your kitchen smells like acrid smoke, stop what you are doing. Throw the burnt spices in the trash, wipe out the pan with a paper towel, and start over. Do not try to save them; the bitter, burnt carbon flavor will completely ruin your entire dish. Next time, lower the heat to medium and have your “quench” ingredients (like your diced onions or crushed tomatoes) prepped, chopped, and ready to go immediately.
“The Oil Splattered Everywhere!”
You likely used a wet wooden spoon to stir your hot oil, or you added a spice that had residual moisture trapped inside it. Remember basic physics: water and hot oil are mortal enemies. When water hits hot oil, it instantly vaporizes into steam, expanding violently and throwing hot oil across your stove. Ensure your spices, your stirring spoons, and your pans are bone-dry before you begin the blooming process.
“I Still Can’t Taste the Difference!”
If you perfectly bloomed your spices in hot oil and your food still tastes like bland cafeteria food, your spices are dead. Spices contain volatile essential oils that naturally degrade and evaporate over time, even when sealed. If that giant plastic jug of paprika has been sitting in your cupboard since the Obama administration, no amount of hot oil or culinary technique is going to resurrect it. Throw it away, buy a small batch of fresh, high-quality spices, and try again.
The Final Verdict: Your Culinary Awakening Awaits
Cooking at home does not have to be an endless, exhausting string of complicated, pretentious techniques that require hours of prep work. As a home cook, your greatest superpower is simply understanding the fundamental, scientific “why” behind the food you are preparing.
By taking exactly 60 seconds to bloom your spices in hot fat, you are unlocking a hidden world of fat-soluble flavor compounds, triggering complex Maillard browning reactions, and transforming your standard weeknight dinners from bland and boring to absolutely breathtaking. You are honoring the ingredients, respecting the science of the kitchen, and saving yourself from eating another bowl of watery, disappointing chili.
So, the next time you reach for that jar of cumin or curry powder, do not just blindly dump it into a pot of boiling liquid. Show it some respect. Give it a sizzle in some hot, shimmering oil, watch the chemical magic happen right before your eyes, and get ready to taste your food the way it was always meant to be tasted. Now get out of here, go clean out your spice rack, and go make something delicious.






