
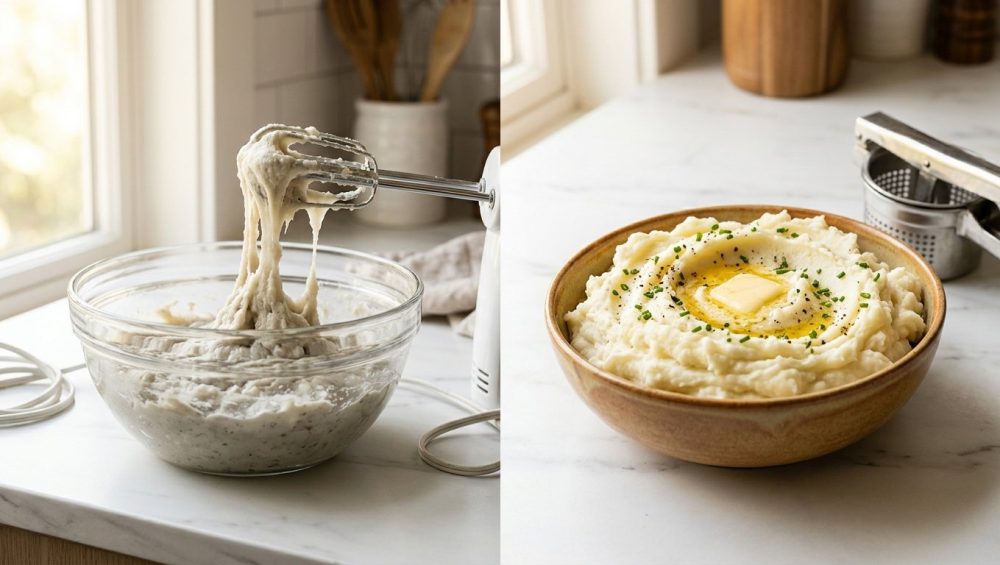
Welcome to my kitchen, weekend culinary warriors. Grab a glass of wine, take a deep breath, and let’s talk about the elephant in the dining room. You have spent hours meticulously roasting the perfect chicken. Your pan gravy is a shimmering pool of liquid gold, and the asparagus is blistered to absolute perfection. But then, you bring out the mashed potatoes. You dip a spoon in, pull it upward, and watch in sheer, unadulterated horror as a thick, elastic rope of potato paste stretches across the table like melted mozzarella cheese. Congratulations, you have just successfully manufactured industrial-grade wallpaper paste.
We have all been there. My smoke detector and I are old friends, and before I figured out the actual food science behind the madness, I once served a batch of mashed potatoes so incredibly dense and gummy that they could have legitimately been used to patch the drywall in my hallway. It is incredibly frustrating, especially when you are just trying to pull off <a href="https://citchenware.com/blog/the-modern-recipe/how-to-master-simple-weeknight-dinners-when-you-have-zero-cooking-skills/">simple weeknight dinners</a> without losing your sanity or setting the house on fire. But here is the brutal, honest truth: it is not your lack of a fancy French culinary degree that ruined your side dish. It is your equipment, and it is a fundamental misunderstanding of botanical science.
I am the biggest advocate for kitchen shortcuts, efficiency hacks, and getting dinner on the table before you collapse. Your time is money. But there is a massive difference between a clever shortcut and mechanical sabotage. Today, we are going deep into the cellular makeup of the potato, the thermodynamics of starch gelatinization, and the devastating physics of shear force. By the time we are done, you will understand exactly why your tubers are turning into a sticky nightmare, and you will know exactly how to achieve ethereally light, cloud-like, restaurant-quality results in your very own home kitchen. Let’s get to work.
The Microscopic Battlefield: The Food Science of Potato Glue
To understand why your mashed potatoes frequently <a href="https://citchenware.com/blog/kitchen-stories-solutions/why-your-mashed-potatoes-turn-into-glue-and-how-to-fix-it/">turn into glue</a>, we have to put on our lab coats and look at what is happening on a microscopic level. Potatoes are not just inert lumps of starch waiting to be seasoned with butter; they are highly complex, dense networks of botanical cells. Inside a raw potato, starch is stored in tiny, delicate microscopic sacs known as amyloplasts. Think of these amyloplasts as millions of microscopic water balloons packed tightly together inside the flesh of the vegetable.
When you apply heat to a raw potato, the magic—and the danger—begins. As the internal temperature of the potato rises, these starch granules begin to absorb the surrounding water. They swell up, becoming incredibly fragile and engorged. According to food science data, this swelling process kicks off in earnest between 140°F and 160°F, and by the time the potato reaches 185°F to 205°F, full starch gelatinization has occurred.
Inside these swollen balloons are two distinct types of starch molecules: amylose and amylopectin. Amylopectin is a highly branched, tree-like molecule that tends to break down and liquify when heated—it is relatively harmless in the mashing process. Amylose, on the other hand, is a long, straight-chain molecule. When it is safely contained inside the cell walls, everything is fine. But if you apply too much mechanical force and violently rupture those fragile, swollen cell walls, the amylose spills out into the surrounding liquid.
Once freed from its cellular prison, amylose functions exactly like literal adhesive. The long chains tangle together, trapping water and forming a cohesive, sticky, gummy paste. You have essentially created a starch-based glue.
But wait, the science gets even more treacherous. Let’s say you manage to mash them gently, but you get distracted and let the potatoes cool down too much before you add your hot dairy. If the temperature of the mashed potatoes drops below 130°F before you finish mixing, a devastating process called retrogradation occurs. The amylose molecules begin to realign themselves into rigid crystalline structures. This is not a subjective matter of taste; it is a quantifiable physical transformation. Laboratory tests utilizing Rapid Visco Analyzers have shown that retrograded potato batches exhibit a massive 68% increase in viscosity hysteresis. In plain English? They become irreversibly chalky, stringy, and gummy.
The Potato Hierarchy: Choosing Your Spud Wisely
Now that we understand the enemy is ruptured starch cells, we have to talk about the raw materials. One of the most common <a href="https://citchenware.com/blog/kitchen-stories-solutions/a-brutally-honest-guide-to-fixing-the-seven-rookie-kitchen-mistakes-that-are-ruining-your-dinners/">rookie kitchen mistakes</a> is assuming that a potato is just a potato. Nothing could be further from the truth. Potatoes exist on a spectrum from starchy to waxy, and choosing the wrong tuber will doom your side dish before you even turn on the stove.
The Starchy Kings: Russet Potatoes
If you want the absolute fluffiest, lightest, most cloud-like mashed potatoes imaginable, the Russet is your undisputed champion. Russets have a very high starch content and a remarkably low moisture content. Because they are so dry and starchy, their cells separate from one another very easily when cooked. You barely have to apply any force to break them down, which means you are far less likely to rupture the cell walls and release that sticky amylose. They absorb butter and cream like an absolute sponge, yielding a phenomenally light texture.
The Golden Compromise: Yukon Gold Potatoes
Yukon Golds sit right in the middle of the spectrum. They are medium-starch, all-purpose potatoes. What they lack in sheer fluff-producing starch, they make up for in flavor. Yukon Golds have a naturally buttery, rich, slightly sweet flavor profile and a gorgeous yellow hue that makes your mash look incredibly appetizing. Because they have a bit more moisture and less starch than Russets, they will yield a slightly denser, creamier mash rather than a dry, fluffy one. Many professional chefs prefer a 50/50 blend of Russets and Yukon Golds to get the structural fluffiness of the former and the rich flavor of the latter.
The Waxy Villains: Red and New Potatoes
Waxy potatoes, such as Red Bliss, fingerlings, or new potatoes, are fantastic for potato salad, roasting, or throwing into a stew. Why? Because they are low in starch and high in moisture, meaning they hold their shape beautifully even after prolonged cooking. However, this exact cellular structure makes them the absolute worst choice for mashed potatoes. To get them to break down into a smooth puree, you have to apply a tremendous amount of physical force. By the time you finally smash the lumps out of a waxy potato, you have obliterated millions of cell walls, releasing a flood of amylose and creating a dense, sticky, gluey disaster. Keep waxy potatoes far away from your masher.
Weapons of Mass Destruction: The Tools Ruining Your Mash
We need to have a serious conversation about the tools you are using. I know that after a long day at the office, the temptation to plug in an appliance and let an electric motor do the heavy lifting is overwhelming. But if you want to save your side dish, you must <a href="https://citchenware.com/blog/the-modern-recipe/stop-making-gluey-mashed-potatoes-why-you-should-ditch-the-hand-mixer/">ditch the hand mixer</a> immediately.
The High-Speed Saboteurs
Food processors, immersion blenders, and electric hand mixers are the ultimate enemies of the potato. Remember those fragile, swollen starch balloons we talked about? When you lower spinning metal blades into a pot of cooked potatoes, those blades act like microscopic lawnmowers. They do not gently separate the cells; they violently slash through them. A food processor will shear open almost every single starch granule in the bowl in a matter of seconds, transforming a fluffy vegetable into a cohesive, gummy paste right before your eyes. This mechanical destruction happens so fast that by the time you realize the texture is wrong, it is already too late. You cannot un-rupture a cell wall.
The “No-Go” Rule on Toxic Kitchenware
While we are on the subject of equipment, I need to address a massive pet peeve of mine. I have absolutely zero patience for cheap, dangerous kitchen gear that ruins your food and threatens your health. If you are boiling your potatoes in a bargain-bin non-stick pot where the mysterious black coating is peeling and flaking off into your cooking water, throw it in the garbage right this second. The same goes for those flimsy, dollar-store plastic hand mashers that bend under pressure and leach endocrine-disrupting chemicals into your screaming-hot food.
We are <a href="https://citchenware.com/blog/the-curators-corner/a-brutally-honest-masterclass-on-upgrading-your-cooking-skills-and-banishing-toxic-kitchen-gear/">banishing toxic kitchen gear</a> from our lives for good. You do not need a culinary degree to cook like a pro, but you do need safe, durable, high-quality equipment. Invest in heavy-gauge, uncoated stainless steel pots and solid metal utensils. They will outlive you, they will not poison your family, and they will actually do the job they were designed to do.
The Holy Grail of Fluff: The Gear You Actually Need
If you want to achieve professional-level results at home, you have to curate your drawers with the right <a href="https://citchenware.com/blog/the-curators-corner/a-no-nonsense-guide-to-the-only-beginner-kitchen-tools-you-actually-need-to-cook-like-a-pro/">beginner kitchen tools</a>. When it comes to mashed potatoes, there are only three acceptable instruments.
The Potato Ricer (The Absolute Champion)
If you want ethereally light, completely lump-free potatoes, <a href="https://citchenware.com/blog/the-curators-corner/the-secret-to-fluffy-mashed-potatoes-why-you-need-a-ricer/">you need a ricer</a>. A potato ricer looks and operates like a giant garlic press. You place the cooked potato chunks into the hopper and squeeze the handles together, forcing the potato through a plate of small holes. Why is this the holy grail? Because it extrudes the potato into delicate, uniform strings with a single, gentle pressing motion. There is no repeated smashing, no violent shearing, and minimal cell rupture. Look for a heavy-duty, 100% stainless steel ricer with a large hopper and comfortable silicone grips.
The Food Mill
A food mill is the traditional French chef’s tool of choice. It consists of a bowl with a hand-cranked blade that sweeps across a perforated bottom plate, gently forcing the food through the holes. Like the ricer, it separates the potato cells with minimal shearing force, leaving the starch granules intact while catching any stray lumps or skins. It is slightly more tedious to clean than a ricer, but it produces a spectacularly smooth, refined puree. Again, only buy food mills made of high-quality stainless steel.
The Traditional Hand Masher
If you refuse to buy a ricer or a food mill, you can still achieve great results with a classic hand masher, provided you use it correctly and buy the right design. Do not buy the bouncy, squiggly wire mashers—they are inefficient and require you to overwork the potatoes. Instead, buy a rigid, heavy-duty stainless steel masher with a flat grid plate with holes punched into it. When using it, press straight down firmly, lift straight up, and move to the next section. Do not stir, whip, or drag the masher through the potatoes, as that creates the shear force that releases amylose.
The Sassy Sous-Chef’s Masterclass for Ethereal Mashed Potatoes
Let’s put all this science into practice. This is the definitive, foolproof, step-by-step masterclass for perfect mashed potatoes.
Step 1: The Prep and the Cut
Peel your Russet or Yukon Gold potatoes completely. Any skin left on will ruin the creamy texture and clog up your ricer. Cut the potatoes into uniform cubes, ideally about 1.5 to 2 inches thick. If you cut them too small, they will absorb too much water and become waterlogged. If you cut them unevenly, the smaller pieces will overcook and disintegrate into mush before the larger pieces are even tender.
Step 2: The Cold Water Protocol
This is where most home cooks fail before they even turn on the heat. You must put your raw potato cubes into an empty pot and cover them with cold water. <a href="https://citchenware.com/blog/the-art-of-the-kitchen/why-your-potatoes-cook-unevenly-the-magic-of-starting-in-cold-water/">starting in cold water</a> is a non-negotiable rule of thermal physics.
Why? It comes down to the starch gelatinization threshold and the pectin solubility curve. Potato starch granules swell and absorb water most efficiently between 140°F and 167°F (60–75°C). If you drop cold potatoes into a pot of rapidly boiling water, you subject them to a massive thermal shock. The exterior of the potato immediately skyrockets in temperature, causing the outer cells to overcook, swell, and burst, releasing amylose into the water. Meanwhile, the dense interior of the potato remains cold and raw. By the time the center is finally tender, the outside has disintegrated into a mealy, waterlogged mush. By starting with cold water and bringing the temperature up gradually, the heat penetrates evenly from the outside to the center, ensuring the entire potato reaches perfect doneness simultaneously.
Step 3: The Salinity Factor
Potatoes are incredibly dense and absorb flavors slowly. If you wait to salt them until they are already mashed, the salt will just sit on the surface, making them taste simultaneously salty and bland. You must aggressively salt your cooking water. Food science dictates an optimal salinity of about 15 grams of kosher salt per liter of water. However, do not over-salt beyond 20 grams per liter, as excessive sodium can actually accelerate the breakdown of the pectin cement holding the cell walls together, leading to a grainy texture.
Step 4: The Gentle Simmer, Never the Boil
Once the water comes to a boil, immediately reduce the heat to maintain a gentle, rolling simmer. Do not subject your potatoes to a violent, chaotic, 212°F (100°C) rapid boil. The calcium-bound pectin that holds potato cells together begins to dissolve at 180°F (82°C) and completely degrades above 203°F (95°C). A violent boil physically batters the potatoes against each other and accelerates this pectin breakdown, destroying their structural integrity. Simmer them gently until a paring knife slides into the center of a cube with just the slightest hint of resistance.
Step 5: The Drain and the Steam
Water is the mortal enemy of fat. If your potatoes are waterlogged, they will not be able to absorb the rich butter and cream you are about to add. Once the potatoes are tender, drain them thoroughly in a colander. But do not stop there. Return the drained potatoes to the empty, hot cooking pot and set it over low heat for about one to two minutes. Gently shake the pot. This crucial step allows the residual surface moisture to evaporate as steam. You want the potatoes to look dry and slightly chalky on the outside.
Step 6: The Extrusion
While the potatoes are screaming hot, process them through your potato ricer or food mill into a large, warm mixing bowl. Do not let them sit around and cool down. Remember the threat of retrogradation! If the temperature drops below 130°F, the amylose will crystallize, and your mash will become chalky and stringy. Work quickly and efficiently.
Step 7: The Hot Dairy Infusion
Never, ever pour cold milk or cold cream into hot potatoes. Not only does it instantly drop the temperature of the mash (triggering that dreaded retrogradation), but it also shocks the starches. While your potatoes are boiling, you should be gently heating your heavy cream, whole milk, and butter in a small saucepan until the butter is completely melted and the liquid is steaming (but not boiling).
Step 8: The Fold
Pour the hot dairy mixture over the riced potatoes. Now, using a high-quality silicone spatula, gently fold the liquid into the potatoes. Use a sweeping, scooping motion—down the side of the bowl, across the bottom, and fold over the top. Do not stir aggressively. Do not whip. The moment the liquid is absorbed and the potatoes look creamy and cohesive, step away from the bowl. Stop touching them. The more you agitate them, the more starch you release.
The Rescue Mission: How to Repurpose Gluey Potatoes
Let’s say you are reading this article a little too late. You are standing in your kitchen, staring into a bowl of elastic, gummy wallpaper paste, and experiencing a severe bout of <a href="https://citchenware.com/blog/the-modern-recipe/a-brutally-honest-guide-to-conquering-weeknight-cooking-anxiety-and-ditching-takeout/">weeknight cooking anxiety</a>. Your guests are arriving in twenty minutes. Panic is setting in.
First, take a deep breath. Can you fix them? The brutal, scientific truth is no. You cannot un-rupture a starch cell wall, and you cannot force the spilled amylose back inside the granule. You cannot reverse amylose gelation.
The worst thing you can possibly do right now is add more milk or cream in an attempt to “thin them out.” Adding more liquid to a gluey starch matrix will not fix the texture; it will simply turn your thick glue into a runny, soupy glue. It worsens syneresis (the weeping of liquid from a gel), making the dish completely inedible.
But you are a resourceful home cook, and you are not going to let this ruin your evening. Instead of fixing them, we are going to repurpose them so brilliantly that no one will ever know you made a mistake. You are going to pivot, and you are going to stop <a href="https://citchenware.com/blog/mindful-gatherings/how-to-stop-ruining-your-dinner-parties-and-master-the-art-of-effortless-hosting/">ruining your dinner parties</a> over a minor setback.
Rescue Option 1: The Crispy Potato Croquette
This is the absolute best way to salvage gummy potatoes. You are going to use that sticky, cohesive texture to your advantage. Because the potatoes are acting like glue, they will bind beautifully into patties. For every cup of ruined mashed potatoes, gently fold in one beaten egg yolk and two tablespoons of freshly grated aged cheddar or parmesan cheese. The fat from the cheese and the protein from the egg will bind the excess moisture and completely mask the gummy texture. Form the mixture into small patties, dredge them lightly in flour or panko breadcrumbs, and pan-fry them in a hot carbon steel skillet with a generous amount of butter and oil until they are golden brown and crispy on the outside. Serve them as savory potato cakes. Your guests will think you planned it all along.
Rescue Option 2: The Ultimate Baked Potato Soup
If your potatoes are both gummy and dry, turn them into a rich, comforting soup. Sauté some diced onions, celery, and garlic in a heavy-bottomed Dutch oven. Add a few cups of high-quality chicken or vegetable broth and bring it to a simmer. Whisk your ruined mashed potatoes into the broth. The sticky starches that ruined your side dish will actually act as a phenomenal thickening agent for the soup, giving it a dense, luxurious, velvety texture. Stir in some heavy cream, a mountain of shredded sharp cheddar cheese, crispy bacon bits, and chopped chives.
Rescue Option 3: Cheesy Potato Casserole
If you are incredibly short on time, grab a glass or ceramic casserole dish and grease it generously with butter. Spread a layer of your gluey potatoes on the bottom. Add a thick layer of shredded cheese, some sour cream, and maybe some leftover cooked vegetables or bacon. Add another layer of potatoes, top with more cheese and a thick layer of crispy breadcrumbs or fried onions. Bake it at 350°F until the cheese is bubbling and the top is browned. The layers of fat and dairy will break up the texture of the potatoes, and the crispy top will provide a much-needed textural contrast.
Reclaiming Your Kitchen Confidence
Cooking is not about being flawless; it is about understanding the basic rules of the game and knowing how to manipulate them to your advantage. You do not need a Michelin star to make mind-blowing food. You just need to respect the science of the ingredients, invest in high-quality, non-toxic tools that do the heavy lifting for you, and give yourself a little grace when things go sideways.
The next time you set out to make mashed potatoes, leave the power tools in the garage where they belong. Treat your ingredients with respect, follow the thermal rules of cold water and hot dairy, and press those tubers through a ricer with the gentle care they deserve. You will be rewarded with a side dish so incredibly light, fluffy, and decadent that it will steal the spotlight from whatever expensive cut of meat you happen to be serving alongside it.
Now, pour yourself another glass of wine, get back in that kitchen, and show those starches who is boss. You’ve got this.






