
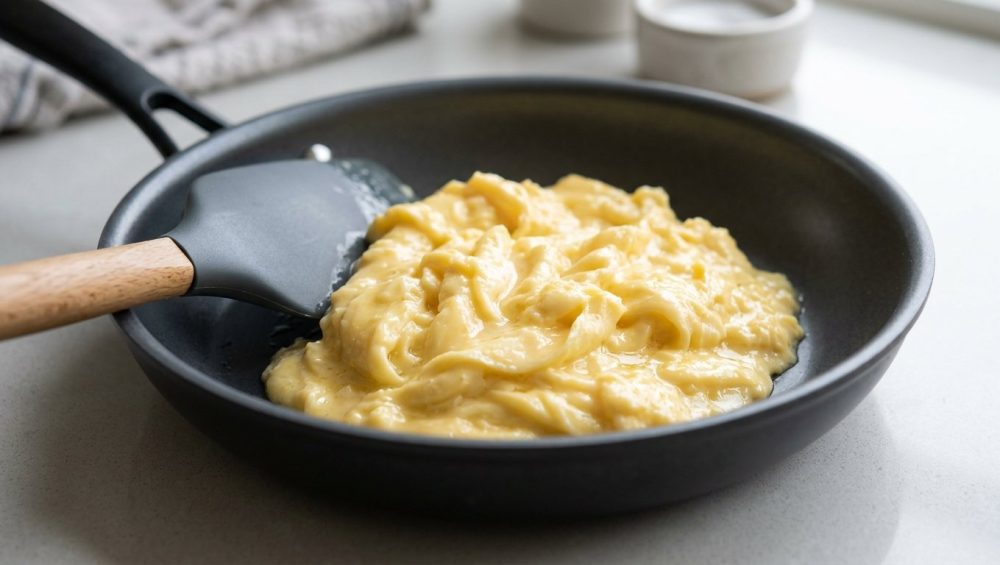
Listen to me, my beautiful, well-intentioned weekend warriors. You have survived another grueling workweek. You navigated office politics, you managed to keep the houseplants alive against all odds, and you finally made it to Saturday morning. You deserve a breakfast that feels like a warm hug, not a culinary punishment. But if you are like the vast majority of home cooks, your weekend morning routine involves cracking a few eggs into a scorching hot pan, aggressively pushing them around until they resemble dry, yellow packing peanuts, and then eating them out of sheer obligation.
Americans are projected to consume a staggering 259.2 eggs per capita in 2026, with breakfast remaining the undisputed champion of egg consumption occasions. That is an astronomical amount of potential for rubbery, joyless disappointment. It breaks my heart, frankly. You do not need to settle for mediocre breakfasts. You do not need a culinary degree from Le Cordon Bleu to make mind-blowing food. You just need to understand a few fundamental principles of how heat works in your kitchen.
Most people assume that cooking is a binary state: the heat is either on, or the heat is off. But this is one of the most common rookie kitchen mistakes that plagues the modern home kitchen. The truth is far more nuanced. Heat is an energy transfer, and your frying pan is not just a surface—it is a thermal battery. Today, we are going to dive deep into the science of protein coagulation, the absolute magic of residual heat, and exactly why waiting for your scrambled eggs to look fully finished in the pan guarantees a tough, rubbery breakfast. Grab your coffee, banish your kitchen anxiety, and let’s fix your food.
The Anatomy of a Scrambled Egg Disaster
When you look at a raw egg, what you are actually looking at is a delicate, highly sensitive web of proteins suspended in a significant amount of water. Eggs are incredibly moisture-rich. When you apply heat to this delicate matrix, the proteins begin to move, uncoil, and bond with one another. This is a beautiful, natural process when done gently. However, when you blast those proteins with aggressive, unyielding heat, they panic.
Think of the proteins in an egg like a wet sponge. If you gently squeeze the sponge, it retains its shape and holds onto its moisture. If you violently wring that sponge out with all your strength, all the water comes rushing out. When you overcook your eggs by leaving them over an active burner for too long, the protein networks tighten so aggressively that they literally wring themselves out, expelling their trapped moisture.
This phenomenon is scientifically known as syneresis, but in the culinary world, we just call it “weeping.” It is the exact reason why your scrambled eggs leak water all over your plate, turning your perfectly toasted sourdough into a soggy, unappetizing mess. The puddle of clear, greyish liquid pooling at the bottom of your breakfast plate is not condensation; it is the literal tears of a ruined egg. You have forced the moisture out of the food and onto the plate.
The Molecular Biology of the Egg (Without the Pretentious Chef-Speak)
I promised you no pretentious chef-speak, and I intend to keep that promise. But to master your kitchen, you need to respect the ingredients, and respecting the ingredients means understanding what makes them tick. Let’s look under the hood of your breakfast.
An egg is composed of the yolk and the albumen (the white). The egg white contains about 60% of the total protein in the egg, while the yolk holds the remaining 40%. More than half of the protein found in the egg white is a specific type of globular protein called ovalbumin. In its raw state, ovalbumin consists of long amino acid chains that are tightly curled and folded up into neat little spherical shapes, drifting peacefully in water.
When you introduce heat to the pan, you are bombarding these peaceful little spheres with thermal energy. The heat agitates the proteins, causing them to bounce around and collide. As the temperature rises, the weak chemical bonds holding those curled-up shapes together begin to break. The proteins uncoil—a process called denaturation—and these newly loosened strings start tangling up with each other, forming a three-dimensional web that traps water inside. This is what turns a liquid egg into a soft, semi-solid curd.
But here is the critical data point that changes everything: egg whites begin to coagulate at an incredibly low temperature of approximately 140°F (60°C). The yolks require a slightly warmer environment, beginning to set between 144°F and 158°F. By the time the entire mass of the egg reaches 180°F (82°C), the proteins have fully and irreversibly coagulated.
Your stove burner, even when set to medium-low, is pumping hundreds of degrees of heat into the bottom of your pan. It takes mere seconds for delicate egg proteins to blow right past that 180°F threshold. If your scrambled eggs are rubbery, it is because you have completely ignored these thermal limits. You have subjected a delicate, heat-sensitive ingredient to a violent thermal assault, causing the protein web to contract, squeeze out its moisture, and turn into a dense, chewy mass.
The “No-Go” Rule: A Brutally Honest Rant on Toxic Cookware
Before we get into the mechanics of heat management, we need to have a serious conversation about your equipment. I have zero patience for cheap, toxic kitchenware, and neither should you. If you are trying to cook delicate eggs in a ten-dollar, lightweight aluminum pan coated in mystery chemicals that you bought on clearance five years ago, you are setting yourself up for failure—and potentially compromising your health.
Non-stick coatings, particularly the cheap ones made with older generations of PTFE (polytetrafluoroethylene) or forever chemicals (PFAS), are notoriously fragile. When subjected to high heat, or when scraped with metal utensils, these coatings degrade rapidly. If your cheap pans are losing their slip and you are noticing little black specks of mystery material flaking off into your morning meal, throw the pan in the garbage immediately. I am not exaggerating. I absolutely despise toxic gear that peels into the food you feed your family.
You deserve better. You should immediately start banishing toxic kitchen gear from your cabinets. Investing in high-quality, safe, and durable cookware is the single fastest way to elevate your home cooking. A well-seasoned carbon steel skillet, a heavy-duty multi-clad stainless steel pan, or a high-end ceramic-coated skillet will offer incredible performance without the risk of toxic off-gassing. Yes, they require a bit more technique to prevent sticking, but that is exactly what I am here to teach you. Stop buying disposable garbage and invest in tools that respect your food.
The Thermodynamics of Your Skillet
Now that we have established that your eggs are delicate and your cookware shouldn’t be actively poisoning you, let’s talk about physics. Specifically, let’s discuss the concept of thermal mass and specific heat capacity.
Specific heat capacity is a measurement of how much thermal energy a substance needs to absorb or lose in order for its temperature to change. Thermal mass, on the other hand, refers to the total heat capacity of the entire object as a whole. When you place a heavy skillet on a burner, it absorbs thermal energy. The heavier and denser the material, the more energy it can store.
A thick, multi-clad stainless steel pan or a hefty cast-iron skillet possesses a massive amount of thermal mass. They take longer to heat up because they are absorbing and storing a vast amount of energy. But crucially, they also take a very long time to cool down.
According to the Second Law of Thermodynamics, energy will always flow from an area of higher energy to an area of lower energy until thermal equilibrium is reached. When you drop cold, beaten eggs into a hot skillet, the stored thermal energy in the pan immediately begins transferring into the eggs, creating a temperature gradient. The surface of the egg touching the pan heats up instantly, while the liquid sitting on top remains cooler.
This is why the pan you choose dictates the success of your breakfast. A flimsy, thin pan has almost zero thermal mass. The moment you add the cold eggs, the pan’s temperature plummets, forcing you to crank up the stove burner to compensate. This leads to aggressive, uneven cooking where the bottom burns and the top remains raw. A heavy pan, acting as a robust thermal battery, maintains its temperature, providing a steady, gentle, and predictable transfer of heat to the delicate egg proteins.
The Magic of Carryover Cooking
This brings us to the absolute core of our masterclass: Carryover cooking. Also known as residual heat cooking, this is the scientific phenomenon where food continues to cook and increase in internal temperature even after it has been completely removed from the primary heat source.
When you turn off the burner under your skillet, the heat does not magically vanish into the ether. The dense metal of your pan is still holding hundreds of degrees of stored thermal energy. Furthermore, the exterior layers of the food itself have absorbed heat that is still migrating toward the cooler thermal center.
In professional kitchens, chefs rely heavily on carryover cooking. A large roast or a thick steak will see its internal temperature rise by 5 to 15 degrees Fahrenheit (3 to 8 degrees Celsius) during its resting period, simply due to the equalization of this post-cooking heat transfer. If a chef leaves a steak on the grill until the center hits a perfect medium-rare, the carryover cooking will push it to a tough medium-well by the time it reaches the dining room table.
The exact same principle applies to your morning eggs, just on a much faster timeline. The residual heat trapped in your heavy-bottomed skillet is more than enough to raise the temperature of your eggs by those final, crucial degrees. Understanding and leveraging this invisible energy source will completely transform your chaotic cooking routine into a serene, predictable, and highly successful daily habit. You are no longer fighting the stove; you are letting the pan do the work for you.
The “Pull-It-Early” Rule: Timing is Everything
So, how do we harness this thermal battery? We implement the “Pull-It-Early” rule.
The golden rule of scrambled eggs is brutally simple: If your eggs look fully cooked while they are still in the pan, they will be overcooked by the time you sit down to eat them. You must intervene before the visual cue of “doneness” arrives.
When cooking scrambled eggs, you need to pull the skillet entirely off the heat source when the eggs are about 80% to 90% set. At this stage, the curds should be mostly formed, but the overall mixture should still look alarmingly wet, glossy, and slightly runny. To the untrained eye, they will look undercooked. Your instincts will scream at you to leave the pan on the burner for another minute. You must fight those instincts.
Remove the pan from the burner. Set it on a cool, unused grate or a trivet. The ambient cooling of the room will begin to affect the pan, but the stored thermal energy—hovering around 120°F to 135°F (49°C to 57°C)—will continue to gently radiate upward into the eggs. This diminishing thermal energy will delicately finish coagulating the remaining liquid proteins without ever pushing them past that fatal 180°F (82°C) rubber threshold.
Furthermore, you must stop aggressively stirring your eggs. Constant, frantic stirring is a habit drilled into home cooks, but it is deeply counterproductive. Continuous agitation disrupts the gentle coagulation of the protein web, breaks the curds into tiny, dry granules, and rapidly accelerates moisture loss. You are not making a smoothie; you are gently folding curds.
A Step-by-Step Masterclass for Flawless, Creamy Scrambled Eggs
Let’s put the science into practice. I want you to follow these steps with absolute precision. No shortcuts. No “eyeballing” the heat. Give yourself permission to be a perfectionist for five minutes.
Step 1: The Whisk and the Salt
Crack your eggs (three large eggs is a perfect portion for one adult) into a mixing bowl. Do not crack them directly into the pan unless you want a streaky, uneven mess. Whisk them vigorously until the yolks and whites are completely homogenized and the mixture is a uniform, pale yellow. You want to beat air into the eggs to create a light, fluffy texture.
Now, add your salt. I know there is an old culinary myth that salting eggs before cooking makes them tough, but modern food science has thoroughly debunked this. Salting your beaten eggs 15 to 30 minutes before cooking actually alters their electrical charge, preventing the proteins from bonding too tightly when heated. This is why salting them early is a brilliant trick to prevent your eggs from weeping moisture onto your plate later.
Step 2: Heat Management and the Fat
Place your heavy-bottomed skillet on the stove and turn the burner to medium-low. Do not rush this. Let the pan heat up gradually so the thermal mass can absorb the energy evenly. If you are using a multi-clad stainless steel pan, you can utilize the water drop test to perfectly gauge when the surface has reached the optimal temperature for non-stick performance.
Once the pan is warm, add a generous knob of high-quality butter—about one tablespoon. Let the butter melt and coat the bottom of the pan. It should foam gently, releasing its water content, but it should never turn brown. If your butter instantly browns and smells nutty, your pan is way too hot. Take it off the heat and let it cool down before proceeding.
Step 3: The Pour and the Patience
Pour your well-beaten, salted eggs into the center of the foaming butter. Now, exercise the hardest skill in the kitchen: patience. Do absolutely nothing for about 15 to 20 seconds. You need to allow the bottom layer of the egg mixture to make direct contact with the heat and begin forming a delicate foundation of coagulated protein.
Step 4: The Gentle Fold
Once you see the edges of the eggs just beginning to set and turn opaque, take a heat-resistant silicone spatula and gently push the eggs from the outside edge of the pan directly toward the center. This sweeping motion lifts the cooked curds and allows the raw, liquid egg on top to flow underneath and make contact with the hot surface of the pan.
Repeat this gentle folding motion three or four times, working your way around the circumference of the skillet. Do not chop, scramble, or frantically whip the eggs. You want large, luxurious, pillowy folds.
Step 5: The Dismount (The Crucial Moment)
Watch the pan like a hawk. The moment the eggs are mostly gathered into soft curds but still look incredibly wet, glossy, and about 10% undercooked, kill the heat. Remove the skillet from the hot burner entirely.
Let the eggs sit undisturbed in the hot pan for exactly 30 to 60 seconds. You will literally watch the magic of residual heat happen right before your eyes. The wet, runny pockets of liquid will slowly turn opaque and firm up as the stored energy in the dense metal of the pan finishes the cooking process. Give the eggs one final, gentle fold to incorporate any remaining moisture.
Step 6: The Plating
Transfer the eggs immediately to a warmed plate. Do not put perfectly cooked, delicate hot food onto a freezing cold ceramic plate; it will instantly sap the heat and ruin the texture. Serve them immediately at their peak creaminess, devoid of any dry, brown edges or rubbery textures.
Elevating the Everyday: Why This Matters
I know what you might be thinking. “It’s just scrambled eggs, why are we treating this like a chemistry thesis?”
Because how you do anything is how you do everything. Weekday mornings are inherently stressful. You are rushing to get dressed, packing lunches, and trying to get out the door. But mastering this technique does not take extra time; in fact, because you are pulling the pan off the heat early and letting the residual energy do the work, you are actually saving active cooking time. You can use those 60 seconds of carryover cooking to pour your coffee or pop your toast.
More importantly, taking pride in the small details of your daily meals is incredibly empowering. You do not need expensive ingredients to eat like royalty. You cannot build a beautifully organized dream kitchen if your foundation is built on bad habits and a fundamental misunderstanding of your tools. By learning to respect the thermal mass of your cookware and the delicate protein structure of your food, you elevate a mundane weekday chore into an act of culinary artistry.
You are a capable, intelligent home cook. You have the power to create mind-blowing food in your own home, without a culinary degree, without pretentious jargon, and without settling for mediocrity. Throw away your toxic peeling pans, turn down the heat on your stove, and let the residual energy do the heavy lifting. Your breakfasts—and your sanity—will never be the same. Now get in there and cook something beautiful.






