Let’s have a little chat about that graveyard of nonstick skillets currently taking up space in the dark recesses of your lower kitchen cabinets. We all know the ones I am talking about. You bought a gorgeous, pristine nonstick pan just six months ago. For the first few weeks, it was a dream. Your morning eggs practically levitated off the surface. You felt like a culinary genius. But then, slowly and insidiously, something changed. Your omelets started to stick. Your delicate fish fillets began tearing into mangled, sad little shreds. Now, despite your best efforts, you are standing in your pajamas on a Tuesday morning, aggressively scraping a burned, scrambled mess into the trash can and wondering where it all went wrong.
You probably blamed yourself. You probably assumed you overheated the pan, or washed it wrong, or just bought a cheap dud. But as a seasoned home cook who has made every mistake in the book so you don’t have to, I am here to tell you that the culprit is likely sitting right there on your countertop, masquerading as a harmless convenience.
It is your aerosol cooking spray.
Yes, that innocent-looking pressurized can of “butter-flavored” mist is secretly assassinating your cookware. If you want to stop ruining your nonstick pans and throwing your hard-earned money straight into the garbage, we need to take a brutally honest look at the chemistry of what you are actually spraying onto your cooking surfaces. You do not need a culinary degree to understand this, but you do need to pay attention, because breaking this one bad habit will save your cookware, your weeknight dinners, and your sanity.
The Anatomy of a Nonstick Pan (The Promise vs. The Reality)
Before we can understand how aerosol sprays destroy your pans, we have to understand how a nonstick pan actually works. I promise to keep the science class brief, but this is essential knowledge for any home cook who wants to protect their investments.
Modern nonstick cookware generally falls into two categories: traditional PTFE (polytetrafluoroethylene, commonly known by the brand name Teflon) and sol-gel ceramic coatings. Both of these materials are modern engineering marvels designed to be incredibly hydrophobic (water-repelling) and lipophobic (fat-repelling). When you look at a brand new nonstick pan under a microscope, the surface is remarkably smooth, with microscopic peaks and valleys that are heavily sealed by these synthetic compounds.
This surface tension is what prevents the proteins in your food from bonding with the metal of the pan. It is the reason you can effortlessly flip a delicate crepe or slide a sunny-side-up egg directly onto your plate without leaving half of it behind. We rely on these pans heavily during the week because time is money, and nobody wants to spend forty-five minutes soaking and scrubbing a stainless steel skillet after a grueling workday.
However, this microscopic nonstick landscape is incredibly fragile. It relies on remaining perfectly clean and unobstructed. If anything manages to bond to those microscopic peaks and valleys, the nonstick properties are instantly neutralized. And when that happens, your food always sticks, no matter how much butter or oil you throw at the problem after the fact.
The Aerosol Assassin: What Are You Actually Spraying?
Take a look at the back of your favorite aerosol cooking spray. You might assume you are just buying pressurized canola or olive oil, but the ingredient list tells a much darker, highly chemical story. In order to get that oil to shoot out of a tiny nozzle in a perfectly aerated, continuous mist, manufacturers have to add a cocktail of chemicals, emulsifiers, and propellants.
A standard can of commercial cooking spray typically contains:
- The Base Oil: Usually a highly refined, cheap commodity oil like canola, soybean, or a generic vegetable blend.
- Propellants: This is the gas that forces the liquid out of the can. The most common propellants used in cooking sprays are isobutane, n-butane, and propane. Yes, the exact same propane you use to fuel your backyard barbecue grill.
- Dimethyl Silicone (Dimethylpolysiloxane): This is an anti-foaming agent. It prevents the oil from foaming up and sputtering when it hits a hot pan. Fun fact: it is also a primary ingredient in cosmetics, hair conditioners, and Silly Putty.
- Soy Lecithin: This is an emulsifier. Since oil and water (or oil and propellants) do not naturally mix, soy lecithin is added to bind the ingredients together so they spray evenly without separating in the can.
While the FDA classifies these propellants and additives as “Generally Recognized As Safe” (GRAS) for human consumption in these microscopic quantities, their safety profile is not the issue here. The issue is what these specific chemicals do to the highly sensitive surface of your nonstick cookware when subjected to high heat.
The Chemistry of the Stick: How Soy Lecithin Ruins Everything
If there is a primary villain in this story, it is soy lecithin. While it does a fantastic job of keeping the spray blended inside the can, it acts as a permanent, destructive glue the second it hits a hot pan.
The Polymerization Problem
When you expose fats and oils to high heat, they undergo a chemical process called polymerization. The heat causes the individual fat molecules to break down, link together, and form massive, complex molecular chains. In the culinary world, polymerization can sometimes be a good thing. For example, when we season a raw cast iron skillet, we are intentionally polymerizing layers of oil to create a hard, protective, nonstick patina. If you want a rust-free skillet that will outlast your grandchildren, controlled polymerization is your best friend.
But on a synthetic nonstick coating, polymerization is a death sentence.
Soy lecithin polymerizes at a much lower temperature than standard cooking oils. When you spray it onto a pan and turn on the burner, the lecithin molecules rapidly link together, transitioning from a slippery liquid into a sticky, hardened, thermoset polymer. A thermoset polymer, unlike a thermoplastic, cannot be melted down or reshaped once it has cured. It is permanently baked onto the surface. It essentially forms a microscopic layer of plasticized varnish directly over your expensive PTFE or ceramic coating.
The Heat Threshold Trap
You might be wondering: “If regular oil polymerizes too, why doesn’t a bottle of standard olive oil ruin my pan?”
The answer lies in thermodynamics and mass. When you pour a tablespoon of regular oil into a skillet, that pool of liquid has a relatively high thermal mass. It takes time for the heat of the burner to raise the temperature of that oil to its polymerization point.
Aerosol cooking sprays, on the other hand, are designed to apply an incredibly thin, microscopic, aerated layer of fat. Because this layer is so unimaginably thin, it has virtually no thermal mass. The second you turn on the heat, that microscopic layer of soy lecithin and cheap oil instantly skyrockets in temperature. It hits its polymerization threshold in a matter of seconds—often before you have even finished chopping your onions or cracking your eggs.
By the time your food actually hits the pan, the soy lecithin has already baked itself into a hard, sticky resin. Congratulations, you have just paved over your pan’s nonstick coating with a layer of industrial glue.
The Invisible Varnish: Propellants and Dimethyl Silicone
Soy lecithin isn’t working alone in this act of kitchen sabotage. The other additives in your aerosol can are happy to help destroy your cookware.
Dimethyl silicone, that handy anti-foaming agent, is highly resistant to breaking down under heat. While it stops your spray from sputtering, it also stubbornly clings to the surface of the pan. Combined with the polymerized lecithin, it creates a gummy, tacky film that is entirely impervious to standard dish soap and hot water.
Furthermore, the chemical propellants (butane and propane) flash off rapidly when they hit the hot pan, leaving behind only the concentrated, sticky additives. Over weeks and months of daily use, this invisible varnish builds up layer by layer. You might not even notice it at first. But eventually, you will realize that your scrambled eggs turn out rubbery and torn because they are physically adhering to this baked-on chemical residue rather than gliding over the nonstick surface.
You are no longer cooking on Teflon or ceramic. You are cooking on a polymerized sheet of soy lecithin and silicone.
The “Toxic Gear” Warning: Why Scrubbing Makes It Worse
As your pan becomes stickier and more frustrating to use, human nature takes over. You drag the pan to the sink, squirt a massive dollop of heavy-duty dish soap onto it, and grab the most abrasive scrubbing sponge you can find. You scrub, and you scour, and you scrape, trying to force the pan back to its original pristine state.
This is where a frustrating situation turns into a toxic, hazardous one. I have a strict, zero-tolerance policy when it comes to toxic kitchen gear, and banishing toxic kitchen gear from your home should be your top priority.
When you use abrasive scouring pads (like green Scotch-Brite pads, steel wool, or harsh powdered cleansers) on a nonstick pan, you are not just removing the polymerized cooking spray. You are actively gouging, scratching, and destroying the PTFE or ceramic coating underneath.
Once a nonstick coating is compromised and scratched, the pan is officially dead. If it is a traditional PTFE pan, those scratches mean that microscopic flakes of synthetic chemicals can begin peeling off and leaching into your food. If it is a cheap aluminum pan underneath, that raw, reactive aluminum is now exposed to your acidic ingredients, creating off-flavors and potential heavy metal leaching.
Never, under any circumstances, take an abrasive scrubber to a nonstick pan. If you have to scrub it to get the food off, the pan has already failed you.
Diagnosing a Spray-Damaged Pan
How do you know if your pan is suffering from polymerized cooking spray buildup, or if it is just genuinely old and worn out? There are a few highly reliable diagnostic tests you can run right now in your kitchen.
1. The Sticky Edge Test:
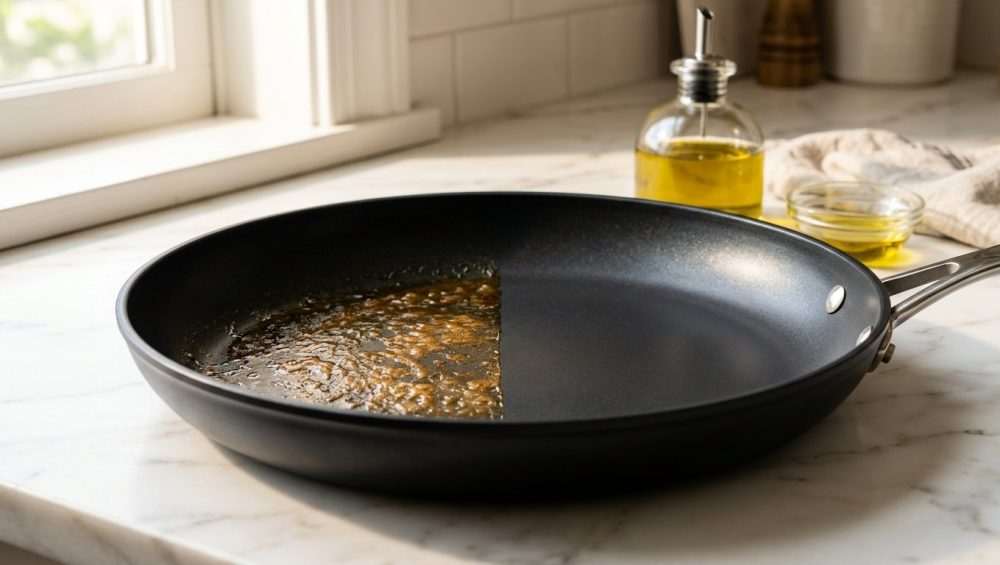
Take your clean, dry nonstick pan out of the cabinet. Run your bare fingertips firmly along the inner slopes and the upper rim of the pan—the areas that get sprayed but rarely come into direct contact with the food you are cooking. If the surface feels smooth and slick, your coating is fine. But if your fingers drag, catch, or feel a tacky, gummy resistance, you are feeling a thick layer of polymerized soy lecithin.
2. The Discoloration Ring:
Hold your pan under a bright kitchen light and inspect the sides. Do you see a faint, yellowish, brownish, or amber-colored ring around the perimeter? That is not a “seasoning” layer. That is baked-on aerosol residue that has permanently bonded to the pan.
3. The Water Beading Test:
Rinse the pan under the faucet. On a healthy nonstick surface, the water should bead up instantly and roll off like mercury. If the water sheets flat and clings to the sides of the pan, the nonstick properties have been completely suffocated by chemical buildup.
Can a Lecithin-Stained Pan Be Saved? (The Brutal Truth)
If you have just realized that your favorite pan is covered in aerosol residue, you are probably wondering if it can be salvaged. The brutal, honest truth is: maybe, but probably not.
Because soy lecithin forms a thermoset polymer, it is incredibly resistant to standard cleaning agents. However, before you march out to the dumpster, there is one last-ditch, Hail Mary method you can try to resurrect your cookware.
The Baking Soda and Vinegar Boil
This method utilizes mild alkalinity and heat to try and loosen the chemical bonds of the polymerized residue without scratching the delicate pan surface.
- Fill the damaged nonstick pan halfway with water.
- Add half a cup of plain white vinegar and a generous quarter-cup of baking soda. (Yes, it will fizz aggressively. Let it happen).
- Place the pan on the stove and bring the mixture to a gentle, rolling simmer over medium heat.
- Let it simmer for 10 to 15 minutes. The heat and the chemical reaction will attempt to soften the baked-on lecithin.
- Turn off the heat and let the liquid cool until it is safe to touch.
- Dump the liquid and use a soft, non-abrasive microfiber cloth or a standard blue sponge to gently massage the sticky areas.
If the residue wipes away, congratulations! You have saved your pan. If the pan remains sticky, gummy, and brown, I am sorry to say that the damage is permanent. Do not reach for the oven cleaner, and do not reach for the steel wool. Accept defeat, throw the pan away, and view it as a relatively inexpensive lesson in kitchen chemistry. It is just like dealing with cheap silicone tools; if your silicone spatulas taste like soap no matter how much you wash them, they are degraded and need to go.
The Sassy Sous-Chef’s Guide to Safe Fat Alternatives
If we are banning aerosol cooking sprays from the kitchen, what are we supposed to use? I am a massive advocate for saving time during the week. When you are battling weeknight cooking anxiety, you need fast, reliable solutions that do not involve meticulously painting your pans with a pastry brush like a 19th-century French chef.
Here are the absolute best, pan-safe alternatives to chemical aerosol sprays.
The Pump-Action Oil Mister (Your New Best Friend)
If you love the convenience of a spray, you need to purchase a reusable, pump-action oil mister immediately. Brands like Evo or Misto sell inexpensive, high-quality spray bottles designed specifically for cooking oils.
You simply fill the reservoir with your favorite high-quality, high-smoke-point oil (like avocado oil, light olive oil, or grapeseed oil). To use it, you pump the cap a few times to build up natural air pressure, and then press the nozzle to release a beautiful, even, continuous mist of 100% pure oil.
There are no propellants. There is no dimethyl silicone. There is absolutely no soy lecithin. It is just pure, unadulterated fat that will protect your nonstick pan rather than destroy it. Plus, buying oil in bulk and refilling a mister will save you a small fortune compared to buying $5 cans of aerosol spray every month.
The Paper Towel Wipe
If you do not want to buy an oil mister, the cheapest and most effective method is the simple paper towel wipe. Pour a dime-sized drop of oil into the center of your cold nonstick pan. Take a folded paper towel and quickly wipe the oil across the entire surface of the pan, coating the bottom and the sides.
This leaves a microscopically thin layer of pure fat that is perfect for searing, frying, or baking, without leaving any heavy pools of grease that will weigh down your food.
Butter and Ghee (The Weekend Indulgences)
When the weekend rolls around and you actually have the time to enjoy the cooking process, ditch the oils entirely and reach for real, high-quality butter or clarified ghee. Yes, butter contains milk solids that can burn at high temperatures, but for gentle, medium-low heat applications, nothing beats it. If you have ever wondered why your pancakes are rubbery and pale when you use cooking spray, it is because they lack the beautiful, golden, crispy edges that only foaming butter can provide.
Masterclass Maintenance: How to Make Nonstick Cookware Last for Years
Eliminating aerosol cooking spray is the single most important step in extending the life of your nonstick pans, but it is not the only rule you need to follow. If you want your cookware to last for years rather than months, you must adopt these strict maintenance protocols.
1. Never Heat an Empty Pan
We have already discussed how thin layers of oil heat up too quickly, but heating a completely bone-dry nonstick pan is a cardinal sin. PTFE and ceramic coatings are highly sensitive to thermal spikes. If you place an empty pan on a high burner, the surface temperature can exceed 500°F (260°C) in less than two minutes. At these temperatures, the nonstick coating begins to break down, off-gas, and permanently degrade. Always add your cooking fat (butter, or pure oil from your mister) before you turn on the heat. The oil acts as a thermal buffer, letting you know when the pan is hot without frying the coating.
2. Respect the Thermal Shock Rule
Imagine you have just finished searing a beautiful piece of salmon. The pan is ripping hot. You take it off the stove, walk it over to the sink, and immediately blast it with cold tap water. The pan hisses violently, sending a plume of steam into the air.
You have just committed cookware murder.
Metals expand when they are hot and contract when they are cold. Blasting a hot pan with cold water causes immense, instantaneous thermal shock. The metal warps, the bottom of the pan bows out, and the nonstick coating stretches and shatters at a microscopic level. If you are constantly wondering why your frying pans keep warping and spinning around like a top on your flat glass stove, thermal shock is the answer. Always, always let your pans cool completely to room temperature before they ever touch a drop of water.
3. Ban Metal Utensils
This should be obvious, but it bears repeating: metal spatulas, metal whisks, and metal forks have absolutely no place near a nonstick pan. Even if the box claims the pan is “metal utensil safe,” it is a marketing lie. Metal will inevitably scratch the coating. Invest in high-quality, heat-resistant silicone spatulas and wooden spoons. They are cheap, effective, and will never compromise your cooking surface.
4. Hand Wash Only
I know the dishwasher is a massive time-saver. But dishwasher detergents are highly caustic and abrasive, and the water pressure is incredibly intense. Putting a nonstick pan in the dishwasher will strip the coating and dull the finish in a matter of weeks. Because it is nonstick, it should only take you fifteen seconds to wash it in the sink with warm water, a few drops of mild dish soap, and a soft sponge. Do not be lazy. Wash it by hand.
5. Control Your Messes Smartly
People often use cooking sprays because they think it prevents messy oil splatters on the stovetop. If you are worried about cleanup, don’t compromise your pan with chemical sprays. Instead, use pure oil and simply invest in a fine mesh splatter screen. It sits over the top of your skillet, allowing steam to escape so your food sears properly, while trapping all the airborne grease droplets that would otherwise coat your kitchen counters.
Conclusion: Break Up with the Can
Cooking should be a joyful, empowering experience, not a frustrating battle against sticky, ruined equipment. You do not need a professional culinary degree to make mind-blowing food in your own home, but you do need to respect the tools of the trade.
Aerosol cooking sprays were invented for convenience, but that convenience comes at the ultimate cost of your expensive cookware. The chemical propellants, the dimethyl silicone, and the dreaded soy lecithin are actively working together to polymerize, bake on, and destroy the delicate engineering of your nonstick pans.
It is time to march into your pantry, grab that pressurized can of chemical mist, and throw it in the garbage where it belongs. Buy a pump-action oil mister. Keep a stick of good butter on the counter. Wipe your pans with a paper towel. Take the extra five seconds to use pure, real fats. Your food will taste significantly better, your cleanup will remain effortlessly simple, and your nonstick skillets will reward you by lasting for years to come. Now get out there, preheat your pan (with oil in it!), and go cook something spectacular.