
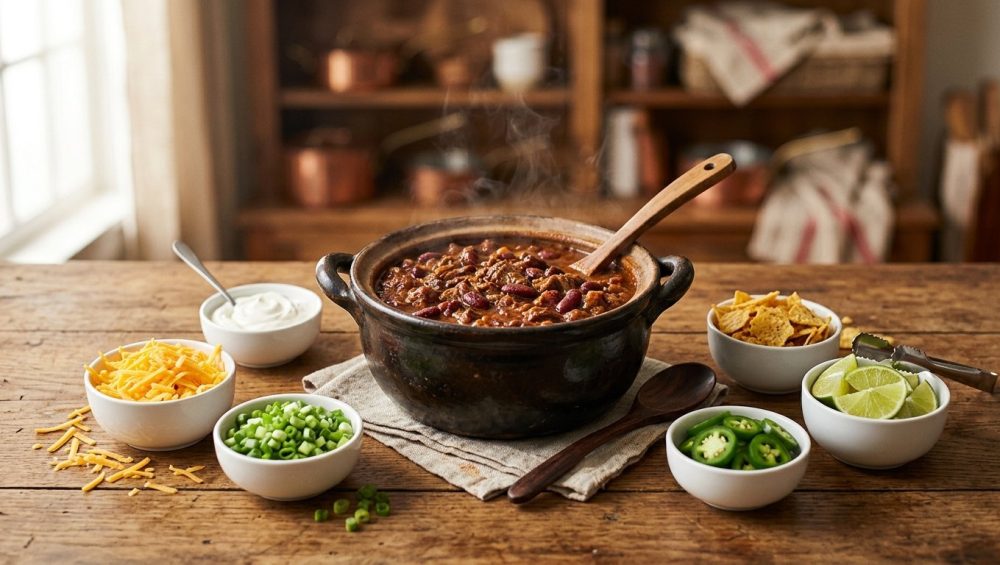
Listen up, weekend culinary warriors. We need to have a serious, sit-down conversation about the swampy, watery mess you’ve been passing off as “chili” at your get-togethers. You know exactly what I am talking about: that tragic, thin, soup-like liquid where sad kidney beans and gray pebbles of ground beef sink straight to the bottom of the bowl, leaving a translucent, greasy red puddle at the top. It is uninspired, it is texturally offensive, and frankly, it is ruining your dinner parties.
But put down your defensive spatulas, because I am not here to judge you—I am here to save you. You do not need a pretentious culinary degree from a French academy to make mind-blowing, thick, deeply flavorful chili. You just need a basic understanding of culinary mechanics, a refusal to use garbage cookware, and a foolproof game plan.
The year is 2026, and the stiff, overly formal dinner party is officially dead. We have entered what industry experts are calling the “Belonging Economy”. People no longer want to sit rigidly at a dining table while a stressed-out host plates a complicated five-course meal with tweezers. Your guests want to feel connected, interactive, and comfortable in your home. They want a communal experience. Enter: the mindful chili bar. It is the ultimate, stress-free hosting hack that buys you the time to enjoy your own party while delivering a highly customized, crowd-pleasing meal.
But before we can build a glorious, interactive toppings station, we have to fix the foundation. We have to talk about the simple food science of building a rich, thick chili. Grab a notebook, pour yourself a glass of whatever gets you through the evening, and let’s dive into the mechanics of starch release, spice blooming, and stress-free entertaining.
The Science of Sad, Watery Chili (And How to Fix It)
Why does your chili end up looking like a tragic bowl of minestrone? The answer lies in how you handle moisture and starch during the cooking process. Chili is essentially a stew, and like all stews, it requires a careful orchestration of liquid reduction and thickening agents. When you fail to manage these elements, you get watery results.
The first culprit is usually meat weeping. When you dump two pounds of fridge-cold ground beef into a lukewarm pot, the temperature of the cooking surface plummets. Because the pan isn’t hot enough to trigger the Maillard reaction (the chemical reaction between amino acids and reducing sugars that gives browned food its distinctive flavor), the meat rapidly releases its intracellular water. Instead of searing, the beef steams instead of browning, leaving you with rubbery, gray crumbles swimming in a pool of murky liquid. To fix this, you must sear your meat in batches over medium-high heat, allowing the moisture to evaporate and a deep, flavorful crust to form.
The second culprit is the vegetable water dump. Onions, bell peppers, and celery are composed of roughly 90% water. If you do not sweat them down properly before adding your tomatoes and broth, all of that internal cellular water will bleed directly into your chili as it simmers, diluting the flavor and thinning the texture. You must cook your aromatics until their moisture has cooked off and they are deeply softened and translucent.
The Starch Solution: Thicken Like a Pro
Even if you perfectly brown your meat and sweat your vegetables, a truly great chili requires a binding agent to achieve that luxurious, velvety texture that clings to the back of a spoon. This is where the science of starch gelatinization comes into play.
Starches are complex carbohydrates composed of two main types of molecules: amylose (which is linear) and amylopectin (which is highly branched). When you introduce raw starch to a cold liquid, nothing much happens. But when you heat starch in the presence of water, the intermolecular bonds between the starch molecules begin to break down. The starch granules absorb water, swell up like microscopic water balloons, and eventually burst, releasing their amylose and amylopectin into the surrounding liquid. These molecules tangle together, creating a thick, viscous matrix that transforms a watery broth into a rich, cohesive sauce.
So, how do we harness this for chili? You have a few scientifically sound options:
1. The Masa Harina Slurry: This is the gold standard for traditional chili. Masa harina is corn that has been treated with an alkaline solution (nixtamalized) and ground into a fine flour. It provides a beautiful, subtle tamale-like flavor while acting as a powerhouse thickener. To use it, whisk two tablespoons of masa harina with an equal amount of warm water or broth to create a smooth slurry, then stir it into your simmering chili during the final twenty minutes of cooking.
2. The Bean Mash Technique: If you want to thicken your chili without adding additional flours, look no further than the ingredients already in your pot. Beans are incredibly rich in natural starches. By taking a ladleful of your chili (making sure to scoop up plenty of beans), blending it until smooth, and stirring it back into the pot, you force those internal bean starches into the liquid, instantly thickening the overall batch.
3. The Precision Hydrocolloid: If you are feeling particularly modern and want to avoid altering the flavor profile whatsoever, you can use a tiny amount of xanthan gum. Food science dictates that just 0.1% to 0.2% by weight is enough to stabilize an emulsion and thicken a watery base without turning it into a gummy nightmare.
The Secret to Deep Flavor: Blooming Your Spices
We have fixed the texture, but now we need to talk about flavor. If you are just dumping spoonfuls of raw chili powder, cumin, and oregano directly into a pot full of wet crushed tomatoes, you are committing a culinary crime. It is time to stop using raw spices straight from the jar into a watery broth.
When you taste a spice, what you are actually experiencing is a complex array of volatile aromatic compounds. These include terpenes in cumin, aldehydes in cinnamon, and phenols in cloves. The defining characteristic of these compounds is that they are highly fat-soluble, meaning they dissolve and release their flavors brilliantly in fats and oils, but they are incredibly stubborn and muted when introduced only to water.
This brings us to the crucial technique of “blooming” (also known as tempering or tadka in Indian cuisine). Blooming is the process of gently heating your spices in a fat—like oil, butter, or rendered beef tallow—before introducing any water-based ingredients to the pan.
When spices hit hot oil, a rapid sequence of chemical reactions occurs. First, the heat physically ruptures the tough cellular walls of the dried spices, releasing the trapped essential oils. Second, the fat-soluble flavor compounds dissolve directly into the cooking oil, creating a highly flavored lipid base that will eventually coat every single ingredient in your pot. Finally, the heat triggers the Maillard reaction within the spices themselves, transforming their raw, dusty, one-dimensional profiles into deep, complex, toasted flavors.
To execute this properly, right after you have sweated your onions and garlic, push them to the perimeter of your pot. Add a tablespoon of neutral oil or let the residual beef fat pool in the center. Dump your chili powder, cumin, coriander, and smoked paprika directly into the hot fat. Stir constantly for about 45 to 60 seconds. The moment your kitchen smells like an intoxicating, heavily spiced heaven—and right before the spices begin to scorch and turn bitter—pour in your tomatoes or broth to instantly drop the temperature and halt the cooking process. You have just unlocked 100% of your spices’ potential.
The Acid Adjustment
Let’s say you have thickened your chili perfectly and bloomed your spices like a master, but when you taste the pot, it still feels a little heavy, muddy, or uninspired. You might be tempted to aggressively dump in more salt, but salt is rarely the answer here.
Rich, heavy dishes loaded with umami, starches, and fats absolutely require a counterbalancing force to wake up the palate. This missing acid is exactly why your homemade soups taste flat until you add a finishing splash of brightness. A tablespoon of apple cider vinegar, or a generous squeeze of fresh lime juice (which sits at a highly acidic pH of around 2.0), added off the heat right before serving, will gently hydrolyze excess starches, cut through the heavy beef fat, and make the individual spices sing.
The “No-Go” Rule: Ditch the Toxic Cookware
I cannot, in good conscience, give you a masterclass on slow-simmering acidic stews without addressing the elephant in the kitchen: your cookware. I will never stop preaching about banishing toxic kitchen gear from your cabinets.
If you are cooking a massive batch of chili in a cheap, lightweight, non-stick aluminum pot that you bought at a big-box store five years ago, you are actively ruining your food and potentially your health. Chili is highly acidic due to the massive volume of tomatoes. When you simmer acidic foods for hours in scratched Teflon or mystery-metal pots, the acid degrades the compromised chemical coatings and leaches metallic off-flavors (and worse, PFAS chemicals) directly into your dinner. Furthermore, cheap, thin pots have terrible thermal conductivity and zero thermal mass. This means the heat from your burner creates aggressive hot spots on the bottom of the pot, guaranteeing that your thick chili will scorch, burn, and stick to the base, infusing your entire batch with the acrid taste of burnt carbon.
You need serious gear for a serious chili. You should exclusively be using heavy-bottomed, high-quality cookware. An enameled cast-iron Dutch oven is the undisputed king of chili pots. The cast iron provides massive thermal mass, absorbing the heat and radiating it evenly across the bottom and up the sides of the pot, allowing for a gentle, perfectly controlled simmer that will never scorch your food. The glass-enamel coating is completely non-reactive, meaning you can simmer highly acidic tomatoes for ten hours without a single metallic off-flavor leaching into your masterpiece. If you don’t have enameled cast iron, a thick, multi-clad stainless steel stockpot with an aluminum core is your next best option. Invest in good tools once, and they will literally outlive you.
The 2026 Dinner Party Era: Why the Chili Bar Rules
Now that you have engineered a scientifically flawless pot of chili, it is time to talk about how to serve it. As I mentioned earlier, the landscape of home entertaining has shifted dramatically. The days of stressing over a perfectly timed, multi-course plated dinner are behind us. When you want to host a relaxed dinner party, you need a menu that does the heavy lifting for you.
Event planners and hospitality experts in 2026 are obsessed with the concept of “emotional inclusion” and the “Belonging Economy”. Guests don’t just want to be served; they want to participate. They want interactive, customizable, low-pressure environments. A chili bar is the absolute pinnacle of this philosophy.
A mindful chili bar shifts the burden of plating and customization entirely off the host and onto the guests. It naturally accommodates every conceivable dietary restriction without requiring you to cook four different meals. You can easily provide a robust beef chili alongside a rich, plant-based black bean and sweet potato chili. From there, the guests take over, building their own bowls exactly to their liking. The picky eater can skip the onions; the spice fanatic can load up on jalapeños; the dairy-free guest can easily bypass the cheese. Everyone gets exactly what they want, and you, the host, actually get to hold a drink, mingle, and enjoy the party you worked so hard to put together.
Blueprint for a Mindful Chili Bar
Setting up a chili bar that looks beautiful, flows logically, and keeps the food safe and appetizing requires a bit of spatial planning and thermodynamic strategy. Do not just throw a bunch of plastic bags and mismatched Tupperware onto your kitchen island. We are aiming for rustic elegance and effortless flow.
The Hot Zone: Thermodynamics of Chili
The anchor of your station is the chili itself. Because a party can stretch on for hours, leaving a giant pot of chili sitting on an unheated table is a recipe for lukewarm, congealed sadness (and a potential food safety hazard). Maintaining proper holding temperatures is the ultimate secret to stress-free mindful gatherings.
If you cooked your chili in a Dutch oven, you can transfer the pot to a portable induction burner set to a low “keep warm” setting. Alternatively, you can absolutely transfer the finished chili to a high-quality slow cooker. Slow cookers are incredibly well-insulated and designed specifically for long-term thermal holding. Place your hot zone at the very beginning of your buffet line, accompanied by a stack of deep, sturdy ceramic bowls (paper bowls will disintegrate under the weight of a proper chili) and a long-handled, deep ladle.
The Toppings Matrix: Building Flavor and Texture
Once your guests have their base, they move down the line through the toppings matrix. A mindful chili bar should hit every single note on the palate: crunchy, fresh, creamy, and rich. Arrange your toppings in beautiful, uniform ceramic or glass bowls, moving from left to right.
The Crunchy Zone: Chili is inherently soft. To prevent palate fatigue, you must introduce contrasting textures. Provide a bowl of classic corn chips (Fritos are the undisputed champion of the chili bowl), crispy tortilla strips, or even toasted pepitas (pumpkin seeds) for an earthy, crunchy bite. Do not forget the cornbread—bake it in a cast-iron skillet and cut it into small, manageable wedges so guests can easily grab a piece to dip.
The Fresh Zone: Heavy, braised dishes desperately need the sharp bite of fresh, raw ingredients to cut through the fat. Offer finely diced red onions (soak them in ice water for ten minutes beforehand to remove their harsh, sulfurous bite), thinly sliced scallions, freshly chopped cilantro, and a bowl of lime wedges. For the heat seekers, provide freshly sliced jalapeños and perhaps a few bottles of artisanal hot sauce.
The Creamy Zone: This is where you tame the heat and add luxurious mouthfeel. Offer full-fat sour cream or Mexican crema. Next, you must provide avocado. We all know how fast guacamole turns brown when exposed to the air, due to the enzyme polyphenol oxidase reacting with oxygen. To prevent your diced avocados from turning into a sad, brown mush before the party is over, toss the cubes gently in a small amount of lime juice (the ascorbic acid halts the enzymatic browning) or keep them submerged in a shallow water bath until right before serving.
The Cheese Zone: This is a non-negotiable rule of the Sassy Sous-Chef: you must grate your own cheese from a high-quality block. Pre-shredded cheese is coated in cellulose, which is exactly why your cheese sauce gets grainy when you try to melt it over a hot bowl of chili. Cellulose prevents the cheese shreds from clumping in the bag, but it also prevents them from melting smoothly. Take the extra three minutes to grate a block of sharp cheddar, Monterey Jack, or pepper jack. Your guests’ palates will thank you.
Time is Money: Weekday Prep Hacks for Weekend Hosting
I am a firm believer that your time is your most valuable asset. The beauty of the chili bar is that 90% of the work can—and should—be done before your doorbell ever rings.
Flavor Maturation: Chili is one of the rare culinary creations that is scientifically proven to taste better the day after it is made. When you let chili rest in the refrigerator for 24 to 48 hours, a process called “flavor maturation” occurs. The starches in the beans and vegetables undergo retrogradation, absorbing more liquid and improving the overall texture. Meanwhile, the complex flavor compounds from your bloomed spices continue to mingle and bond with the proteins and fats, resulting in a significantly more rounded, cohesive flavor profile. Make your chili on a Thursday evening, let it cool, and stash it in the fridge. On Saturday, all you have to do is gently reheat it.
The Tomato Trap: If you are making your chili from scratch using dried beans rather than canned, you must heed this warning regarding acid. If you dump canned tomatoes in with dry legumes too early, your beans are always hard no matter how long you simmer them. The acid in the tomatoes binds with the pectin in the bean skins, reinforcing their cellular structure and making them virtually impenetrable to water. Always simmer your dried beans in a neutral broth until they are completely tender before introducing any acidic tomatoes or vinegar to the pot.
Toppings Prep: You can prep almost your entire toppings matrix the day before. Grate your cheese and store it in an airtight container. Dice your onions and scallions. If you want to stop eating mushy veggies at your toppings station, keep your pre-diced fresh produce wrapped in slightly damp paper towels inside airtight containers in the crisper drawer to maintain their cellular turgor pressure (crunchiness). The only things you should prep at the absolute last minute are your avocados and your fresh cilantro, as both are highly susceptible to rapid oxidation and wilting.
Confidently Claim Your Kitchen
There you have it. You are now armed with the molecular science of starch gelatinization, the thermodynamic knowledge of spice blooming, and the psychological blueprint for hosting the ultimate 2026-approved dinner party.
You do not need a Michelin star to make exceptional food. You just need to ditch the toxic, peeling pans, respect the chemical properties of your ingredients, and stop taking the act of hosting so seriously. Cooking should be an act of joyful creation, not a stressful chore.
So, this weekend, skip the pretentious, anxiety-inducing plated dinner. Brown your beef properly, bloom your spices in hot fat, simmer it all in a heavy Dutch oven, and set out a beautiful, sprawling chili bar. Pour yourself a drink, invite your friends into the kitchen, and let them build their own perfect bowls. You’ve earned the right to relax and enjoy your own party. Now get cooking.






