
Listen, nobody invites their friends over for a backyard cookout with the intention of serving them dense, dry, spherical meatballs balanced precariously on oversized buns. Yet, weekend after weekend, I see well-meaning home cooks fall victim to the exact same culinary tragedy. You spend your hard-earned money on quality ground beef. You meticulously form these beautiful, wide, perfectly flat patties. You gently lay them into a hot skillet or onto the grill grates, feeling like an absolute culinary deity. And then, the betrayal begins.
Before your very eyes, those gorgeous, wide patties violently contract. The edges pull inward, the center aggressively bulges upward, and suddenly, your perfectly proportioned slider has transformed into a sad, tough little golf ball. It’s infuriating. It’s one of the most common rookie kitchen mistakes that completely derails an otherwise flawless gathering.
But here is the absolute truth: you do not need a culinary degree, a commercial flat-top griddle, or a pretentious chef’s attitude to fix this. You just need a basic understanding of thermodynamics, a little bit of technique, and a refusal to accept mediocrity. Today, we are going to dive deep into the thermal science of muscle fiber contraction, the absolute necessity of fat rendering, and the foolproof shaping techniques that will ensure your patties stay flat, juicy, and perfectly sized.
More importantly, we are going to take that chaotic, stressful, smoke-alarm-inducing stovetop session and transform it into a relaxed, prep-ahead interactive meal. We are building the ultimate mindful slider bar. Because your weekends are precious, your time is valuable, and life is simply too short to eat terrible burgers while hiding from your own dinner guests.
The Great Patty Betrayal: Why We Are Plagued by Shrinkage
Let’s get one thing straight: meat is not a solid block of inanimate clay. It is a complex, water-logged matrix of proteins, connective tissues, and lipids. When you throw a raw patty onto a scorching hot surface, you are initiating a violent cascade of chemical and physical reactions. If you don’t understand what is happening on a microscopic level, you will never be able to control the outcome.
The Thermodynamics of Meat: Muscle Fibers and Heat
To understand why burgers always shrink into thick pucks, we have to look at the composition of the beef itself. On average, lean muscle tissue is composed of roughly 75% water, 18% protein, and about 5% fat, with the remainder being carbohydrates, minerals, and vitamins. Yes, you read that correctly: that raw ground beef you just bought is mostly water.
When you apply heat to this water-logged protein matrix, the proteins—specifically myosin and actin—begin to denature and coagulate. At around 115°F to 120°F (46°C to 49°C), the myosin proteins begin to unfold and bond together. As the internal temperature climbs higher, the actin proteins follow suit. As these protein fibers denature, they physically shrink in both length and width.
Imagine a wet sponge being violently wrung out by an invisible hand. That is exactly what is happening inside your burger. The shrinking protein fibers squeeze the trapped water out of the meat matrix. This moisture loss is an unavoidable law of thermal dynamics. You cannot stop it entirely, but you can manage it. If you overcook the meat, you force out too much water, leaving behind a dry, crumbly mess. But the shrinkage isn’t just about water loss; it’s about structural deformation. As the fibers tighten, they pull the edges of the patty inward, forcing the center to dome upward.
The Fat Factor: Rendering and Moisture Loss
Water isn’t the only thing leaving the party when the heat gets turned up. We also have to talk about fat rendering. Fat is the magical substance that lubricates the muscle fibers, carries fat-soluble flavor compounds to your palate, and provides the psychological sensation of juiciness even as the actual water content evaporates.
When you cook a burger, the solid fat melts and renders out into the pan. This physical loss of mass contributes significantly to the overall shrinkage of the patty. This is precisely why the lean-to-fat ratio you select at the grocery store is the single most important decision you will make in this entire process.
If you buy 90/10 (90% lean, 10% fat) ground beef because you are trying to be healthy, I need you to stop right now. Save that for a bolognese sauce. In a burger, 90/10 will turn into absolute sawdust. There is not enough fat to lubricate the contracting muscle fibers, meaning the moment the water evaporates, you are left with a dry, choking hazard.
On the other end of the spectrum, if you buy 70/30 (70% lean, 30% fat), you are going to experience catastrophic shrinkage. As that massive volume of fat renders and liquifies, the physical structure of the patty collapses, leaving you with a tiny, greasy nugget swimming in a pool of its own oil.
The golden ratio—the indisputable champion of the burger world—is 80/20. Eighty percent lean chuck, twenty percent fat. This ratio provides exactly enough fat to baste the meat internally as it cooks, replacing the lost water with rich, flavorful lipids, without causing the patty to shrink into oblivion.
The Connective Tissue Conundrum
Grinding meat fundamentally changes its structural integrity. When a butcher grinds a chuck roast, they are mechanically pulverizing the muscle fibers and connective tissues. This is why a burger is tender enough to bite through, unlike a solid steak cooked to the same temperature. However, this mechanical tenderization also means that the structural network holding the moisture and fat together has been compromised. The more you handle, mix, and compress the ground meat with your hands, the more you encourage the proteins to cross-link and bind together before they even hit the heat. Overworking the meat creates a dense, sausage-like texture that will contract aggressively the second it touches a hot pan.
The Science of Shaping: How to Defeat the Shrinkage
Now that we understand the microscopic warfare happening inside the beef, we can deploy strategic countermeasures. You are the master of your kitchen, and you are going to dictate the final shape of these sliders.
The Magic of the Dimple Trick
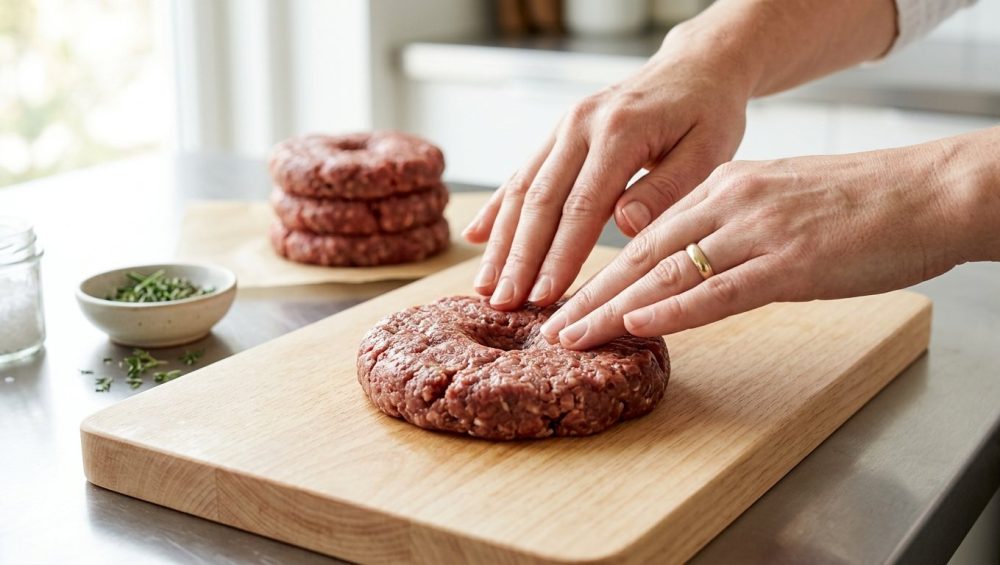
You have probably seen professional chefs or your overly confident uncle press their thumb into the center of a raw burger patty before grilling. This isn’t just culinary theater; it is applied physics. It is widely known as the dimple trick, and it is your first line of defense against the dreaded dome.
When you create a shallow indentation (about the width of your thumb and maybe a quarter-inch deep) in the center of the patty, you are creating a mechanical stress relief zone. Remember how the heat causes the muscle fibers to contract and pull inward? If the patty is perfectly flat, that inward pressure has nowhere to go but up, creating a bulge in the center.
By removing a small amount of mass from the center and creating a depression, you give the contracting meat room to expand laterally into the empty space. As the edges pull inward, the dimple slowly rises and fills in, resulting in a perfectly flat, even patty once fully cooked. It is a brilliant, effortless hack that requires zero special equipment. Do not skip the dimple.
The Diameter Rule: Sizing Your Patties Correctly
Even with the perfect 80/20 blend and a strategically placed dimple, your burger is still going to lose some overall diameter due to fat rendering and protein contraction. If you form your raw patties to be the exact same size as your slider buns, you are going to end up with an embarrassing meat-to-bun ratio. Nobody wants a mouthful of dry bread with a tiny meatball hiding in the center.
The absolute golden rule of shaping is to form your raw patties at least half an inch to a full inch wider than the buns you plan to serve them on. When making sliders, which are inherently smaller and more prone to rapid moisture loss, this visual discrepancy will feel extreme. You will look at the raw meat and think, “This is way too big for that tiny bun.” Trust the process. By the time the Maillard reaction has worked its magic and the fat has rendered, that oversized disc will have shrunk to perfectly mirror the circumference of your bun.
Temperature Matters: Cold Meat vs. Hot Pans
One of the most insidious ways home cooks ruin their burgers is by letting the raw meat sit out on the counter while they prep their toppings. Ground beef is an emulsion of meat and fat. If the fat gets too warm before it hits the pan, it will become soft, sticky, and begin to smear. Smeared fat melts out of the burger instantly upon hitting the heat, rather than staying trapped inside the protein matrix to keep the meat juicy.
Keep your ground beef in the refrigerator until the exact moment you are ready to shape it. Shape the patties quickly with cold hands, dimple them, and put them back in the fridge while your skillet preheats. You want the fat to be solid and distinct when the meat hits the searing hot metal.
The Hardware: Why Your Skillet is Ruining Your Sliders
We need to have a serious, brutally honest conversation about your kitchen equipment. I have zero patience for cheap, toxic, poorly manufactured cookware, and neither should you. If you are trying to achieve a professional-level sear on a burger using a warped, scratched, fifteen-dollar non-stick pan you bought at a big-box store five years ago, you are setting yourself up for failure.
Ditch the Toxic Teflon
Let me be absolutely clear: traditional non-stick coatings (like Teflon/PTFE) have absolutely no business being anywhere near a burger. To develop a proper Maillard crust—that deeply browned, caramelized, intensely savory exterior that defines a great burger—you need high heat. Most cheap non-stick pans cannot safely withstand the temperatures required for a hard sear. When pushed past their thermal limits, these coatings can degrade, off-gas toxic fumes, and eventually peel or flake directly into your food.
There is nothing appetizing about mystery chemical flakes in your sliders. Furthermore, the slick surface of a non-stick pan actually prevents the meat from gripping the metal, which is a necessary step for building a crust. Throw the scratched non-stick pans in the trash where they belong.
Cast Iron and Carbon Steel: The Home Cook’s Best Friends
If you want to cook like an expert without a culinary degree, you need to invest in thermal mass. You need a pan that can absorb a massive amount of heat and hold onto it when a cold slab of meat is dropped onto its surface.
Your best options are a heavy cast iron skillet or a thick carbon steel pan. Both of these materials offer exceptional heat retention and emissivity. Yes, they require a little bit of maintenance to keep their seasoning intact, but the payoff is immense. If you are worried about the upkeep and why your cast iron leaves black specks, it just means you need to properly clean and re-polymerize the oil layer. It is not rocket science.
Carbon steel, in particular, is a phenomenal choice for the home cook. It heats up slightly faster than cast iron but offers the same indestructible, naturally non-stick properties once properly seasoned. Understanding the thermodynamics of carbon steel pans will completely revolutionize your stovetop cooking.
If you prefer stainless steel, that works too, provided it is a heavy-bottomed, multi-clad pan. Just remember to preheat the stainless steel properly and utilize the water drop test to ensure the surface has reached the Leidenfrost point before adding your oil and meat. This will prevent the proteins from permanently fusing to the metal.
Transforming Chaos into Calm: The Mindful Slider Bar Strategy
Now that we have the science and the hardware sorted, we need to address the logistics of entertaining. There is a toxic myth in the culinary world that a good host must be a sweaty, stressed-out martyr, chained to the stove flipping burgers to order while the guests mingle and have fun in the other room. I reject this premise entirely. You deserve to enjoy your own party.
What is a Mindful Slider Bar?
A mindful slider bar is a strategic, prep-heavy approach to entertaining that front-loads all the labor so you can actually sip a glass of wine when your guests arrive. Instead of taking custom temperature orders and playing short-order cook, you batch-cook a mountain of perfectly shaped, beautifully seared sliders just before the doorbell rings, and you hold them at a safe, juicy temperature.
You then lay out a gorgeous, sprawling buffet of toasted buns, artisanal cheeses, caramelized onions, crisp lettuce, pickles, and homemade sauces. The guests build their own masterpieces. It is interactive, it is fun, and it completely removes you from the role of kitchen servant. Mastering this setup is the true art of effortless hosting.
Batch Cooking and Thermal Holding Techniques
The secret to a successful slider bar is knowing how to hold cooked meat without drying it out or violating food safety protocols. The USDA mandates that hot food must be held at an internal temperature of 135°F (57°C) or higher to prevent bacterial growth.
You have a few brilliant options for holding your batch-cooked sliders. If you are hosting a larger crowd, invest in a basic chafing dish with a water pan. The gentle, indirect steam heat from the water bath will keep the burgers hot without continuing to cook them aggressively. Just be sure the water isn’t at a rolling boil, or you will steam the burgers into tough, gray hockey pucks.
Alternatively, you can use a slow cooker set to the “Warm” setting. Pour a tiny splash of high-quality beef broth into the bottom to create a humid environment, place a piece of parchment paper down, and stack your cooked patties. The ambient humidity will prevent the edges from drying out. Never leave perishable meat out at room temperature for more than two hours (or one hour if it’s over 90°F outside).
Prep-Ahead Assembly: Toppings and Buns
A slider bar lives and dies by its condiments. You must eliminate bottlenecks by organizing your toppings logically. Buns first, then the meat holding station, followed by cheeses, hot toppings (like bacon or grilled mushrooms), cold toppings (lettuce, tomato, pickles), and finally, the sauces.
Do not serve cold, sad, un-toasted buns. A toasted bun provides a crucial structural barrier that prevents the meat juices and sauces from turning the bread into a soggy, disintegrating mess. Brush the cut sides of your slider buns with a little melted butter and toast them under the broiler or on a griddle before setting them out.
If you are serving a warm cheese sauce instead of sliced cheese, ensure you use a stabilizer like sodium citrate or a proper roux base. There is nothing sadder than watching a guest pump a spoonful of broken, oily liquid onto their burger because your cheese sauce gets grainy as it cools.
The Masterclass: Step-by-Step to Slider Perfection
We have covered the theory, the equipment, and the strategy. Now, let’s execute. This is your definitive, step-by-step masterclass for creating the ultimate slider patties.
Selecting the Right Blend
Go to the butcher counter. Do not buy the pre-formed, tightly vacuum-sealed patties in the freezer aisle; they are compressed into dense bricks and will never yield a tender bite. Ask the butcher for freshly ground 80/20 chuck. The chuck roast has an incredible, beefy flavor profile and the perfect ratio of intramuscular fat to keep the sliders moist during a hard, fast sear.
The Gentle Mix and Shape
Take your cold ground beef out of the fridge. If you are adding seasonings directly into the meat (which I generally advise against—salt the exterior only, to prevent drawing out moisture prematurely and creating a sausage texture), do it gently.
Divide the meat into 2-ounce to 3-ounce portions for sliders. Wet your hands slightly with cold water to prevent sticking. Gently toss the portion of meat back and forth between your palms to form a loose ball, then press it flat on a piece of parchment paper. Remember the diameter rule: press it out wider than your bun.
Now, take your thumb and press a distinct, shallow dimple right into the center of the patty. Do not pierce all the way through; just create a little crater. Place the formed patties on a baking sheet lined with parchment paper and put them back in the fridge to chill for 15 minutes.
The Sear, The Flip, The Cheese
Place your cast iron or carbon steel skillet over medium-high heat. Let it get screaming hot. You want it hot enough that the meat sizzles violently the second it makes contact, but not so hot that the oil instantly bursts into plumes of acrid black smoke.
Take your chilled patties and generously season the top side with coarse kosher salt and freshly cracked black pepper. Place them seasoned-side down into the dry skillet (the 20% fat in the beef will render quickly enough to prevent sticking, though a tiny wipe of neutral oil on the pan doesn’t hurt). Season the top side now facing you.
Do not touch them. Do not move them. And for the love of all things holy, do not press down on them with your spatula. Pressing the burger wrings out the juices just like a sponge, leaving you with dry meat. Let the Maillard reaction do its job.
After about 2 to 3 minutes, you will see a deeply browned crust forming around the bottom edges. Slide a thin, flexible metal spatula under the patty, scraping hard against the metal to keep the crust intact, and flip it.
If you are adding sliced cheese, do it immediately after the flip. To ensure the cheese melts perfectly before the burger overcooks, you need to trap the ambient heat. Using a stainless steel melting dome over the patties for 30 seconds will create a mini-oven effect, melting the cheese into a glorious, gooey blanket.
Cook for another 1 to 2 minutes on the second side. Because these are sliders, they cook incredibly fast. If you are paranoid about doneness, remember that your cheap meat thermometer is lying to you if it isn’t an instant-read digital model. Ground beef should technically reach 160°F (71°C) for maximum food safety. Once they hit the target, pull them from the pan immediately and transfer them to your holding station.
The Final Bite: Reclaiming Your Weekend Gatherings
Cooking for a crowd should never feel like a punishment. By understanding the thermal dynamics of muscle fibers, respecting the necessity of an 80/20 fat ratio, and utilizing the brilliant simplicity of the dimple trick, you have officially conquered the shrinking burger phenomenon.
You have banished the toxic Teflon, embraced the power of heavy thermal mass, and set up a mindful slider bar that allows you to actually be a guest at your own party. You are no longer at the mercy of unpredictable meat pucks. You are a resourceful, intelligent home cook who knows that a little bit of science and a lot of preparation is the ultimate recipe for a flawless weekend gathering. Now go pour yourself a glass of wine, preheat that cast iron, and show those sliders exactly who is boss.






