
The Heartbreak of the Seize: A Weekend Baker’s Worst Nightmare
Welcome to the weekend, my fellow culinary hobbyists. You have successfully survived the grueling weekday grind, navigating the chaos of quick thirty-minute meals and one-pan wonders. Now, it is your time to shine. The kitchen is yours, the wine is poured, and you are ready to tackle an elaborate, show-stopping dessert that requires zero shortcuts. You have invested in high-quality couverture chocolate, meticulously set up your workspace, and you are gently melting it down for a glossy ganache, a flawless truffle coating, or a structurally perfect mirror glaze. Everything is going beautifully. The chocolate is cascading like liquid silk.
And then, in the blink of an eye, disaster strikes.
Without warning, that beautiful, glossy pool of liquid luxury violently seizes up. It transforms from a smooth, flowing curtain of elegance into a dull, gritty, stiff paste that looks more like spackle than dessert. You stare into the bowl, spatula in hand, wondering why your melted chocolate turns clumpy and stiff, effectively ruining your masterpiece. Panic sets in. Premium chocolate is not cheap, and throwing it in the trash feels like a culinary crime.
If this has happened to you, take a deep breath and put down the trash can. You are not alone, and more importantly, you are not a failure. As home baking continues to skyrocket in popularity—with the global baking chocolate market valued at $4.8 billion in 2025 and projected to reach a staggering $7.6 billion by 2034—more home cooks than ever are encountering this exact kitchen nightmare. We are buying better ingredients, attempting more ambitious recipes, and running headfirst into the highly temperamental physics of cocoa butter.
You do not need a culinary degree to fix this. You just need to understand the science of what is happening in that bowl, and you need the right techniques to reverse the damage. Today, we are going to dive deep into the microscopic world of chocolate. We are going to explore exactly how trace amounts of moisture or a few degrees of excess heat can completely destroy a cocoa butter suspension. Then, I am going to teach you the foolproof, scientifically backed emulsion hacks to rescue your ruined chocolate and save your dessert. Class is in session.
The Anatomy of Chocolate: A Microscopic Balancing Act
To defeat the enemy, we must first understand the ingredient. When you look at a solid bar of high-quality chocolate, your brain registers it as a single, uniform ingredient. But from a chemical and physical standpoint, chocolate is not a single substance at all. It is a highly complex, meticulously engineered mechanical suspension.
During the chocolate-making process, cocoa nibs and sugar are subjected to a rigorous grinding and smoothing process known as “conching.” Heavy rollers grind the solid particles down to a microscopic size—usually between fifteen and twenty microns. For context, the human tongue can detect grittiness in anything larger than thirty microns. By milling the particles down to this microscopic level, chocolatiers ensure that the final product feels perfectly smooth as it melts on your palate.
Once these dry particles (the cocoa solids and the sugar) are milled into a fine powder, they are suspended in a continuous phase of fat. That fat is cocoa butter. In high-quality chocolate, there is absolutely zero moisture. Let me repeat that, because it is the most critical fact you will learn today: there is no water in chocolate. It is a completely dry environment where microscopic, moisture-starved particles of sugar and cocoa are floating harmoniously in a sea of liquid fat, often aided by a touch of soy lecithin to reduce friction and improve the flow.
When you apply gentle heat to this suspension, the cocoa butter melts, allowing the dry particles to glide past one another effortlessly. This is what gives melted chocolate its glorious, fluid, silky texture. We already know that hot liquid makes chocolate taste infinitely richer by releasing its volatile flavor compounds, but keeping that liquid state stable requires absolute perfection in your environment. If you disrupt that delicate balance of dry particles and fat, the suspension collapses.
The Primary Culprit: The Moisture Trap
The absolute cardinal rule of working with chocolate is that water is the enemy. Even the most microscopic amount of moisture can trigger a catastrophic chain reaction in your bowl. We are not just talking about a splashed spoonful of tap water; we are talking about a single drop of condensation from a lid, a lingering droplet on a poorly dried spatula, or even heavy ambient steam in a humid kitchen. The danger of a wet bowl cannot be overstated.
But why does water cause such a violent reaction? It all comes down to the chemical properties of sugar.
Sugar is highly hydrophilic, meaning it loves water and actively seeks to absorb it. Cocoa butter, on the other hand, is a fat, making it strictly hydrophobic, meaning it repels water. When a tiny drop of moisture breaches the surface of your melted chocolate, the microscopic sugar particles suspended in the cocoa butter act like tiny sponges. They aggressively absorb that water drop.
Because there is only a tiny amount of water introduced, the sugar doesn’t fully dissolve into a liquid solution. Instead, it forms a highly concentrated, sticky, microscopic syrup. This syrup acts like an incredibly strong culinary glue. It instantly binds the dry cocoa solids and the sugar particles together, forming massive, jagged aggregates that are far larger than the original fifteen microns.
As these particles glue themselves together into massive clumps, they violently squeeze out the cocoa butter that was previously lubricating them. The continuous fat phase is broken, the friction between the particles skyrockets, and the entire structural matrix of the chocolate collapses. In a matter of seconds, your smooth, flowing liquid turns into a gritty, stiff, unworkable paste. The chocolate has seized.
The Secondary Culprit: The Heat Trap
While moisture is the most common reason for seized chocolate, it is not the only threat. Chocolate is notoriously sensitive to temperature fluctuations. If you push the heat just a few degrees past its comfort zone, you will trigger a thermal seize that is often much harder to recover from than a moisture seize.
Different types of chocolate have vastly different temperature thresholds, dictated by their fat, sugar, and milk protein content. Dark chocolate is the most resilient, containing the highest percentage of cocoa solids and cocoa butter. It melts beautifully between 113°F and 120°F (45°C to 48°C). However, if you allow dark chocolate to exceed 120°F, the structural integrity begins to fail. If it hits 131°F (55°C), the cocoa butter fully separates from the solids, the sugar crystals clump together, and the cocoa solids begin to scorch, leaving you with a gritty, bitter, muddy mess. If your meat thermometer is lying to you and reading lower than the actual temperature of your double boiler, you are flying blind into a thermal disaster.
Milk chocolate and white chocolate are significantly more fragile. Because they contain added milk solids, milk proteins, and much higher ratios of sugar, their melting points are much lower—typically around 105°F to 115°F (40°C to 45°C). If you expose milk or white chocolate to temperatures above 110°F to 122°F (43°C to 50°C), the delicate milk proteins will rapidly coagulate, tighten, and burn.
When chocolate seizes due to overheating rather than moisture, it loses its glossy shine entirely, taking on a dull, muddy appearance. If you catch it early enough—before the solids actually scorch and emit a burnt odor—you can sometimes save it. But if the chocolate smells acrid or burnt, there is no culinary magic that can reverse the chemical degradation of scorched cocoa. At that point, it belongs in the compost bin.
The “No-Go” Rule: Why Your Cheap Kitchen Gear is Sabotaging You
Before we get into the rescue methods, we need to have a serious conversation about your equipment. I have zero patience for pretentious chef-speak, but I have even less patience for cheap, toxic, poorly manufactured kitchenware that actively sabotages your cooking. I am a fierce advocate for banishing toxic kitchen gear from your home, and melting chocolate is the ultimate stress test for your equipment.
When you set up a double boiler (a bain-marie), you are relying on precise, gentle, indirect heat transfer. If you are using a flimsy, thin-gauge aluminum mixing bowl from a dollar store, you are practically begging for your chocolate to seize. Thin metals conduct heat too rapidly and unevenly, creating aggressive hot spots on the bottom of the bowl that will scorch your cocoa solids before the chocolate at the top even begins to melt.
Worse yet are the cheap, non-stick double boiler inserts flooded across online marketplaces. These pans are often coated in “mystery metals” or low-grade polytetrafluoroethylene (PTFE) that degrades rapidly. When exposed to the direct, concentrated steam of a double boiler, these cheap non-stick coatings can blister, peel, and flake directly into your expensive chocolate. You are trading your health and your dessert for a minor convenience in dishwashing.
Glass bowls present their own unique dangers. While tempered glass is a poor conductor of heat (which is actually great for the slow, gentle melting of chocolate), cheap, non-tempered glass cannot handle rapid temperature fluctuations. If you place a cold, cheap glass bowl over a pot of boiling water, the thermal shock can cause the bowl to violently crack. Nobody wants to deal with the nightmare of a glass baking dish shattered into a hundred pieces, sending shards of glass and ruined chocolate all over the stovetop.
Furthermore, pay close attention to your stirring utensils. If you are using cheap, low-grade silicone spatulas, you are introducing foreign chemicals and trapped odors into your delicate cocoa butter. If you have ever noticed that your silicone spatulas taste like soap, it is because cheap silicone contains plastic fillers that absorb dishwasher detergents and food odors, which will immediately taint the flavor profile of your premium chocolate.
To melt chocolate like an expert, invest in a heavy-gauge, high-quality stainless steel mixing bowl, or a professional-grade borosilicate glass bowl. Use a seamless, 100% platinum-grade silicone spatula that will not harbor moisture or odors. Quality tools yield quality results.
Masterclass Rescue Method 1: The Counterintuitive Boiling Water Hack
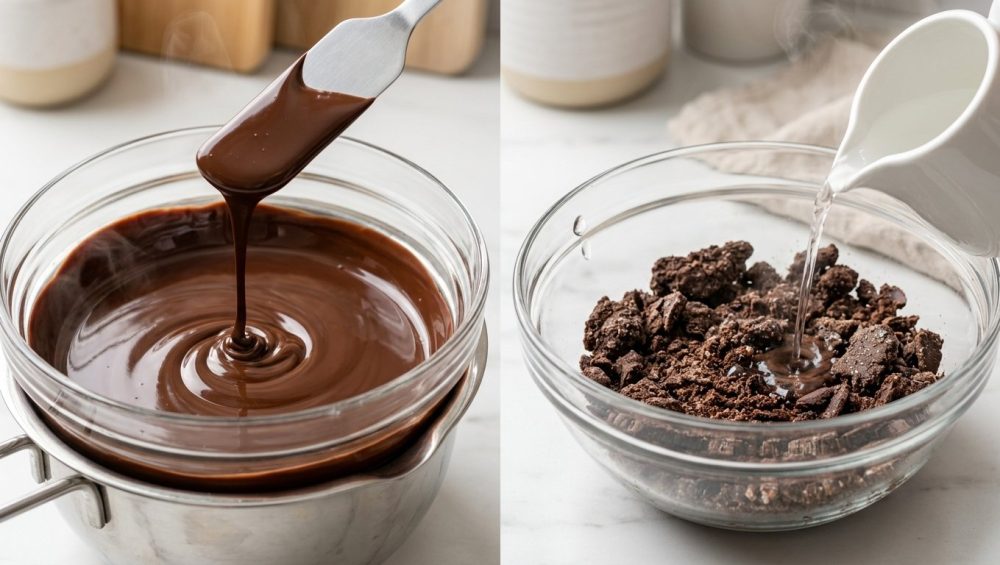
Alright, the unthinkable has happened. A drop of condensation fell into your bowl, the sugar bound together, and your chocolate has seized into a gritty paste. Do not throw it away. When it comes to surviving kitchen disasters, you have to rely on science, and the science of saving seized chocolate requires a brilliantly counterintuitive approach.
Since water caused the problem, your instinct is probably to try and cook the water out, or add more fat immediately. But the truth is, you cannot remove the water once it has bound to the sugar. The only way to fix a moisture seize is to lean into the skid. You must add more water.
By adding a significant amount of boiling water, you are fundamentally changing the structure of the mixture. You are transitioning it from a broken mechanical suspension into a stable fluid emulsion—much like making mayonnaise. The extra hot water fully dissolves the sticky sugar syrup that is gluing the cocoa particles together. Once the sugar is fully dissolved into a liquid state, the cocoa particles are released, and the mixture smooths out into a glossy, cohesive emulsion.
The Step-by-Step Boiling Water Rescue
- Remove from Heat Immediately: The moment you notice the chocolate seizing, take the bowl off the double boiler and place it on a heat-proof surface. Continued heat will only tighten the clumped particles and risk scorching them.
- Boil Fresh Water: Bring a kettle or a small saucepan of water to a rolling boil. The water must be boiling hot; cold or lukewarm water will instantly chill the cocoa butter, turning the chocolate into an unworkable brick.
- The One-Teaspoon Rule: Add exactly one teaspoon of boiling water to the seized chocolate. Do not dump a quarter cup in all at once, or you will shock the mixture and create a watery soup.
- Whisk Vigorously: Using a clean, dry metal whisk or a sturdy silicone spatula, beat the chocolate and the boiling water together vigorously. At first, it will look worse. The chocolate may appear oily, separated, or stringy. This is the emulsion trying to form. Keep whisking.
- Repeat and Assess: If the chocolate is still thick and grainy, add another teaspoon of boiling water and whisk again. Watch the texture closely. Around the third or fourth teaspoon, you will witness a culinary miracle. The dull, gritty paste will suddenly relax, the fat will re-integrate, and the mixture will transform into a beautifully smooth, glossy, flowing liquid.
The Caveat of the Water Hack
While this hack is absolute magic for saving your expensive ingredients, it comes with a strict limitation: you have fundamentally altered the chemical composition of the chocolate. By introducing water, you have diluted the cocoa butter matrix.
This rescued, water-emulsified chocolate cannot be used for tempering, molding, dipping strawberries, or creating structural chocolate shells. It will never set up into a hard, snappy finish again.
However, it is absolutely perfect for applications where moisture is already welcome. You can use this rescued chocolate to make a decadent hot fudge sauce, a rich hot cocoa base, a silky chocolate drizzle for ice cream, or fold it directly into a brownie or cake batter where the added liquid will simply bake off.
Masterclass Rescue Method 2: The Warm Fat Restoration
What if you do need that chocolate to set up? What if you are making truffles, or coating a cake, and you cannot afford to introduce water into the mixture? If your chocolate has seized slightly due to a minor temperature fluctuation or a microscopic speck of moisture, you can attempt to restore the original fat suspension without turning it into a water emulsion.
To do this, you must introduce a compatible, warm lipid (fat) to lubricate the seized particles, essentially forcing the clumped sugar and cocoa solids apart so they can glide freely once again.
The Step-by-Step Warm Fat Rescue
- Choose the Right Fat: You must use a fat that contains absolutely zero water. The holy grail is pure cocoa butter, as it is the native fat of the chocolate. If you do not have cocoa butter, you can use clarified butter (ghee) or a highly neutral vegetable oil (like canola or grapeseed oil). Never use standard baking butter or margarine; standard American butter contains 15% to 20% water, which will instantly make your seize catastrophically worse.
- Warm the Fat: The fat must be warm (around 110°F). If you pour cold oil into warm seized chocolate, the temperature shock will solidify the existing cocoa butter, creating a waxy, unworkable mess.
- The Golden Ratio: The standard rescue ratio is one tablespoon of warm fat for every six ounces of seized chocolate.
- Incorporate and Fold: Pour the warm fat over the seized chocolate and use a spatula to gently but firmly fold it into the clumps. Do not whip air into it; press the fat into the gritty paste against the side of the bowl.
- Smooth it Out: As the warm fat coats the glued-together particles, the friction will drop, and the chocolate will slowly return to a fluid, workable state.
The Caveat of the Fat Hack
While this method avoids water, it still alters the fat ratio of the chocolate. The resulting mixture will be incredibly smooth and glossy, and it will set up nicely at room temperature, making it excellent for dipping, enrobing, or making ganache. However, because you have altered the precise crystalline structure of the native cocoa butter, it will be incredibly difficult to properly temper this chocolate for a professional, snappy shine.
Foolproof Prevention: Setting Up the Perfect Double Boiler
The best way to fix seized chocolate is to never let it seize in the first place. Melting chocolate is an exercise in mindfulness, patience, and meticulous workspace management. If you follow these strict preventative rules, you will never waste a drop of couverture again.
1. The “Bone Dry” Rule
Before you even look at your chocolate, audit your equipment. Your stainless steel bowl, your spatula, your cutting board, and your knife must be bone dry. Wipe them down with a dry paper towel. Wash your hands and dry them thoroughly.
Pay special attention to your whisk. Many cheap whisks have unsealed handles where the wire loops enter the barrel. If your whisk leaks dishwater from the handle while you are stirring, that single rogue drop of dirty water will instantly seize your entire batch of chocolate. Always use a fully sealed, professional-grade whisk, or stick to a seamless silicone spatula. Furthermore, never use wooden spoons to stir chocolate; wood is porous and inherently holds onto hidden moisture and ambient humidity, which it will happily transfer to your cocoa butter.
2. The Water Gap
When setting up your double boiler, the water in the bottom saucepan must never touch the bottom of the mixing bowl. You want a gap of at least one to two inches between the surface of the water and the base of the bowl. You are using the gentle, ambient steam to melt the chocolate, not the direct conductive heat of boiling water. If the water touches the bowl, the chocolate will overheat and scorch in seconds.
3. The Simmer, Not the Boil
Chocolate does not need high heat to melt. Remember, milk chocolate begins to melt at a mere 105°F. Bring the water in your saucepan to a gentle simmer, and then—this is the crucial step—turn the heat off completely. Place the bowl of chocolate over the steaming water. The residual steam trapped in the saucepan provides more than enough gentle, even heat to melt the chocolate perfectly without ever risking a thermal seize. Just like ruining your nonstick pans with high-heat aerosol sprays, blasting your delicate chocolate with a rolling, violent boil is a rookie habit you must break immediately.
4. Beware the Steam Trap
When you are melting the chocolate, never cover the bowl with a lid. A lid will trap the rising heat, creating condensation on the underside of the lid. That condensation will eventually gather into a water droplet and fall right back down into your pristine chocolate, instantly seizing it. Let the chocolate breathe.
5. Chop for Uniformity
Do not throw massive, uneven chunks or whole blocks of chocolate into the bowl and expect them to melt evenly. The smaller pieces will melt and overheat long before the core of the massive block even begins to soften. Use a sharp, dry chef’s knife to chop your chocolate into fine, uniform shards. Uniform size guarantees uniform heat distribution, allowing the entire batch to melt simultaneously and smoothly.
Conclusion: Empowering the Home Cook
Cooking and baking should never be a source of stress. Yes, the science of baking is precise, and yes, ingredients like premium chocolate demand respect and attention to detail. But a seized bowl of chocolate is not a reflection of your skills as a cook; it is simply a temporary disruption in a thermodynamic process.
You do not need a culinary degree to create mind-blowing, professional-level desserts in a standard home kitchen. You just need to understand the physics of your food, invest in safe, high-quality tools that won’t betray you, and keep a few scientific rescue hacks up your sleeve.
The next time a rogue drop of water turns your silky ganache into a gritty nightmare, you won’t panic. You will calmly remove it from the heat, boil some water or warm up some cocoa butter, and whisk that suspension back into a beautiful, glossy emulsion. You are in control of your kitchen. Now go forth, conquer your weekend baking projects, and make something deliciously unapologetic.






