
The Backyard BBQ Betrayal: Why Your Burgers Hate You
Picture this: It is a beautiful Saturday afternoon. You have invited your friends over for a casual weekend cookout. You went out of your way to visit the local butcher, dropping a small fortune on premium, freshly ground beef. You bought those artisanal, ridiculously overpriced brioche buns from the bakery downtown. You spent twenty minutes meticulously shaping massive, perfectly flat, plate-sized patties. You preheated the grill, you poured yourself a well-deserved glass of wine, and you tossed those gorgeous disks of beef onto the grates with a satisfying sizzle.
Fast forward ten minutes. You open the grill lid, tongs in hand, ready to serve up culinary perfection. But instead of the glorious, wide patties you lovingly crafted, you are staring at a grill full of charred, swollen golf balls. They look like weird, beefy UFOs. You try to place one on your artisanal bun, and it looks utterly ridiculous—a tiny, thick dome of meat surrounded by a two-inch halo of empty bread. You try to stack a slice of tomato on top, and it immediately slides off the curved surface, taking the lettuce with it.
If you have ever watched in absolute despair as your beautiful, meticulously shaped patties aggressively contract and shrink into thick pucks the moment they hit the heat, take a deep breath. You are not cursed, and you certainly do not lack culinary talent. You are simply fighting a losing battle against the fundamental laws of thermodynamics and meat biology.
As a home cook, you do not need a culinary degree to make mind-blowing food, but you do need to understand what is actually happening inside your food when you apply heat. The dreaded “meatball effect” is one of the most common, infuriating rookie mistakes in the culinary world, but it is also one of the easiest to fix once you stop blindly following bad advice and start understanding the science. Today, we are going to leave no stone unturned. We are going to dive deep into the molecular biology of ground beef, the physics of high-heat cooking, and the simple, everyday prep techniques that will guarantee perfectly flat, evenly cooked, bun-filling burgers every single time.
The Anatomy of Ground Beef: What Are We Actually Cooking?
Before we can stop the shrinkage, we have to understand what a hamburger actually is. When you look at a package of ground beef, you are not just looking at a red paste. You are looking at a highly complex, chaotic matrix of three primary components: muscle fibers, connective tissue, and fat. And hiding within all of those components is the silent saboteur of your backyard cookout: water.
Meat is predominantly water. Depending on the specific cut of beef and the fat ratio, raw ground beef is composed of roughly 60 to 70 percent water. This moisture is trapped inside the muscle cells and suspended in the protein network.
The protein itself is primarily made up of myofibrillar proteins—specifically actin and myosin—which are the proteins responsible for muscle contraction in the living animal. These proteins are long, coiled structures that behave like microscopic springs. Intertwined with these muscle fibers is collagen, the tough connective tissue that holds the animal’s muscles together.
Finally, there is the fat. Fat is your absolute best friend when it comes to flavor and juiciness, but it is also a wild card when exposed to heat. In a standard burger blend, the fat is distributed throughout the ground muscle in small, irregular chunks.
When you form a patty, you are essentially taking all of these elements—water-filled cells, coiled protein springs, tough collagen networks, and solid pockets of fat—and mashing them together into a fragile, temporary shape. The patty only holds its shape because the sticky proteins (myosin) act as a mild glue, and the fat is solid at room temperature. But the moment you introduce that patty to a 500-degree skillet, all hell breaks loose on a molecular level.
The Science of the Shrink: A Thermodynamic Nightmare
To truly master the burger, we need to put on our lab coats for a moment. When a cold, raw burger patty hits a screaming hot cooking surface, a violent chain reaction of physical and chemical changes occurs almost instantaneously. The shrinkage you see is not an illusion, and it is not just the fat melting away. It is a three-part thermodynamic event.
Phase 1: The Great Evaporation
The moment the surface of the meat reaches 212°F (100°C), the water trapped near the exterior of the patty begins to boil. It rapidly converts into steam and aggressively forces its way out of the meat. Because meat is mostly water, this evaporation represents a massive loss of physical volume. If your pan is not hot enough, or if you crowd too many patties into the skillet at once, the temperature of the pan plummets, and the escaping moisture gets trapped. Instead of getting a gorgeous crust, your meat simply steams instead of browning, resulting in a sad, gray, boiled-looking burger. But even with a perfectly hot pan, that moisture loss is inevitable and contributes significantly to the shrinking diameter of your patty.
Phase 2: The Fat Rendering
As the internal temperature of the burger rises, the solid pockets of fat begin to liquefy and render out. Fat softens and melts rapidly under high heat. While a lot of this liquid fat gets reabsorbed by the porous meat sponge (thankfully, because that is where the flavor lives), a significant portion of it drips down into the grill grates or pools in your cast iron skillet. Research shows that an 80/20 ground beef blend loses a noticeable percentage of its fat volume during the cooking process. When the solid fat turns to liquid and vacates the premises, the physical structure of the patty collapses slightly, causing further shrinkage.
Phase 3: Protein Denaturation and Collagen Contraction
This is the main event. This is the biological phenomenon that turns your wide patty into a golf ball. As heat penetrates the meat, the myofibrillar proteins (actin and myosin) begin to denature. They lose their natural shape, unfold, and then rapidly coagulate and bind together.
According to meat science, myofibrillar proteins begin to unfold at around 86°F to 90°F (30-32°C), and they start to aggressively associate and gel together between 113°F and 122°F (45-50°C). But the real kicker happens when the internal temperature hits the 127°F to 145°F (53-63°C) range. At this exact temperature—which ironically is the exact temperature range for a perfect medium-rare to medium burger—the collagen fibers in the meat undergo massive shrinkage.
Imagine the protein and collagen network in your burger as a giant, microscopic net made of rubber bands. When you apply heat, those rubber bands violently snap back and contract. They squeeze tightly together, wringing out moisture like a wet sponge, and pulling the entire physical mass of the burger inward.
The Dreaded “Meatball Effect”: Why It Bulges in the Middle
So, we know that heat causes the proteins to contract and the volume to decrease. But why does the burger bulge up in the center? Why doesn’t it just shrink into a smaller, but still perfectly flat, disk?
It all comes down to the geometry of heat transfer. When you place a burger on a hot surface, the heat does not penetrate the meat perfectly evenly. The exterior edges of the patty—the circumference—are exposed to the most intense ambient heat, and they cook much faster than the dense, insulated center of the patty.
Because the edges cook first, the proteins around the perimeter of the burger reach that critical 127°F (53°C) collagen-shrinking threshold before the center does. The outside of the burger violently contracts, creating a tight, constricting belt of cooked protein around the equator of the patty.
Meanwhile, the center of the patty is still relatively raw, soft, and full of expanding juices. As the outer belt tightens and shrinks, it squeezes the raw meat in the middle. Since the meat cannot expand outward (because of the tightened protein belt), and it cannot expand downward (because of the solid cooking surface), it has only one place to go: straight up.
The contracting edges force the center of the burger to dome upward, creating that infuriating, swollen meatball shape. This not only ruins the presentation and makes the burger impossible to top, but it also ruins the cooking process. You end up with a burger that has thin, overcooked, dry edges, and a massive, thick, undercooked center.
The Sassy Sous-Chef’s “No-Go” Rule: Ditch the Toxic Cookware
Before we get into the exact techniques to fix this mess, we need to have a serious talk about your equipment. I have zero patience for pretentious chef-speak, but I also have absolutely zero tolerance for cheap, toxic kitchenware.
If you are trying to cook a proper burger in a $15, lightweight, scratched-up non-stick pan that you bought at a grocery store five years ago, we need an intervention. Making a great burger requires high heat. You need high heat to trigger the Maillard reaction—the chemical reaction between amino acids and reducing sugars that creates that deeply browned, savory crust.
Standard Teflon and cheap non-stick coatings are not designed for high heat. When you blast them over a high flame, the coating degrades, releases toxic fumes into your kitchen, and eventually flakes off into your food. Furthermore, using aerosol oils on these pans is a disaster; the propellants in the can bake onto the surface, and before you know it, that cheap cooking spray is the enemy that permanently ruins whatever non-stick properties the pan had left.
You do not need a culinary degree to cook like a pro, but you do need safe, high-quality, durable equipment that can handle the heat. For burgers, you should be using heavy-gauge Cast Iron, traditional Carbon Steel, or thick, multi-clad Stainless Steel.
Cast iron and carbon steel hold onto thermal mass like a vault, meaning when you drop a cold patty into the pan, the temperature doesn’t instantly plummet. And if you are terrified of your meat tearing and sticking to a stainless steel skillet, you simply need to learn the basic science of temperature control. By preheating the pan properly and utilizing the Leidenfrost effect—commonly known as the reliable water drop test—you can sear meat on stainless steel without a single stuck fiber.
Stop poisoning your weekend meals with peeling mystery metals. Invest in a heavy pan, take care of it, and it will outlive you. Now, back to the meat.
The Masterclass: How to Stop the Shrinkage Once and For All
We know the science. We know the enemy. Now, how do we defeat it? You do not need to buy expensive binders or chemical additives. You just need to apply these simple, foolproof, highly effective prep techniques to outsmart the proteins.
Strategy 1: The Legendary Dimple Method
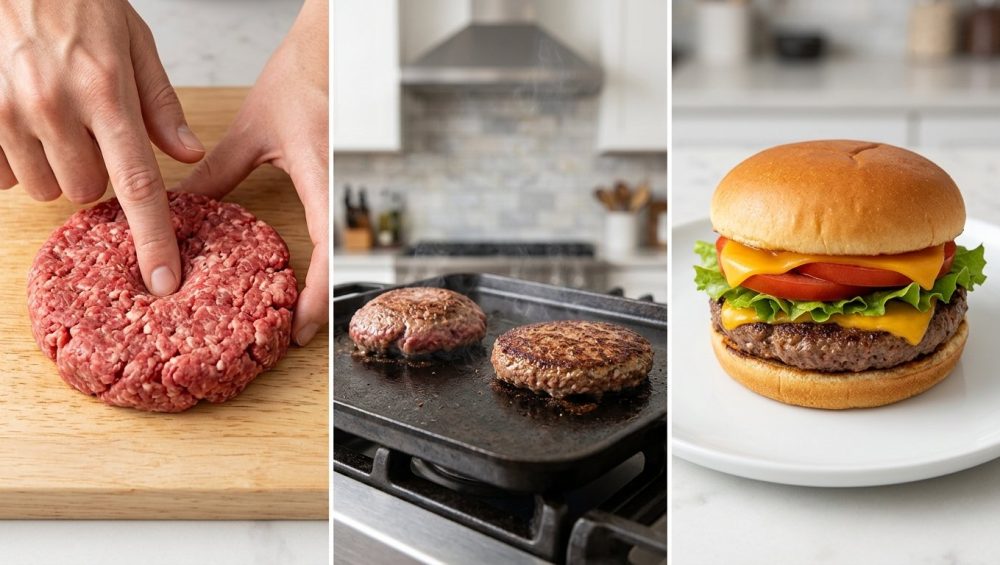
This is the single most important trick in the home cook’s arsenal, and it costs absolutely nothing. Since we know that the edges of the burger will contract and force the center to bulge upward, we are simply going to preemptively remove the center.
When you are forming your patties, use your thumb or the back of a spoon to press a wide, shallow indentation directly into the center of the raw meat. You want to create a divot that is about the size of a half-dollar coin and roughly half an inch deep. Your patty should look like a shallow, meaty bowl or a very sad, deflated donut.
When this dimpled patty hits the heat, the physics still apply. The edges will still cook first, and the protein belt will still tighten. But this time, when the edges squeeze the center of the meat upward, there is empty space waiting for it. The divot acts as an expansion joint. As the meat contracts, the dimple “reinflates” and fills in, resulting in a perfectly flat, evenly thick patty by the time it is fully cooked. It is simple, brilliant, and it works every single time.
Strategy 2: The 25 Percent Rule of Sizing
Even with the dimple method preventing the bulge, you cannot stop the total volume loss caused by fat rendering and water evaporation. The laws of physics dictate that meat will lose mass when cooked.
On average, ground beef will shrink by roughly 25 percent in total diameter and weight during the cooking process. If you form a raw patty that is exactly the same size as your bun, you will end up with a cooked patty that is 25 percent smaller than your bun.
To achieve the perfect meat-to-bun ratio, you must overcompensate during the prep phase. Measure your buns. If you are using a standard 4-inch brioche bun, you need to form your raw patties to be at least 5 to 5.5 inches in diameter. Yes, they will look comically large when raw. They will look like meat frisbees. Trust the process. By the time they have released their moisture and their proteins have contracted, they will shrink down to perfectly match the edges of the bun.
Strategy 3: The 80/20 Fat Ratio Sweet Spot
The type of ground beef you buy plays a massive role in how much the burger will shrink and deform. Do not buy extra-lean ground beef (90/10 or 93/7) for burgers. Lean meat lacks the necessary fat to lubricate the protein matrix. Without enough fat, the intense heat causes the lean muscle fibers to tightly bind together, resulting in a dry, tough, wildly shrunken puck of meat that tastes like cardboard.
On the other end of the spectrum, do not buy excessively fatty blends (like 70/30) unless you are intentionally making ultra-thin, crispy smash burgers. In a thick pub-style burger, a 30 percent fat ratio means that almost a third of your burger is going to liquefy and melt away into the pan, leading to massive volume loss and severe shrinkage.
The Goldilocks zone for a standard home-cooked burger is 80/20 (80 percent lean muscle, 20 percent fat). This ratio provides enough fat to keep the meat juicy, tender, and flavorful, while providing enough structural muscle to hold the patty together without shrinking into oblivion.
Strategy 4: The Golden Rule of Handling (Don’t Massage Your Meat)
I see home cooks do this all the time, and it makes me want to scream. They dump the ground beef into a bowl, add a bunch of chopped onions, garlic powder, and Worcestershire sauce, and then they aggressively knead the meat with their hands for five minutes like they are making sourdough bread.
Stop doing this. Ground beef is not dough. When you aggressively handle, mix, and compress ground meat, you are physically forcing the myosin proteins to cross-link and bind together. This is the exact scientific process used to make sausage. It creates a snappy, dense, bouncy texture.
When you form a highly-worked, densely packed patty, the protein network is already tight before it even hits the heat. Once it cooks, it will contract violently and shrink aggressively.
To prevent this, handle the meat as little as humanly possible. Gently grab a handful of ground beef and lightly coax it into a disk shape. Do not compress it. Do not squeeze it. Leave the internal structure loose and airy. The looser the protein network is when raw, the less it will contract and shrink when cooked.
Strategy 5: The Salting Strategy
Salt is a magical ingredient, but it is also a powerful chemical agent. Salt dissolves muscle proteins and draws moisture out of the meat through osmosis.
If you mix salt directly into the ground beef before forming the patties, or if you salt the exterior of the patties and let them sit in the fridge for an hour, you are asking for trouble. The salt will dissolve the myosin, turning your burger into a dense, sticky sausage, and it will pull the internal moisture to the surface, causing massive evaporation and shrinkage in the pan.
The rule is simple: never salt the inside of a burger, and never salt the outside until the very last second. Wait until your pan is smoking hot, season the exterior aggressively, and immediately drop the patty onto the heat. By avoiding the mistake of salting ground beef too early, you keep the proteins relaxed and the moisture locked safely inside the meat where it belongs.
Weekday Efficiency vs. Weekend Perfection
As a home cook, your approach to the kitchen should adapt to your schedule. I firmly believe that time is money during the week, but the weekends are for culinary artistry. Let’s look at how to apply this anti-shrinkage science to both scenarios.
The Weeknight Lifesaver: The Smash Burger
When it is a Tuesday night and you have exactly twenty minutes to get dinner on the table, you do not have time to gently coddle a thick pub burger. This is when you deploy the Smash Burger technique.
The smash burger entirely bypasses the “meatball effect” through brute physical force. You start with a loose, 2.5-ounce ball of 80/20 ground beef. You place it on a screaming hot cast iron skillet or griddle, and you immediately smash it completely flat with a heavy, rigid spatula.
Because you smash it within the first 30 seconds of cooking—before the fat renders and before the proteins reach the 127°F (53°C) collagen-contraction phase—you mechanically force the meat fibers to spread out and adhere to the pan. The meat cooks so incredibly fast (about 90 seconds per side) that the proteins do not have time to slowly squeeze together and dome upward. You get maximum Maillard browning, zero doming, and dinner is ready in under five minutes.
The Weekend Masterpiece: The Thick Pub Burger
When you have the luxury of a Saturday afternoon, you can tackle the thick, juicy, pub-style burger. This is a 6 to 8-ounce patty that requires patience and precision.
Because this patty is thick, the exterior will cook much faster than the interior, making it highly susceptible to the bulging meatball effect. This is where the Dimple Method is absolutely mandatory.
You also need to manage your heat. Do not blast a thick burger on maximum heat the entire time, or the outside will turn to carbon while the inside remains raw. Sear the burger over high heat for two minutes per side to develop a crust, then drop the heat to medium-low to gently bring the center up to temperature.
This is where you need to check your ego and use a thermometer. The difference between a juicy medium-rare and a dry, shrunken hockey puck is only about 10 degrees. But beware: your cheap, grocery-store, dial-face meat thermometer is lying to you. Those old bimetallic strip thermometers can take up to 30 seconds to register a temperature, and they read the average temperature across the entire two-inch probe. By the time it tells you the burger is done, it is already overcooked. Invest in a high-quality, instant-read digital thermocouple thermometer. It reads the exact temperature at the very tip of the probe in under two seconds. It is the single greatest investment you can make for your meat cooking.
Finishing Touches: Cheese, Resting, and Serving
Once your perfectly flat, properly sized, beautifully dimpled burger reaches your desired internal temperature (I recommend pulling it at 135°F for a perfect medium-rare, as carryover cooking will bring it to 140°F), it is time for the final touch: the cheese.
Do not just throw a slice of cheddar on top and stare at it, hoping it melts before the bottom of the burger burns. Turn off the heat, add the cheese, and immediately cover the pan with a stainless steel melting dome (or an inverted mixing bowl) and add a tiny splash of water to the pan. The water instantly flashes to steam, gets trapped by the dome, and melts the cheese into a luxurious, gooey blanket in exactly ten seconds without overcooking the meat.
Finally, remove the burgers from the pan and let them rest for three to five minutes. This allows the proteins to slightly relax and the juices to redistribute, ensuring that your first bite is juicy, not a watery mess that ruins the bottom bun.
While the burgers are resting, you can tackle the cleanup. If you used a proper cast iron skillet, do not let it sit in the sink soaking in soapy water for three days. While the pan is still warm, run it under hot water and hit it with a chainmail scrubber to effortlessly knock off any burnt-on fond. Dry it thoroughly, wipe it with a microscopic drop of oil, and it is ready for next weekend.
You Can Do This
Serving a perfect, flat, juicy, restaurant-quality burger at home is not magic, and it does not require a commercial kitchen. It simply requires a basic understanding of how meat reacts to heat.
By utilizing the dimple method to give the proteins room to expand, sizing your patties 25 percent larger to account for moisture loss, utilizing the 80/20 fat ratio, handling the meat gently, and salting only at the last second, you strip away all the mystery. You don’t need to be intimidated by the grill, and you certainly don’t need a drawer full of useless, single-task gadgets; a few high-quality beginner kitchen tools and a little bit of food science are all you need to completely transform your cooking.
So pour yourself another glass of wine, throw away that toxic non-stick pan, and go form some ridiculously large, heavily dimpled patties. Your days of serving shrunken, bulging meatballs on a bun are officially over. Happy cooking.






