Listen up, weekend culinary warriors. We need to have a serious talk about the absolute massacre happening in your kitchen every time you try to sear a piece of protein. You know exactly what I am talking about. You buy a beautiful, expensive piece of salmon or a premium chicken breast. You place it into your shiny, uncoated pan, wait a few minutes, and attempt to flip it. Instead of a smooth release, you are met with the horrific, tear-inducing sound of ripping meat. Half of your beautiful dinner is now permanently cemented to the metal, and you are left scraping culinary superglue off your pan while contemplating ordering a pizza.
You are frustrated, you are hungry, and you are probably one burned dinner away from throwing that expensive pan out the window. But before you retreat to the false comfort of cheap, disposable pans, take a deep breath. You do not lack culinary talent; you simply lack an understanding of basic thermodynamics. You don’t need a culinary degree to cook like a professional, and you certainly don’t need magic. You just need physics. Specifically, you need to master a brilliant little scientific phenomenon known as the Leidenfrost effect.
Once you understand how to manipulate heat, moisture, and metal, you will never fear a bare skillet again. We are going to break down the exact science of thermal mass, the precise vaporization temperatures of water, and how to create a temporary, impenetrable nonstick barrier out of thin air. Grab a glass of wine, take out your notepad, and let’s permanently solve the most annoying problem in everyday cooking.
The Toxicity Trap: Why We Are Ditching Nonstick
Before we dive into the glorious physics of levitating water droplets, we have to address the elephant in the room. I know what you are thinking: “Why should I learn thermodynamics when I can just buy a nonstick pan?” Let’s be brutally honest here. Relying on chemically coated pans for high-heat searing is a crutch, and it is a dangerous one at that.
The Hidden Dangers of Forever Chemicals
Those slick, lightweight pans you buy for twenty bucks at the big box store are coated in polytetrafluoroethylene (PTFE), commonly known by the brand name Teflon. While they might make flipping a delicate egg idiot-proof on a lazy Sunday morning, they have absolutely no business being used for high-heat cooking.
Here is the terrifying scientific reality: PTFE begins to structurally degrade at temperatures above 260°C (500°F). When you preheat a thin coated pan on a high-BTU gas burner, you can hit that degradation threshold in a matter of minutes. Once that temperature is breached, the coating begins to release toxic fluorocarbon gases into your kitchen. Inhaling these fumes leads to a very real, well-documented medical condition known as “polymer fume fever,” which hits you with flu-like symptoms including chills, chest tightness, and a raging headache. Oh, and if you happen to own a pet bird, those fumes are famously lethal to them.
If that isn’t enough to make you reconsider your cookware choices, consider the environmental impact. The manufacturing and inevitable degradation of these coatings contribute significantly to the release of per- and polyfluoroalkyl substances (PFAS)—the notorious “forever chemicals” that accumulate in the environment and the human body, linked to a laundry list of severe health issues including thyroid disease and organ damage. If you are serious about banishing toxic kitchen gear from your home, the cheap coated skillets need to be the very first things to go.
The False Economy of Cheap Cookware
Beyond the glaring health and environmental hazards, cheap coated pans are a terrible financial investment. They are the definition of planned obsolescence. The moment you accidentally use a metal spatula or scrub a little too aggressively, the coating scratches. Once compromised, the pan begins flaking microscopic plastics directly into your food.
You end up throwing the pan away and buying a new one every single year. It is a vicious, wasteful cycle. Meanwhile, a high-quality, uncoated metal skillet is virtually indestructible. It will easily outlive you, your children, and probably your kitchen itself. Learning to cook on bare metal is an essential skill if you want to build a durable, minimalist kitchen setup that doesn’t require constant, expensive replacements.
Enter the Hero: Bare Stainless Steel and the Magic of Physics
So, if we are throwing the toxic crutches in the trash, how do we prevent our expensive groceries from permanently bonding to bare metal? The answer lies in an 18th-century discovery made by a German doctor named Johann Gottlob Leidenfrost.
What Actually Is the Leidenfrost Effect?
In 1756, Leidenfrost observed a fascinating physical phenomenon: when a liquid comes into contact with a solid surface that is significantly hotter than the liquid’s boiling point, it does not instantly boil away. Instead, the extreme temperature differential causes the very bottom layer of the liquid to vaporize instantaneously upon contact.
This instant vaporization creates a microscopic, highly pressurized cushion of steam directly underneath the rest of the liquid. Because steam is a relatively poor conductor of heat compared to direct metal contact, this vapor layer actually insulates the liquid above it, preventing it from boiling rapidly. The result? The liquid literally levitates. It hovers above the surface, completely frictionless, skittering and gliding around the pan like an air hockey puck.
The Thermodynamics of Floating Droplets
How does this apply to your Tuesday night chicken breast? Meat is primarily composed of water. When you place a piece of protein into a properly heated skillet, the exact same thermodynamic magic occurs. The moisture on the very surface of the meat instantly vaporizes when it hits the hot metal, creating a microscopic steam barrier between the protein fibers and the steel.
This vapor cushion physically prevents the proteins from sinking into the microscopic pores and crevices of the metal surface. It acts as a temporary, entirely natural nonstick coating made out of nothing but physics. As long as you maintain the heat and allow the crust to form, your food will glide around the pan just as easily as it would on a brand-new chemical coating. This is one of those brilliant, foolproof cooking secrets that instantly elevates your culinary game with zero extra money spent.
The Exact Science: Hitting the 193°C to 200°C Sweet Spot
The Leidenfrost effect is not magic; it is a highly specific scientific reaction that requires exact conditions to trigger. You cannot just turn your stove to “high,” blindly throw your food in, and hope for the best. You need to hit a very specific thermal window.
Why 193°C is Your Magic Number
Water boils at 100°C (212°F). However, if your pan is only sitting at 120°C or 150°C, the water will simply sizzle, boil off rapidly, and disappear. This is the danger zone. The water evaporates too slowly to create the pressurized steam cushion, but fast enough to leave the protein dry and directly exposed to the metal.
To trigger the Leidenfrost effect, the surface temperature of the pan must cross a specific threshold known as the Leidenfrost point. For water on a smooth metal surface, this point is approximately 193°C (379°F). The ideal operating window for searing without sticking sits comfortably between 193°C and 210°C (379°F to 410°F). If you hit this exact pocket of heat, you achieve perfect levitation.
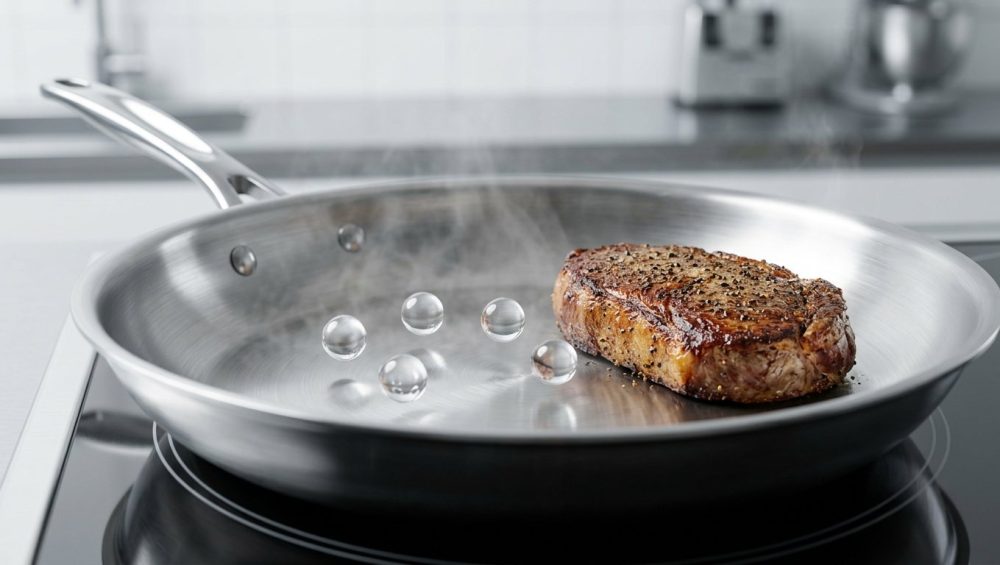
The Water Drop Test: Your Visual Thermometer
You probably do not have a commercial-grade infrared surface thermometer sitting next to your spatula. Fortunately, you don’t need one. You can use the water drop test—also known as the mercury ball test—to visually confirm the exact moment your pan reaches the 193°C threshold.
Here is how you execute the test like a professional:
- Place your clean, completely dry skillet over medium heat.
- Wait two to three minutes.
- Take exactly 1/4 teaspoon of water and drop it into the center of the pan.
Now, observe the behavior of the water. It will tell you exactly what temperature the metal is holding.
- The Sad Sizzle (Under 150°C): The water hits the pan, flattens out, bubbles violently, and quickly boils away. The pan is far too cold. If you put meat in now, it will cement itself to the steel.
- The Shatter (Over 250°C): The water hits the pan and instantly violently explodes into dozens of tiny, erratic micro-beads that shoot across the kitchen. The pan is dangerously hot. Your cooking oil will instantly catch fire, and your food will turn to bitter charcoal.
- The Mercury Ball (193°C – 210°C): The water drops into the pan and instantly forms a perfect, cohesive, shimmering sphere. It does not bubble. It does not sizzle. It simply glides effortlessly across the surface of the metal like a bead of liquid mercury. Congratulations, you have achieved the Leidenfrost point.
The Role of Thermal Mass and Pan Construction
Understanding the temperature requirement is only half the battle. The other half is maintaining that temperature the exact second your food hits the pan. This is where the physical construction of your cookware dictates your success or failure.
Why Flimsy Pans Fail the Leidenfrost Test
Let’s imagine you perform the water drop test on a cheap, paper-thin, single-ply steel pan. The water forms a perfect mercury ball. You smile, wipe out the water, and confidently drop a massive, half-pound, refrigerator-cold steak into the center of the pan.
Instantly, the searing sound dies. The pan goes silent. Three minutes later, your steak is hopelessly glued to the metal. What happened? You fell victim to a lack of thermal mass.
Thermal mass refers to a material’s ability to absorb, store, and maintain heat energy. When you drop a cold piece of mass (the steak) onto a hot surface, the heat energy rapidly transfers from the pan into the meat. If the pan is thin and lacks sufficient mass, it cannot hold enough stored energy to withstand the shock. The surface temperature plummets instantly from 200°C down to 130°C. The Leidenfrost vapor barrier collapses, the microscopic pores of the metal clamp down on the proteins, and your dinner is ruined. This scenario is one of the most agonizing beginner cooking mistakes that drives people back to toxic nonstick pans.
Cladding, Cores, and Heat Distribution
To prevent this catastrophic temperature drop, you need a pan that can punch back against the cold protein. Here is a fascinating metallurgical fact: pure stainless steel is actually a remarkably terrible conductor of heat. It has a thermal conductivity rating of only about 15 to 45 W/m·K (Watts per meter-Kelvin). If you cook on a pan made entirely of cheap steel, the heat stays localized directly over the burner flame, creating aggressive hot spots while the edges remain ice cold.
To solve this, reputable manufacturers engineer multiclad stainless steel cookware. They take two thin, durable sheets of non-reactive stainless steel and sandwich a thick core of highly conductive metal between them—usually aluminum or copper.
Aluminum boasts a thermal conductivity of roughly 237 W/m·K, while copper is an absolute powerhouse at around 401 W/m·K. These conductive cores act as a rapid transit system for heat energy. They pull the heat from the burner, distribute it flawlessly across the entire base of the pan, and, most importantly, store a massive reserve of thermal energy.
When you drop a cold steak into a heavy, fully-clad pan, the thick aluminum or copper core acts like a thermal battery. It instantly rushes stored heat to the surface, preventing the temperature from dipping below the 193°C Leidenfrost threshold. The vapor barrier holds strong, and the meat sears perfectly. While copper cores are heavier and significantly more expensive, the metallurgical properties of copper cookware provide the absolute pinnacle of rapid temperature recovery and precise thermal control.
Step-by-Step Masterclass: Creating a Temporary Nonstick Barrier
Now that you understand the physics of vapor barriers and the metallurgy of thermal mass, it is time to put it into practice. This is the exact, step-by-step workflow you must follow to achieve flawless, stick-free cooking every single time.
Step 1: The Dry Preheat (Patience is a Virtue)
Place your clean, completely dry skillet on the stove. Turn the burner to medium heat. Do not blast it on high; you want the metal to expand slowly and evenly to prevent warping.
Crucially: Do not put your cooking oil into the cold pan. If you heat the oil from cold to 200°C, it will degrade, polymerize prematurely, and turn into a sticky, gummy mess before the food even arrives. Heat the bare metal first.
Step 2: The Mercury Ball Verification
After two to three minutes, perform the water drop test. Drop your 1/4 teaspoon of water into the pan. If it sizzles, wait another 60 seconds. Once the water forms a cohesive, floating bead that skates around the pan effortlessly, you have achieved the 193°C Leidenfrost point.
Once verified, immediately dump the water out or wipe it away with a paper towel. Do not leave the water in the pan, or it will violently explode when you add the oil.
Step 3: Oil Management and Smoke Points
With the pan perfectly heated and dry, pour in your cooking fat. Because the pan is already at 193°C, the oil will instantly shimmer, thin out like water, and coat the entire bottom of the pan in seconds.
You must select your fat wisely here. Extra virgin olive oil and unclarified butter have smoke points well below 193°C. If you drop butter into a pan at the Leidenfrost point, the milk solids will instantly burn and turn black. You must use a high-smoke-point fat such as avocado oil, refined olive oil, grapeseed oil, or clarified butter (ghee).
Step 4: Protein Introduction and the Waiting Game
Gently lay your protein into the shimmering oil, laying it away from your body so the hot fat does not splash onto your hands.
The moment the food hits the pan, it will sizzle loudly. This is the sound of success. That aggressive sizzle is the surface moisture of the meat rapidly vaporizing, creating the steam cushion that prevents adhesion.
Now comes the hardest part for any home cook: Step back and do absolutely nothing. Do not poke it. Do not prod it. Do not try to lift the corner with your tongs to “check on it.”
As the meat cooks, a complex chemical reaction occurs between the amino acids and reducing sugars, known as the Maillard reaction. This reaction creates the deeply savory, browned crust we all crave. Managing your pan’s thermal mass is a vital step in accelerating the Maillard reaction properly. As this crust forms, the proteins naturally tighten and release their grip on the metal. When the meat is ready to be flipped, it will let go of the pan voluntarily. If you feel resistance when you try to slide your spatula underneath, the crust has not finished forming. Walk away and give it another sixty seconds.
Troubleshooting the Skillet: When Physics Seems to Fail
Even with a solid understanding of the science, things can occasionally go sideways in the heat of the moment. If your food is sticking, one of these three variables has failed.
The Pan is Too Cold (The Sizzle of Sadness)
You were hungry, you were impatient, and you dropped the chicken in before the pan reached 193°C. The water boiled away, no vapor barrier formed, and the meat is now hopelessly fused to the steel.
Do not panic, and do not try to rip the meat off the pan. Let it cook. As the pan eventually comes up to temperature and the Maillard reaction completes, the meat will often release itself. If it is truly stuck, remove the pan from the heat, pour in a splash of broth or wine to deglaze the surface, and use a stiff wooden spatula to scrape the protein free. It won’t win any beauty contests, but it will still taste fine.
The Pan is Too Hot (The Smoke Alarm Symphony)
You got distracted by your phone, left the pan on the burner for ten minutes, and the surface temperature skyrocketed to 280°C. You dropped the oil in, and it instantly billowed acrid, black smoke.
Do not put food into smoking oil. The fat has chemically broken down, and it will impart a horrific, bitter, burnt-ashtray flavor to your expensive groceries. Turn off the burner, carefully move the pan to a cool burner, wipe out the ruined oil with a wadded paper towel (using tongs so you don’t burn your hands), and let the pan cool down before trying again.
The Dreaded Cold Protein Drop
This is the silent killer of the perfect sear. You executed the water drop test perfectly. Your pan was at exactly 200°C. But you took a massive, icy-cold steak directly out of the back of the refrigerator and slammed it into the skillet.
No amount of copper cladding can save you from an extreme thermal shock. The massive temperature differential obliterated the pan’s thermal mass, dropping the surface temperature well below the Leidenfrost point in a fraction of a second.
To prevent this, you must temper your meat. Pull your proteins out of the refrigerator 20 to 30 minutes before cooking to take the chill off. This simple act preserves your thermal mass and ensures the vapor barrier remains intact.
Managing Moisture: The Enemy of the Perfect Sear
While the Leidenfrost effect requires internal moisture to create the steam cushion, excessive surface moisture is the absolute enemy of a good sear.
The Paper Towel Pat-Down
If you take a chicken breast out of its plastic packaging, it is usually dripping in a wet, sticky brine. If you drop that soaking wet piece of meat into your perfectly heated skillet, the pan has to expend a massive amount of thermal energy just to boil off that surface water before it can even begin to sear the meat.
Because liquid water cannot exceed 100°C (212°F) before turning into steam, the surface temperature of your pan is effectively capped at the boiling point until every drop of water is gone. At 100°C, the Maillard reaction cannot occur, and your meat will simply steam and turn a sad, unappetizing shade of gray.
Before any protein goes near a hot pan, you must aggressively pat it bone-dry with paper towels. The drier the surface of the meat, the faster the crust forms, and the less likely it is to stick.
Salt Timing and Osmosis
Salt draws moisture out of meat through osmosis. If you salt your steak and immediately throw it into the pan, you are fine. However, if you salt your steak and let it sit on the counter for ten minutes, the salt will pull a pool of liquid water to the surface of the meat. If you put that wet meat into the pan, you will instantly kill your sear.
You have two choices: Salt the meat immediately before it hits the oil, or salt the meat 45 minutes to an hour in advance. If you wait 45 minutes, the meat will reabsorb the salty brine, deeply seasoning the interior while leaving the exterior perfectly dry and ready for the Leidenfrost treatment.
Conclusion: Reclaiming Your Kitchen Confidence
Cooking shouldn’t be an exercise in frustration, and you shouldn’t have to rely on cheap, toxic, disposable plastics just to get dinner on the table. By understanding the thermodynamic principles of the Leidenfrost effect, managing your skillet’s thermal mass, and respecting the physics of heat transfer, you unlock a completely new level of culinary freedom.
You can now sear a delicate piece of fish on bare steel without fear. You can build incredible, complex pan sauces from the browned fond left behind. You can finally start breaking your takeout habit because you are no longer terrified of the cleanup waiting for you at the stove.
The next time you are standing in front of your stove, elevating your simple weeknight dinners into something spectacular, remember that you are in total control. Wait for the mercury ball. Respect the thermal mass. Dry your proteins. If you follow these immutable laws of physics, you will never have to scrape a ruined dinner out of a pan again, and you can fully embrace the art of the kitchen with absolute, unshakeable confidence. Now, pour yourself another glass of wine, turn on the stove, and show that stainless steel skillet who is truly in charge. I promise you, once you see that water droplet glide across the pan, you will realize how a complete novice stopped burning dinner and started cooking like a pro.


