
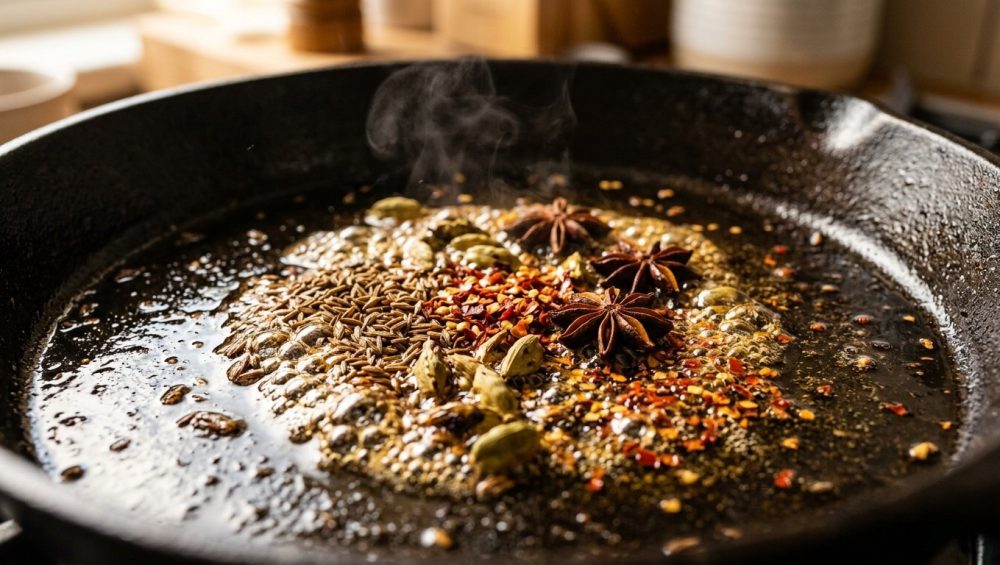
Grab a glass of wine, pull up a stool, and let’s have a brutally honest conversation about your spice rack. You’ve likely spent a small fortune curating a collection of cute little glass jars filled with exotic powders and seeds. Yet, when Tuesday night rolls around and you’re desperately trying to inject some life into a basic chicken stew or a pot of lentils, the results are… aggressively mediocre. You dump a teaspoon of cumin and a dash of paprika directly into your simmering broth, stir it around, and wonder why the dish tastes like a scented candle factory reject instead of a vibrant, restaurant-quality meal.
I’ll tell you exactly why: You are drowning your spices before they ever have a chance to sing.
I’m your sassy sous-chef, and as someone who learned to cook by setting off the smoke detector more times than I care to admit, I am here to save you from a lifetime of bland, dusty-tasting dinners. You do not need a culinary degree to cook mind-blowing food at home. You just need to understand a little bit of basic chemistry. Today, we are going to master the absolute game-changer of flavor development: blooming your spices in hot oil.
The Chemistry of Flavor: Why Water is the Enemy of Your Spices
Let’s get one thing straight right out of the gate: water is the absolute enemy of raw spices. If you take nothing else away from this masterclass, let it be that.
To understand why, we have to look at the molecular makeup of the spices sitting in your pantry. Spices are essentially dried plant parts—seeds, barks, roots, and fruits—that contain highly concentrated volatile flavor compounds. These compounds are what give cinnamon its warmth, cumin its earthiness, and black pepper its sharp bite. Scientifically speaking, we are talking about molecules like terpenes (which provide citrusy, piney, and floral notes), aldehydes (which offer sweet and fruity aromas), eugenol (the dominant, numbing warmth in cloves), and anethole (the sweet, licorice-like essence of star anise and fennel).
Here is the crucial scientific catch: the vast majority of these magical flavor compounds are fat-soluble, not water-soluble.
When you dump a spoonful of raw, ground coriander directly into a watery soup or a simmering pot of chili, those flavor compounds remain locked tight inside their cellular structures. Water simply cannot dissolve them. Instead of releasing their complex aromas, the spices just get wet, muddy, and stubbornly dull. If you have ever stared into a pot and wondered why your homemade soup tastes flat despite adding half the spice aisle to it, this is exactly why. You left the flavor trapped inside the powder.
However, when you introduce those same spices to hot fat—whether that is olive oil, ghee, coconut oil, or butter—a magnificent chemical transformation occurs. The heat acts as a thermal catalyst, melting the solid essential oils within the spices. Simultaneously, the lipid molecules in the fat act as a solvent. They bind to the fat-soluble flavor compounds, extracting them from the plant matter and dissolving them directly into the oil itself.
The result? The oil becomes a highly concentrated flavor carrier. When you subsequently add your liquids and other ingredients to the pot, that deeply flavored, spice-infused oil coats every single grain of rice, every piece of meat, and every vegetable in the pan. You haven’t just seasoned the broth; you have fundamentally altered the flavor profile of the entire dish.
A Brief History of Hot Fat and Flavor
I would love to claim that I invented this brilliant technique during a frantic weeknight cooking experiment, but the truth is that this method is ancient. We are talking about 5,000 years of codified culinary science.
In Indian cuisine, this technique is known as tadka, chhonk, or baghaar, depending on the region. It is the absolute foundational pillar of South Asian cooking. Traditional Indian cooks understood the thermodynamics of lipid extraction centuries before modern molecular gastronomy chefs started playing with centrifuges and liquid nitrogen. They knew that dropping mustard seeds into smoking hot ghee until they frantically pop and crackle was the only way to release their pungent, sulfurous compounds. They understood that blooming turmeric in hot fat alongside black pepper wasn’t just about taste—it was an early biohacking technique. Modern science has since proven that the piperine in black pepper, when combined with lipids, increases the bioavailability of turmeric’s active ingredient (curcumin) by a staggering 2,000 percent.
But this wisdom isn’t limited to India. Look at Latin American cooking, where the sofrito forms the aromatic baseline of countless dishes. While sofrito heavily features aromatics like onions and peppers, the technique of sweating them down in hot oil alongside spices like cumin and annatto (achiote) relies on the exact same principles of fat-soluble flavor extraction. In Middle Eastern cuisines, you will frequently see spices bloomed in olive oil before being mixed into pilafs or drizzled over hummus.
This isn’t a trendy kitchen hack; it is the universal, time-tested secret to making food taste deeply, profoundly good. And the best part? It doesn’t require any extra ingredients. You are simply maximizing the potential of the groceries you already bought.
The Sassy Sous-Chef’s Rules of Engagement: Whole vs. Ground Spices
Before you go throwing your entire pantry into a sizzling skillet, we need to establish some ground rules. All spices are not created equal, and they demand different levels of respect when exposed to high heat.
The Armor of Whole Spices
Whole spices—think cinnamon sticks, whole cloves, cumin seeds, coriander seeds, and cardamom pods—are like tiny, armored flavor vaults. Because their surface area is relatively small compared to their total volume, they are much more resilient to heat.
When blooming whole spices, you can leave them in the hot oil for a longer period, usually anywhere from 30 seconds to a couple of minutes, depending on the temperature of the fat. As they heat up, you will literally see them transform. Cumin seeds will darken and begin to sizzle. Cardamom pods will puff up slightly. Mustard seeds will violently pop and dance around the pan (keep a lid handy unless you want a face full of hot oil and flying seeds).
If you want to get the absolute most out of them, especially for a slow-cooked weekend masterpiece, lightly crushing them in a granite mortar and pestle right before they hit the oil will crack their protective outer layers and expose more of their internal oils to the fat.
The Fragility of Ground Spices
Ground spices are a completely different animal. Because they have been pulverized into a fine powder, their surface area is massive, and their essential oils are completely exposed. This means they will bloom almost instantly. It also means they will burn in the blink of an eye.
If you toss ground cumin, coriander, or paprika into smoking hot oil and walk away to check your phone, you will return ten seconds later to a pan full of acrid, bitter, blackened dust. Burnt spices cannot be saved. You cannot mask the flavor. If you burn them, you have to throw everything away, wash the pan, and start over.
Ground spices require a “flash bloom.” They only need about 10 to 30 seconds of constant stirring in hot (but not smoking) oil to release their magic. Often, the safest way to bloom ground spices is to pull the pan completely off the heat source, stir the spices into the residual heat of the oil for fifteen seconds, and then immediately quench the pan with your liquid ingredients.
Also, a quick public service announcement: if your ground spices have been sitting in your cabinet since 2018, no amount of hot oil is going to resurrect them. If they turn into hard bricks in the jar, do yourself a favor and throw them in the trash. You deserve fresh ingredients.
Choosing Your Weapon: The Best Fats for Blooming
The fat you choose to bloom your spices in will dictate the entire underlying flavor profile of your dish. You need a lipid that can handle the heat without breaking down into a smoky, bitter mess.
Ghee and Clarified Butter
Ghee is the undisputed heavyweight champion of the spice-blooming world. Because the milk solids have been meticulously toasted and removed, ghee boasts a spectacularly high smoke point (around 485°F or 250°C). It can handle the intense heat required to pop stubborn whole spices, and it imparts a rich, nutty, luxurious flavor that plain vegetable oil simply cannot touch. If you are making any sort of curry, dal, or robust stew, ghee is your best friend.
Neutral Oils (Grapeseed, Avocado, Canola)
For weeknight cooking where you want the pure, unadulterated flavor of the spices to shine through without any competing background notes, neutral oils are perfect. They have high smoke points and act as a blank canvas. Avocado oil is particularly excellent for high-heat blooming, though grapeseed is a wonderful, cost-effective alternative.
Olive Oil
Extra virgin olive oil is fantastic for blooming, provided you respect its limits. It has a lower smoke point than ghee or avocado oil, meaning it will degrade and turn bitter if you blast it on high heat. Use olive oil over medium-low heat for gentle blooming—perfect for Mediterranean flavor profiles, like blooming red pepper flakes and fennel seeds before tossing in your pasta.
Standard Butter
Proceed with extreme caution. Standard butter is about 15-20% water and contains milk solids that will scorch rapidly when exposed to the heat required to bloom spices. If you absolutely must use butter for its flavor, the smart chef’s trick is to cut it with a tablespoon of neutral oil, which raises the overall smoke point of the fat in the pan and buys you a little more time.
The “No-Go” Rule on Toxic Gear
We need to pause here for a crucial hardware intervention. The pan you use matters just as much as the fat. I have absolutely zero patience for cheap, lightweight, toxic kitchenware. If you are trying to execute a high-heat spice bloom in a scratched, peeling Teflon non-stick pan that you bought at a discount store five years ago, you are doing it wrong.
Not only are those peeling coatings leaching mystery chemicals into your food, but cheap non-stick pans are notorious for terrible heat distribution. They create massive hot spots that will scorch your spices on one side of the pan while leaving them raw on the other. I am a relentless advocate for banishing toxic kitchen gear from your home.
You need a heavy-bottomed stainless steel skillet, a carbon steel pan, or an enameled cast-iron Dutch oven. These materials retain heat beautifully and distribute it evenly, giving you total control over the blooming process. If you are worried about your spices or food from sticking aggressively to stainless steel, you just need to learn proper temperature control. Preheating your pan properly and utilizing the water drop test will ensure your surface is perfectly primed before the oil even touches the metal.
The Weekday Shortcut vs. The Weekend Masterpiece
I firmly believe that anyone can cook like a pro, but I also live in the real world. I know that the amount of effort you are willing to expend on a Tuesday evening after a grueling workday is vastly different from a lazy Sunday afternoon. Fortunately, blooming spices scales perfectly to fit your schedule.
The Weekday Shortcut: The Foundational Bloom
When time is money and you need dinner on the table in thirty minutes, efficiency is your primary goal. You do not want to wash extra pans. For the weekday shortcut, we perform a “foundational bloom” at the very beginning of the cooking process.
You start by heating your oil in your main soup pot or Dutch oven. Once shimmering, you drop in your whole spices for thirty seconds. Then, you add your chopped onions. The moisture from the onions instantly drops the temperature of the pan, halting the blooming process and preventing the spices from burning. Once the onions are soft and translucent, you push them to the edges of the pan, drop your ground spices into the oily center for a quick ten-second flash bloom, and then immediately dump in your broth, tomatoes, or proteins.
It takes exactly zero extra minutes to do this compared to dumping raw spices into boiling water, but the flavor payoff is astronomical. It’s a foolproof way to build deep, complex flavor without letting the process dry out your chicken or overcomplicate your evening routine.
The Weekend Masterpiece: The Secondary Bloom (Tadka)
When the weekend arrives and you have the luxury of time, you can elevate your cooking to absolute perfectionism by utilizing the secondary bloom, or tadka.
In this method, you cook your main dish—let’s say a massive pot of creamy, slow-simmered lentils (dal) or a rich, complex stew. You season it well, but you hold back the heavy-hitting aromatic spices. Once the dish is completely finished and sitting hot on the stove, you take a tiny, separate tempering pan (a small skillet works fine).
You heat a generous spoonful of ghee until it is practically smoking. You drop in your mustard seeds, cumin seeds, dried red chilies, and perhaps some fresh curry leaves. They violently sizzle and pop, instantly infusing the fat. Off the heat, you stir in a pinch of ground turmeric or paprika. Then, in the ultimate culinary mic drop, you pour that aggressively sizzling, violently aromatic spiced fat directly over the surface of your finished stew. It crackles as it hits the liquid, sending a plume of mind-blowing fragrance through your entire house. You stir it in right before serving. The flavor is bright, punchy, and incredibly vivid because the volatile oils haven’t had time to evaporate during a long simmer.
Step-by-Step Masterclass: Blooming in Action
Let’s walk through exactly how to execute a flawless spice bloom, step by agonizingly detailed step. We will assume you are doing a foundational bloom for a weeknight curry or stew.
Step 1: Uncompromising Mis En Place
Mis en place is French for “everything in its place,” and it is non-negotiable here. Spices go from perfectly bloomed to bitterly burnt in a matter of seconds. If you have your spices sizzling in hot oil and you suddenly realize you haven’t chopped your onions yet, you are going to panic. Rushing through your prep work is the fastest way to end up dulling your kitchen knives or slicing a finger. Chop your onions. Measure your liquids. Have your ground spices sitting in a little bowl next to the stove. Be ready.
Step 2: Heat the Pan, Then the Fat
Place your high-quality, heavy-bottomed skillet or Dutch oven over medium heat. Let the dry metal heat up for a minute or two. Once the pan is hot, add your chosen fat (ghee or neutral oil). You want the oil to be shimmering, but not smoking. If you see thick plumes of white smoke, pull the pan off the heat immediately—your fat is breaking down and will instantly incinerate your spices.
Step 3: The Whole Spice Sizzle
Add your whole spices first. Cumin seeds, coriander seeds, cinnamon sticks, or cardamom. The moment they hit the oil, they should sizzle happily. If they don’t sizzle, your oil is too cold—pull them out and wait. Stir them continuously with a wooden spoon. Watch them closely. You are looking for a slight darkening in color and a massive burst of aroma. This usually takes 30 seconds to a minute.
Step 4: The Ground Spice Flash
Once the whole spices are toasted, it is time for the fragile ground spices. Lower the heat slightly. Dump in your ground turmeric, paprika, cumin, or whatever powder your recipe calls for. Stir like your life depends on it. The oil will immediately change color, taking on the vibrant hues of the spices. You only need 15 to 30 seconds here.
Step 5: The Quench
The exact second you smell that rich, toasted aroma (and before it turns sharp or acrid), you must drop the temperature of the pan to stop the cooking process. You do this by adding your “quench” ingredients. Usually, this is your chopped onions, a splash of broth, or crushed tomatoes. The water content in these ingredients immediately halts the temperature of the fat from climbing any higher, locking the perfectly bloomed spices in a safe zone.
A Sassy Sous-Chef Pro-Tip: Notice how I didn’t mention garlic? That is because adding your minced garlic at the same time as your dry spices is a rookie error that will ruin your dinner. Minced garlic contains moisture and sugars that burn incredibly fast in hot oil. Always add your garlic after your onions have softened and cooled the pan down slightly.
Troubleshooting: Why Your Bloom Went Bust
Even with the best intentions, things can go wrong. If your dinner tasted a bit off, let’s diagnose the culinary crime scene.
Symptom: The dish tastes bitter, acrid, and smells like a campfire.
Diagnosis: You burned the spices.
Your oil was simply too hot, or you walked away from the stove. Remember the Maillard reaction (the browning process that makes food taste good) happens beautifully around 300°F (150°C). If your oil pushes past 400°F (200°C), the delicate chemical structures of the terpenes and aldehydes are destroyed, leaving behind nothing but bitter carbon. Next time, turn the burner down, or pull the pan entirely off the heat when adding ground spices.
Symptom: The dish is greasy, and the spices taste raw and dusty.
Diagnosis: Your oil was too cold.
If you drop spices into lukewarm oil, the thermal shock required to melt the essential oils never occurs. Instead of dissolving into the lipid, the spices just absorb the cold oil like a sponge, resulting in a greasy, gritty texture and zero flavor enhancement. Always wait for the oil to shimmer.
Symptom: Some spices burned while others stayed raw.
Diagnosis: Pan overcrowding or toxic gear.
If you dump a massive mountain of spices into a tiny puddle of oil, the ones on the bottom will fry while the ones on top stay dry. You need enough fat to coat and suspend all the spices. Alternatively, you ignored my earlier rant and used a cheap, warped pan with terrible heat distribution. While you don’t need a million gadgets to cook well, investing in a few essential tools for beginners—specifically, one high-quality, heavy-clad stainless steel skillet—will instantly solve this problem.
Symptom: The bloom was going perfectly, and then it lost all its punch.
Diagnosis: You added water too early.
If you panic and dump a cup of cold water or broth into the pan before the spices have had a full 20 to 30 seconds to dissolve into the fat, you prematurely halt the lipid extraction. Let them sizzle, let them toast, and trust your nose.
The Final Word from Your Sassy Sous-Chef
Transforming your daily cooking from a stressful, bland chore into a vibrant, restaurant-quality experience doesn’t require foraging for truffles or buying a $400 sous-vide machine. It requires mastering the fundamentals of heat, fat, and flavor.
By taking an extra 45 seconds to bloom your spices in hot oil, you are unlocking a 5,000-year-old scientific secret. You are forcing those stubborn little flavor compounds out of their cellular prisons and into the rich, luxurious fats that will carry them to your palate.
So the next time you are standing over a pot of weekday chili, holding a jar of cumin, and contemplating just dumping it into the watery abyss—stop. Grab a skillet. Heat up some ghee. Let those spices sizzle, pop, and bloom. Your kitchen will smell like an absolute dream, your food will taste infinitely better, and you will finally be cooking like the brilliant, resourceful home chef you were always meant to be. Now, go pour yourself that glass of wine and get to work. Dinner isn’t going to bloom itself.






