
Let’s get one thing straight right out of the gate: cooking should be a joyful, creative release, not a wrestling match with a jar of peanut butter. If you have ever found yourself aggressively thwacking a standard measuring cup against the side of a mixing bowl, desperately praying that the stubborn clump of shortening will magically dislodge itself, you are not alone. We have all been there. We have all used our fingers, a butter knife, and every curse word in our vocabulary to scrape out that last clinging tablespoon of honey, only to realize we’ve left half the ingredient behind and our hands are now coated in a sticky, ungodly mess.
As a home cook who firmly believes that your time is far too valuable to be spent scrubbing molasses out of the crevices of a traditional measuring cup, I am here to introduce you to your new best friend. It is a tool that looks like a giant syringe, operates on the basic laws of physics, and will single-handedly save your sanity (and your baking ratios). I am talking about the adjustable plunger measuring cup.
If you want to cook like a pro without needing a culinary degree, you need to work smarter, not harder. This masterclass is going to break down exactly why sticky ingredients are the villains of the modern kitchen, how the genius mechanics of physical displacement can save you, and why you need to banish toxic, flimsy gear from your drawers forever. Pour yourself a glass of wine, grab a notebook, and let’s dive into the friction-based magic of the plunger measuring cup.
The Viscous Villain: Why Sticky Ingredients Ruin Your Baking Ratios
Before we can celebrate the solution, we have to understand the enemy. In the culinary world, sticky ingredients are notorious for throwing a wrench into even the most meticulously planned recipes. But why do they cause such a headache? The answer lies in a little bit of science.
The Science of Viscosity and Adhesion in the Kitchen
Viscosity is essentially a fluid’s resistance to flow, and it is measured in a unit called centipoise (cPs). To give you some context, water has a viscosity of 1 cPs at room temperature, meaning it pours effortlessly and leaves virtually nothing behind in the cup.
Now, let’s look at the heavy hitters. Honey clocks in at around 10,000 cPs. Molasses sits right around 5,000 to 10,000 cPs. And peanut butter? A staggering 250,000 cPs. When you are dealing with numbers that high, you are no longer just pouring an ingredient; you are fighting its fundamental molecular desire to cling to whatever surface it touches. This stickiness is compounded by adhesion—the tendency of dissimilar particles or surfaces to cling to one another. When you pack honey or shortening into a standard stainless steel or plastic measuring cup, the ingredient forms a bond with the walls of the cup. Gravity alone is not enough to break that bond, which is why you end up standing over your mixing bowl, scraping like a maniac.
The Hidden Cost of “Close Enough” Measurements
Here is the brutal truth: while cooking a savory stew allows for a little improvisation, baking is an unforgiving science. Every single ingredient in a baking recipe plays a specific, structural role. Flour provides the gluten skeleton. Sugar tenderizes the crumb. Fats coat the gluten strands to keep the final product moist and soft.
When you measure half a cup of peanut butter in a standard measuring cup and leave a tablespoon stuck to the sides, you aren’t just losing a bit of flavor. You are fundamentally altering the fat-to-flour ratio of your dough. A lack of fat means the gluten will overdevelop, resulting in cookies that taste like dry, crumbly sand. The same goes for honey or corn syrup; shorting your recipe on these viscous sweeteners will rob your baked goods of their moisture and chewiness.
This is exactly how beginner cooking mistakes happen. You follow the recipe’s instructions, but because your tools failed to deliver the accurate volume into the bowl, your cake comes out dense and your cookies don’t spread. Accurate measurements are the non-negotiable foundation of baking success, and “close enough” simply doesn’t cut it when you are dealing with sticky fats and syrups.
Enter the Plunger Measuring Cup: A Masterclass in Physical Displacement
If standard measuring cups are the problem, the plunger measuring cup is the brilliantly simple, friction-based solution. Popularized by brands like KitchenArt (with their Adjust-A-Cup) and OXO Good Grips, this tool takes the headache out of viscous ingredients by utilizing the foolproof science of physical displacement.
How the Plunger Mechanism Actually Works
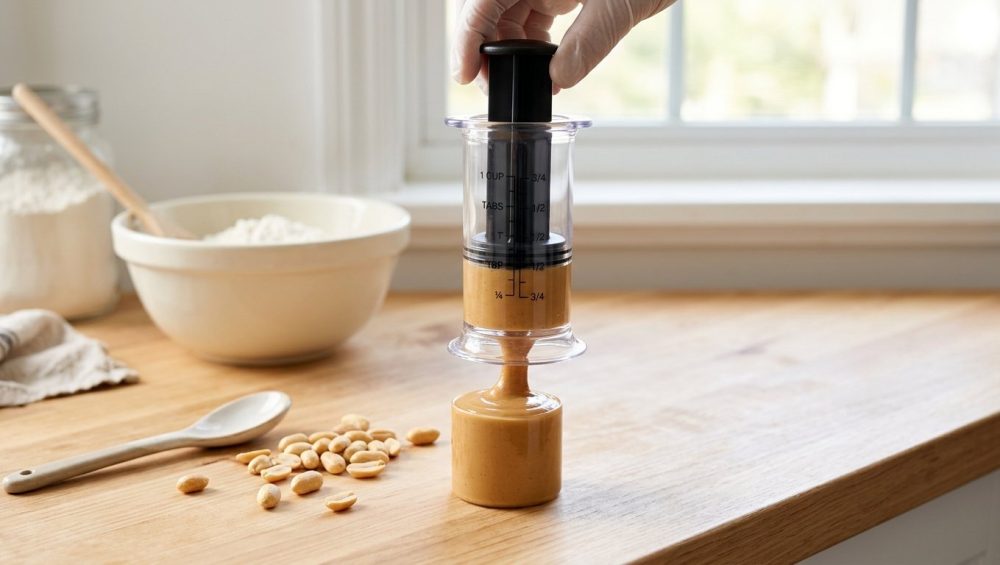
A plunger measuring cup consists of two main parts: a clear outer tube printed with measurement markings (usually cups, ounces, and milliliters), and a snug-fitting inner tube—the plunger—that slides up and down inside the outer casing.
To use it, you simply pull the inner plunger down until the top edge of the plunger aligns with your desired measurement mark on the outer tube. Next, you pack your sticky ingredient into the empty space you’ve just created. Because the top is wide open, you can easily spoon or spatula the ingredient in, pressing down to eliminate any hidden air pockets. Finally, you hold the cup over your mixing bowl and push the plunger straight up.
The Friction-Based Magic Explained
The true genius of this tool lies in the squeegee effect. The top edge of the inner plunger is designed to fit flush against the inner walls of the outer tube. As you push the plunger upward, it acts like a perfectly sized scraper, forcing 100% of the ingredient out of the cup and cleanly shearing it off into your bowl.
There is no digging. There is no scraping. There is no leaving two tablespoons of expensive manuka honey behind. The physical displacement guarantees that whatever volume you measured is exactly the volume that ends up in your recipe. It is one of those essential kitchen tools for beginners that instantly elevates your accuracy and makes you wonder how you ever survived without it.
The Sassy Sous-Chef’s Guide to What to Put in Your Plunger Cup
Now that you own this magnificent plastic syringe of culinary justice, what exactly should you be putting in it? While it is incredibly versatile, it shines brightest when tasked with the absolute worst ingredients in your pantry.
The Classics: Honey, Peanut Butter, and Molasses
These are the big three—the ingredients that strike fear into the hearts of weekend bakers everywhere.
- Honey & Corn Syrup: Because these syrups have a viscosity ranging from 5,000 to 10,000 cPs, they love to adhere to measuring cups. The plunger cup handles them beautifully. Just remember to hold the cup level while filling, as these ingredients will slowly self-level.
- Peanut Butter & Nut Butters: At 250,000 cPs, peanut butter doesn’t self-level. You have to actively pack it into the plunger cup to ensure there are no air bubbles hiding at the bottom. Once packed, the plunger pushes out a perfectly smooth, satisfying cylinder of nut butter.
- Molasses: Thick, dark, and notoriously messy. Pushing molasses out of a plunger cup is a deeply satisfying experience that guarantees your gingerbread cookies will have the exact right amount of moisture.
The Surprises: Shortening, Mayonnaise, and Sour Cream
Don’t limit your plunger cup to the baking aisle. It is an absolute lifesaver for savory prep and general cooking.
- Shortening & Lard: With a viscosity that can exceed 1,000,000 cPs, solid fats are a nightmare to measure volumetrically. Packing shortening into a plunger cup eliminates air gaps and pushes out cleanly, making pie crust prep a breeze.
- Mayonnaise & Sour Cream: If you are whipping up a massive batch of potato salad or a creamy dip for a party, measuring out a cup of mayonnaise (around 100,000 cPs) is vastly easier with a plunger. It keeps your hands clean and your ratios tight.
The Absolute “Do Nots” (Liquids and Super Hot Stuff)
As much as I love this tool, I am nothing if not a realist. The plunger cup has its limitations.
- Thin Liquids: Do not use this for water, milk, or broth. While the seal is tight enough to push out peanut butter, thin liquids will inevitably seep into the microscopic gap between the plunger and the outer tube, dripping all over your counter and making a sticky mess. Stick to your glass liquid measuring pitchers for the thin stuff.
- Boiling Ingredients: Never pour boiling hot syrups or melted fats directly into a plastic plunger cup. Extreme heat can warp the plastic casing, permanently ruining the friction seal.
Material Matters: Banishing Toxic Plastics and Flimsy Gear
If you have read any of my previous rants, you know my strict “No-Go” rule: I absolutely despise cheap, toxic kitchenware. You are cooking food for yourself and your family; the last thing you want is endocrine-disrupting chemicals leaching into your organic honey.
Identifying Food-Safe, BPA-Free Plastics
When shopping for an adjustable measuring cup, you must be a relentless label-reader. Look for products explicitly labeled as BPA-free, BPS-free, and made from food-grade polycarbonate or Tritan plastic. Tritan is highly durable, shatter-resistant, and doesn’t carry the toxic baggage of older, cheaper plastics.
Do not buy the two-dollar knockoff from a sketchy online marketplace. Those unbranded plastics can degrade over time, leaching microplastics into your food when exposed to the oils in peanut butter or shortening. Investing in safe, high-quality equipment is how you banish toxic kitchen gear from your life and protect your health.
The Durability Factor: Why Cheap Knockoffs Will Break Your Heart
The entire mechanism of the plunger cup relies on a perfectly engineered, airtight friction seal between the inner and outer tubes. If the plastic is thin and flimsy, it will eventually warp. Just like how cheap baking sheets keep warping in a hot oven, a low-quality plunger cup will lose its shape after a few runs through the dishwasher.
Once that outer tube warps even a fraction of a millimeter, the seal is broken. Your honey will leak down the sides, your shortening will get trapped in the gaps, and the tool will become completely useless. Furthermore, pay attention to the rubber or silicone seal on the plunger head. Low-grade silicone absorbs odors and flavors—which is exactly silicone spatulas taste like soap if you buy the cheap ones. Spend the extra ten dollars to buy a reputable brand like OXO or KitchenArt. It will last you for years.
A Head-to-Head Showdown: Plunger Cups vs. Traditional Hacks
I know what some of you are thinking. “But Sassy Sous-Chef, my grandmother taught me a trick for measuring honey! I don’t need another gadget!”
Look, I respect your grandmother, but we are living in the future, and we don’t have time for outdated kitchen hacks that only work half the time. Let’s put the plunger cup up against the classic “sticky ingredient” hacks and see who wins.
The “Spray with Oil” Trick: Why It’s Flawed
The most common advice for measuring honey or molasses is to spray your standard measuring cup with non-stick cooking spray before pouring in the syrup.
- The Problem: First, you are adding an unmeasured amount of aerosolized oil to your recipe. Second, aerosol sprays contain propellants and emulsifiers that can mess with delicate baking chemistry. Third, this trick does absolutely nothing for solid sticky ingredients like peanut butter or shortening.
- The Winner: The Plunger Cup. No extra oil, no chemical propellants, and it works on solids.
The “Hot Water” Method: Too Much Effort
Another classic hack is to run your metal measuring cup under screaming hot water to heat the metal, supposedly allowing the honey or peanut butter to slide right out.
- The Problem: Who has the time? When I am frantically trying to throw together simple weeknight dinners, I am not going to stand at the sink waiting for the water to get hot enough to scald me, just so my peanut butter might slide out a little easier. Plus, you have to dry the cup perfectly, or you’ll introduce unwanted water into your fat.
- The Winner: The Plunger Cup. It takes zero prep time and works at room temperature.
The Displacement Method: A Math Nightmare
Old-school home economics teachers love the water displacement method for shortening. You want half a cup of shortening? Fill a two-cup liquid measure with one cup of cold water, then plop spoonfuls of shortening into the water until the water level rises to the one-and-a-half cup line.
- The Problem: I cook to relax, not to do algebra. Furthermore, once you hit the magic line, you have to fish a slimy, wet glob of shortening out of the water and somehow dry it off before adding it to your flour. It is a messy, slippery disaster waiting to happen.
- The Winner: The Plunger Cup. No math, no water, no slimy fat globs.
The Digital Scale: The Only Worthy Rival
The only method that truly rivals the plunger cup is measuring by weight using a digital kitchen scale. Weighing your peanut butter directly into the mixing bowl is incredibly accurate and creates zero dirty measuring cups.
- The Verdict: It’s a tie. If a recipe provides measurements in grams, use your scale. But if you are working from a vintage family recipe or an American blog that only lists volumetric cups, converting cups of shortening to grams on the fly can be tedious. In a volume-based kitchen, the plunger cup remains king.
Maintenance and Care: Keeping Your Plunger Cup Pristine
To ensure your adjustable measuring cup survives years of intense weekend baking sessions, you have to treat it right. It is a mechanical tool, and like all mechanics, it requires proper maintenance.
The Disassembly and Cleaning Process
Never throw the fully assembled plunger cup into the sink to soak. Sticky ingredients will inevitably find their way into the microscopic tracks between the two tubes, and if left to harden, they will act like glue, permanently fusing the tool together.
Instead, fully separate the two pieces immediately after use. Push the plunger all the way up and pop it entirely out of the outer casing. Most high-quality plunger cups are technically top-rack dishwasher safe, but I strongly advise against it. The intense heat and abrasive detergents in a dishwasher will degrade the silicone wiping seal over time, causing it to crack and lose its squeegee effect.
Take two minutes to hand wash the pieces in warm, soapy water. Use a soft sponge—never an abrasive scouring pad, which will scratch the clear plastic and make it impossible to read the measurement lines.
Preventing Stains and Odor Retention
If you use your plunger cup for highly pigmented or pungent ingredients—like a dark molasses, a vibrant curry paste, or an aggressively garlicky aioli—you run the risk of staining the plastic or leaving behind phantom smells. This is exactly why plastic containers stay greasy and smell like last week’s chili.
To combat this, rinse the cup with cold water immediately after use to prevent the pores of the plastic from opening up and absorbing the oils. If a smell does linger, make a quick paste of baking soda and water, gently rub it over the silicone seal and the inner tube, let it sit for ten minutes, and rinse. Your cup will be as good as new.
Real-World Application: Weekend Baking Projects Transformed
Let’s talk about how this tool actually feels in the heat of battle. When you are deep into a complex baking project, eliminating friction and bottlenecks is the key to maintaining your flow state.
Conquering the Sticky Pecan Pie
Pecan pie is a holiday staple, but it requires a massive amount of corn syrup (around 5,000 cPs). Trying to measure a full cup of corn syrup in a standard measuring cup means you are going to lose at least ten percent of it to the sides of the cup, throwing off the sugar structure of your custard and resulting in a runny pie.
With a plunger cup, you pull the base down to the one-cup line, pour the corn syrup directly in, and push it straight into your mixing bowl. The entire process takes five seconds. The pie sets perfectly. You look like a culinary genius.
Flawless Peanut Butter Cookies Every Time
Peanut butter cookies require a delicate balance of fat and flour. If you skimp on the peanut butter because it’s stuck in your measuring cup, the cookies won’t spread properly in the oven.
By using the plunger cup, you can aggressively pack the peanut butter down, eliminating the hidden air bubbles that secretly rob you of volume. When you plunge it into the bowl, you are delivering a mathematically perfect cylinder of fat and protein. The result? Cookies with crispy edges, chewy centers, and bakery-level consistency.
The Art of the Kitchen: Plating and Prep
Beyond baking, the plunger cup is a secret weapon for mastering the art of the kitchen. If you are hosting a dinner party and need to portion out identical amounts of a thick puree, a compound butter, or a dense frosting, the plunger cup acts like a precise, oversized piping bag. It allows you to control your volumes with absolute authority, ensuring every plate looks identical and professional.
The Final Verdict: Is It Worth the Drawer Space?
In a world obsessed with culinary minimalism, I am usually the first person to tell you to throw away your single-use gadgets. I hate clutter. I hate tools that only do one highly specific job.
But the plunger measuring cup is the exception to the rule.
The ROI of Frustration-Free Prep
Yes, it takes up a bit of space in your utensil drawer. But the return on investment is astronomical. It saves you the physical frustration of scraping. It saves you the financial waste of leaving expensive ingredients behind in the cup. Most importantly, it saves your recipes from the structural failures caused by inaccurate measurements.
Much like a stainless steel bench scraper, the plunger cup is a humble, friction-based tool that quietly does the heavy lifting, allowing you to focus on the joy of cooking rather than the stress of the mess.
Stop fighting your food. Stop settling for “close enough.” Invest in a high-quality, BPA-free plunger measuring cup, and take back control of your kitchen. Your peanut butter cookies—and your sanity—will thank you.






