
Picture this. It’s Saturday morning. You have survived another grueling workweek consisting of endless emails, rush-hour traffic, and meetings that absolutely could have been resolved with a single text message. You have finally decided to treat yourself by baking a batch of your famous, deeply caramelized chocolate chip cookies. You gather your ingredients, preheat the oven, and reach into the pantry for the bag of brown sugar. But instead of a soft, scoopable mound of molasses-scented goodness, your fingers meet a solid, impenetrable brick. You poke it. You squeeze it. You seriously consider walking out to the garage to grab a hammer.
Welcome to one of the most universally infuriating culinary pain points known to the modern home cook.
As weekend culinary hobbyists, our time is our most valuable asset. We rely on clever, time-saving hacks during the week just to survive, which buys us the luxury to be absolute perfectionists with our elaborate baking projects on the weekend. But you cannot be a perfectionist when your primary ingredient requires a masonry chisel just to measure out a half-cup. You do not have the time, and frankly, you do not have the patience for pretentious chef-speak explaining why your pantry conditions aren’t perfectly climate-controlled.
You might be tempted to toss that sugary boulder directly into the trash, or worse, you might try one of those ridiculous viral internet “hacks” that leave you with a sticky, melted mess. Stop. Put the hammer down, step away from the microwave, and listen to me.
Today, we are diving deep into the literal science of why your ingredients betray you, and more importantly, we are going to explore the brilliantly simple, scientifically backed, and incredibly cheap solution that will permanently banish this problem from your kitchen. If you want to soften your brown sugar and keep it perfectly scoopable forever, you are in exactly the right place. Let’s get into it.
The Anatomy of Brown Sugar: What Are We Actually Dealing With?
To understand why your sugar is currently masquerading as a geological specimen, we first need to understand what it actually is. And no, it is not just “raw” sugar, nor is it inherently healthier than the white stuff, despite what the wellness influencers on your feed might claim.
The Science of Sucrose and Molasses
Contrary to popular belief, the brown sugar you buy in the baking aisle is not some unrefined, natural wonder straight from the sugarcane field. In modern commercial production, brown sugar is simply standard, highly refined white granulated sugar (sucrose) that has had a very specific amount of molasses added back into it.
Standard commercial brown sugar consists of roughly 95% sucrose, with the remaining percentage made up of molasses and moisture. The difference between light and dark brown sugar simply comes down to the volume of molasses. Light brown sugar contains about 3.5% molasses by volume, while dark brown sugar contains up to 6.5% by volume (and can reach up to 10% by total weight). This addition of molasses is what gives the sugar its distinct acidity, its rich toffee-like flavor, and most importantly, its moisture.
The Hygroscopic Nature of Your Pantry
Molasses is highly hygroscopic. In non-science terms, this means it absolutely loves water. It naturally attracts and holds onto moisture from its surrounding environment. Because of this, fresh brown sugar typically boasts a moisture content of anywhere between 2% and 4%.
When the sugar is fresh out of the factory, this thin coating of wet molasses acts as a lubricant, allowing the jagged little sucrose crystals to slip and slide easily over one another. This is what gives fresh brown sugar that incredibly satisfying, wet-sand texture that packs perfectly into a measuring cup. However, the very thing that makes it soft is exactly what makes it so incredibly vulnerable to turning into a weapon.
Why Your Brown Sugar Turns to Stone (The Dehydration Crisis)
So, what happens between the grocery store shelf and your Saturday morning cookie session? The answer is simple: dehydration.
The Evaporation and Crystallization Process
Because molasses is hygroscopic, it is constantly interacting with the air around it. When you open that plastic bag and expose the sugar to the ambient air in your kitchen, a moisture exchange begins. If the air in your pantry is drier than the sugar (which it almost always is, especially in the winter or in air-conditioned homes), the moisture inside the molasses evaporates into the air.
As that 2% to 4% moisture content begins to vanish, the physical properties of the molasses change drastically. It stops being a liquid lubricant and starts acting like a highly effective industrial adhesive. The sticky, dehydrated molasses binds the sucrose crystals together, locking them into a rigid, solid mass. The longer it sits exposed to dry air, the more moisture it loses, and the harder the crystallization becomes. You aren’t dealing with a chemical change; you are dealing with a purely physical loss of water.
The True Cost of Pantry Waste
It is incredibly easy to get frustrated and just throw the hardened brick into the garbage. But before you do, let’s talk about the reality of food waste. We often think of food waste as rotting vegetables or expired milk, but pantry staples contribute massively to the problem.
According to the UN’s 2024 Food Waste Index, households are responsible for a staggering 60% of all global food waste, which equates to roughly 631 million metric tons of food thrown away annually. In the United States alone, the EPA estimates that tens of millions of tons of food are wasted every single year. Throwing away an entire bag of perfectly safe, edible sugar just because it lost a tiny percentage of its water content is a preventable tragedy. We advocate for the home cook here, and part of being a resourceful home cook is protecting your grocery investment.
The Internet Hacks That Fail (And Why We Hate Them)
If you have ever Googled how to fix this problem in a panic, you have undoubtedly been bombarded with a slew of “kitchen hacks.” As someone who has actually tested these in a real home kitchen, let me save you the trouble: most of them are garbage.
The Microwave Disaster
The most common advice is to put the sugar brick in a bowl, cover it with a damp paper towel, and microwave it for 20 seconds. Does it work? Technically, yes—for about three minutes.
The microwave works by rapidly heating the water molecules left in the molasses, essentially melting the sugar structure and creating steam from the paper towel. You can absolutely scoop it while it’s hot. But here is the brutal reality: once that sugar cools down, the heat will have driven off even more moisture than before. The molasses will polymerize, and your sugar will turn into a diamond-hard, caramelized rock that is permanently ruined. If you are trying to prioritize efficiency and shortcuts, intentionally ruining your ingredients is not the way to do it.
The Bread and Apple Slices (A Science Fair Experiment)
Another classic trick passed down from our grandmothers is to seal a slice of sandwich bread or a few apple wedges in the container with the hard sugar. The science here is actually sound: bread and apples contain high amounts of moisture (bread is often 35-40% water). Because the sealed environment seeks equilibrium, the dry sugar will pull the moisture out of the bread, softening the sugar over 24 hours.
But we are running a kitchen, not a middle school biology lab. Introducing fresh, perishable organic matter into a shelf-stable pantry ingredient is a recipe for disaster. The bread will eventually grow mold. The apple will rot, ferment, and transfer a bizarre, fruity flavor to your sugar. You do not want your chocolate chip cookies tasting like a moldy apple orchard.
The Wet Paper Towel Mess
Some suggest laying a piece of damp paper towel directly over the sugar in a sealed container. While this doesn’t introduce mold as quickly as bread, it is incredibly inconsistent. The areas of sugar directly touching the wet paper towel will absorb too much water, melting into a syrupy, sticky puddle, while the sugar at the bottom of the container remains rock hard.
Enter the Terracotta Disk: The Science of Fired Clay
We don’t need messy hacks. We need a permanent, hygienic, scientifically sound solution. This is exactly why you need a terra cotta disk. It is, without a doubt, the most genius tool you can add to your baking arsenal.
What Exactly is Terracotta?
Terracotta (which translates to “baked earth” in Italian) is a type of unglazed, low-fire earthenware clay. It has been used for thousands of years for everything from ancient plumbing to garden pots. But its true magic in the kitchen lies in its unique physical structure.
The Physics of Capillary Action and Porosity
Because terracotta is fired at a relatively low temperature and remains unglazed, it retains an incredibly high level of porosity—often around 10%. This means the clay is packed with a microscopic network of pores and channels.
When you submerge a piece of terracotta in water, a phenomenon known as capillary action occurs. The water is physically drawn up into the microscopic voids of the clay, saturating the material without causing it to dissolve or break down. The clay acts like a natural, rigid sponge.
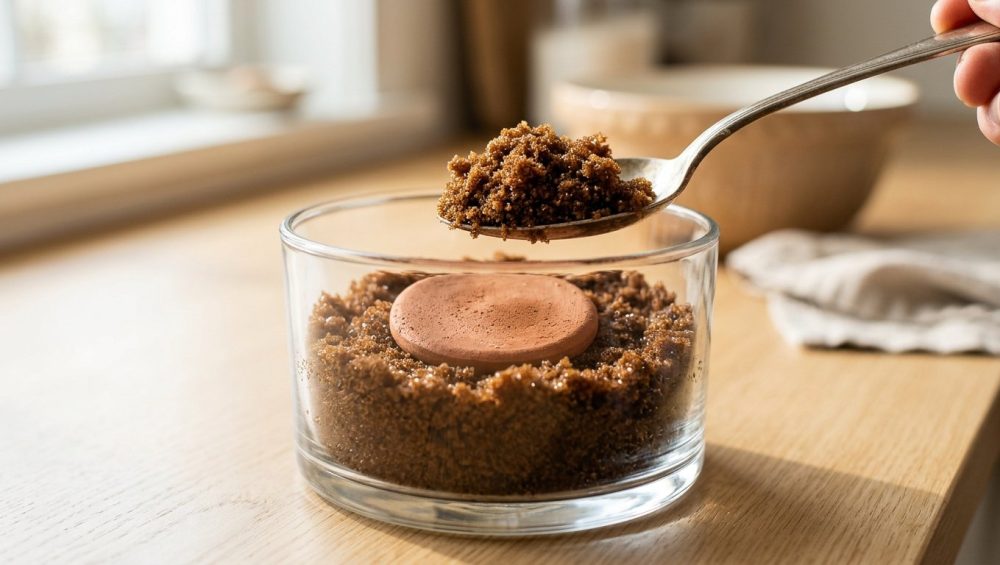
When you take that soaked terracotta disk and place it into a sealed, airtight container filled with dehydrated brown sugar, basic thermodynamics takes over. The dry environment inside the container pulls the moisture out of the porous clay. The disk slowly, gently, and evenly releases its stored water vapor into the ambient air of the container. The hygroscopic molasses in the sugar absorbs this ambient humidity, rehydrating perfectly and separating the sucrose crystals.
It is a slow-release, perfectly balanced humidification system that costs less than five dollars and lasts for a lifetime.
The “No-Go” Rule: Why We Banish Toxic Kitchen Gear
Now, a quick but crucial rant. If you go online to buy a sugar softener, you will inevitably see cheap plastic “moisture disks” or synthetic chemical sponges marketed as alternatives to clay. Do not buy them.
The Danger of Synthetic Moisture Disks
I have a strict “no-go” rule when it comes to cheap, toxic kitchenware. We are actively banishing toxic kitchen gear from our homes, and that includes mystery polymers that are designed to sit in direct, prolonged contact with our food.
Synthetic sponges and cheap plastic humidifiers can harbor dangerous bacteria, degrade over time, and potentially leach microplastics or endocrine-disrupting chemicals (like BPA or its equally shady cousins, BPS and BPF) directly into the sugar you are about to feed your family. Furthermore, synthetic materials often degrade when exposed to the natural acidity of molasses.
Embracing Natural, Earth-Born Materials
Terracotta is literally just earth and water, baked in a kiln. It is 100% natural, completely non-toxic, and infinitely reusable. It will never peel, it will never leach chemicals, and it will never transfer strange flavors to your food. When we advocate for the home cook, we advocate for safe, high-quality, durable equipment that offers real value. Stick to natural clay.
How to Prep, Use, and Maintain Your Terracotta Disk Like a Pro
Using a terracotta disk is foolproof, provided you follow a few basic rules. If you skip these steps, you will end up with a puddle of syrup instead of soft sugar.
Step 1: The Initial Soak
When you first get your disk (or when your sugar starts to feel a little stiff), place the terracotta piece in a small bowl and cover it completely with clean, warm water. Let it soak for about 20 to 30 minutes. You might actually see tiny bubbles rising to the surface—that is the capillary action at work, displacing the air inside the clay with water.
Step 2: The Crucial Drying Phase
This is the step everyone messes up. Once the 30 minutes are up, remove the disk from the water and aggressively pat it dry with a clean dish towel or paper towel. The surface of the disk should feel completely dry to the touch, even though it will be noticeably heavier from the internal water weight.
If you drop a dripping-wet piece of clay into your sugar, the standing surface water will instantly dissolve the sucrose crystals it touches, creating a localized puddle of liquid syrup that will eventually harden into a candy-like crust. Dry the surface!
Step 3: The Waiting Game
Bury the soaked and dried disk halfway into your hardened brown sugar and seal the container tightly. Now, walk away. This is not a 60-second microwave hack. The moisture transfer takes time. Depending on how badly dehydrated your sugar is, it will take anywhere from 12 to 24 hours for the sugar to fully soften. By the next morning, you will be able to effortlessly scoop your sugar as if it were freshly packed at the factory.
Maintenance and Cleaning (No Soap Allowed!)
Your disk will keep your sugar soft for anywhere from 3 to 6 months, depending on the humidity of your climate and how often you open the container. When the sugar starts to feel stiff again, simply take the disk out, rinse it, and re-soak it.
CRUCIAL WARNING: Never, under any circumstances, wash your terracotta disk with dish soap. Because the clay is highly porous, it will absorb the detergent via capillary action just as easily as it absorbs water. If you use soap, the next time you put the disk in your sugar, your cookies are going to taste like soap. If your disk gets covered in a sticky sugar crust, simply soak it in boiling hot water and scrub it with a stiff-bristled brush. That is all the cleaning it ever needs.
Storage Best Practices: The Airtight Container Mandate
A terracotta disk is a miracle worker, but it cannot perform miracles if you actively sabotage it. The disk only works if the moisture it releases is trapped inside the container.
Ditch the Original Plastic Bag
The thin plastic bag your sugar comes in is not airtight. Even if you roll the top down and secure it with a rubber band, air is constantly exchanging. If you put a soaked terracotta disk into a loosely rolled bag, the moisture will simply evaporate into your pantry, and your sugar will remain hard.
Investing in the Right Materials
You must invest in a proper storage vessel. Look for heavy-duty glass jars with rubber or silicone gaskets and metal latch closures. If you prefer a lighter option, opt for high-quality, BPA-free Tritan plastic containers with locking lids and silicone seals.
A quick note on plastic storage: cheap plastics degrade, scratch, and hold onto grease and odors over time. If you are struggling to clean your plastic containers, it is a sign that the material is breaking down and losing its airtight integrity. Upgrade to something durable. And if you are using glass, make sure it is thick, tempered storage glass to avoid the nightmare of shattering glass baking dishes and jars in your kitchen.
The Ripple Effect on Your Baking
You might be asking yourself, “Is it really that big of a deal if my sugar is a little dry and clumpy? Can’t I just force it into the measuring cup?”
Listen to me: baking is a science, and precision matters.
Why Soft Sugar Equals Better Cookies
When a recipe calls for one cup of packed brown sugar, it is assuming the sugar has its standard 2-4% moisture content. If your sugar is dehydrated and hard, you are physically unable to pack it correctly. You will end up with large air gaps in your measuring cup, meaning you are adding significantly less sugar (and less molasses) to your dough than the recipe intended. This simple measuring error completely ruins your baked goods.
Furthermore, the moisture in brown sugar is actively factored into the hydration level of cookie dough. If you use dry, hardened sugar, your dough will lack the necessary liquid to hydrate the flour properly. This throws off the spread of the cookie in the oven, often resulting in dense, dry lumps rather than perfect, chewy disks, or conversely, causing butter separation that leads to your cookies spreading into puddles.
The Chemistry of Leavening and Moisture
The acidity in the molasses is also required to activate baking soda. If the sugar is clumped into hard rocks, it will not dissolve properly into the butter during the creaming process. This means the acid won’t evenly distribute to react with your leavening agents. You will end up with baked goods that fail to rise properly, leaving them burnt on the outside and raw in the middle.
A perfectly soft, hydrated ingredient ensures a smooth, homogeneous batter, proper leavening, and the exact texture you worked so hard to achieve.
Conclusion: Reclaiming Your Weekend Baking
You do not need a culinary degree to make mind-blowing food in a standard home kitchen. You just need to understand the basic science of your ingredients and equip yourself with the right, non-toxic tools to manage them.
The next time you are preparing for a weekend baking project, you shouldn’t have to factor in 20 minutes of aggressive chiseling just to get your ingredients out of the jar. By utilizing the natural porosity and capillary action of a simple, three-dollar terracotta disk, you can permanently eliminate one of the most annoying bottlenecks in the kitchen.
Save your time, protect your grocery budget from unnecessary food waste, and keep your ingredients in peak condition. It is small, scientifically sound adjustments like this that make the difference between a stressful chore and truly mastering the home kitchen. Now, go soak your clay, seal up your containers, and get back to making those flawless chocolate chip cookies. You’ve earned them.






