
Picture this: It is a rainy Tuesday evening. You have survived a grueling day of endless emails, back-to-back meetings, and the general chaos of modern professional life. The only thing standing between you and a well-deserved batch of warm, gooey, brown butter chocolate chip cookies is a quick, therapeutic trip to the pantry. You gather your butter, your eggs, your vanilla extract. But when you reach for the brown sugar, your fingers do not sink into a soft, sandy mound of sweet perfection. Instead, they hit a solid, impenetrable boulder. You poke it. You squeeze it. You seriously consider throwing it at the wall.
We have all been there. Chiseling away at a petrified block of brown sugar is a universal kitchen frustration, and frankly, nobody has time for it. As a home cook who firmly believes that weekday cooking should be ruthlessly efficient and stress-free, I refuse to let a crystallized pantry staple ruin my baking plans. You should not either. While I love taking my time with elaborate culinary projects on the weekends, Monday through Friday is all about working smarter, not harder.
In this exhaustive masterclass, we are going to dive incredibly deep into the fascinating (and slightly annoying) food science behind why your brown sugar turns into a geological specimen. More importantly, we are going to walk through the absolute best, rigorously tested methods to soften it—whether you need it in twenty seconds or twenty hours. We will also cover the foolproof, non-toxic storage systems that will ensure you never have to aggressively stab a bag of sugar with a butter knife ever again.
The Science of the Brick: Why Brown Sugar Hardens
To defeat the enemy, you must first understand the enemy. And in this case, the enemy is simple evaporation driven by thermodynamics. You cannot outrun science, but you can absolutely outsmart it.
The Anatomy of Brown Sugar: Sucrose Meets Molasses
To grasp why brown sugar hardens, we need to look at how it is manufactured. Commercially produced brown sugar is essentially highly refined white granulated sugar that has been coated in a thin, precise layer of molasses. White sugar is about 99.95% pure sucrose. It has virtually zero moisture, which is why it flows freely and can sit in a paper bag for a decade without changing its granular texture.
Brown sugar, on the other hand, contains about 96% to 97% sucrose and 3% to 4.5% moisture, depending on whether it is light or dark brown sugar. Dark brown sugar contains roughly 6.5% molasses by volume, while light brown sugar contains about 3.5%. This molasses coating is what gives brown sugar its rich, caramel-like flavor, its slightly acidic pH (usually around 5.0 to 6.5), and its delightfully soft, packable texture.
The Hygroscopic Reality of Molasses
Molasses is highly hygroscopic. In food science terms, this means it readily absorbs moisture from its surrounding environment, but it also rapidly loses moisture to the air if the ambient humidity drops. When you open a fresh bag of brown sugar, you are exposing that delicate moisture balance to the dry air of your kitchen. The moisture within the molasses coating instantly begins to equalize with the drier air around it.
Thermodynamics and Crystallization: The Cement Factor
When the water in the molasses coating begins to evaporate, the remaining sugars in the molasses become supersaturated. Without that critical moisture to keep things fluid and pliable, the sucrose molecules begin to bind together. The molasses essentially transforms from a flexible, slippery coating into a rigid, sticky cement. As moisture continues to leave the container, the sugar crystals fuse into interlocked aggregates, forming a solid brick.
This isn’t spoilage; it is simply a physical reorganization driven by thermodynamic equilibrium. The harder the clump, the more complete the intercrystalline bridging. It is a completely natural reaction, but much like watching your fresh herbs get slimy in the crisper drawer, letting your sugar petrify is a completely avoidable culinary tragedy.
Water Activity (aW) and Ambient Humidity
Food scientists measure the “available” water in a substance using a metric called water activity (aW). Brown sugar needs to maintain a very specific water activity level—around 0.75 aW—to remain soft and scoopable without crossing the threshold into becoming a breeding ground for microbial growth. When the aW drops below this optimal level, crystallization accelerates. This is why brown sugar stored in a humid climate might stay soft for months in a poorly sealed bag, while the exact same bag stored in a dry, air-conditioned apartment will turn to stone in a matter of days.
The Global Brown Sugar Spectrum: Do They All Turn to Stone?
Not all brown sugars are created equal. Depending on how they are processed, different varieties of brown sugar will react to moisture loss in different ways. Understanding what you have in your pantry will dictate how you treat it.
Commercial Light vs. Dark Brown Sugar
As mentioned, dark brown sugar contains nearly double the amount of molasses as light brown sugar. Because it has more molasses, it technically has more moisture. This means it might take slightly longer to dry out initially. However, because there is more molasses acting as a binding agent, when dark brown sugar does eventually dry out, the resulting brick is significantly denser and harder to break apart than dried-out light brown sugar. Both require the exact same airtight storage protocols, so do not get complacent just because you bought the dark stuff.
Muscovado: The Unrefined Heavyweight
Muscovado is a non-centrifugal, partially refined cane sugar. Unlike standard brown sugar (which is white sugar with molasses added back in), muscovado is made by boiling down cane juice and retaining its natural molasses. It has a much higher moisture content and a deeply complex, almost smoky flavor. Because its molasses content is so high, when muscovado dries out, it doesn’t just turn into a brick—it turns into literal asphalt. Reviving dried muscovado requires aggressive heat and moisture reintroduction.
Turbinado and Demerara: The Raw Sugar Exceptions
Turbinado (often sold as Sugar in the Raw) and Demerara are partially refined sugars with very large, pale golden crystals. They retain a tiny fraction of natural molasses, but their moisture content is incredibly low compared to standard brown sugar. Because the crystals are so large and the molasses layer is so thin, they do not clump or harden into bricks. They flow freely, much like white sugar. You never need to worry about softening Turbinado sugar.
Emergency Triage: How to Soften Brown Sugar in Minutes
Let’s be real: time is money, especially on a weeknight. If you are in the middle of creaming butter and realize your sugar is rock-hard, you do not have 24 hours to wait for a slice of bread to do its magic. You need a solution, and you need it right now. Here are the most effective, rapid-fire methods to revive your sugar.
The Microwave Steam Bath (The 20-Second Miracle)
This is the absolute best method for immediate results. It uses the power of your microwave to force moisture back into the molasses coating via targeted steam.
- Portion it out: Break off the approximate amount of hard sugar you need (or just grab the whole chunk) and place it in a microwave-safe glass or ceramic bowl. Do not use flimsy plastic; cheap plastic bowls are terrible for this (and it’s exactly why your plastic containers stay greasy no matter how much you scrub).
- Create the steam source: Take a heavy-duty paper towel, run it under the tap, and wring it out completely. It should be damp, not dripping wet. If it is too wet, you will melt the sugar into a puddle of syrup.
- Cover and heat: Drape the damp paper towel over the bowl, ensuring it covers the sugar completely. Microwave on high (assuming a standard 1000W to 1200W microwave) for 20 seconds.
- Check and fluff: Carefully remove the bowl (it might be warm) and use a fork to scrape and break apart the sugar. If there are still hard lumps, repeat in 10-second intervals until the sugar is soft, sandy, and ready to measure.
A crucial warning: Microwave-softened sugar will harden again—and often become even harder—once it cools down. Only soften what you immediately need for your recipe.
The Oven Bake (For the Truly Petrified)
If you are dealing with a massive, five-pound boulder of brown sugar and you do not want to microwave it in tiny batches, the oven is your best bet. This method relies on gentle, ambient heat to relax the molasses bonds.
- Preheat your oven to 250°F (120°C).
- Place the hardened block of sugar on a rimmed baking sheet. If your cheap baking sheets keep warping under the heat, use a heavy-duty aluminized steel pan or a tempered glass baking dish.
- Bake for 5 to 10 minutes. Check the sugar frequently by poking it with a spoon or fork.
- As soon as it yields and feels soft, pull it out of the oven.
Again, the heat makes the molasses pliable, but once it cools, it will turn back into concrete if you do not immediately store it properly. Measure out what you need while it is warm. You don’t want to learn the hard way why your glass baking dish shattered due to rapid temperature changes, so let any hot glass cool naturally before washing.
The Food Processor Method (Mechanical Destruction)
If you are completely out of patience and do not want to mess with heat or steam, you can rely on sheer mechanical force. Toss the chunks of hard brown sugar into a high-powered food processor or a heavy-duty blender. Pulse a few times until the blades shatter the clumps back into a granular state.
While effective, this method does not actually reintroduce moisture; it just breaks the crystalline bonds by force. The sugar will still be slightly dry, which could marginally affect the moisture content of very delicate baked goods. However, for a standard batch of weeknight cookies or a quick marinade, it works perfectly fine. Be careful not to blend it for too long, as the friction from the blades can generate enough heat to melt the sugar into a sticky paste.
The Slow and Steady Fixes: Softening Overnight
If you are prepping for a weekend baking project and discover a hard bag of sugar on Friday night, you have the luxury of time. These slow-release methods rely on the science of osmosis to gently and evenly rehydrate the molasses coating over 12 to 24 hours.
The Classic Bread Slice Hack
This is the trick your grandmother probably taught you, and it works flawlessly. Place a slice of fresh sandwich bread (white or whole wheat, it does not matter) into an airtight container with the hardened brown sugar. Seal it tightly.
Over the next 24 hours, the moisture from the bread will naturally migrate through the air to the drier environment of the sugar. The bread will become stale and rock-hard, acting as a sacrificial moisture donor, while the brown sugar will absorb that water vapor and become incredibly soft. Just remember to remove the bread after a day or two; leaving it in indefinitely can introduce mold spores to your sugar.
The Apple Slice Trick
Operating on the exact same thermodynamic principles as the bread hack, a few wedges of a fresh apple will release moisture into the sealed container. The benefit of the apple is that it holds a significant amount of water, meaning it works slightly faster than bread.
The downside? It will impart a faint, fruity apple aroma to the sugar. Just like the reason your silicone spatulas taste like soap, sugar readily absorbs ambient odors from its environment. If you are baking an apple pie or a spice cake, this is a delightful bonus. If you are making a savory barbecue rub for ribs, you might want to skip the apple and use bread instead.
The Damp Paper Towel Method (Overnight Version)
If you do not want to waste food, you can use a damp paper towel. Wring out a piece of paper towel until it is barely damp. Place it inside a plastic zip-top bag, leave the bag partially open, and place that inside your airtight sugar container. You want the moisture to escape into the container, but you absolutely do not want the wet paper towel directly touching the sugar, or it will melt into a syrupy mess. Leave it overnight, and wake up to perfectly soft sugar.
Preventing the Petrified Pantry: Long-Term Storage Solutions
As any good sous-chef knows, prevention is infinitely better than triage. If you store your brown sugar correctly from the moment you bring it home from the grocery store, you will never have to Google “how to soften brown sugar” again.
The Magic of the Terracotta Disc (The Brown Sugar Saver)
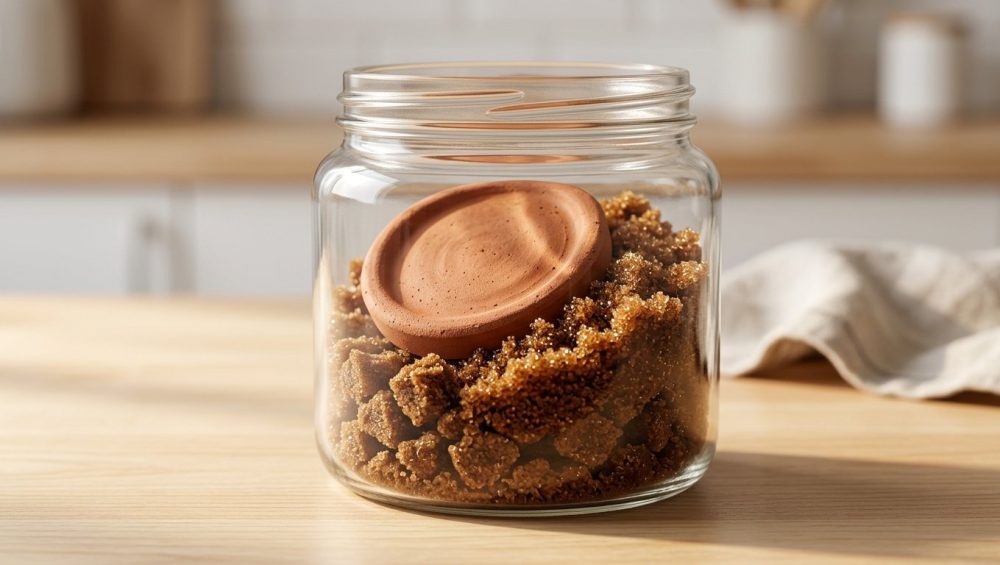
If you do not already own a terracotta brown sugar saver, you need to buy one immediately. It is one of the cheapest, most effective, and scientifically sound tools you can have in your kitchen. I am a huge advocate for banishing toxic kitchen gear, and natural, unglazed terracotta is as safe and non-toxic as it gets.
Here is how it works: Terracotta is a highly porous clay. When you soak a terracotta disc in tap water for 15 to 20 minutes, the microscopic capillaries inside the clay absorb a significant amount of water. After soaking, you pat the outside of the disc completely dry so there is no standing water to melt the sugar.
When you drop this hydrated disc into an airtight container of brown sugar, it acts as a hygroscopic regulator. It slowly and consistently releases water vapor, stabilizing the humidity inside the container at that ideal water activity level (around 0.75 aW). This keeps the molasses perfectly pliable for up to six months. When the sugar starts to feel a little stiff, you simply pull the disc out, re-soak it, and toss it back in.
Pro-tip: Never wash your terracotta disc with soap. The porous clay will absorb the soap, and your next batch of cookies will taste like dish detergent. Rinse it with hot water only.
Why Airtight Storage is Non-Negotiable
The flimsy plastic bag your brown sugar comes in is not designed for long-term storage. Once you tear it open, it is virtually impossible to seal it perfectly again. Air is the ultimate enemy.
Invest in high-quality, airtight storage containers. Heavy-duty glass jars with rubber gaskets and wire bails are excellent, as are thick acrylic containers with silicone-sealed push-button lids. The goal is to create a micro-environment where the moisture cannot escape into the dry ambient air of your kitchen. Just like cheap bamboo boards are ruining your knives, bad storage is ruining your ingredients.
The Marshmallow Trick
If you do not have a terracotta disc on hand, grab a few large marshmallows and toss them into the container with your brown sugar. Marshmallows are high in moisture and contain humectants (like corn syrup and gelatin) that hold onto water. In a sealed environment, they create enough ambient humidity to keep the sugar soft for months. It sounds like a gimmick, but the food science checks out.
Debunking Brown Sugar Storage Myths
There is a lot of misinformation floating around the culinary internet. Let’s clear up a few persistent rumors about brown sugar storage and behavior.
The Refrigerator Trap: Why Cold Air is the Enemy
Some people swear by keeping their brown sugar in the refrigerator. Do not do this. Refrigerators are essentially giant dehumidifiers. The cold environment actively pulls moisture out of the air (and out of your food) to prevent frost buildup. Storing brown sugar in the fridge will actually accelerate the evaporation of the molasses, turning your sugar into a brick much faster than if it were left in a room-temperature pantry.
Does Freezing Brown Sugar Actually Work?
Yes and no. Freezing brown sugar will effectively pause the evaporation process. Because the temperature is so low, the moisture in the molasses cannot escape. If you buy sugar in bulk and want to store it for a year, the freezer is a great option.
However, freezing does not soften already-hardened sugar. Furthermore, when you take the sugar out of the freezer, you must let it thaw completely at room temperature before opening the container. If you open a freezing cold container in a humid kitchen, condensation will immediately form on the sugar crystals, turning your sugar into a soggy, clumpy mess.
The Ultimate Kitchen Hack: Make Your Own Brown Sugar
If you are tired of playing the softening game, or if you simply ran out of brown sugar mid-recipe, there is a brilliant, foolproof solution: stop buying it altogether and make it yourself.
Remember, commercial brown sugar is just refined white sugar coated in molasses. You can easily replicate this in your own kitchen in about two minutes. By making it on demand, you guarantee that your brown sugar is always fresh, perfectly moist, and never hardened.
The Golden Ratio
To make your own brown sugar, you only need two ingredients: standard white granulated sugar and a jar of unsulphured molasses.
- For Light Brown Sugar: Combine 1 cup of white sugar with 1 tablespoon of molasses.
- For Dark Brown Sugar: Combine 1 cup of white sugar with 2 tablespoons of molasses.
Place the sugar in a mixing bowl, pour the molasses over the top, and use a fork to mash and stir them together. At first, it will look like it isn’t going to mix, but keep rubbing the molasses into the sugar crystals. Within two minutes, you will have fluffy, aromatic, perfect brown sugar. If you are making a large batch, toss the ingredients into a stand mixer with the paddle attachment and let the machine do the work.
Choosing the Right Molasses
You must use standard unsulphured molasses (like Grandma’s brand) for this trick. Do not use blackstrap molasses. Blackstrap has been boiled down multiple times, making it incredibly bitter, highly concentrated, and overly rich in ash and minerals. It will completely ruin the flavor profile of your baked goods.
Why This is a Weekday Lifesaver
Making your own brown sugar on demand is the ultimate efficiency hack. It eliminates the need to store a separate, bulky container of brown sugar in your pantry, and it completely eradicates the risk of encountering a hard brick when you are in a rush. If you have ever watched your spices turn into hard bricks, you know how frustrating pantry storage can be. By keeping a single bottle of molasses in the cupboard (which lasts for years and rarely crystallizes), you have an infinite supply of fresh brown sugar at your fingertips.
When you make your own, it is also easier to ensure your measurements are accurate. I will always tell you to stop scooping your flour with a measuring cup and instead rely on a trusty digital kitchen scale for precision. The same goes for sugar. Weighing out 200 grams of white sugar and mixing in your molasses guarantees a perfect bake every single time, without the hassle of trying to pack rock-hard sugar into a plastic cup.
A Final Word on the Sweet Stuff
Cooking and baking should be joyful, creative outlets, not stressful chores where you find yourself doing battle with your own ingredients. Understanding the simple science of moisture evaporation and molasses viscosity allows you to outsmart your pantry and take control of your prep time.
Whether you choose to invest in a terracotta disc, rely on the 20-second microwave steam bath, or switch to making your own brown sugar on demand, you now have the tools to ensure your ingredients work for you, not against you. So go ahead, preheat that oven, grab your mixing bowls, and bake those cookies. You have got this, and your brown sugar is finally under control.






