
The Great Sunday Stew Tragedy
Picture this: It is a chilly Sunday afternoon. You have spent the last four hours lovingly tending to a massive Dutch oven full of beef short ribs, root vegetables, and a bottle of red wine that was arguably too expensive to cook with. Your kitchen smells like a rustic French bistro. You are feeling like an absolute culinary genius. But then, you take the lid off your masterpiece, and your heart sinks.
Instead of a rich, velvety, mahogany-colored sauce, you are staring at a reflective, bright orange oil slick that looks less like a comforting meal and more like an environmental disaster.
If this scenario sounds familiar, take a deep breath. You are not a bad cook. You haven’t ruined your dinner. You are simply experiencing the harsh, unavoidable reality of rendering animal fat. There is nothing that triggers weeknight cooking anxiety quite like realizing your beautifully braised meal requires an hour of tedious, surgical fat removal before it is actually edible. But here is the good news: you do not need a culinary degree to fix this. You just need a basic understanding of kitchen physics and one highly specific, brilliantly engineered tool.
Welcome to the masterclass on why your braises turn into grease traps, and how to permanently solve the problem without losing your mind.
The Physics of the Oil Slick: Why Fat Floats and Ruins Everything
To understand why your stews end up looking like a petroleum spill, we have to talk about the science of rendering and specific gravity. I promise to keep the pretentious chef-speak to an absolute minimum, but you need to know what is happening inside that pot.
When you buy a beautiful chuck roast or a rack of short ribs, you are looking at two types of fat: subcutaneous fat (the thick white cap on the outside) and intramuscular fat (the beautiful webbing of marbling inside the meat). You can—and should—trim the heavy outer fat cap before cooking. But that internal marbling? That is what melts down during a long, slow braise, transforming tough muscle fibers into melt-in-your-mouth perfection.
As the meat cooks, the collagen breaks down into rich, lip-smacking gelatin, while the intramuscular fat melts into liquid beef tallow. This is where specific gravity comes into play. Specific gravity is a measurement of density compared to water. Water (and by extension, your wine-and-stock-based braising liquid) has a specific gravity of 1.0. Liquid beef tallow, on the other hand, has a specific gravity ranging from about 0.917 to 0.938. Because the fat is roughly 10% less dense than the water-based liquid, it physically cannot sink. It is forced to the surface, creating that dreaded floating oil slick.
If you have ever wondered why your soups are greasy despite aggressively trimming your meats beforehand, this is your answer. The internal fat has nowhere else to go.
Furthermore, you must actively avoid the trap of a rolling boil when cooking fatty meats. If your stew is boiling violently, the aggressive bubbling acts like a blender, forcing the liquid fat and the water-based broth to temporarily mix together into a cloudy, greasy, broken emulsion. By keeping your stew at a gentle, lazy simmer, you allow the physics of specific gravity to do its job, keeping the fat cleanly separated on the surface where we can easily remove it.
The Absolute Futility of Traditional Skimming Methods
For generations, home cooks have battled the grease slick using a variety of maddening, inefficient methods. Let’s break down why traditional skimming is a complete waste of your valuable time.
The Spoon Skim
This is the most common method, and it is pure torture. You take a shallow spoon, tilt the pot, and try to surgically scoop the fat off the surface without grabbing the broth. Not only does this take twenty minutes of intense lower-back-straining concentration, but it is also incredibly wasteful. No matter how careful you are, you end up throwing away spoonfuls of your precious, flavor-packed, gelatin-rich broth. You spend all afternoon trying to cook perfectly tender beef, only to accidentally throw half of your sauce down the drain.
The Paper Towel Drag
Some well-meaning internet blogs will tell you to gently drag a paper towel across the surface of the stew to absorb the grease. This is a fantastic way to burn your fingers, waste a whole roll of paper towels, and accidentally leave soggy, disintegrating paper fibers in your dinner. Skip it entirely.
The Fridge Chill
From a purely scientific standpoint, this is the most effective traditional method. You put the entire pot in the refrigerator overnight. By morning, the liquid tallow has solidified into a hard, white disc of fat that you can simply lift off and throw away. It is flawless—if you have twelve hours to spare. But if it is 6:00 PM on a Tuesday and your family is staring at you with hungry, hollow eyes, telling them to wait until tomorrow for dinner is not going to fly. Time is money, and we need a faster solution.
The Spout-Style Pitcher
This is the old-school plastic pitcher with a spout attached to the bottom. The idea is that you pour the liquid in, the fat rises, and you pour the good broth out of the low spout. The problem? As you tilt the pitcher forward to pour, the layer of floating fat tilts right along with it, often spilling directly into the spout and defeating the entire purpose of the tool. It is a flawed design.
Enter the Hero: The Bottom-Drain Fat Separator
If you want crystal-clear broths, velvety braises, and grease-free stews without waiting overnight, you need a gravity-fed, bottom-drain separator. It is, without a doubt, one of the most brilliantly simple, highly functional tools you can own in a modern kitchen.
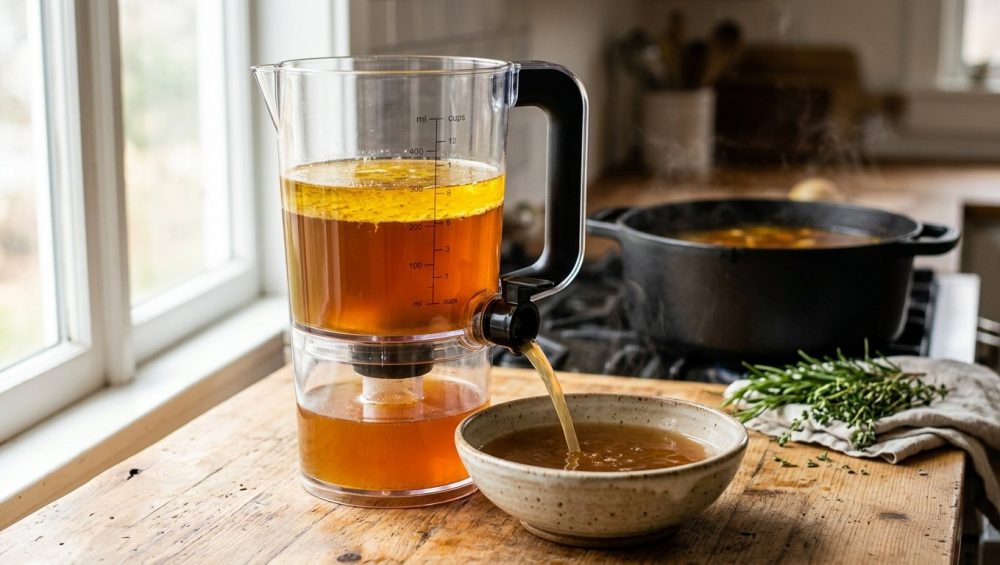
Here is how it works: Instead of a clumsy spout, this tool looks like a large measuring pitcher with a small hole directly in the center of the bottom. That hole is tightly plugged by a silicone stopper, which is connected to a mechanical trigger on the handle.
When you pour your braising liquid into the pitcher, you simply let it sit on the counter for three to five minutes. Gravity takes over. The heavy, flavorful broth sinks to the bottom, and the lighter liquid fat rises to the top. When you hold the pitcher over a saucepan and squeeze the trigger on the handle, the silicone plug lifts up. The rich, clean broth drains out from the absolute lowest point of the pitcher, leaving the floating fat suspended above it.
Once the broth has drained and the fat layer lowers to the bottom of the pitcher, you simply release the trigger. The plug snaps shut, trapping the unwanted grease inside the pitcher. It is incredibly satisfying, highly accurate, and takes less than five minutes. This is why I constantly preach that every home cook needs a high-quality bottom-release fat separator in their arsenal. It turns a stressful, messy chore into a quick, effortless mechanical process.
The “No-Go” Rule: Why I Despise Cheap, Toxic Kitchen Plastics
Now, before you run to the nearest discount home goods store and buy the cheapest separator on the shelf, we need to have a serious talk about material science. As your resident sassy sous-chef, I have a strict “No-Go” rule when it comes to cheap, mystery-metal, or toxic plastic kitchenware.
You are going to be pouring boiling, 212°F liquid animal fat into this vessel. If you use a flimsy, four-dollar plastic jug, you are asking for a disaster.
Historically, many clear kitchen plastics were made from Polycarbonate (PC). While polycarbonate is rigid and clear, it contains Bisphenol A (BPA). When polycarbonate is exposed to high-temperature liquids (like boiling beef broth), it rapidly accelerates the leaching of BPA directly into your food.
Other cheap separators are made from basic Polypropylene (PP). While polypropylene is generally BPA-free, it is soft, cloudy, and scratches incredibly easily. Once a plastic pitcher gets micro-scratches on the inside, it holds onto rancid grease odors and becomes a nightmare to clean. Furthermore, cheap plastics warp under the intense heat of a dishwasher, causing the silicone plug mechanism to misalign and leak hot broth all over your countertops.
I am heavily committed to banishing toxic kitchen gear from your home, which is why I absolutely forbid you from buying a cheap, peeling, warping plastic fat separator. You need a tool that can handle extreme thermal shock without poisoning your family or shattering into a million pieces.
The Holy Grail Material: Heat-Resistant Tritan Plastic
If you want a tool that will last a lifetime, you must buy a bottom-drain separator made exclusively from Tritan plastic.
Tritan is a high-performance copolyester developed by the Eastman Chemical Company. It was specifically engineered to replace polycarbonate in food-contact applications. Here is why Tritan is the absolute gold standard for this specific kitchen tool:
- It is 100% Non-Toxic: Tritan is not only free of BPA, but it is also completely free of BPS (Bisphenol S) and any other bisphenol compounds. Independent third-party testing has proven that Tritan has absolutely zero estrogenic activity (EA) or androgenic activity (AA). It will not disrupt your hormones, even when exposed to boiling liquids.
- Extreme Heat Resistance: While cheap plastics melt or warp, high-quality Tritan is rated to withstand temperatures up to 228°F (109°C) without deforming. Since water boils at 212°F, your hot braising liquids are perfectly safe inside a Tritan vessel.
- Shatterproof Durability: Tritan has the crystal-clear, glass-like transparency of actual glass, but it is virtually indestructible. If you accidentally knock a Tritan separator off your kitchen counter onto a hard tile floor, it will bounce, not shatter.
- Stain and Odor Resistance: Unlike cheap plastics that absorb the smell of old beef fat, Tritan is highly resistant to chemical and oil absorption, meaning it washes completely clean and stays odor-free.
When shopping, always check the box or the bottom of the pitcher. If it does not explicitly say “Made with Tritan,” put it back on the shelf.
A Step-by-Step Masterclass: Defatting Your Stew Like a Pro
Alright, you have your shatterproof, heat-resistant, bottom-drain separator. Let’s walk through exactly how to use it to rescue your Sunday stew.
Step 1: The Transfer
Remove your cooked meat and large vegetables from the Dutch oven and set them aside on a platter. Place your fat separator on a stable, heat-proof surface. Most high-quality models come with a perforated strainer lid that sits on top of the pitcher. Pour all of the remaining liquid from your pot directly through that strainer lid. The mesh will catch the stray peppercorns, rogue bay leaves, and mushy bits of onion, allowing only the liquid to pass through into the pitcher.
Step 2: The Settling Period (Patience is Key)
Do not touch the trigger yet. Walk away for three to five minutes. This is where you let the physics of specific gravity do the heavy lifting. As the liquid sits undisturbed, you will see a distinct, sharp line form in the pitcher. The dark, rich, opaque broth will settle at the bottom, and a clear, brightly colored layer of liquid fat will pool at the top.
Step 3: The Drain
Hold the separator over a clean saucepan (or directly back over your empty Dutch oven). Gently squeeze the trigger on the handle. The silicone stopper at the bottom will lift, and a glorious, grease-free stream of pure flavor will pour into your pan.
Step 4: The Cut-Off
Keep your eyes glued to the line where the fat meets the broth. As the pitcher empties, that line will drop lower and lower. The exact second that the fat layer reaches the bottom drain hole, release the trigger. The stopper will snap shut, instantly cutting off the flow and trapping 100% of the unwanted grease inside the pitcher.
Step 5: The Fat Reserve (Optional but Highly Recommended)
Do not pour that trapped beef tallow down your kitchen sink, unless you enjoy paying exorbitant emergency plumbing bills to clear a fat-clogged pipe. Instead, pour the reserved tallow into a glass jar and keep it in your fridge. Beef tallow is an incredible cooking fat with a high smoke point. Use it next week to roast potatoes or sear a steak.
Beyond the Braise: Five Unexpected Uses for Your Separator
While rescuing a greasy beef stew is the primary reason to buy this tool, it is far from a one-trick pony. Once you own a bottom-drain separator, you will find yourself reaching for it constantly.
1. The Ultimate Thanksgiving Turkey Gravy
Roast turkey produces an enormous amount of highly flavored drippings, but those drippings are swamped in liquid poultry fat. If you try to make gravy without separating it first, your gravy will be an oily, broken mess. Run the drippings through the separator, use a few tablespoons of the reserved fat to make your flour roux, and use the defatted juices as your gravy base.
2. Crystal Clear Bone Broths
When making homemade chicken broth, you want a pristine, golden liquid, not a murky, heavy soup covered in a thick layer of yellow schmaltz. The separator allows you to achieve that restaurant-quality clarity in seconds.
3. Rescuing Watery Crockpot Meals
Because slow cookers trap steam, they often leave you with a massive amount of unreduced, greasy liquid at the end of the cooking time. The separator is the ultimate fix for slow cooker meals. Just drain the liquid, separate the fat, and rapidly boil the remaining broth in a saucepan on the stove to reduce it into a thick glaze.
4. Fixing Broken Pan Sauces
There is nothing sadder than when a beautiful pan sauce separates into a greasy puddle because you didn’t drain the excess oil from the skillet before deglazing. Pouring the skillet juices through the separator before adding your wine and cold butter guarantees a tight, glossy, perfect emulsion every single time.
5. Effortless Clarified Butter
Want to make clarified butter for dipping lobster or searing delicate fish? Melt a pound of butter in a saucepan, pour it into the separator, and let it sit. The watery milk solids will sink to the bottom, and the pure, clear butterfat will float to the top. Just pull the trigger to drain away the milk solids, and keep the liquid gold.
Cleaning and Maintenance: Keeping It Pristine
Even with high-quality Tritan plastic, you need to care for your gear properly to ensure it lasts. Animal fat is notoriously sticky, and if left unwashed, it will create a cloudy, rancid film on the inside of the pitcher.
We all know how cheap plastic containers stain orange when exposed to hot, acidic tomato-and-beef grease. While Tritan is highly stain-resistant, you still shouldn’t let greasy tomato-based braising liquids sit in the separator overnight.
As soon as you are done using the tool, immediately fill it with blazing hot water and a generous squirt of a high-quality, grease-cutting dish soap (like Dawn). Pump the trigger a few times to flush the hot soapy water through the bottom valve mechanism. While most Tritan separators are technically top-rack dishwasher safe, I highly recommend hand washing them with a soft sponge. Never use abrasive scouring pads or steel wool, as scratching the plastic will give future grease a place to cling to.
The 2026 Home Cooking Renaissance: Why This Matters Now
If you feel like you are cooking at home more than ever, you are not alone. According to the latest 2025-2026 culinary industry data, a staggering 93% of Americans expect to cook as much or more at home over the next year. Driven by ongoing economic pressures and skyrocketing restaurant prices, the era of ordering expensive takeout four nights a week is rapidly declining.
But this shift back to the home kitchen isn’t just about saving money; it is about finding comfort. Recent data shows a massive resurgence in the popularity of nostalgic, slow-cooked comfort foods. Consumers are actively turning away from rigid, restrictive diet rules and leaning heavily into meals that bring them joy, warmth, and a sense of well-being.
Because of rising premium meat costs, home cooks are increasingly relying on budget-friendly, highly flavorful cuts of meat like beef chuck, short ribs, pork shoulders, and neckbones. These cuts are incredibly economical and yield mind-blowing flavor when braised low and slow. However, these cuts are also packed with massive amounts of intramuscular fat and connective tissue.
You cannot successfully cook these economical, trending cuts of meat without dealing with the resulting fat. If you try to serve a braised chuck roast without defatting the sauce, the meal will be heavy, greasy, and ultimately unappetizing. The bottom-drain fat separator is no longer just a specialty gadget for Thanksgiving; it is an absolute mandatory survival tool for the modern, budget-conscious home cook who wants to turn cheap cuts of meat into restaurant-quality dinners.
Final Thoughts from the Sassy Sous-Chef
Cooking incredible, soul-warming food at home does not require a Michelin star, a massive budget, or endless hours of tedious labor. It simply requires working smarter, not harder.
Stop fighting the laws of physics with a soup spoon. Stop burning your fingers with paper towels. Stop ruining your beautiful weekend braises by serving them in a pool of rendered tallow. By investing in a high-quality, Tritan-plastic, bottom-drain fat separator, you are buying yourself time, sanity, and drastically better-tasting food.
You put the effort into buying the ingredients, chopping the vegetables, and searing the meat. You deserve to enjoy the pure, unadulterated, velvety sauce that you worked so hard to create. Buy the tool, pull the trigger, and leave the grease behind. Your Sunday stews—and your sanity—will never be the same.






