
You open the pot, expecting a fluffy, ethereal cloud of ancient grains, and instead, you are staring at a depressing, waterlogged paste that looks like it belongs in a kindergarten paper-mâché class. We have all been there. Quinoa has a terrible reputation among weekend culinary hobbyists, and honestly, it is not the grain’s fault. It is the fault of the completely fabricated, universally accepted cooking instructions printed on the back of the bag.
As a busy professional who has set off the smoke alarm more times than I care to admit, I have absolutely zero patience for recipes that set home cooks up for failure. I firmly believe that you do not need a culinary degree to make mind-blowing food. You just need to understand the basic mechanics of what is happening inside your cookware. If you are tired of eating sad, mushy desk lunches, it is time to master the ultimate prep-ahead meal format. We are going to break down the exact science of grain hydration so you can build a structurally flawless, modular grain bowl spread. Trust me, once you have the right foundational knowledge and the proper beginner kitchen tools at your disposal, your weekend cooking projects will transform from a source of anxiety into an absolute breeze. Pour yourself a glass of wine, grab your apron, and let us dissect exactly why your pseudocereals are turning into wallpaper paste.
The Anatomy of a Mushy Disaster: The Science of Starch Gelatinization
To fix the problem, we first have to understand the chemistry of the crime scene. Quinoa is not rice. It is a seed from the Amaranthaceae family, making it a close botanical cousin to spinach and beets. Yet, for decades, the culinary industry has stubbornly treated it exactly like long-grain white rice, slapping a generic one-to-two liquid ratio on the packaging and calling it a day. This is a fundamental misunderstanding of the grain’s thermodynamic properties.
The mushiness you are experiencing is a direct result of catastrophic starch gelatinization. Starch granules are essentially tiny, tightly packed bundles of complex carbohydrates—specifically amylose and amylopectin. When these granules are exposed to heat in the presence of water, they begin to absorb moisture and swell. Every type of starch has a specific temperature threshold where this swelling process launches. Quinoa starch is incredibly delicate; it has a remarkably low pasting temperature, generally launching the gelatinization process between 57°C and 67°C.
When you drown this delicate seed in two full parts of water, you are setting off a microscopic bomb. The starch granules absorb the excess water too rapidly. They swell past their structural breaking point and literally rupture, violently releasing their sticky amylose and amylopectin straight into the boiling liquid. The result? The water thickens into a gluey, gelatinous nightmare, binding the shattered seeds together into a dense, unappetizing brick. It is not your fault that your dinner turned out this way; the package directions have been lying to you for years.
The Golden Ratio: Strictly 1:1.5
This is the culinary hill I will gladly die on. The only verified, scientifically sound liquid-to-grain ratio for cooking perfect quinoa is strictly 1:1.5. That means for every one cup of dry quinoa, you use exactly one and a half cups of water or high-quality broth. Period.
Why Less is More
The physics of water absorption in pseudocereals dictate that they require far less hydration than traditional cereal grains. The 1:1.5 ratio provides the exact mathematical amount of moisture required to fully penetrate and cook the endosperm without leaving a pool of excess liquid behind to drown the starch granules. When you restrict the water supply to this precise golden ratio, the grains remain perfectly distinct. They develop that signature, satisfying “al dente” pop when you chew them.
Accounting for Color Variations
You will occasionally see white, red, black, or tri-color quinoa blends at the market. While their nutritional profiles are nearly identical, their outer hulls have slightly different thicknesses. White quinoa is the most delicate and cooks the fastest. Red and black quinoa have slightly thicker, more robust exteriors that require a few extra minutes of simmering to soften. However, the golden ratio of 1:1.5 remains completely unchanged regardless of the color. You simply adjust your simmering time, not your water volume. Do not let anyone convince you to add an extra half-cup of liquid just because you bought the black seeds.
The Saponin Situation: Why Rinsing is Non-Negotiable
Let us talk about the bitter, soapy elephant in the room: saponins. If you have ever taken a bite of a seemingly healthy grain bowl and immediately felt like you were chewing on a mouthful of lavender dish detergent, you have been victimized by unwashed quinoa.
Quinoa seeds are naturally coated in a chemical compound called saponin, which is a highly concentrated triterpenoid glycoside. In nature, this is a brilliant evolutionary defense mechanism. Saponins are intensely bitter, astringent substances concentrated in the grain’s pericarp that foam up when wet, effectively deterring birds, insects, and pests from eating the crop. In your kitchen, however, it is the enemy of flavor and texture.
Crucially, saponins do not just ruin the taste of your food; they actively interfere with the hydration kinetics of the grain. Because saponins act as a surfactant, they delay water penetration into the endosperm by several minutes during the simmering process. This causes uneven cooking, where the outside of the grain turns to mush while the inside remains stubbornly crunchy and raw. Furthermore, saponins are incredibly heat-stable. You cannot boil them away.
You must aggressively rinse your quinoa under cold, running water for at least 60 to 90 seconds with gentle manual agitation. The physical friction of your fingers rubbing the grains together is what actually dislodges the sticky saponin coating. Do not skip this step, even if the cardboard box arrogantly claims the product is “pre-rinsed.” Using a fine-mesh strainer or a Japanese wash bowl makes this process incredibly efficient, ensuring the bitter compounds are washed away without losing half of your expensive organic grains down the sink drain.
Cookware Matters: The “No-Go” Rule on Toxic Gear
Before we dive into the actual execution of the cooking protocol, we need to have a brutally honest conversation about your pots and pans. I advocate fiercely for the home cook, which means I will absolutely not sit idly by while you cook your beautiful, expensive ancient grains in a cheap, scratched-up Teflon pot that is actively flaking mystery chemicals into your dinner.
Time is money, yes, but your long-term health is priceless. I have a strict, uncompromising “no-go” rule when it comes to toxic kitchen gear. PFAS, PFOA, and peeling synthetic non-stick coatings have absolutely no place in a modern, mindful kitchen. If you are remotely serious about banishing toxic kitchen gear, you need to immediately invest in high-quality, heavy-bottomed stainless steel or enameled ceramic cookware.
The Thermodynamics of a Good Saucepan
When cooking any grain, heat distribution is everything. A flimsy, thin-bottomed aluminum pot will create aggressive hot spots, scorching the quinoa at the bottom of the pan while leaving the top layer completely raw. A heavy-bottomed, multi-clad stainless steel saucepan, on the other hand, absorbs and distributes thermal energy evenly across the entire surface area. This prevents the delicate starch from burning and sticking to the bottom during the simmer.
If you are terrified of cooking without a non-stick coating, please understand that proper temperature control is your best friend. In fact, if you know how to properly preheat your cookware and utilize simple scientific techniques like the water drop test to gauge surface temperature, stainless steel becomes naturally stick-resistant. And please, for the love of all things culinary, remember that aerosol cooking spray is the enemy of high-quality pans. The chemical propellants in those cans polymerize under heat, creating an impossible-to-remove sticky residue that will ruin your expensive cookware forever. Use real butter, high-quality olive oil, or avocado oil instead.
The Cooking Protocol: Heat, Simmer, and the Sacred Steam-Vent
The weekday hustle requires ruthless efficiency, but weekend culinary projects demand absolute perfection. This specific cooking method beautifully bridges the gap, giving you flawless, restaurant-quality results with minimal active hands-on time.
Step 1: The Flavor-Building Toast
After rinsing and draining your quinoa thoroughly, add a small splash of olive oil to your heavy-bottomed saucepan over medium heat. Add the damp quinoa and toast it for 2 to 3 minutes, stirring constantly. This crucial step evaporates the residual surface moisture from the rinsing phase and triggers a mild Maillard reaction. Toasting the dry grain develops a deep, distinctly nutty flavor profile that elevates the entire dish from bland health food to a gourmet base layer.
Step 2: The Controlled Simmer
Pour in your 1.5 parts of liquid. I highly recommend using a high-quality vegetable stock or chicken bone broth instead of plain tap water for an instant, effortless flavor upgrade. Add a generous pinch of kosher salt. Bring the liquid to a rapid boil, then immediately drop the heat to the lowest possible setting on your stove and cover the pot with a heavy, tight-fitting lid.
Step 3: Absolute Neglect
Let the pot simmer completely undisturbed for exactly 15 minutes. Do not lift the lid to peek. Do not stir it. Stirring the grains while they are actively absorbing liquid forces them to rub against each other, which releases excess starch into the pot and guarantees a gluey, clumpy texture. Walk away and let the gentle heat do its job.
Step 4: The Sacred Steam-Vent and Resting Phase
This is the exact moment where 90% of home cooks snatch defeat from the jaws of victory. After 15 minutes, turn off the heat completely. Do not remove the lid. Let the pot sit on the cooling burner for an additional 5 to 10 minutes. This resting phase is absolutely non-negotiable. It allows the trapped ambient steam to gently finish cooking the grains and allows the fragile starch network to set and stabilize. If you aggressively stir the quinoa while it is piping hot and wet, the swollen grains will shatter into mush.
After the resting period, remove the lid and gently fluff the quinoa with a fork. This is the steam-venting protocol. Fluffing separates the individual grains and releases the trapped vapor, instantly halting the cooking process and leaving you with a light, airy, structurally flawless mound of perfection.
Building the Mindful Grain Bowl Bar: Your Ultimate Hosting Hack
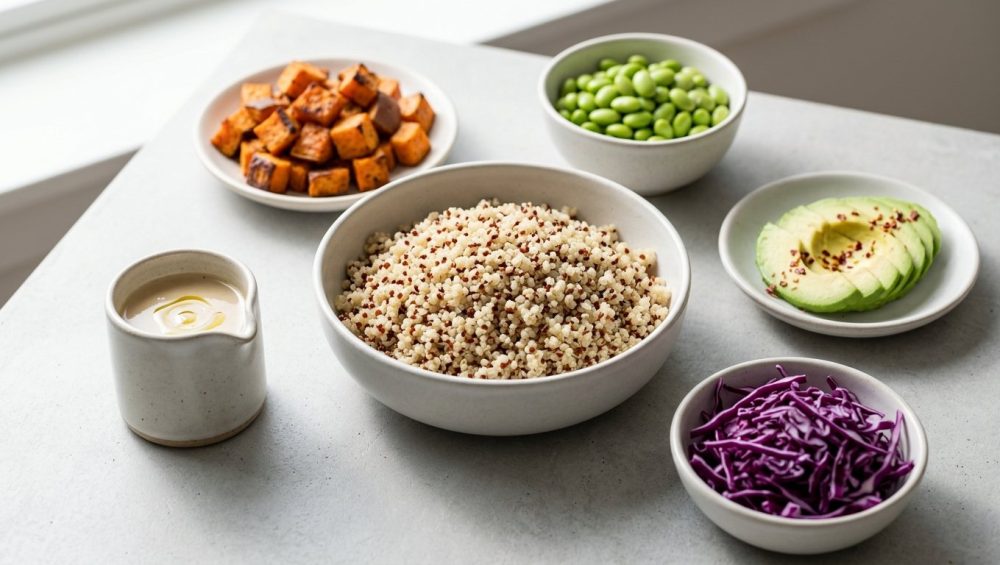
Why are we obsessing so deeply over the structural integrity of a tiny South American seed? Because perfect quinoa is the foundational building block of the greatest, most stress-free meal format in existence: the modular grain bowl bar.
Whether you are meal-prepping for a chaotic workweek or hosting a casual weekend dinner party for friends, the grain bowl bar is your ultimate secret weapon. It effortlessly accommodates multiple, overlapping dietary restrictions—vegan, gluten-free, dairy-free, nut-free—without forcing you to play short-order cook and prepare four entirely different meals. You simply lay out the beautiful, distinct components and let your guests build their own culinary masterpieces.
The true beauty of this format is that 90% of the work can be executed hours before anyone even arrives. It completely eliminates the frantic, sweaty, last-minute kitchen panic that ruins so many gatherings. If you want to truly master the art of effortless hosting, you must embrace modular, prep-ahead menus that allow you to actually sit down, relax, and enjoy a glass of wine with your guests instead of hyperventilating over a hot stove.
Architecting the Flawless Spread
A truly spectacular grain bowl is not just a random pile of leftovers thrown into a dish. It requires an orchestrated, intentional balance of textures, temperatures, and bold flavor profiles. Here is exactly how you build out the ultimate spread.
The Base
Your structurally flawless, perfectly hydrated quinoa takes center stage. It should be served warm or at room temperature. Because you utilized the strict 1:1.5 ratio and executed the steam-venting protocol, your grains will remain light and separated. They will not clump together into a sad, unappetizing brick as they sit on the buffet table waiting to be served.
The Roast
This is where you introduce deep, caramelized, savory notes to the bowl. Think cubed sweet potatoes, charred broccoli florets, or deeply roasted Brussels sprouts. The secret to getting those dark, crispy edges instead of steamed, sad, flabby vegetables is thermal shock. The magic of a preheated pan ensures that the moment your oil-coated vegetables hit the hot metal baking sheet in the oven, the searing process begins instantly, locking in a firm texture and aggressively amplifying the natural sugars.
The Crunch
Every bowl desperately needs a textural contrast to offset the softness of the grains and roasted vegetables. Toasted pepitas, slivered almonds, crispy oven-roasted chickpeas, or even quick-pickled red onions provide that essential acoustic crunch that makes eating a multi-sensory experience. Do not skip the crunch; it is the difference between a good meal and a great one.
The Dressing
A grain bowl without a phenomenal sauce is just a pile of dry, disconnected ingredients. You need a vibrant, punchy emulsion that coats the grains without drowning them. A creamy tahini lemon dressing, a spicy peanut sauce, or a sharp shallot vinaigrette works wonders. If you constantly struggle with broken, oily vinaigrettes that look like a science experiment gone wrong, remember that your salad dressing separates because it lacks a proper chemical emulsifier. A generous dollop of Dijon mustard, a spoonful of miso paste, or a splash of aquafaba will permanently bind the oil and acid together into a luxurious, stable, velvety cream.
The Freshness
Finally, you need a bright, herbaceous lift to cut through the heavy, savory, and starchy elements. Fresh cilantro, torn mint, delicate dill, or a handful of peppery baby arugula provide the necessary acidic and fresh counterpoint. Just ensure your greens are completely dry before you take a knife to them. If you chop wet herbs, they oxidize rapidly and turn into a dark, bruised, unappetizing sludge. Nobody wants to eat swampy garnishes. If you are tired of watching your expensive organic produce rot in the crisper drawer after two days, learning how to properly wash, dry, and store them is the only way to ensure your fresh herbs get slimy no more.
Storage, Batch Cooking, and Weekday Survival
Because your time is incredibly valuable, you should always make a double batch of quinoa on Sunday afternoon. It stores beautifully in the refrigerator and acts as a versatile culinary blank canvas for the rest of the week’s meals. However, improper storage techniques will instantly ruin all the hard work you just put into achieving that perfect, fluffy texture.
The Cooling Protocol
Quinoa must be completely cooled to room temperature before it goes anywhere near your refrigerator. If you eagerly seal warm quinoa into a storage container, the trapped radiant heat will create condensation on the lid. That moisture will rain right back down onto your perfectly cooked grains, turning them into a soggy, waterlogged mess by Tuesday. To speed up the process, spread the cooked, fluffed quinoa out into an even layer on a rimmed aluminum baking sheet to cool rapidly.
The Case for Glass
Once completely cooled, store your grains in high-quality glass containers with airtight lids. I absolutely despise cheap plastic storage ware. Not only does it warp in the dishwasher and leach microplastics into your food, but it also absorbs ambient odors and heavy oils like a sponge. If you have ever spent twenty minutes aggressively scrubbing a plastic bin because your plastic containers stay greasy no matter how much dish soap and elbow grease you apply, you know exactly what I mean. Invest in a matching set of tempered glass. It is non-porous, environmentally friendly, infinitely durable, and keeps your food tasting exactly how it should.
Reheating Without Ruining
When you are ready to reheat your batch-cooked quinoa for a quick weekday lunch, do not just blast it in the microwave until it turns to rubber. Simply sprinkle a few tiny drops of water over the top of the grains and microwave the bowl loosely covered with a damp paper towel for 60 to 90 seconds. The gentle steam created by the damp towel will rehydrate the exterior of the grains without turning the interior to mush, restoring that freshly-cooked, al dente texture almost instantly.
The Final Word
Cooking exceptional, healthy food at home does not require a brigade of trained sous-chefs, a pantry full of expensive molecular gastronomy chemicals, or a fancy culinary degree. It requires a fundamental understanding of your raw ingredients, a stubborn refusal to accept mediocre, toxic kitchen equipment, and the absolute willingness to ignore the terrible, outdated instructions written on the back of cardboard boxes.
By mastering the hydration mechanics of ancient pseudocereals, utilizing the strict 1:1.5 liquid ratio, aggressively rinsing away those bitter saponins, and respecting the sacred steam-venting protocol, you have just unlocked a lifetime of perfect, structurally flawless meals. You now hold the blueprint for the ultimate, stress-free grain bowl bar. So pour yourself that well-deserved glass of wine, permanently ditch the expensive takeout menus, and step into your kitchen with confidence. You’ve absolutely got this.






