
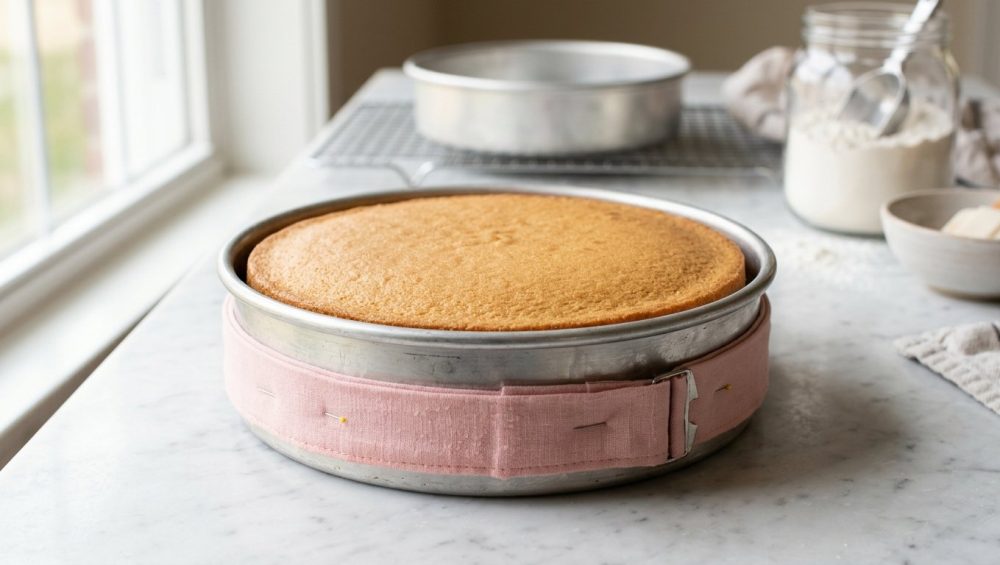
We have all been there. You spend your precious weekend meticulously measuring flour, creaming expensive European butter, and carefully folding in dry ingredients like you are handling highly enriched uranium. You pour that beautiful, velvety batter into your pans, slide them into the oven, and wait for the culinary magic to happen. But when the timer goes off, you do not pull out perfectly flat, stackable, bakery-style layers. Instead, you pull out a pair of volcanic mounds. You have baked a dome.
Listen to me, weekend warrior: you did not fail. Physics failed you. Or rather, thermodynamics did exactly what thermodynamics always does, and your baking pan was just a willing accomplice. As a home cook, you might think that achieving perfectly level cakes requires a culinary degree, a commercial oven, or a pact with a kitchen demon. It requires none of those things. You can absolutely skip the frustration of lopsided cakes and achieve bakery-smooth, easy-to-frost results in a standard home kitchen. Forget expensive renovations; focusing on technique and quality gear are the best aesthetic kitchen upgrades you can make for your culinary sanity.
Today, we are going to dive deep into the science of baking, eliminate the wasteful habit of slicing off cake tops, and introduce you to the simplest, cheapest, most scientifically brilliant tool in the baking world: reusable fabric cake strips.
The Thermodynamics of a Baking Cake (Why the Dome Happens)
To understand how to fix the dreaded cake dome, we first have to understand why it happens. Baking is not just an art; it is an aggressive series of chemical and physical reactions triggered by heat. When you place a cake pan into a hot oven, you are initiating a race between the edges of your batter and the center.
The Heat Transfer Race
In a standard home oven, heat transfers to your cake batter in three ways: radiation from the oven walls, convection from the hot circulating air, and conduction through the metal pan itself. Conduction is by far the most efficient and rapid method of heat transfer. When you place a thin metal cake pan into a 350°F (175°C) oven, the outer sidewalls of that pan heat up almost instantly.
Because the metal conducts heat rapidly—often heating up over three times faster than the dense, moisture-rich batter in the center—the outer edge of your cake begins to bake immediately. Just like how cheap baking sheets warp under intense, uneven heat, your cake batter reacts violently to this temperature differential.
The Chemistry of the Dome
As the outer ring of batter reaches about 140°F to 160°F, the starches begin to gelatinize. Shortly after, as it approaches 180°F, the proteins from the eggs and flour coagulate. In layman’s terms: the outer edge of your cake sets and turns into a solid crust.
Meanwhile, the center of your cake is still a cool, liquid pool of batter. The leavening agents (like baking powder and baking soda) are working in overdrive, producing carbon dioxide gas. The moisture in the batter is turning into steam. All of this expanding gas needs somewhere to go. Because the outer edges of the cake have already set and locked into place, the center has only one path of least resistance: straight up.
The center continues to rise, expand, and eventually set much later than the edges, leaving you with a frustrating, mountainous dome.
The “Just Cut It Off” Fallacy
I can already hear some of you saying, “But Chef, I just use my serrated bread knife to level it off! It’s fine!”
Stop it. Just stop. Your time is far too valuable to be spent performing unwanted topiary surgery on a baked good. While leveling a cake with a knife is a common practice, it is fundamentally a waste of time, a waste of money, and a structural nightmare for casual bakers.
Wasting Precious Ingredients
First and foremost, when you slice off the top of a domed cake, you are throwing away (or immediately eating over the sink) up to 20% of your total cake volume. Do you know how much pure vanilla extract and high-fat butter costs these days? You are quite literally throwing money into the compost bin. If your cakes are too dense, that is usually a measurement issue, but a dome is purely a thermal problem that can be prevented entirely.
The Crumb-Coating Nightmare
Furthermore, the moment you slice the top off a cake, you expose the porous, delicate interior crumb. The natural “crust” that forms on the top of a baked cake acts as a protective seal. When you remove it, you expose millions of tiny crumbs that will immediately tear away and mix into your frosting the second your spatula touches them. You are forcing yourself to do a meticulous crumb coat, chill the cake, and do a final coat, adding hours to your weekend baking project.
By baking the cake flat from the start, you keep the protective top crust intact, making frosting an absolute breeze.
The Magic of Fabric Cake Strips Explained
Enter the hero of our story: the fabric cake strip. This is not some gimmicky, useless infomercial gadget that will sit in the back of your drawer. It is a masterclass in applied physics and thermodynamics, and it costs less than a decent bottle of wine.
What Are They?
Fabric cake strips (often made of heavy cotton, canvas, or specialized heat-resistant synthetic blends) are simple bands that feature loops or pins. You soak them in cold water, wring them out, and wrap them tightly around the outside of your metal cake pan before putting it in the oven.
The Science of Evaporative Cooling
The magic behind these strips relies on a scientific principle called evaporative cooling, specifically leveraging the latent heat of vaporization.
Water boils and turns to steam at exactly 212°F (100°C). It requires a massive amount of thermal energy to force water to change phases from a liquid to a gas. When you wrap a water-soaked fabric strip around your cake pan, the heat from the oven hits the wet strip first. Instead of that heat transferring directly into the metal pan and scorching the edges of your batter, the thermal energy is entirely consumed by the process of evaporating the water in the fabric.
As long as there is liquid water evaporating from that strip, the temperature of the fabric—and therefore the temperature of the metal pan’s outer edge—cannot physically exceed 212°F. Unless you are using a simple oven thermometer to verify, your oven is likely blasting the pan at 350°F. The wet strip acts as a powerful thermal buffer, keeping the edges of the pan significantly cooler during the critical first 20 to 30 minutes of the bake.
Because the edges are kept cool, they do not set prematurely. The outer ring of batter and the center pool of batter rise at the exact same rate, expanding and setting in perfect harmony. The result? A structurally sound, perfectly level, completely flat cake layer that requires zero trimming.
The Toxic Gear Warning (A Sassy Sous-Chef Rant)
Before we discuss the step-by-step application of these magical strips, we need to have a brutally honest conversation about the cake pans you are wrapping them around. I have absolutely zero patience for cheap, toxic kitchenware, and neither should you.
The Danger of Cheap Non-Stick Pans
If you are baking your cakes in flimsy, dark-coated, cheap non-stick pans, you need to march into your kitchen and throw them away right now. You are actively ruining your nonstick pans if you expose them to high heat or harsh utensils, but more importantly, they are terrible for baking.
Many cheap non-stick coatings contain PFAS (forever chemicals). When these pans inevitably scratch, chip, or peel, those toxic chemicals can leach directly into your food. Furthermore, dark-colored pans absorb radiant heat far more aggressively than light-colored pans. A dark pan will aggressively overbake the edges of your cake, turning them dry, tough, and crusty, completely counteracting the delicate texture you are trying to achieve.
The Ultimate Solution: Anodized Aluminum
The only cake pans you should ever use are light-colored, bare, anodized aluminum pans.
Aluminum is an exceptional conductor of heat, ensuring an even bake. However, raw aluminum is reactive to acidic foods (like lemon cake or buttermilk batters). Anodization is an electrochemical process that thickens the natural oxide layer on the surface of the aluminum. This process seals the metal, making it harder than stainless steel, completely non-reactive, and entirely non-toxic. It will never peel, it will never rust, and it will never leach mystery metals into your food.
It is the same thermal shock principle as when your glass baking dish shattered—using the wrong material for the wrong job yields disastrous results. Pair a high-quality anodized aluminum pan with a damp fabric cake strip, and you have engineered the ultimate, foolproof baking environment.
How to Use Fabric Cake Strips (Step-by-Step)
Using fabric cake strips is incredibly straightforward, but you must follow the correct procedure. Time is money, and we want to get this right on the first try so you can get back to enjoying your weekend.
Step 1: Size the Strips Dry
Before you do anything, take your dry cake strip and wrap it around your empty cake pan. Most commercial strips come with a fabric loop or a specialized pin. Adjust the strip so it fits snugly around the circumference of the pan. It is much easier to size the strip when it is dry and the pan is empty than trying to wrestle a wet strip onto a pan full of liquid batter.
Step 2: The Cold Water Soak
Fill a bowl with cold tap water. Submerge the sized cake strips completely into the water. Let them soak for a minimum of 10 to 15 minutes. You want the thick cotton fibers to absorb as much water as structurally possible. Do not rush this step; if the core of the fabric remains dry, the evaporative cooling effect will fail halfway through the bake.
Step 3: The Goldilocks Wring
Remove the strips from the water and gently wring them out. You are aiming for a “Goldilocks” level of moisture here. The strip must be thoroughly damp, but it should not be dripping wet. If it is dripping, it will create a puddle on your oven rack, drop the ambient temperature of your oven, and potentially seep under your pan, resulting in a soggy crust. Unlike when butter always splatters during a chaotic stovetop sear, baking requires precise, controlled moisture management.
Step 4: Wrap and Fill
Slide the damp, pre-sized strip over your greased and lined cake pan. Make sure it sits flush against the metal sidewalls. Once the strip is secure, pour your prepared cake batter into the pan.
Step 5: Adjust the Bake Time (Crucial!)
Because the fabric strip acts as a thermal insulator, it actively slows down the rate at which heat penetrates the outer edges of the batter. Consequently, the overall baking process will take slightly longer. You must generally add 5 to 10 minutes to your recipe’s stated baking time. Do not panic if the cake looks underdone at the 30-minute mark. Trust the process, and rely on a wooden skewer inserted into the center to test for doneness.
DIY vs. Store-Bought Cake Strips
I am a huge advocate for resourcefulness in the kitchen, but I am an even bigger advocate for efficiency. Can you make your own cake strips at home? Yes. Should you? Probably not.
The DIY Method
The internet is full of tutorials on how to make DIY cake strips. The most common method involves taking a long sheet of aluminum foil, placing a layer of folded, soaking wet paper towels in the center, and folding the foil over to encase the wet paper. You then wrap this foil belt tightly around the pan.
Why You Should Buy the Real Thing
While the DIY method works in a pinch, it is a tedious, annoying chore. It wastes aluminum foil and paper towels every single time you bake. Furthermore, if the foil tears and exposes the paper towel to the dry heat of the oven, the paper can scorch or even catch fire.
If your silicone spatulas taste soapy, you are buying cheap gear, and the same logic applies here—invest in the right tools. A set of high-quality, reusable cotton cake strips costs about $10 to $15. They are infinitely reusable, eco-friendly, and take five seconds to slip onto a pan. Skip the arts and crafts project and buy the dedicated tool. Your future self will thank you.
Troubleshooting the Flat Cake
Baking is a science, and sometimes variables in your specific kitchen environment can throw off even the best techniques. If you used a fabric cake strip and did not get the flawless result you were expecting, do not throw in the towel just yet. Let’s troubleshoot the most common issues.
The Cake Still Domed Slightly
If your cake still produced a noticeable dome despite using a damp fabric strip, there are two likely culprits. First, your strip may not have been wet enough. If you wrung it out too aggressively or did not soak it for the full 15 minutes, the water evaporated too quickly, and the thermal buffer disappeared before the center of the cake could set.
Second, your oven is running dangerously hot. If your cookies bake unevenly, it is often an indicator that your oven thermostat is lying to you. If your oven is actually at 400°F when it claims to be at 350°F, the intense heat will overwhelm the evaporative cooling effect of the strip. Buy an independent oven thermometer and calibrate your baking environment.
The Center of the Cake Sank
If your cake sinks in the middle, you almost certainly underbaked it. Remember Step 5 from our guide: fabric strips slow down the baking process. If you pull the cake out at the recipe’s original time without checking for doneness, the center will still be raw and structurally unstable. As it cools, the unbaked center will collapse. Always rely on a physical test (a skewer coming out clean with a few moist crumbs) rather than the clock.
The Edges Are Pale and Gummy
If the outer edges of your cake are excessively pale, soggy, or gummy, your cake strip was too wet. If water drips from the strip and pools at the base of the pan, it creates a localized steam bath that prevents the crust from forming properly. Next time, give the strip one extra firm squeeze before wrapping the pan.
Final Thoughts from the Sassy Sous-Chef
You do not need to attend a prestigious culinary academy in Paris to bake a cake that looks like it belongs in a bakery window. You just need to understand the basic rules of thermodynamics and use the right tools to manipulate them in your favor.
By tossing out your toxic, dark non-stick pans, upgrading to safe anodized aluminum, and utilizing the brilliant evaporative cooling power of reusable fabric cake strips, you will completely eliminate the dreaded cake dome. You will save money on wasted ingredients, save time on frustrating crumb-coating, and finally achieve those perfectly flat, beautifully stackable layers you deserve.
Now, go soak those strips, preheat that oven, and bake something spectacular. You’ve got this.






