
Let’s get one thing straight right out of the gate: making homemade bread is romanticized to a fault. You see those pristine, flour-dusted Instagram reels of someone effortlessly tossing a perfectly hydrated sourdough boule, and you think, I can do that. Cut to two hours later, and you are standing in your kitchen, covered in a spackle-like paste, aggressively cursing at a wooden spoon that has essentially become one with a sticky, shaggy mass of flour and water.
Listen, I am all for weekend culinary projects. I live for them. But if you want to cure cooking anxiety, you have to stop fighting your food. The truth that professional bakers know—and that most amateur recipe blogs conveniently forget to mention—is that high-hydration doughs are an absolute nightmare to mix with standard kitchen utensils. You do not need to suffer through the concrete-batter phase. You do not need to pull a muscle in your forearm just to make a batch of morning muffins.
What you actually need is a tool that looks like a bent coat hanger attached to a broomstick.
I am talking about the Danish dough whisk. If you haven’t heard of it, prepare to be mildly infuriated that you’ve gone this long without one. This strange, concentric-looped culinary oddity is the ultimate secret weapon for the home cook. It is the definitive answer to the messy, tiring, and frankly infuriating process of mixing thick batters and rustic bread doughs by hand. Today, we are taking a brutally honest, highly-researched deep dive into the mechanics of this genius tool, why your traditional utensils are sabotaging your bakes, and how this simple piece of wire will permanently change the way you operate in the kitchen.
The Sticky Situation: Why Mixing Dough Actually Sucks
If you have ever attempted a modern, artisan bread recipe, you have undoubtedly run into the term “high-hydration.” In the baking world, hydration refers to the ratio of water to flour in a dough. Traditional sandwich breads might sit around 60% hydration, which results in a stiff, easily manageable ball that you can confidently knead on a countertop. But rustic sourdoughs, airy ciabattas, and artisanal focaccias? Those bad boys routinely push 75% to 85% hydration.
At 80% hydration, flour and water do not form a polite, cohesive ball. They form a weaponized sludge.
The initial mixing phase of these recipes is known as the “shaggy mass” stage. The goal here is simple: hydrate every single speck of dry flour so the autolyse process (where enzymes begin breaking down starches and proteins) can begin. You aren’t trying to knead the dough yet; you are just trying to get the wet ingredients and the dry ingredients to mingle.
But standard kitchen tools turn this simple task into an agonizing chore. The dough is too thick for a standard whisk, too sticky for a spatula, and too heavy for a flimsy spoon. You end up chasing a clump of dry flour around the bottom of a mixing bowl while the wet dough cements itself to your utensil. When it comes to surviving kitchen disasters, having the right tool for the initial mix is the difference between a triumphant loaf of bread and a tear-soaked kitchen counter.
Enter the Danish Dough Whisk: What the Heck Is It?
Before we get into the fluid dynamics and the food physics (yes, we are going there, because I don’t do anything halfway), let’s properly introduce our hero.
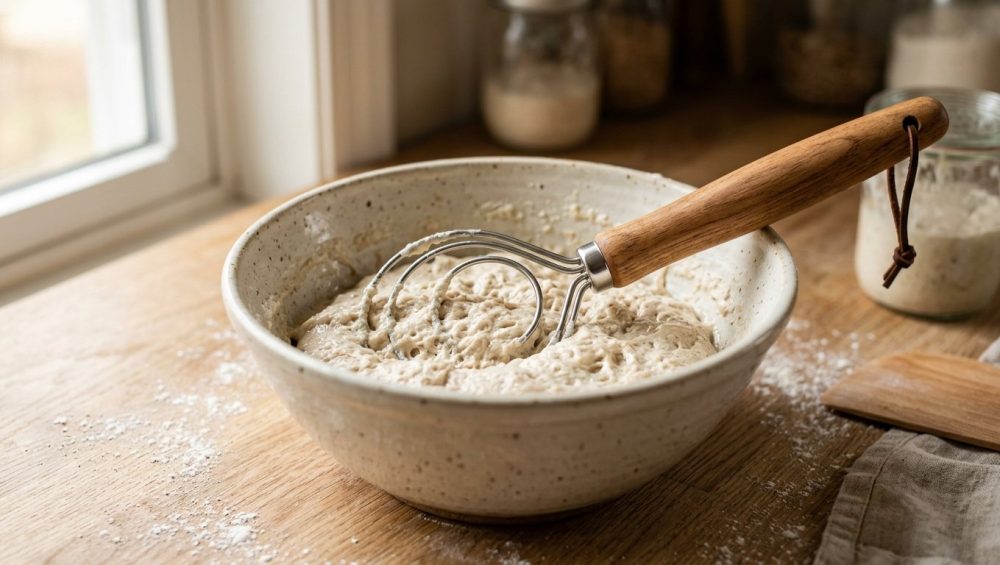
The Danish dough whisk is a specialized hand-mixing tool consisting of a long, sturdy handle (usually wood) attached to a flat, circular-ish metal coil made of thick, stiff wire. Unlike a standard balloon whisk, which features a 3D cage of thin, flexible wires, the Danish dough whisk is entirely two-dimensional. It typically features three concentric loops of wire—an outer circle, an inner oval, and a smaller central loop.
In Denmark, this tool is traditionally known as a brødpisker (which literally translates to “bread whipper”). However, historical deep-dives reveal that early iterations of this tool were actually called farsrører, or “meat mashers”. Long before the artisanal sourdough craze took over the internet, resourceful Danish cooks were using these stiff wire loops to aggressively mash and mix minced meat, onions, and spices for traditional frikadeller (Danish meatballs). The thick wire could cut through the dense, sticky meat mixture without clogging, which eventually led some genius baker to realize, Hey, this would probably work on bread dough, too.
Today, it is widely revered as one of those essential tools every beginner needs if they plan on doing any sort of baking. It bridges the massive gap between a wooden spoon and an expensive electric stand mixer, offering a mechanical advantage that is almost shocking the first time you feel it.
The Anatomy of a Culinary Oddity
Let’s break down the physical structure of the brødpisker, because every design element serves a distinct, highly functional purpose.
First, the wire. This is not the flimsy, bendable wire of a French whisk. The wire on a proper Danish dough whisk is thick, rigid, and unyielding. It is designed to withstand the immense torque required to move three pounds of wet dough without bending or snapping.
Second, the flat profile. Because all the loops exist on a single, flat plane, the whisk can be scraped cleanly against the curved bottom and sides of a mixing bowl. It acts like a squeegee, ensuring no rogue pockets of dry flour are left hiding in the corners.
Third, the handle. Traditional models feature a long, tapered hardwood handle, usually made of oak or beech. The length of the handle (often 11 to 14 inches) provides critical leverage. You aren’t just mixing with your wrist; you are using the length of the handle to generate torque from your forearm and shoulder, drastically reducing physical fatigue.
The Mechanics of Mixing: Why Traditional Tools Fail You
To truly appreciate the genius of the Danish dough whisk, we have to brutally roast the tools you are currently using. I am a firm believer that anyone can cook like a pro, but you cannot do it if you are actively handicapping yourself with the wrong equipment. Let’s look at why your current arsenal is failing you.
The Wooden Spoon: A Blunt Instrument of Torment
The wooden spoon is a kitchen classic, but for high-hydration doughs, it is a blunt instrument of torment. The problem lies in its surface area. A wooden spoon features a broad, solid paddle. When you push that paddle into a thick, sticky dough, the dough has nowhere to go. It doesn’t flow through the spoon; it simply gets pushed around by it.
Because the dough is highly adhesive, it immediately clings to the broad face of the spoon. Within ten seconds of mixing, your spoon is coated in a thick layer of dough, effectively turning it into a useless, sticky club. You are no longer mixing ingredients; you are just mashing a dough-covered stick against the side of a bowl. Furthermore, the immense drag created by that broad surface area puts incredible strain on the handle. If your wooden spoons keep cracking under the pressure of your weekend baking projects, this is exactly why. You are fighting physics, and the spoon is losing.
The Balloon Whisk: The Dough Trap
If the wooden spoon is a blunt instrument, the balloon whisk is a suffocating trap. Balloon whisks are designed for aeration. Their tight, overlapping cage of thin wires is meant to whip air into heavy cream or egg whites.
When you plunge a balloon whisk into a thick bread dough or a dense muffin batter, disaster strikes instantly. The sticky dough immediately forces its way into the center of the wire cage and refuses to leave. The wires are too close together to allow the dense mass to pass through. Congratulations, you have just created a dough-clogged cage of misery. You can bang it on the side of the bowl all you want, but that dough isn’t coming out. Not only does this completely halt your mixing process, but it also creates a cleaning nightmare. There is nothing worse than when your whisk leaks dishwater because you had to soak it for three days just to dissolve the concrete-like dough trapped in its core.
The Bare Hands Strategy: A Sticky, Exhausting Mess
Out of frustration, many home bakers ditch the utensils entirely and just dive in with their bare hands. While getting tactile with your food is great, doing it during the initial hydration phase is a rookie mistake.
First, your hands are warm. Human body temperature sits around 98.6°F (37°C). When you plunge your warm hands into a dough—especially one that relies on cold butter like biscuits, or a sourdough that requires precise temperature control—you are actively transferring heat into the mixture. This can prematurely melt fats or accelerate fermentation in a way you didn’t intend.
Second, the “concrete hands” phenomenon. High-hydration dough will coat your fingers, webbing between them like a swamp monster. You end up having to stop, scrape your hands off with a bench scraper, wash them, and dry them, just to answer a text message or grab the salt you forgot to add. It is inefficient, messy, and entirely avoidable.
The Physics of the Brodpisker: Why the Danish Dough Whisk Works
A smart home cook decodes the modern recipe trend by understanding the underlying physics of the food they are preparing. The Danish dough whisk isn’t magic; it is an exercise in brilliant, applied mechanical engineering. Here is exactly why it effortlessly conquers the stickiest doughs on the planet.
Low Surface Area, High Shearing Force
The fundamental secret of the Danish dough whisk is its incredibly low surface area combined with high shearing force. Unlike the broad paddle of a wooden spoon, the thick wire loops of the whisk present almost zero surface area for the dough to cling to.
When you drag the whisk through a shaggy mass of flour and water, the wire physically cuts through the dough. It acts like a series of dull blades, slicing the hydration through the dry flour. Because the loops are spaced widely apart, the dough flows seamlessly through the gaps. It doesn’t get pushed, and it doesn’t get trapped. The whisk creates a natural triaxial strain field—a fancy scientific way of saying it forces the wet and dry ingredients to fold over each other rapidly and efficiently. You are applying maximum mixing force with minimum physical drag.
The Aerodynamics of Flour and Water
In baking, overmixing is a cardinal sin, especially for tender baked goods like muffins, pancakes, and quick breads. When flour meets water, gluten proteins (glutenin and gliadin) immediately begin to link up and form an elastic network. The more you agitate and mix the batter, the stronger and tighter that gluten network becomes.
For a chewy sourdough, you want strong gluten. But for a fluffy blueberry muffin? Too much gluten development results in a dense, rubbery, hockey-puck texture.
Because the Danish dough whisk cuts through batter so efficiently, it achieves full hydration in a fraction of the time it takes a wooden spoon. You can fully incorporate the dry ingredients of a pancake batter in just a few swift strokes. The open loops gently fold the ingredients together without aggressively beating them, preventing the over-oxidation of flour proteins and keeping your tender baked goods impeccably light and airy.
Gentle Gluten Development
Even when you do want gluten development, the Danish dough whisk shines during the initial stages. In artisan bread making, the “autolyse” phase requires you to mix flour and water and let it sit before adding salt or yeast. This allows the flour to fully hydrate and gluten bonds to form naturally without aggressive mechanical kneading.
The dough whisk is the ultimate autolyse tool. It blends the shaggy mass quickly without tearing the fragile, newly forming gluten strands. It respects the structure of the dough, giving you a massive head start before you move on to your stretch-and-folds.
Beyond Sourdough: The Versatility of the Danish Dough Whisk
Do not make the mistake of thinking this is a unitasker. I despise unitaskers. If a tool is going to take up precious real estate in my kitchen drawer, it better earn its keep during the busy workweek, not just on lazy Sunday afternoons. While it is famous for bread, the brødpisker is a multi-tasking powerhouse.
High-Hydration Breads and Artisan Loaves
Obviously, this is where the tool made its name. Whether you are mixing a sticky rye bread, a rich brioche, or a classic no-knead artisan loaf, the dough whisk handles it flawlessly. It easily incorporates large mix-ins like toasted walnuts, dried cranberries, or chunks of roasted garlic into a fully formed dough without crushing them. Combine this with the magic of a baking steel in your oven, and you are unstoppable. You will be churning out bakery-quality loaves that will make your neighbors weep with envy.
Thick Batters (Pancakes, Waffles, Muffins)
As previously mentioned, the open-loop design is a godsend for thick, delicate batters. When making brownies, blondies, or heavy cake batters, the whisk incorporates the dry flour into the wet fats (like melted butter and eggs) in seconds. It leaves just enough small lumps in a pancake batter to ensure the final product is impossibly tender, rather than beating the batter into a smooth, rubbery glue.
Porridge, Polenta, and Complex Sauces
Remember the Danish origins as a “meat masher”? The stiff wire is incredible for breaking up clumps of ground beef or turkey in a hot skillet. But where it truly shines on the stovetop is with thick, simmering pots of oatmeal, grits, or polenta.
Polenta is notoriously annoying to stir. As it thickens, a wooden spoon struggles to scrape the bottom of the pot effectively, leading to scorched cornmeal. A balloon whisk gets hopelessly clogged. The flat profile of the Danish dough whisk scrapes the bottom of the pot perfectly, while the thick wire loops break up any clumps of dry cornmeal, resulting in a silky-smooth texture with half the physical effort.
The “No-Go” Rule: How to Spot a Toxic or Trashy Dough Whisk
Here is where I get serious. I have zero patience for cheap, poorly manufactured kitchen tools that break after three uses or leach mystery chemicals into your food. The rising popularity of the Danish dough whisk has flooded the market with cheap knock-offs. I am a huge advocate for banishing toxic kitchen gear from your home, and that starts with knowing exactly what to look for when buying a new tool.
Material Matters: Food-Grade Stainless Steel is Non-Negotiable
The wire coils of your dough whisk must be made of high-quality, food-grade stainless steel (ideally 304 grade). Do not buy a whisk with a mysterious “non-stick” coating, painted metal, or cheap aluminum.
When you are mixing a stiff dough, the wire undergoes significant stress. Cheap metals will bend, warp, or worse, snap entirely. Furthermore, cheap alloys are prone to rusting and pitting when exposed to the acidic environment of a sourdough starter or the high-pH detergents in your sink. If you see a whisk that feels suspiciously lightweight or has a dull, grayish finish, run the other way. You want thick, heavy-gauge, rust-resistant stainless steel that will outlive you.
Handle Construction: Hardwood vs. Cheap Composite
The handle is the anchor of the tool. It needs to be crafted from a solid piece of sealed hardwood, such as oak, beech, or walnut. Avoid plastic handles, which can harbor deep scratches where bacteria thrive, and absolutely avoid cheap composite woods that will splinter the moment you apply real torque.
A good hardwood handle should feel substantial in your hand. It should be ergonomically tapered to provide a comfortable grip, allowing you to drive the whisk from your shoulder rather than straining your wrist.
The Seal: Preventing Bacteria Traps
This is the most critical feature to inspect: the junction where the metal wire enters the wooden handle. On cheap, trashy models, there is an open gap between the wire and the wood. This gap is a bacterial nightmare. Wet dough, raw eggs, and moisture will inevitably get shoved up into that dark crevice, where it will rot and eventually cause the wooden handle to split from the inside out.
A high-quality Danish dough whisk will have a sealed junction. The manufacturer will either use a food-safe epoxy to completely fill the gap, or they will feature a stainless steel ferrule (a metal collar) that tightly caps the end of the wood, preventing any food from entering the handle. If the whisk you are looking at has open, unsealed holes at the base of the wire, do not buy it.
A Masterclass in Technique: How to Actually Use It
Owning the right tool is only half the battle; knowing how to wield it is what separates the chaotic amateurs from the kitchen artists. Using a Danish dough whisk is incredibly intuitive, but there is a specific rhythm to it that maximizes its efficiency.
The Initial Shaggy Mix
Let’s say you are making a batch of sourdough. Once you start using a digital kitchen scale, everything changes, so you have precisely weighed your flour, water, and starter into a large mixing bowl.
Take your dough whisk and hold it firmly by the handle. Do not stir in tiny, frantic circles like you are scrambling an egg. Instead, plunge the flat coils down to the bottom of the bowl and use large, sweeping, orbital motions. Pull the whisk up through the center of the dough, lifting the wet ingredients from the bottom and folding them over the dry flour on top.
Because the tool is flat, you can rotate the bowl with your non-dominant hand while you drag the edge of the whisk along the inner curve of the bowl. It acts as a scraper, pulling every stray bit of flour into the main mass. Within thirty to sixty seconds, your weaponized sludge will transform into a cohesive, shaggy dough.
The Scrape and Fold
Once the dough has come together, the whisk has done its primary job. You will notice that the dough is sitting cleanly in the bowl, and the whisk itself is remarkably clean. If there is a small clump of dough clinging to the inner loop, a quick, sharp tap against the rim of the bowl will dislodge it instantly. From here, you can cover the bowl for the autolyse phase, and eventually grab your trusty stainless steel bench scraper to finish the job on the counter.
The Unbelievably Easy Cleanup
I promised you that this tool would save you time, and the cleanup is where it truly pays dividends. To clean a Danish dough whisk, you must follow one strict rule: do it immediately.
Do not let the whisk sit on the counter for three hours while the dough turns into literal cement. The moment you are done mixing, run the whisk under hot water. Because there are no tight corners or overlapping wire cages, the sticky dough will simply slide right off the thick stainless steel loops. A quick swish in hot, soapy water, a wipe with a sponge, and you are done.
Crucial Warning: Never, under any circumstances, put a wooden-handled Danish dough whisk in the dishwasher. The extreme heat and harsh alkaline detergents will strip the natural oils from the wood, causing it to dry out, warp, and crack. Hand wash it, dry it immediately with a towel, and occasionally rub the handle with a drop of food-grade mineral oil to keep the wood pristine.
Time is Money: The Weekday Baking Argument
As a busy professional, I live by the mantra that time is money. Weekend baking is a luxury, but weekday cooking is a survival sport. You might be wondering if a specialized dough whisk is really necessary for a quick Tuesday night dinner.
Absolutely.
Let’s say you want to whip up a quick batch of drop biscuits to serve with a hearty stew, or you need to mix a thick meatloaf before the kids have a meltdown. Pulling a heavy, cumbersome electric stand mixer out of the cabinet, locking in the bowl, attaching the paddle, and then having to wash all those bulky components afterward is a massive deterrent. It turns a ten-minute prep job into a thirty-minute chore.
The Danish dough whisk gives you the mechanical mixing power of a stand mixer without the electrical cord or the cleanup nightmare. It sits quietly in your utensil crock, ready to be deployed at a moment’s notice. It empowers you to tackle thick, heavy recipes on a random Wednesday evening because you know the mixing and the cleanup will take less than two minutes combined. It removes the friction from the cooking process, and when you remove friction, you cook more often.
The Final Verdict: Is It Really Worth the Drawer Space?
I am ruthlessly protective of my kitchen space. I regularly purge gadgets that do not pull their weight. But the Danish dough whisk is a permanent fixture in my culinary arsenal.
It is a masterclass in functional, minimalist design. It solves a highly specific, universally frustrating problem—sticky, impossible-to-mix doughs—with elegant simplicity. It respects the physics of your food, prevents you from overworking your delicate batters, and saves you from the agonizing chore of scrubbing dough out of a balloon whisk.
You do not need a culinary degree to make mind-blowing food in your home kitchen, but you do need the right tools. Stop fighting your sticky dough. Stop torturing your wooden spoons. Upgrade your arsenal, embrace the genius of the brødpisker, and get back to making incredible food without the exhausting mess. Now, if you’ll excuse me, I have a batch of 80% hydration focaccia that needs my attention, and I am not about to mix it with my bare hands.






