
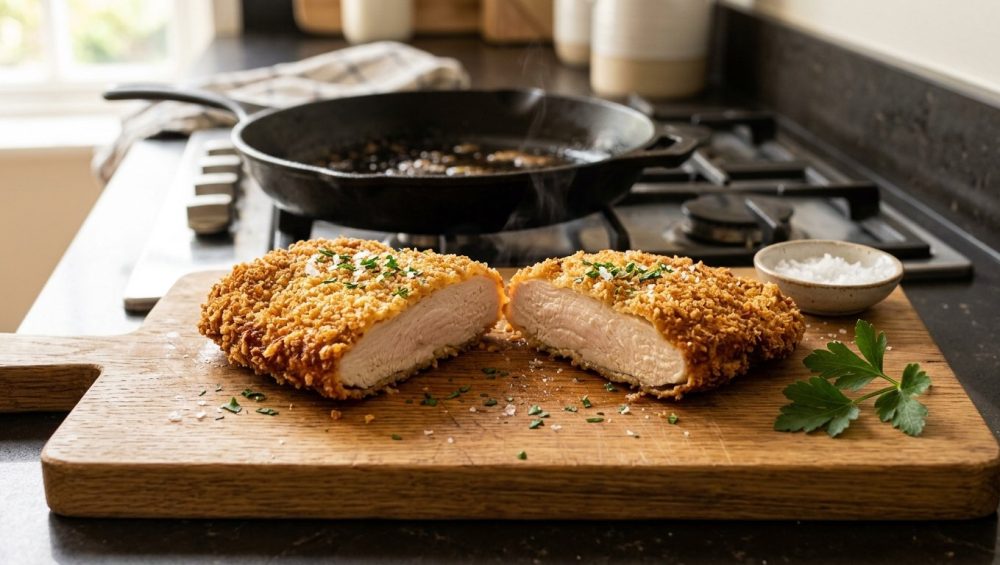
Listen, we need to have a serious talk about your Tuesday night chicken cutlets. I know exactly how this plays out in your kitchen because I used to do the exact same thing before I actually learned how food chemistry works. You buy a beautiful, expensive piece of protein. You set up your little bowls of flour, beaten eggs, and breadcrumbs. You dip, you dunk, you coat, and you immediately drop that chicken into a skillet of hot oil. It sizzles, it smells amazing, and for a brief, fleeting moment, you feel like an absolute culinary genius.
But then, tragedy strikes. You pull the chicken out of the pan, set it on your cutting board, and the moment your knife breaks the surface, the entire golden, crispy crust slides off in one sad, soggy sheet. You are left staring at a pale, naked piece of poultry on one side of your plate and a greasy pile of detached breadcrumbs on the other. It is infuriating. It makes you want to order takeout, throw your spatula across the room, and never look at a frying pan again.
If your dinners frequently turn out completely bald, I am here to tell you that it is not your recipe’s fault. It is a fundamental misunderstanding of how ingredients interact under heat. You are treating the breading process like a frantic assembly line when you should be treating it like a science experiment. The secret to a bulletproof, tear-resistant, restaurant-quality crust doesn’t require a culinary degree, expensive hydrocolloids, or pretentious chef-speak. It requires exactly ten to fifteen minutes of doing absolutely nothing.
Welcome to the definitive masterclass on the science of starch hydration, protein bonding, and the magic of a short rest. Grab a glass of wine, take a deep breath, and let’s fix your food.
The Anatomy of a Breaded Disaster: Why Your Crust Bails on You
Before we can fix the problem, we have to understand why the crime is happening in the first place. Breading doesn’t just fall off out of spite; it falls off because the physical forces inside your frying pan are actively trying to destroy it.
The Steam Room Effect
Meat is essentially a water balloon. A raw chicken breast or pork chop is composed of roughly 75 percent water. When you drop that piece of meat into a skillet filled with oil heated to 350 degrees Fahrenheit, a violent reaction occurs. The moisture on the surface of the meat instantly boils and turns into steam. Because steam takes up roughly 1,600 times more volume than liquid water, it expands forcefully and rapidly.
If your breading is simply sitting loosely on top of the meat, that erupting steam acts like a microscopic bulldozer, physically pushing the crust away from the protein. This violent expansion of steam, combined with the natural contraction of the muscle fibers—which incidentally is exactly why your pork chops curl when they hit the pan—creates a massive gap between the meat and the crust. By the time you pull the food out of the oil, the breading is entirely detached, hovering over the meat like a crispy, fragile tent.
The Rushed Coating Syndrome
The second reason your crust is failing is entirely behavioral. Home cooks are always in a rush. You dredge the meat in flour, drag it through the egg, press it into the breadcrumbs, and immediately toss it into the hot oil.
When you do this, you are frying three distinct, separate layers that haven’t had time to get to know each other. The flour is still a dry powder underneath the egg. The egg is just a wet slip-and-slide sitting on top of the powdery flour. The breadcrumbs are barely clinging to the wet egg. No chemical bonds have formed. There is no structural integrity. This lack of cohesion is the primary reason why your breading always falls off chicken the second you try to flip it with your tongs. You haven’t given the ingredients the time they need to chemically fuse together.
The Science of the “Short Rest”: Your Culinary Super Glue
So, how do we fight the steam room effect and the rushed coating syndrome? We wait. Letting your breaded meat rest on a wire rack for 10 to 15 minutes before frying is the single most important step in the entire process. Here is the undeniable, snark-free science of why this works.
Starch Hydration: The Magic of Moisture
Flour and breadcrumbs are primarily composed of dry starches. In their dry state, these starch granules are hard, brittle, and completely incapable of acting as an adhesive. However, when you let the breaded meat sit, a process called starch hydration occurs.
During this 15-minute window, the dry starches in the flour and the breadcrumbs begin to absorb the moisture from the egg wash and the natural juices of the meat. As the starch granules drink in this liquid, they swell, soften, and transform into a sticky, gel-like paste. This paste acts as a natural culinary super glue. By the time the 15 minutes are up, the flour, egg, and breadcrumbs are no longer separate layers; they have merged into a single, unified matrix that is fiercely bonded to the surface of the meat.
Protein Coagulation and Gluten Bonding
It gets better. Flour contains proteins which form gluten when hydrated. Eggs are packed with heavily folded protein structures. During the resting period, as the moisture activates the flour, gluten networks begin to develop and physically tangle with the proteins in the egg wash.
When this highly interconnected, hydrated matrix finally hits the hot oil, the heat causes those tangled proteins to coagulate and the starches to instantly gelatinize and set. Because they are already chemically locked together, they form a rigid, impenetrable armor. The steam escaping from the meat is forced to vent through the microscopic pores of the breading rather than blowing the entire sheet of crust off the protein.
Temperature Equalization
There is a bonus benefit to the short rest: temperature management. Most home cooks pull their chicken directly from the frigid depths of the refrigerator, bread it, and throw it into the pan. Dropping ice-cold meat into hot oil plummets the temperature of the fat.
When oil temperature drops too low, it stops actively frying and searing. Instead, the breading acts like a sponge, soaking up the lukewarm grease. This greasy absorption is exactly why your fried food gets soggy and heavy instead of shattering with a satisfying crunch. A 15-minute rest at room temperature takes the chill off the meat, preventing a drastic temperature drop in your skillet and ensuring a flawless, crispy finish.
The Standard Breading Procedure (SBP): A Refresher Course
Now that you understand the chemistry of the rest, we need to talk about the execution leading up to it. The culinary world relies on the Standard Breading Procedure (SBP). It is a rigid, three-stage, dry-wet-dry method that has been used in professional kitchens for centuries. You cannot skip these steps, and you cannot half-ass them. Let’s break it down.
Step 1: The Dry Meat Mandate
Moisture is the enemy of adhesion. If you pull a wet, slimy chicken breast out of its packaging and immediately toss it into the flour, you are doomed. The flour will instantly turn into a clumpy, gummy paste that slides right off the slick surface of the meat.
You must aggressively pat your protein completely dry with paper towels before you even look at the flour bowl. If you are dealing with particularly thick cuts of poultry, you should also pound them out to an even thickness. This ensures they cook quickly and evenly, preventing the tragic scenario where your chicken breast turns out dry and rubbery on the inside while you wait for the crust to brown on the outside.
Step 2: The Flour Foundation (Dredging)
The first bowl in your station should contain seasoned all-purpose flour. The flour acts as the primer for your culinary paint job. It fills in the microscopic crevices, dimples, and imperfections on the surface of the meat, creating a perfectly smooth, dry canvas for the egg wash to grab onto.
Drop the dry meat into the flour and coat it completely. Then—and this is crucial—shake off the excess. You want a whisper-thin, translucent dusting of flour, not a thick, powdery snowbank. If you leave too much flour on the meat, the egg wash will only stick to the outer layer of the powder, leaving a dry, unbonded layer of flour underneath that will inevitably detach in the pan.
Step 3: The Egg Wash Binder
The second bowl contains your liquid binder, typically beaten eggs. The eggs provide the moisture needed for starch hydration and the protein needed for structural integrity.
Do not just lightly scramble the eggs with a fork and call it a day. You need to beat them thoroughly until the yolks and whites are completely homogenous. I highly recommend adding a splash of water or milk (about one tablespoon per egg) to the mixture. This slightly thins out the viscosity of the egg wash, preventing it from going on too thick and clumpy. Dip the floured meat into the egg, ensure every single millimeter is coated, and let the excess drip off for a few seconds.
Step 4: The Crispy Shell (Panko, Italian, or Bust)
The third and final bowl contains your breadcrumbs. Whether you are using traditional Italian breadcrumbs, ultra-crispy Japanese Panko, or crushed-up cornflakes, the technique remains the same.
Lay the egg-coated meat into the crumbs and use your hands to aggressively pile more crumbs on top. Do not just lightly toss it. You need to firmly press the breadcrumbs into the meat with the palm of your hand. You are physically forcing the dry crumbs into the wet egg wash, kickstarting the hydration process and ensuring maximum coverage.
The 10-Minute Masterclass: How to Execute the Rest Perfectly
You have successfully navigated the Standard Breading Procedure. Now, you must execute the most important step: doing nothing. But even doing nothing requires the right technique.
The Wire Rack Requirement
You cannot take your beautifully breaded cutlets and stack them on top of each other on a flat dinner plate. If you do this, the moisture from the meat will pool at the bottom, creating a humid microclimate that will turn the underside of your breading into a gummy, soggy disaster.
You must place the breaded items in a single layer on a stainless steel wire cooling rack set over a baking sheet. This setup allows air to circulate completely around the food, ensuring the crust hydrates evenly without sweating. A sturdy wire rack is truly one of the most essential kitchen tools for beginners, and it is non-negotiable for this technique.
Timing Is Everything: Not Too Short, Not Too Long
Set a timer for 10 to 15 minutes. This is the goldilocks zone for starch hydration. If you wait less than 10 minutes, the starches won’t have fully absorbed the moisture, and the bond will be weak. If you wait longer than 30 minutes, the starches will absorb too much moisture, turning the entire crust into a heavy, doughy paste that will fry up dense and greasy rather than light and crispy.
Use this mandatory 15-minute window productively. Wash your dredging bowls, wipe down your counters, and preheat your skillet. By the time your pan is ready, your breading will be locked and loaded.
Beyond the Rest: Other Culprits Ruining Your Crunch
The 15-minute rest is your ultimate defense mechanism, but it cannot save you if you aggressively sabotage the actual cooking process. If you have rested your meat and your crust is still falling apart, you are likely committing one of these cardinal frying sins.
Oil Temperature: The Goldilocks Zone
Shallow frying requires precision. Your oil needs to be sitting squarely between 350°F and 375°F before the meat ever touches the pan.
If your oil is screaming hot (400°F+), the exterior breadcrumbs will scorch and burn into a bitter, blackened mess before the raw chicken inside has even begun to cook. If your oil is too cold (under 325°F), the water inside the meat won’t vaporize quickly enough to create the outward pressure needed to repel the fat. The oil will seep directly into the breading, ruining the texture. Use an instant-read thermometer to check your oil. If you don’t have one, drop a single breadcrumb into the pan; it should immediately sizzle and dance on the surface, not sink to the bottom or instantly turn black.
Pan Crowding: The Enemy of Crispy
I know you want to get dinner on the table quickly, but cramming four massive, cold chicken breasts into a standard 10-inch skillet is a recipe for disaster.
When you overcrowd the pan, you instantly crash the temperature of the oil. The skillet simply cannot recover the heat fast enough. Instead of frying, the meat begins to steam in its own trapped juices. Furthermore, shoving too much food into thin, cheap cookware causes rapid temperature fluctuations, which is exactly why your frying pans keep warping and spinning on your stovetop. Fry in batches. Leave at least an inch of space between each piece of meat. If you need to keep the first batch warm, place them on a clean wire rack in a 200°F oven while you finish the rest.
The Flip: Patience Over Panic
Once the meat hits the hot oil, step back and leave it alone. Do not poke it. Do not prod it. Do not continuously slide it around the pan. You are mastering the maillard reaction, and that complex browning process requires uninterrupted, continuous contact with the hot fat.
If you try to flip the meat before the crust has fully set and hardened, you will rip the breading right off. Wait until you can see a deep, golden-brown halo forming around the bottom edges of the cutlet.
When it is finally time to turn the food, do not use a bulky silicone spatula or dull, clumsy tongs that will scrape the crust. Instead, use a stainless steel spider skimmer or a thin, flexible fish spatula to gently lift and gracefully flip the meat without disturbing the armor.
Gear Check: Ditch the Toxic Pans for a Better Sear
As a home cook, your technique is only as good as the tools you are using. I have a strict, zero-tolerance policy for terrible kitchenware, and nothing exposes bad gear quite like shallow frying breaded meats.
Why Cheap Non-Stick is Your Enemy
If you are trying to fry crispy chicken cutlets in a $15, lightweight, scratched-up Teflon pan you bought at a supermarket five years ago, you are fighting a losing battle.
First of all, cheap non-stick pans have terrible thermal mass. The moment you add the meat, the pan loses its heat and struggles to recover, leading to soggy, pale breading. More importantly, traditional non-stick coatings are not designed to handle the sustained, medium-high heat required for shallow frying. Pushing these cheap pans past their temperature limits degrades the chemical coating, releasing toxic fumes into your kitchen and peeling carcinogenic flakes directly into your food. Using aerosol cooking sprays on these surfaces only accelerates the degradation, permanently ruining your nonstick pans with a sticky, polymerized residue that is impossible to clean. Throw them away.
The Right Tools for the Job
For a flawless, golden-brown, crispy crust, you need cookware that holds heat like a vault. You should be using a heavy-bottomed cast iron skillet, a thick carbon steel pan, or a high-quality, fully-clad stainless steel frying pan.
These materials have incredible thermal retention. They will not drop in temperature when you add the food, ensuring a vigorous, continuous sizzle. Yes, I can already hear the complaints that meat sticks to stainless steel, but that is a myth born from bad technique. If you preheat your stainless steel pan properly (using the water drop test to ensure it’s hot enough) and use the correct amount of oil, it becomes a virtually stick-free surface that produces a sear a cheap non-stick pan could only dream of. Invest in safe, durable, heavy-duty cookware. It will outlive you, and it will fundamentally transform the quality of your weekend cooking projects.
Conclusion: Empowering Your Inner Fry-Master
Cooking incredible, restaurant-quality food in a standard home kitchen does not require magic, and it certainly doesn’t require a culinary degree. It simply requires a basic understanding of how your ingredients behave and the patience to let them do their job.
The next time you are craving a crispy, golden chicken parmesan or a flawless pork schnitzel, do not rush the process. Dry your meat, respect the Standard Breading Procedure, press those crumbs in firmly, and step away from the kitchen counter for 15 minutes. Let the starches hydrate. Let the proteins bond. Let the science work for you.
When you finally drop that beautifully rested cutlet into the hot oil, you won’t be praying for the crust to stay on; you’ll know it’s locked in place. You will pull a masterpiece out of that skillet, and you will never eat a sad, bald, soggy piece of poultry ever again. Now go preheat your skillet, pour yourself that glass of wine, and fry something spectacular.






