
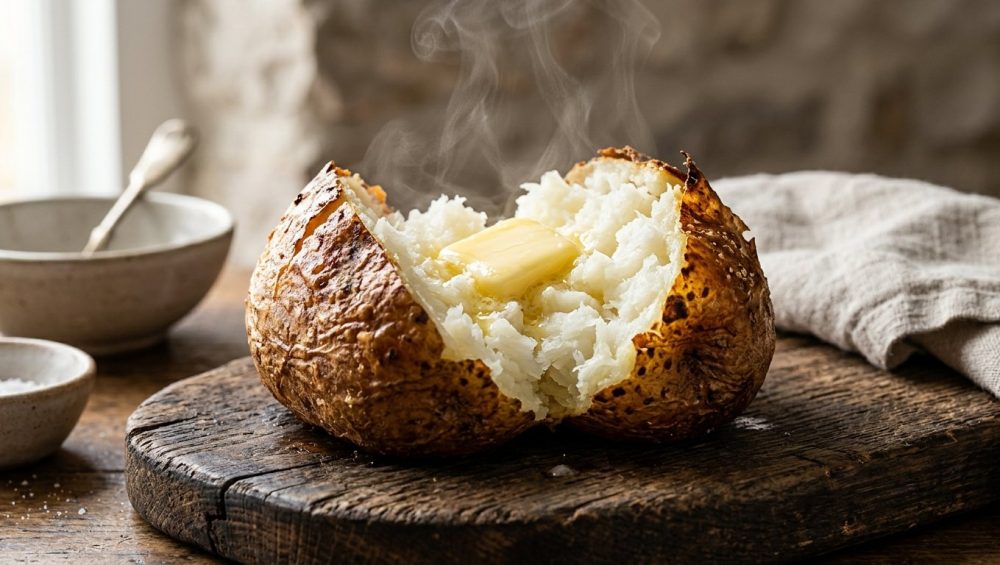
Pour yourself a large glass of wine, grab your favorite chef’s knife, and let’s have a brutally honest conversation about a side dish that has been systematically abused in home kitchens for far too long. I am talking about the baked potato. You know the exact one I mean. You pull it out of the oven, unwrap a crinkled, dangerously hot sheet of aluminum foil, and slice into what should theoretically be a fluffy, snowy cloud of starchy perfection. Instead, your knife drags through a dense, wet, gummy mass that tastes and feels like a damp kitchen sponge. You immediately drown it in a ridiculous amount of butter, sour cream, and bacon bits just to mask the tragic texture, but we both know the culinary truth: you steamed that potato, you didn’t bake it.
As a home cook, you absolutely do not need a fancy culinary degree to make mind-blowing, restaurant-quality food in your own kitchen, but you do need to understand a little bit of basic kitchen science. Today, we are putting a permanent end to the foil-wrapped potato myth. We are going to dive deep into the thermodynamics of a classic Russet, the fascinating chemistry of starch gelatinization, and exactly why wrapping your beautiful spuds in a metal straightjacket is single-handedly ruining your dinners.
The Great Foil Conspiracy: Why We Need to Talk About Your Potatoes
If wrapping potatoes in foil is such a terrible idea, why does everyone do it? Why is it the default method passed down from our grandmothers, and why do you still see it happening at your local steakhouse? The answer comes down to a massive misunderstanding of commercial kitchen logistics versus home kitchen reality.
How We Got Here: The Steakhouse Lie
You have undoubtedly unwrapped a steaming baked potato at a restaurant, its shiny aluminum foil revealing a hot, butter-ready spud. This widespread visual has convinced generations of home cooks that foil is the secret to a faster, better bake. It is a lie. Restaurants rely on aluminum foil for practical, operational reasons that have absolutely nothing to do with improving the flavor or texture of the food.
In a commercial kitchen, a chef might need to bake 200 potatoes at 3:00 PM to prepare for a massive 7:00 PM dinner rush. Foil acts as a highly effective insulating layer, helping the potato stay warm for hours after it is pulled from the oven. It allows restaurants to hold potatoes at a consistent serving temperature during busy service times. But what works for a line cook trying to survive a Friday night rush is actively sabotaging your Tuesday night dinner.
Somewhere along the line, a myth was born that wrapping a potato in foil actually speeds up the cooking time. The physics of thermal transfer completely debunk this. Aluminum has high thermal conductivity (around 237 W/m·K), but when you wrap it tightly around a cold, moist surface like a raw potato, it forms an insulating vapor barrier. The foil itself has to be heated before the potato even begins to bake. In recent laboratory tests utilizing infrared thermography, foil-wrapped Russet potatoes took an average of 78 minutes to reach an internal temperature of 205°F, while unwrapped control potatoes reached the exact same temperature in just 62 minutes under identical oven settings. Wrapping your potato in foil increases your core cooking time by 15 to 25 percent. You are wasting time, and you are ruining your food.
The Kitchen Science: What Actually Happens Inside a Baking Potato
I have zero patience for pretentious chef-speak, but if you want to stop serving sad, gummy side dishes, we need to talk about the molecular biology of a potato. We aren’t making an avant-garde foam here; we just want a fluffy center and a skin that shatters when you bite into it.
Anatomy of a Russet: Starch, Water, and Pectin
Not all potatoes are created equal, and their internal structure dictates how they react to heat. A raw potato is composed of roughly 80 percent water. The rest is primarily starch, along with pectin, which acts as the biological glue holding the cell walls together.
Potatoes are categorized by their starch content. Waxy potatoes, like red potatoes and Yukon Golds, have low starch and high moisture. When cooked, their cells stay firmly intact, making them perfect for boiling, roasting in chunks, or tossing into a potato salad. Starchy potatoes, specifically the Russet Burbank (often sold simply as Idaho potatoes), have the lowest moisture content and the highest starch content. They are packed with two specific types of starch molecules: amylose (a straight-chain molecule) and amylopectin (a branched-chain molecule). This high starch-to-water ratio is the foundational requirement for a fluffy baked potato.
The Steaming Trap: Why Foil Equals Glue
Baking a potato is fundamentally an exercise in controlled dehydration. When you wrap a potato in aluminum foil, you completely disrupt this process. As the internal water heats up, it attempts to migrate outward and evaporate. But because the foil creates a sealed environment, the steam cannot escape. The relative humidity at the skin interface skyrockets to over 92 percent.
Instead of baking in dry heat, the potato is trapped in a miniature sauna, steam-cooking in its own juices. The skin stays soft, pale, and rubbery because the Maillard reaction—the chemical process responsible for browning and flavor development—cannot occur in the presence of excessive moisture. Inside the potato, the trapped water prevents the starch matrix from properly dehydrating. The free water sloshes around within the cell walls, turning the starches into a dense, pasty, gummy mass. Just like when your roasted veggies turn mushy because you overcrowded the sheet pan, trapped steam is the ultimate enemy of texture. A fluffy potato is one where the water is tightly bound within the gelatinized starch, not floating around freely.
Dehydration and Starch Gelatinization: The Dry Heat Magic
When you ditch the foil and expose the potato to the dry, ambient heat of a 400°F oven, culinary magic happens. As the internal temperature of the potato rises, the starch granules begin to absorb the surrounding water and swell. This process, known as starch gelatinization, kicks off at around 140°F.
As the temperature continues to climb above 160°F, the starch molecules begin to break down, releasing moisture. Because the potato is unwrapped, this moisture is free to evaporate through the skin. By the time the potato reaches its target core temperature, the starch has transformed into a light, airy, gel-like structure. The flesh expands, the cells separate, and you are left with that signature snowy, fluffy interior. Meanwhile, the dry heat of the oven aggressively attacks the skin, caramelizing the natural fibers and creating a taut, deeply browned, shatteringly crisp exterior.
The Health and Safety Check: Let’s Talk About Heated Aluminum
As a home cook who spends a lot of time testing equipment, I have a strict, non-negotiable rule: I absolutely despise cheap, toxic kitchenware. I will never recommend mystery metals, peeling non-stick coatings, or disposable crutches that compromise the safety of your food.
Leaching Metals and Toxic Gear (The No-Go Rule)
Cooking your food in direct contact with aluminum foil at high temperatures is a habit you need to break. When aluminum is exposed to heat, especially in the presence of acidic or highly salted foods (like a heavily seasoned potato skin), the metal can leach directly into your meal. We are constantly exposed to environmental toxins, and there is no reason to willingly bake your dinner in a disposable metal wrapper. Just as cheap aerosol sprays are ruining your nonstick pans by leaving polymerized chemical residue, aluminum foil is a lazy crutch that degrades the quality of your cooking. If you are using foil to protect a cheap baking pan from drips, it is time to upgrade your gear. If your baking sheets keep warping and rusting, invest in a heavy-gauge, bare aluminum or stainless steel half-sheet pan that can withstand 450°F without buckling.
Beyond the leaching issue, foil-wrapped potatoes present a legitimate, scientifically documented food safety hazard. Clostridium perfringens is a spore-forming pathogen that thrives in low-oxygen, warm, moist environments. According to recent CDC FoodNet data, it is implicated in roughly one million U.S. foodborne illnesses annually. When you bake a potato in foil and then leave it sitting on the counter to cool, you are creating the ultimate breeding ground for this bacteria. Foil-wrapped potatoes stored at room temperature for two hours or more exceed the FDA’s “danger zone” threshold (41°F to 135°F) for bacterial germination by nearly four times the normal rate. The foil cuts off the oxygen and traps the warmth, turning your side dish into a microbiological nightmare. Skip the foil. It is safer, it tastes better, and it yields a vastly superior texture.
The Masterclass: How to Bake a Flawless, Foil-Free Potato
Now that we have successfully debunked the steakhouse myth and covered the thermodynamics of starch, it is time to actually cook. I promise you, achieving a flawless, restaurant-quality baked potato at home is incredibly simple, provided you follow these exact steps without cutting corners.
Step 1: Choosing the Ultimate Spud
Do not attempt to bake a waxy potato. Leave the red potatoes, the fingerlings, and the Yukon Golds for your potato salads and mashes. You must use a high-starch potato, and the undisputed king of the oven is the Russet. Look for medium-to-large potatoes that weigh between 6 and 8 ounces. They should feel firm heavy for their size, with taut, unblemished skin. Avoid any potatoes that have sprouted “eyes” or show a green tint on the skin, which indicates the presence of solanine, a bitter and mildly toxic alkaloid.
Step 2: The Prep (Scrub, Dry, and Pierce)
Potatoes grow in the dirt, and unless you enjoy the gritty texture of soil in your teeth, you need to scrub them aggressively under cold running water using a vegetable brush.
Once they are clean, you must dry them completely. I cannot stress this enough: use a clean kitchen towel or paper towels to remove every single drop of surface moisture. If the skin is wet when it goes into the oven, the water will turn to steam, and you will end up with a leathery, chewy exterior instead of a crisp one.
Next, grab a standard fork and pierce the potato 8 to 12 times, spacing the holes evenly around the entire surface. This step is non-negotiable. These holes act as structural steam vents. As the internal water heats up and expands, it needs an escape route. If you do not pierce the skin, the pressure will build until the potato literally explodes in your oven, leaving you with a charred, starchy mess to clean up.
Step 3: The Brine (Yes, We Are Salting the Skin)
A great baked potato should be delicious from the inside out, which means the skin needs to be treated like a highly seasoned crust. Once the potato is perfectly dry and pierced, gently rub the entire exterior with a high-heat fat. Olive oil is standard, but if you want to be an absolute perfectionist on a weekend, use melted beef tallow or duck fat. The fat prevents the skin from drying out into a papery husk and conducts heat evenly across the surface to promote browning.
Immediately after oiling, generously coat the potato in coarse kosher salt. Do not use standard table salt; the iodine tastes metallic, and the fine grains will over-salt the skin. Kosher salt acts as a desiccant, actively drawing out the last bit of surface moisture from the skin to accelerate the crisping process while deeply seasoning the exterior.
Step 4: The Bake (Temperature and Timing)
Preheat your oven to 400°F if you are using convection, or 425°F for a standard conventional oven. Place the potatoes directly on the middle oven rack. Do not place them on a solid baking sheet, as the pan will trap moisture underneath the potato, resulting in a soggy bottom. If you are worried about oil dripping onto your heating elements, place a foil-lined baking sheet on the bottom rack to catch the drips, but keep the potatoes on the wire rack above it.
Bake the potatoes for 55 to 75 minutes, depending on their size. Do not guess when they are done, and do not rely on the outdated “squeeze test.” Baking a potato is a science, and science requires precise measurement. The starches inside a potato do not fully gelatinize and become fluffy until the internal temperature reaches a minimum of 205°F. The sweet spot for absolute perfection is between 205°F and 212°F.
Take the guesswork out of your cooking. If your meat thermometer is lying to you with inaccurate readings, throw it in the trash and invest in a high-quality, calibrated instant-read thermometer. A fast, reliable digital thermometer is one of the absolute essential tools every beginner needs to instantly elevate their cooking from amateur to expert. Probe the potato right in the center. If it reads 208°F, it is done.
Step 5: The Oil Finish (For Shatteringly Crisp Skin)
If you want to take your potato skin to a level of crispness that rivals a kettle-cooked potato chip, try this optional finishing move. Ten minutes before the potato reaches its target internal temperature (around the 50-minute mark), quickly pull it from the oven and give it one more light brush of oil or a swipe of melted butter. Return it to the oven for the final ten minutes. This secondary blast of fat hits the already-dehydrated skin, effectively shallow-frying the exterior while the interior finishes steaming.
Step 6: The Immediate Vent (Do Not Let It Sit)
This is the most critical step of the entire process, and it is where 90 percent of home cooks fail. When the potato hits 210°F, pull it out of the oven. Do not let it sit on the counter to cool. Do not leave it intact while you finish searing your steaks.
The core of that potato is currently a raging inferno of trapped steam. If you let it sit unopened, the temperature will drop, the steam will condense back into liquid water, and the fluffy starches will instantly turn into a heavy, gummy paste. You must vent the potato within 60 seconds of removing it from the heat.
Using a sharp paring knife, immediately slice a line down the center of the potato. Grab the ends (using a kitchen towel to protect your hands from the heat) and push them inward and upward. The potato will “blossom” open, releasing a massive plume of hot steam. Take a fork and gently fluff the interior flesh. Be gentle! If you aggressively mash the inside, you will crush the delicate starch granules, and your mashed potatoes turn into glue. A light, raking motion is all you need to separate the snowy crystals.
Troubleshooting Your Spuds: Common Rookie Mistakes
We all make mistakes in the kitchen, and I have set off my fair share of smoke detectors learning these lessons the hard way. Here are the most common pitfalls you might encounter, and exactly how to fix them.
The Microwave Shortcut: When Time is Money
I am a firm believer that weekend cooking projects deserve patience and perfection, but when you are exhausted on a Tuesday night, time is money. You probably do not have 75 minutes to wait for a potato to bake.
When you need a lightning-fast side dish, the microwave is your best friend, provided you use it correctly as part of a hybrid cooking method. Do not cook the potato entirely in the microwave, or it will taste like a damp kitchen sponge. Instead, scrub, dry, and pierce the potato as usual. Microwave it on high for 5 to 6 minutes, flipping it halfway through. This rapidly brings the core temperature up to around 150°F, jumpstarting the starch gelatinization process.
Immediately transfer the hot potato to a preheated 425°F oven, rub it with oil and salt, and bake for 20 to 25 minutes until the internal temperature hits 210°F. You get the fluffy interior and the crispy, roasted skin in less than half the time. It is the ultimate weeknight efficiency hack.
The Soggy Bottom: Why You Need a Wire Rack
If you are baking your potatoes on a flat, solid sheet pan, you will notice that the bottom of the potato always turns out soggy, pale, and wet. This happens because the moisture escaping from the bottom of the potato gets trapped against the metal pan.
To fix this, you must elevate the potato to allow 360-degree convective airflow. If you don’t want to place the potatoes directly on your oven racks (which can be a pain to clean if oil drips), place a heavy-duty, uncoated stainless steel wire cooling rack inside a rimmed baking sheet. Rest the potatoes on the wire rack. The hot air will circulate entirely around the spud, ensuring the bottom gets just as crispy as the top.
Elevating the Humble Potato: Fillings and Finishes
You have just spent an hour scientifically engineering the perfect, fluffy, foil-free baked potato. Do not disrespect your hard work by topping it with cheap, highly processed garbage.
Ditching the Pre-Shredded Cheese
If you are going to put cheese on your potato, grate it yourself from a high-quality block of sharp cheddar, Gruyère, or Monterey Jack. Pre-shredded cheese from the grocery store is heavily coated in cellulose (wood pulp) and potato starch to prevent it from clumping in the bag. Those pre-shredded bags ruin the texture of a good cheese melt, leaving you with a grainy, oily, plasticky mess that refuses to incorporate into the hot potato flesh. A simple box grater and 30 seconds of elbow grease will yield a smooth, luxurious melt that actually tastes like real dairy.
Compound Butters and Acids
Standard butter and sour cream are classic for a reason, but if you want to elevate this side dish into the main event, you need to introduce compound butters and acid. Mix room-temperature Kerrygold butter with roasted garlic, finely minced chives, a pinch of smoked paprika, and a squeeze of fresh lemon juice. The fat provides richness, while the acid cuts through the heavy starch, balancing the flavor profile perfectly.
Simply drop a generous dollop of your compound butter right into the steaming, fluffed center of the potato. If your butter always splatters and burns when you try to melt it in a hot skillet on the stove, skip the pan entirely; the 210°F residual heat of the potato will gently melt the butter without ever scorching the milk solids.
And when the meal is finally over, do yourself a favor and wash your storage ware immediately with blazing hot water and dish soap; there is no reason your plastic containers stay greasy after a simple weeknight dinner. Proper cleanup is just as important as proper prep.
The Final Verdict: Step Away from the Foil
Cooking incredible food at home does not require a commercial kitchen, an endless budget, or a fancy French vocabulary. It simply requires an understanding of how ingredients react to heat, and the willingness to abandon bad habits that are holding you back.
Wrapping a beautiful, starchy Russet potato in aluminum foil is a culinary crime. It traps moisture, ruins the skin, turns the interior into glue, increases your cooking time, and introduces unnecessary heavy metals and bacterial risks into your kitchen.
The next time you make baked potatoes, trust the science. Scrub them clean, dry them thoroughly, pierce the skin, hit them with oil and kosher salt, and let the dry heat of your oven work its magic. Use your thermometer, vent them immediately, and prepare to experience the lightest, fluffiest, crispiest baked potato of your life. You’ve got this. Now get cooking.






