
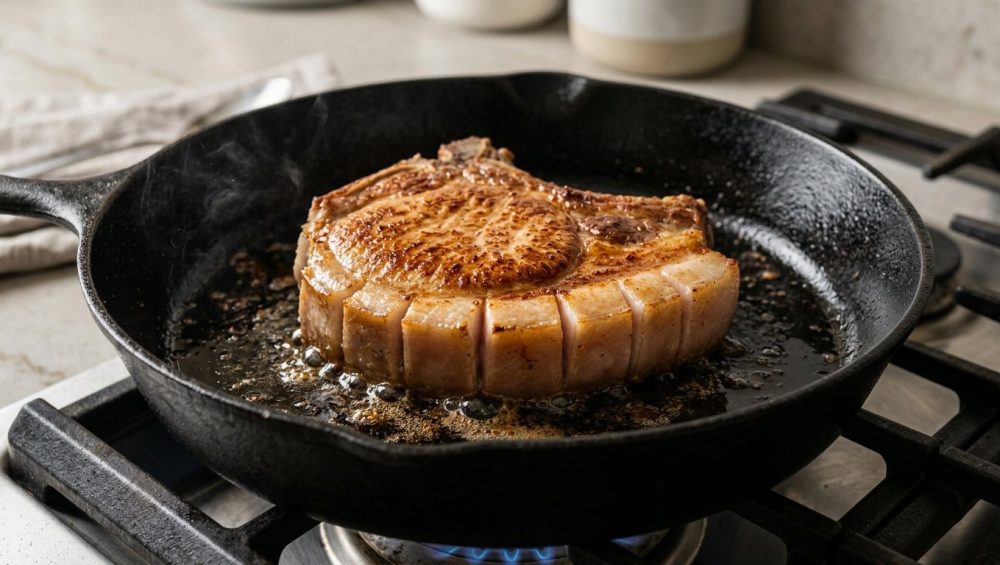
The Tragedy of the Cupped Pork Chop
Listen up, weekend culinary warriors. We need to have a serious conversation about one of the most infuriating, universally despised phenomena in the modern home kitchen. Picture this: It is Friday evening. You have survived another grueling workweek, and you have decided to treat yourself. You bypassed the sad, thin-cut meats wrapped in styrofoam and marched straight to the butcher counter to purchase a gorgeous, two-inch-thick, bone-in center-cut pork chop. It is a thing of beauty, boasting a gorgeous ruby-pink hue and a thick, luxurious cap of fat running along its outer edge. You bring it home, heat up your favorite skillet, and carefully lay the meat down. You hear that aggressive, satisfying sizzle. You are already mentally preparing your side dishes, confident that you are about to execute a steakhouse-quality dinner.
But then, tragedy strikes. Within two minutes, the edges of your beautiful pork chop begin to violently curl inward. The meat bows up in the center, transforming from a perfectly flat, elegant cut of protein into a sad, beige meat-bowl. The outer edges of the chop remain in contact with the scorching pan, rapidly burning into a tough, leathery crust, while the raised center of the meat is completely lifted off the cooking surface. Instead of searing, that suspended center portion merely steams in its own escaping juices, turning a depressing, unappetizing shade of grey.
You try to press it down with your spatula, but the meat fights back with the stubborn elasticity of a heavy-duty rubber band. You flip it over, hoping the other side will fare better, but the damage is done. You are left with an unevenly cooked, visually unappealing protein that is dry on the edges and rubbery in the middle.
If this scenario raises your blood pressure, take a deep breath. You are not alone, and more importantly, you are not to blame. You do not lack culinary talent, and you certainly do not need a professional culinary degree to fix this. The issue is not your stove, and it is not your lack of a Michelin-starred background. The culprit is a matter of structural biology and fundamental thermodynamics. To defeat the curl, we have to stop treating cooking like magic and start treating it like the applied science that it is. We are going to break down the exact biological mechanisms of connective tissue, the chemistry of the Maillard reaction, and the precise, foolproof scoring technique that will guarantee a perfectly flat, evenly seared pork chop every single time.
The Anatomy of the Enemy: Muscle, Fat, and Connective Tissue
To understand why your pork chop behaves like a curling leaf in a hot pan, we first have to take a microscopic look at the anatomy of the pig. A standard bone-in pork chop is essentially a cross-section of the animal’s loin, specifically the Longissimus dorsi muscle. This is the same muscle group that gives us ribeye steaks in beef. It is prized for its relatively tender, uniform muscle fibers and its mild, sweet flavor.
However, the meat itself is only one part of the equation. Running along the outer edge of that beautiful loin muscle is the fat cap. In the culinary world, fat is flavor. That thick layer of subcutaneous fat is crucial for a great pork chop; as it renders down in the pan, it provides a natural, flavorful basting liquid that crisps the exterior and enriches the final pan sauce. But the fat cap is not just floating freely next to the muscle. It is securely anchored to the meat by an incredibly tough, invisible barrier known as the epimysium, or more commonly, the “silver skin.”
This barrier is composed of dense connective tissue, which is primarily made up of two distinct structural proteins: collagen and elastin. Understanding the difference between these two proteins is the absolute key to mastering meat cookery.
Collagen is a structural protein that appears white and somewhat semi-transparent in raw meat. It is the biological glue that holds the animal’s muscle fibers together. When subjected to low, slow, moist heat—think of a pork shoulder simmering in a slow cooker for eight hours—collagen slowly breaks down, melting into rich, luxurious gelatin. This is what gives braised meats that incredible, lip-smacking, melt-in-your-mouth texture. However, when collagen is exposed to rapid, intense, dry heat—like the surface of a screaming hot skillet—it does not melt. Instead, it aggressively seizes and contracts.
Elastin, on the other hand, is a yellowish connective tissue that functions exactly like its name implies: it is highly elastic. It is the biological rubber band of the animal kingdom. Unlike collagen, elastin is completely impervious to heat. It does not matter if you boil it, braise it, or sear it; elastin will not break down, it will not melt into gelatin, and it will not soften. It remains tough and rubbery regardless of the cooking method.
When home cooks experience intense fear of food sticking to stainless steel, they often make the rookie mistake of dropping their pan temperature to a lukewarm simmer. Unfortunately, cooking a pork chop over low heat does not solve the connective tissue problem; it only delays the inevitable contraction while simultaneously guaranteeing that the meat will overcook before it ever develops a crust. To conquer the chop, we have to embrace high heat, but we must first neutralize the biological tension waiting to spring the trap.
The Thermodynamics of the Curl: What Happens at 140°F
Now that we know what the fat cap and the silver skin are made of, let us examine the violent physical reaction that occurs when that connective tissue meets a hot pan. This is where the thermodynamics of cooking come into play.
When you place a raw pork chop into a skillet heated to 400°F (200°C), heat energy immediately begins transferring into the meat via direct conduction. Meat is essentially a dense sponge made of water and protein. Because water is an excellent thermal insulator, the internal temperature of the pork chop does not rise instantly. Instead, a steep temperature gradient forms. The very outer millimeter of the meat rapidly approaches the temperature of the pan, while the dead center of the chop remains cool.
As the heat penetrates inward, it eventually reaches the band of connective tissue separating the fat cap from the loin muscle. When the internal temperature of that specific collagen band hits approximately 140°F (60°C), a dramatic biological event occurs. The triple-helix structure of the collagen protein destabilizes and begins to rapidly denature. As the hydrogen bonds holding the collagen molecules together break apart, the protein fibers violently coil and shrink.
Scientific studies on meat thermodynamics show that when collagen denatures at this temperature threshold, the connective tissue can shrink by up to a staggering 30 percent of its original length. Meanwhile, the elastin embedded in that same tissue band acts as a high-tension cable, reinforcing the shrinking force.
Here is where the physics of the curl are finalized: The actual muscle fibers of the Longissimus dorsi (the meat you actually want to eat) do not shrink at the same rate, nor do they shrink in the same direction as the connective tissue band. You now have a thick strip of meat bordered by a biological rubber band that has suddenly and violently contracted by a third of its length. Because the connective tissue is securely anchored to the outside edge of the meat, it pulls the perimeter of the pork chop incredibly tight.
Since the softer, wider center of the muscle cannot compress to match the new, drastically reduced circumference of the outer edge, the physical tension must go somewhere. The meat is forced to buckle. It bows outward, lifting the center of the chop completely off the flat surface of the skillet, creating the dreaded concave cup.
The Maillard Reaction: Why a Flat Surface is Non-Negotiable
Why is this cupping effect such a catastrophic culinary disaster? To answer that, we have to talk about the holy grail of cooking: the Maillard reaction.
Discovered in 1912 by French chemist Louis Camille Maillard, this reaction is a complex form of non-enzymatic browning. It occurs when the reactive carbonyl group of a reducing sugar interacts with the nucleophilic amino group of an amino acid under high heat. This chemical collision creates hundreds of brand new, highly complex flavor compounds—melanoidins—that give seared meat its irresistible, savory, roasted, and nutty flavor profile. The Maillard reaction is the sole reason why a beautifully seared steak tastes infinitely better than a boiled one.
However, the Maillard reaction has strict thermal requirements. It does not begin to occur in earnest until the surface temperature of the food reaches at least 285°F (140°C), and it reaches its peak efficiency between 330°F and 390°F (165°C – 200°C).
When your pork chop curls and the center of the meat lifts off the pan, it loses direct conductive contact with the hot metal. The intense heat of the skillet can no longer reach the center of the meat. Instead, the moisture that is naturally being squeezed out of the contracting muscle fibers begins to pool in the concave space underneath the cupped meat.
As this moisture hits the hot pan, it instantly vaporizes into steam. But here is the fatal flaw of steam: under normal atmospheric pressure, liquid water cannot exceed 212°F (100°C). Therefore, the steam trapped underneath your cupped pork chop creates a localized micro-climate that is hard-capped at 212°F.
Because the Maillard reaction requires a minimum of 285°F to initiate, it is physically and chemically impossible for the center of your cupped pork chop to brown. The reaction stops dead in its tracks. The edges of the meat, which are still touching the pan, continue to climb past 350°F and eventually burn, while the center of the meat is subjected to a gentle, 212°F steam bath. You are left with a culinary abomination: a pork chop that is burnt on the outside and boiled in the middle.
Many frustrated home cooks attempt to solve this by purchasing a heavy meat press to violently flatten the curling protein against the skillet. I despise this method. Forcing a shrinking, contracting piece of meat flat with a heavy iron weight does not stop the connective tissue from tightening; it merely crushes the muscle fibers under immense pressure. This forcefully squeezes the precious intramuscular moisture out of the meat and into the pan, guaranteeing a dry, chalky, ruined dinner. We do not use brute force in my kitchen; we use finesse and technique.
The Masterclass Solution: The 1-Inch Interval Scoring Technique
We have identified the anatomical enemy (collagen and elastin) and the physical trigger (140°F heat causing rapid shrinkage). The solution is not to press the meat, nor is it to cook it at a lower temperature. The definitive, foolproof solution is to physically break the mechanical tension of the connective tissue before the meat ever touches the pan. We do this through a precise technique known as scoring the fat cap.
Here is the exact, step-by-step masterclass on how to properly score a pork chop to ensure a perfectly flat, edge-to-edge sear.
Step 1: Moisture Eradication
Before a knife ever touches your meat, you must prepare the surface. As we established, surface moisture is the mortal enemy of the Maillard reaction. If your pork chop is wet, the thermal energy of the pan will be wasted on evaporating water rather than searing protein. You must pat your meat dry with heavy-duty paper towels. Press down firmly on both sides of the chop, as well as along the fat cap, until the surface feels tacky and matte to the touch.
Step 2: Blade Selection
Do not attempt this technique with a flimsy paring knife or a dull chef’s knife. The silver skin is incredibly tough, and a dull blade will simply crush the fat, tear the tissue, and mangle the beautiful presentation of your expensive cut. You must sharpen your dull knife before proceeding. A razor-sharp edge is required to make clean, surgical incisions that sever the elastin without butchering the meat underneath.
Step 3: The 1-Inch Interval Score
Place the dried pork chop flat on your cutting board. Locate the thick band of fat running along the outer curved edge of the meat. Taking your sharp knife, make a vertical slice directly through the fat cap and through the tough, silvery band of connective tissue, stopping the blade exactly where the red muscle meat begins. You want to completely sever the silver skin, but you do not want to slice deeply into the actual loin muscle, as doing so will allow precious juices to escape during cooking.
Now, repeat this vertical slice every 1 inch (about 2.5 centimeters) along the entire length of the fat cap.
Why exactly one inch? It all comes down to the physics of tension distribution. By severing the continuous band of collagen and elastin at 1-inch intervals, you are isolating the shrinking effect. When the meat hits the hot pan and the internal temperature reaches 140°F, those small, individual segments of connective tissue will still denature and shrink. However, because the continuous band has been broken into isolated fragments, they no longer possess the collective mechanical leverage required to warp the massive loin muscle. The tension is dissipated. The meat remains completely, perfectly flat against the cooking surface.
Step 4: The Pre-Sear Fat Render
To maximize flavor and further reduce the risk of curling, you should render the fat cap before searing the flat sides of the chop. Using a sturdy pair of kitchen tongs, hold the scored pork chop vertically, pressing the fat cap directly against the hot surface of your skillet. Hold it there for 60 to 90 seconds. The intense heat will rapidly render the fat, creating a pool of liquid gold in your pan that you will use to sear the rest of the meat. More importantly, this targeted blast of heat will initiate the localized shrinkage of the scored connective tissue segments while you are physically holding the meat straight, permanently locking the chop into a flat shape before you lay it down on its side.
Ditching the Toxic Gear: The Ultimate Pan for the Perfect Sear
You can score your pork chops with surgical precision, but if you drop that beautifully prepped meat into a cheap, warped, peeling Teflon pan, you are still going to ruin your dinner. As your Sassy Sous-Chef, I have zero patience for pretentious culinary jargon, but I have even less patience for mystery metals and toxic chemical coatings.
We are banishing toxic kitchen gear from our lives starting today. Non-stick coatings (PTFE) are incredibly fragile. They begin to break down and release toxic fumes when heated past 500°F (260°C). To achieve a steakhouse-quality, edge-to-edge Maillard crust on a thick pork chop, your pan needs to be smoking hot. If you attempt to sear a thick cut of meat in a non-stick pan, one of two things will happen: you will either cook on low heat and boil your meat, or you will crank the heat and permanently destroy the chemical coating of your pan, ingesting flakes of toxic polymer with your dinner.
Furthermore, cheap, thin aluminum pans lack the necessary thermal mass. When you drop a massive, cold pork chop into a thin pan, the temperature of the metal plummets instantly. The pan cannot recover its heat fast enough, leading to—you guessed it—steaming instead of searing.
To execute the perfect sear, you need cookware with serious thermal retention and high emissivity. You need Heavy Cast Iron, Carbon Steel, or Multi-Clad Stainless Steel.
Cast iron and carbon steel are the undisputed kings of the hard sear. They hold onto heat with a stubborn ferocity, ensuring that when the meat hits the metal, the temperature remains high enough to sustain the Maillard reaction without interruption.
If you prefer stainless steel, you must understand the Leidenfrost effect to prevent your meat from cementing itself to the pan. By preheating your stainless steel skillet until a drop of water beads up and dances across the surface like a mercury marble, you create a microscopic layer of vapor that prevents proteins from bonding to the metal. Mastering this temperature control is the absolute secret to stick-free searing on stainless steel. Once the pan is properly preheated, add your high-smoke-point oil, wait for it to shimmer, and lay down your perfectly scored pork chop.
Advanced Execution: Elevating Your Weekday and Weekend Chops
Scoring the fat cap and using the right pan will permanently solve your curling issues, but if you want to elevate your cooking from “good enough for a Tuesday” to “mind-blowing weekend perfection,” you need to master a few advanced techniques.
The Power of the Dry Brine
If you have the time, you should absolutely be dry brining your pork chops. This is not some complicated chef trick; it takes thirty seconds of active work. Generously season your pork chops with kosher salt on all sides, place them on a wire rack set over a baking sheet, and leave them uncovered in the refrigerator for 12 to 24 hours.
The magic of dry brining is rooted in osmosis and protein denaturation. Initially, the salt draws moisture out of the meat. That moisture dissolves the salt, creating a concentrated liquid brine on the surface. Over the next few hours, the meat reabsorbs that salty liquid deep into its muscle fibers. The salt alters the physical structure of the proteins, causing them to unwind and swell. This allows the meat to hold onto significantly more moisture during the brutal heat of the searing process, guaranteeing a juicy interior. As a bonus, the circulating air in the fridge completely dehydrates the exterior of the chop, practically ensuring a flawless, immediate Maillard crust the second it hits the pan.
Precision Temperature Control
Do not leave your pork chop’s internal temperature to guesswork, the “poke test,” or arbitrary recipe times. The thickness of the meat, the starting temperature of the pan, and the ambient humidity of your kitchen all alter cooking times. The USDA recommends cooking whole cuts of pork to a safe internal temperature of 145°F (63°C), followed by a three-minute rest.
However, if you leave the meat in the pan until it hits 145°F, it will be hopelessly overcooked by the time it reaches your plate. Heat continues to travel inward even after the meat is removed from the stove—a phenomenon known as carryover cooking. You must pull your pork chops off the heat when the center registers between 135°F and 140°F. To hit this window with dead-on accuracy, you must invest in a high-quality, reliable digital meat thermometer. Stop guessing and start measuring.
Butter Basting and Pan Maintenance
During the last minute of cooking, drop a generous tablespoon of unsalted butter, a crushed clove of garlic, and a sprig of fresh thyme into the pan. As the butter melts and foams, tilt the skillet and rapidly spoon the aromatic fat over the top of the pork chop. This technique, known as arroser, accelerates the browning process, imparts incredible flavor, and gently cooks the meat from the top down.
A quick warning on pan prep: If you are using cast iron or carbon steel, ensure you are using a pure, high-smoke-point liquid oil (like avocado, grapeseed, or canola oil) to sear your meat. Aerosol cooking spray is the enemy of high-heat cooking. Most commercial sprays contain soy lecithin, an emulsifier that burns at low temperatures and leaves a sticky, impossible-to-remove polymerized residue that will completely ruin the seasoning on your beautiful cookware.
The Cleanup and Final Thoughts
Once your pork chop has reached its target pull temperature, immediately transfer it to a cutting board. Do not touch it. Do not slice into it to “check if it’s done.” You must let the meat rest for at least 5 to 10 minutes. During the intense heat of the sear, the muscle fibers contract and squeeze moisture toward the cooler center of the meat. If you slice the chop immediately, all of that pressurized juice will bleed out onto your cutting board, leaving you with a dry piece of meat. Resting allows the muscle fibers to relax and the temperature to equalize, drawing the juices back out toward the edges for a uniformly moist bite.
While the meat is resting, you can tackle the pan. Because you utilized high heat and a proper heavy-bottomed skillet, you likely have a beautiful layer of browned proteins—the fond—stuck to the bottom of the pan. You can easily deglaze this with a splash of chicken stock, apple cider vinegar, or white wine, scraping it up with a wooden spoon to create a phenomenal two-minute pan sauce.
If you choose to skip the sauce, cleanup is still a breeze. Once the pan has cooled slightly, run it under hot water and use a stainless steel bench scraper to effortlessly sheer away any stubborn, carbonized bits of fat or protein. It is the most satisfying cleanup tool in a home cook’s arsenal, saving your sponges and your sanity.
Cooking an extraordinary, restaurant-quality pork chop on a random weeknight is not an unattainable dream reserved for professional chefs. By understanding the biological tension of elastin and collagen, respecting the thermal requirements of the Maillard reaction, and taking thirty seconds to execute a simple 1-inch interval score along the fat cap, you have completely neutralized the threat of the cupped chop.
You now possess the scientific knowledge and the technical prowess to command your ingredients, rather than letting them command you. So, ditch the toxic pans, sharpen your knives, and go buy the thickest, most beautiful bone-in pork chop you can find. You are ready to sear like a master.






