
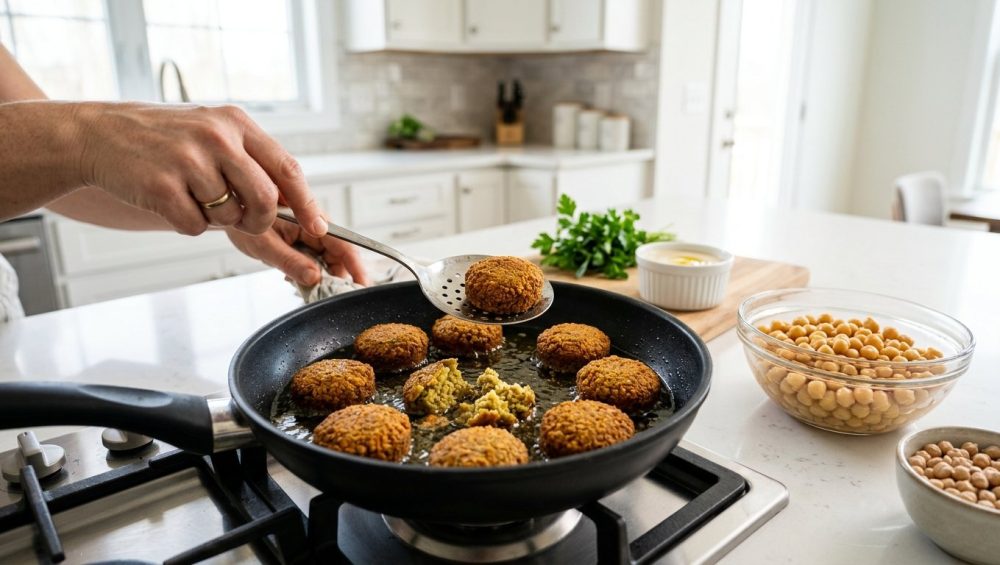
The Universal Tragedy of the Disintegrating Falafel
Picture this: It is a beautiful Saturday evening. You have invited your friends over for a chic, interactive Mediterranean dinner party. You have the wine flowing, the playlist bumping, and you are feeling like an absolute culinary deity in your kitchen. You wanted to impress everyone with homemade falafel, so you did what any logical, time-starved human would do. You popped open a couple of cans of chickpeas, tossed them into the food processor with a handful of herbs, rolled them into cute little green spheres, and confidently dropped them into a pan of hot oil.
And then, absolute tragedy strikes.
Instead of forming golden, crispy, street-cart-style falafel, your beautiful little chickpea patties instantly dissolve. You watch in sheer horror as they disintegrate into a cloudy, bubbling, greasy swamp of despair. You are left staring at a pan of oily mush, frantically wondering if you can somehow pass it off to your guests as a “deconstructed fried hummus bowl.” (Spoiler alert: You cannot, and your friends will judge you).
This is a safe space, so let us be brutally honest with each other. We have all been there. I have personally set off my apartment’s smoke detector more times than I care to admit while trying to master the art of deep-frying. But as someone who firmly believes that you do not need a pretentious culinary degree to make mind-blowing food, I am here to tell you that this disaster is entirely preventable. Mastering this one simple technique is the ultimate key to breaking your takeout habit for good.
You do not lack talent; you simply lack a basic understanding of legume food science. Today, we are going to fix this. We are going to break down the exact starch and moisture mechanics required to bind traditional falafel without relying on dense, heavy fillers that turn your dinner into a hockey puck. Grab a glass of wine, take a deep breath, and let us reclaim your kitchen.
The Science of the Crumble: Why Canned Chickpeas Are the Enemy
If you take away only one piece of advice from this entire masterclass, let it be this: Canned chickpeas are the mortal enemy of authentic falafel. Yes, canned beans are a fantastic, time-saving shortcut for a quick weeknight salad or a batch of hummus, but using them for falafel is a guaranteed one-way ticket to a culinary disaster [1].
To understand why your falafel is falling apart, we have to look at the biology of the bean and the commercial canning process. When you buy a can of chickpeas, those legumes have already been cooked to death in a high-heat, high-pressure commercial canner. This aggressive cooking process fundamentally alters their chemical structure [1]. The natural, raw starches inside the bean have already absorbed water, swollen, and gelatinized. Because the starch has already been activated and broken down, it has absolutely zero binding power left to give.
Furthermore, canned beans are completely waterlogged. Even if you drain and rinse them, they are holding a massive amount of internal moisture. When you drop a wet, pre-cooked, structurally compromised bean into 350-degree oil, the water inside the bean rapidly turns into steam. That steam aggressively expands, literally blowing your falafel apart from the inside out.
When home cooks see their falafel turning to mush in the pan, they usually panic. They commit one of the most classic beginner cooking mistakes by desperately dumping half a cup of all-purpose flour or cracking raw eggs into the mixture to force it to bind. While eggs and flour might technically hold the mush together, they completely ruin the texture. You are no longer making falafel; you are making dense, doughy, chickpea-flavored bread wads. Authentic, street-style falafel is naturally vegan and gluten-free. It relies entirely on its own natural chemistry to hold its shape.
The Anatomy of a Perfect Chickpea: The 24-Hour Soak Method
If we cannot use canned beans, what is the solution? You must start with raw, dried chickpeas. This is a non-negotiable rule of the kitchen. Yes, it requires a tiny bit of forethought, but remember our golden rule: we survive weekdays with clever shortcuts so we can be absolute perfectionists with our weekend projects.
The secret to perfect falafel lies in the 24-hour cold water soak. When you soak dried chickpeas overnight, you are hydrating the beans without exposing them to heat. This means the bean plumps up and softens, but the crucial raw starches remain completely intact [1]. When you eventually grind these soaked, raw beans in your food processor, they release a sticky, milky substance. This raw starch acts like natural, microscopic Velcro. When this raw starch hits the hot oil in your frying pan, it instantly gelatinizes and binds together, creating a perfectly sealed, crispy exterior crust that locks the fluffy interior in place [1].
But there is one more scientific trick to the perfect soak: Baking soda.
Adding half a teaspoon of baking soda to your soaking water is a game-changer. Baking soda is an alkaline powder that raises the pH of the water. This slightly basic environment weakens the pectin in the tough outer skins of the chickpeas. Why does this matter? Because authentic falafel only cooks for about four to five minutes in the hot oil. If the beans are too tough, the outside of your falafel will burn before the raw inside has a chance to cook through. The baking soda soak ensures the beans are tender enough to cook perfectly and rapidly in the fryer [1].
To execute the perfect soak, place one pound of dried chickpeas in a massive bowl. They will triple in size, so use a bowl much larger than you think you need. Cover them with at least four inches of cold water, stir in the baking soda, and leave them on your counter for a full 24 hours. Drain them, rinse them thoroughly, and pat them completely dry before proceeding.
The “No-Go” Rule: Safe Frying in the Home Kitchen
Before we even think about turning on the stove, we need to have a serious conversation about your cookware. As your sassy sous-chef, I have zero patience for cheap, toxic kitchenware, and neither should you. If you are still deep-frying in a lightweight, heavily scratched Teflon pan, we are banishing toxic kitchen gear from your house today.
Heating polytetrafluoroethylene (PTFE) non-stick coatings to the 375°F required for deep-frying is incredibly dangerous. These coatings degrade at high heat, off-gassing toxic fumes into your home and leaching mystery chemicals into your beautifully crafted food. Furthermore, cheap aluminum pans have terrible thermal mass. The moment you drop your falafel into the oil, the temperature of the pan will plummet, ruining your fry.
For safe, effective deep-frying in a home kitchen, you need cookware with serious thermal retention. An enameled cast-iron Dutch oven is the gold standard. Its thick walls hold heat beautifully, ensuring the oil temperature remains stable. If you do not have a Dutch oven, a heavy-gauge carbon steel wok or a high-quality, multi-clad stainless steel pot will work perfectly.
While you might rely on the water drop test to gauge if your stainless steel skillet is ready to sear a steak, deep-frying requires absolute precision. You cannot guess the temperature of a pot of hot oil. You absolutely must invest in a digital probe thermometer or a clip-on deep-fry thermometer. Guessing your oil temperature is a guaranteed way to ruin your dinner party, and thermometers cost less than the ingredients you are about to waste.
A Masterclass in Falafel Architecture: Building the Dough
Now that your beans are perfectly soaked and your safe, heavy-duty cookware is standing by, it is time to build the dough. The architecture of a perfect falafel relies on moisture control, aggressive seasoning, and achieving the exact right physical texture.
The Aromatics and Herbs
Authentic falafel is bright green on the inside. This color comes from a massive amount of fresh herbs. You will need a large bunch of fresh parsley, a large bunch of fresh cilantro, and a smaller handful of fresh dill.
Here is the catch: You must wash these herbs, but they must be bone dry before they go into the food processor. Remember, excess moisture is the enemy of binding. Run them through a salad spinner and pat them aggressively with paper towels.
Next, you need aromatics. A medium yellow onion and about six cloves of garlic will provide the necessary pungent backbone. If you find yourself weeping uncontrollably while chopping onions, it is time to sharpen that blade—a dull knife crushes the onion cells and releases the volatile sulfur compounds straight into your eyes. Rough chop the onion and garlic; the food processor will do the rest of the heavy lifting.
The Spice Blend
Falafel without spices is just a sad, mashed bean. You need to be heavy-handed here. The holy trinity of falafel spices consists of cumin, coriander, and cardamom.
For the absolute best flavor, buy whole cumin and coriander seeds. Toast them gently in a dry skillet over medium heat for about two minutes until they become intensely fragrant, then grind them in a mortar and pestle or a spice grinder. Add a generous pinch of cayenne pepper for warmth, a teaspoon of freshly ground black pepper, and a very aggressive amount of kosher salt. Legumes require an astonishing amount of salt to taste properly seasoned. If your final product tastes bland, you simply did not use enough salt.
The Grind and The Chill
This is where the magic happens. Add your dried, soaked chickpeas, your dry herbs, your aromatics, and your toasted spices into the bowl of a large food processor.
Do not turn the machine on and walk away. If you puree this mixture into a smooth paste, you will end up with dense, gummy falafel. You want to pulse the machine repeatedly. You are looking for a texture that resembles wet, coarse green sand. It should look crumbly, but when you squeeze a handful of it in your palm, it should hold its shape perfectly.
Once you achieve this texture, you must stop. Transfer the mixture to an airtight container and place it in the refrigerator for at least one to two hours. This chilling period is not optional. Resting the dough allows the moisture from the onions and herbs to properly hydrate the dry starches in the chickpeas. It also drops the temperature of the dough, firming up the natural fats and starches so that the patties hold their structural integrity when they hit the hot oil.
The Chemistry of the Fry: Achieving the Perfect Street-Style Crunch
Frying is not just throwing food into hot fat; it is a rapid, violent thermodynamic reaction. When the cold, starchy falafel hits the hot oil, the surface moisture instantly boils and turns to steam. This escaping steam pushes outward, creating a barrier that prevents the cooking oil from seeping into the food. Meanwhile, the high heat triggers the Maillard reaction, browning the proteins and starches on the surface to create that irresistible, savory crust.
Oil Selection and Temperature Control
You need an oil with a high smoke point and a neutral flavor. Extra-virgin olive oil is a terrible choice for deep-frying because its smoke point is too low, and it will break down and become bitter. Instead, opt for avocado oil, grapeseed oil, sunflower oil, or high-quality peanut oil [1]. Fill your heavy Dutch oven about two to three inches deep with your chosen oil.
Attach your thermometer and bring the oil to exactly 350°F to 375°F. Temperature control is the difference between success and a greasy disaster. If your oil temperature drops below 325°F, the escaping steam barrier fails, the oil seeps into the porous dough, and your food turns out greasy and heavy [1]. If the oil spikes above 400°F, the outside of the falafel will burn to a bitter, blackened crisp while the inside remains a raw, mealy paste.
The Baking Powder Secret
Right before you are ready to fry, pull your chilled falafel mixture from the fridge. We are going to add one final, crucial ingredient: a teaspoon of baking powder.
Why do we add this now and not earlier? Baking powder is a chemical leavener that reacts to moisture and heat by producing carbon dioxide bubbles. If you add it before the long rest in the fridge, it will lose its potency. By gently folding the baking powder into the cold dough right before frying, you ensure a rapid chemical reaction the second the dough hits the hot oil. These expanding gas bubbles create internal lift, ensuring the inside of your falafel is light, airy, and fluffy rather than dense and heavy [1].
Use a cookie scoop or a traditional falafel press to form the mixture into small balls or thick patties. Do not pack them too tightly; use just enough pressure to help them hold their shape.
Carefully lower the falafel into the 350°F oil. Do not crowd the pan! Adding too many cold falafel balls at once will cause the oil temperature to crash. Fry them in small batches of five or six. Let them fry undisturbed for about four to five minutes, flipping them halfway through, until they are a deep, rich, mahogany brown.
When they are done, you absolutely need a stainless steel spider skimmer to gently fish them out of the hot oil. A slotted spoon simply does not drain the oil fast enough. Transfer the fried falafel to a wire cooling rack set over a baking sheet. Do not put them on paper towels; the trapped steam will immediately destroy the crispy crust you just worked so hard to build.
Prep-Ahead Strategy: The Mindful Falafel Bar
As a home cook, your time is incredibly valuable. You cannot be chained to a hot stove, frantically grinding chickpeas and monitoring oil temperatures while your guests are standing around your living room waiting to eat. The secret to weekend entertaining is strategic, prep-ahead food science.
The Make-Ahead Timeline
Setting up a DIY, interactive food bar is the true art of effortless hosting. It removes the pressure of plating individual meals and allows your guests to customize their own experience.
The beauty of this falafel recipe is that the hardest parts must be done in advance.
- Thursday Night: Place your dried chickpeas in their baking soda bath. It takes exactly three minutes of active work.
- Friday Night: Drain the beans, dry your herbs, and pulse the entire mixture in the food processor. Put the finished dough in an airtight container in the fridge. It will happily sit there for up to 48 hours, fully hydrating and developing incredible flavor.
- Saturday (Party Day): All you have to do is fold in the baking powder, scoop the balls, and fry them. You can even fry them an hour before your guests arrive and keep them warm on a wire rack in a 200°F oven.
Assembling the Spread
Having your prep stations ready and your serving platters laid out in advance is essential for a beautifully organized dream kitchen. A falafel bar is all about contrasting textures and temperatures.
You will need a stack of high-quality, fluffy pita bread, warmed in the oven so it is pliable. Next, you need an acidic crunch to cut through the richness of the fried food. An Israeli salad—finely diced cucumbers, tomatoes, red onions, and parsley, dressed simply with lemon juice and olive oil—is mandatory. Add a bowl of bright pink pickled turnips or quick-pickled red onions for a sharp, vinegary bite.
Finally, the sauces. A classic, garlicky tahini sauce is non-negotiable. Whisk high-quality sesame tahini with ice water, lemon juice, grated garlic, and salt until it turns into a pale, creamy drizzle. And of course, you need hummus. Just make sure you follow the proper techniques to remove the chickpea skins and blend with ice cubes; do not ruin your spectacular, crunchy falafel by pairing it with a grainy, subpar dip. You want to serve a flawless, silky mezze night spread that makes your guests feel like they are dining at a high-end Mediterranean bistro.
Troubleshooting Guide: When Good Beans Go Bad
Even with the best instructions, the kitchen is a dynamic environment. If your falafel batch goes sideways, do not throw in the towel. Here is how to diagnose the culinary science behind the failure:
Symptom: The falafel is incredibly dense and heavy.
- The Science: You either over-processed the mixture into a smooth paste, destroying the coarse texture needed for air pockets, or you panicked and added flour.
- The Fix: Next time, pulse the machine carefully and trust the raw starch to do the binding. Ensure you fold in the baking powder right before frying for that essential internal lift.
Symptom: The falafel cracked open and split in the fryer.
- The Science: Your oil temperature fluctuated wildly, or your dough was too wet. If the oil is too hot, the outside crust forms instantly and shrinks, while the inside expands, causing a violent rupture. If the dough has too much moisture, the excess steam forces the patty to crack open [1].
- The Fix: Dry your herbs thoroughly, dry your soaked chickpeas completely before grinding, and use a reliable thermometer to maintain a steady 350°F.
Symptom: The outside is burnt, but the inside is raw and mealy.
- The Science: Your oil was entirely too hot (above 400°F), or you skipped the baking soda in the overnight soak. Without the baking soda to soften the bean skins, the chickpeas require a longer cooking time than the exterior crust can survive [1].
- The Fix: Lower your heat, use a thermometer, and never skip the alkaline soak.
Symptom: The falafel tastes like a bland, grassy hockey puck.
- The Science: You chronically under-seasoned the dough.
- The Fix: Legumes are flavor sponges. You must use generous amounts of kosher salt and freshly toasted, highly aromatic spices. Always fry one single “test falafel” first. Taste it, adjust the salt and spices in the remaining dough, and then fry the rest of the batch.
The Final Bite
Cooking should never be a source of anxiety. It is simply a series of predictable chemical reactions that you can learn to control. You do not need to rely on soggy takeout, and you certainly do not need to settle for mushy, disintegrating falafel made from waterlogged canned beans.
By respecting the ingredients, understanding the power of raw starch hydration, utilizing safe and effective cookware, and managing your oil temperatures, you can produce shatteringly crisp, vibrant green, street-cart-quality falafel right in your own home.
So pour yourself that glass of wine, set up your soaking bowl tonight, and get ready to host the most stress-free, mind-blowing Mediterranean dinner party of your life. You have completely got this.






