
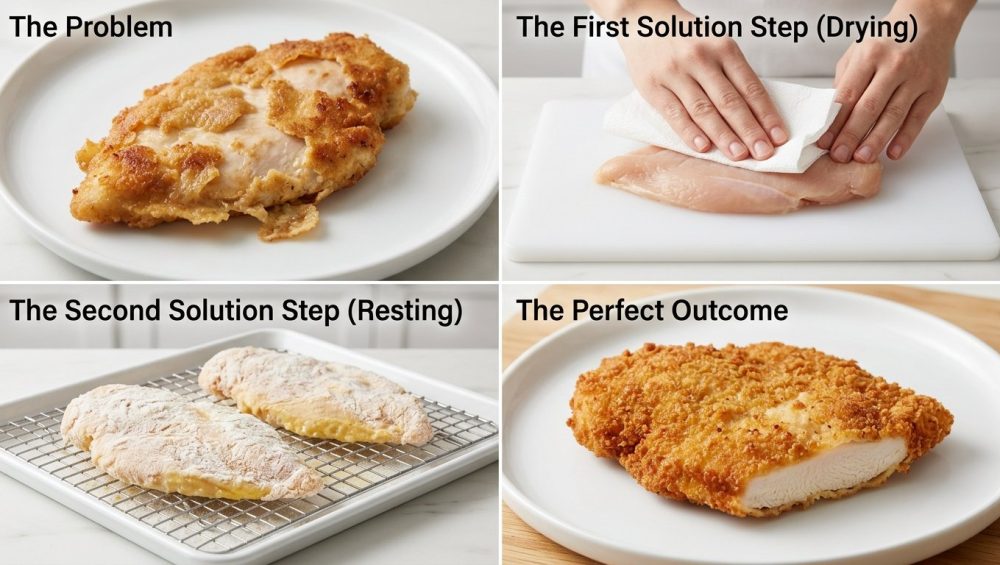
Listen up, folks. We need to have a serious, unfiltered chat about the tragedy that is a bald chicken cutlet. You know exactly what I am talking about. You have spent your precious Tuesday evening diligently coating a beautiful piece of poultry, dreaming of that golden, shatteringly crisp, restaurant-quality crust. You gently lay it into the sizzling pan, wait a few minutes, and confidently go for the flip. And then it happens. The entire sheet of breading sloughs off, sliding into the oil like a wet sweater, leaving you staring at a pale, naked piece of chicken and a pan full of burnt, floating shrapnel.
It is infuriating. It is enough to make you want to throw your spatula across the room, give up on cooking forever, and order greasy, overpriced takeout. But before you banish yourself from your own kitchen, I need you to take a deep breath. You are not cursed. Your kitchen is not broken. And contrary to what you might think, achieving a flawless, armor-like crust does not require a culinary degree, a commercial deep fryer, or a pact with a dark kitchen deity. It requires science.
As your favorite sassy sous-chef, I am here to tell you that absolutely anyone can cook like an expert. You just need to understand the basic physics and chemistry happening in your skillet. Today, we are leaving no stone unturned. We are going to completely deconstruct the standard breading procedure, expose the hidden saboteurs ruining your weeknight dinners, and rebuild your pan-frying technique from the cutting board up. By the end of this definitive masterclass, you will understand exactly why your breading separates from your proteins and, more importantly, how to permanently fix it.
The Culinary Science of Breading Failure
Before we start aggressively tenderizing meat on your favorite wooden cutting board, we need to look at the microscopic warfare happening between your chicken and your frying oil. Breading failure is never a random stroke of bad luck; it is a structural collapse caused by two primary culprits: trapped surface steam and incomplete starch hydration.
The Enemy Within: Trapped Surface Steam
Water is the ultimate enemy of a crispy crust. When a piece of raw chicken goes into hot oil, the heat immediately begins to transfer from the fat into the meat. The surface temperature of the chicken rapidly approaches 212°F (100°C), which is the boiling point of water. If there is excess moisture trapped between the surface of the chicken and the bottom layer of your breading, that water rapidly vaporizes into gas.
Because steam expands to about 1,700 times the volume of liquid water, it needs somewhere to go immediately. If the breading has formed a tight seal around the meat, the expanding steam acts like a microscopic explosive charge, literally blowing the crust off the surface of the meat from the inside out. This is why your breading often looks like a balloon that has deflated and detached. The steam creates a physical barrier of gas, preventing the flour and egg matrix from gripping the protein strands of the chicken. To stop the explosion, you have to eliminate the fuel.
The Starch Hydration Deficit
The second scientific reason your cutlets are going bald is a failure to properly hydrate your starches. Breading is essentially a temporary culinary glue made of complex carbohydrates and proteins. When you dust a piece of chicken in flour, the starches (specifically amylose and amylopectin) need time to absorb ambient moisture and swell. This swelling process, known as starch hydration, is what transforms dry, powdery flour into a sticky, cohesive gel that can physically bond to the meat.
If you bread a piece of chicken and immediately toss it into a hot pan, you are rushing the chemistry. The flour remains a dry powder underneath the egg wash. When the high heat hits it, instead of acting as a binder, that dry powder acts as a lubricant. The outer crust simply slides right off the slippery surface of the chicken. Great cooking is about patience, and forcing starch to hydrate on your timeline is a battle you will always lose.
The Golden Rules of Prep: Setting Up for Success
Now that we understand the enemy, let us talk about the preparation phase. Weekend perfectionists know that the secret to an effortless, flawless meal lies entirely in the setup. We are going to aggressively eliminate moisture and ensure our meat is structurally sound before it ever sees a breadcrumb.
Bone-Dry Protein is Non-Negotiable
I cannot overstate this: your chicken must be bone-dry before it ever touches a single grain of flour. When you take your poultry out of its supermarket packaging, it is usually swimming in a puddle of myoglobin, water, and condensation. You need to take multiple paper towels and aggressively blot every single millimeter of that meat.
Do not worry about losing juiciness. Drying the exterior surface of the meat has absolutely nothing to do with the internal moisture of the final dish. In fact, locking in a tight, protective crust is exactly how you fix dry chicken breasts, because the breading acts as a thermal shield, preventing the internal juices from evaporating into the pan. Dry the meat until the paper towel comes away completely clean. If you have the time, leaving the chicken uncovered on a wire rack in the fridge for an hour will allow the cold, circulating air to desiccate the surface even further, practically guaranteeing a steam-free frying experience.
Pounding the Meat for Even Cooking
A thick, uneven chicken breast is a disaster waiting to happen. If one end is an inch thick and the other is a quarter-inch thin, the thin end will turn into dry shoe leather before the thick end even registers as safe on a reliable meat thermometer. Furthermore, a thick piece of meat requires a significantly longer cooking time, which exponentially increases the risk of your breading burning black before the inside reaches that crucial 165°F (74°C).
You need to butterfly the chicken breasts by slicing them horizontally, and then pound them out. Place the meat inside a heavy-duty zip-top bag or between two sheets of plastic wrap to prevent cross-contamination and raw chicken juice from flying around your kitchen. Use a meat mallet, or even a heavy cast iron skillet, to gently but firmly pound the cutlets until they are a uniform half-inch thickness. This structural uniformity guarantees that the chicken will cook through in the exact amount of time it takes for the crust to turn a beautiful, deep golden brown.
The Standard Breading Procedure (SBP) Masterclass
In professional kitchens, we use a rigid, three-step system called the Standard Breading Procedure. It is a non-negotiable trinity of flour, egg, and crumb. Do not try to take shortcuts here to save time on a weeknight. Do not try to mix the egg and flour together into a weird slurry. Respect the process, and the process will reward you with a crust that shatters audibly when you bite into it.
Station 1: The Flour Matrix (The Primer)
The first station is your dry flour. I highly recommend using standard all-purpose flour seasoned generously with kosher salt, freshly ground black pepper, garlic powder, and smoked paprika. The flour serves two vital structural purposes. First, it absorbs any microscopic droplets of moisture you missed with your paper towels, acting as a final safeguard against steam. Second, it creates a textured, starchy surface—a primer—for the liquid egg wash to grab onto.
For an advanced culinary trick, whisk the magic of baking powder directly into your flour mixture. The slightly alkaline nature of the baking powder weakens the peptide bonds in the chicken’s surface proteins, accelerating the Maillard reaction and encouraging a faster, crunchier browning process in the pan.
When dredging the chicken, coat the meat completely, but—and this is absolutely crucial—shake off the excess. You want a translucent, microscopic dusting, not a thick, pasty sweater. Too much flour will clump, fail to hydrate properly, and create a weak structural layer that will ultimately cause the entire outer crust to detach.
Station 2: The Egg Wash (The Glue)
The second station is your binder. Beat your eggs thoroughly until the yolks and the whites are completely homogenized into a pale yellow liquid. I always add a splash of water or whole milk (about one tablespoon per egg) to the mixture. This slightly thins out the proteins in the egg white (ovalbumin), preventing the wash from becoming too gloopy, stringy, and thick.
Dip your perfectly flour-dusted cutlet into the egg wash, ensuring every single crevice is coated. If there is a dry spot of flour left untouched by the egg, the breadcrumbs will not stick to it, resulting in an ugly bald patch on your final dish. Lift the chicken from the bowl and let the excess egg drip off for a few seconds. You want a thin, even layer of protein glue, not a dripping, sloppy mess that will pool in your breadcrumbs.
Station 3: The Crunch (Panko, Breadcrumbs, and Beyond)
The final station provides your texture. While standard, sand-like Italian breadcrumbs are fine in a pinch, Panko (Japanese-style breadcrumbs) are vastly superior for achieving a shatteringly crisp, airy texture. Panko flakes are larger, jagged, and absorb significantly less oil than standard crumbs, resulting in a lighter, crunchier bite.
Lay the egg-coated chicken into the crumbs. Do not just lightly toss them over the top. You need to use your hands to aggressively press the crumbs into the meat. Pack them on firmly. This physical pressure forces the jagged edges of the crumbs deep into the sticky egg wash and flour matrix, creating a tightly locked mechanical bond that will survive the bubbling turbulence of hot oil.
The “Wet Hand, Dry Hand” Technique
A quick word on kitchen logistics to save your sanity. If you use the same hand to move the chicken from the flour, to the egg, to the crumbs, you will rapidly bread your own fingers, creating giant, sticky clubs of dough that are impossible to work with. Assign your left hand as the “dry hand” (exclusively for the flour and breadcrumbs) and your right hand as the “wet hand” (exclusively for the egg wash). It takes a minute of mental focus to get used to, but it will save you from a massive, frustrating mess. And when you are finally done, a stainless steel bench scraper makes cleaning up those stray, stubborn breadcrumbs from your counter an absolute breeze.
The Secret Weapon: The Mandatory 15-Minute Rest Phase
If you take absolutely nothing else away from this masterclass, let it be this strict rule: you must rest your breaded chicken before frying it. This is the single most skipped step by weekend culinary hobbyists, and it is the undisputed number one reason crusts fall off in the pan.
Why Resting the Breading Changes Everything
Once your chicken is fully coated and packed with crumbs, place it on a wire cooling rack set over a baking sheet and walk away. Leave it in the refrigerator (or just on the counter if your kitchen is cool) for a minimum of 15 minutes.
During this quiet resting phase, invisible biochemical magic happens. The moisture from the egg wash slowly permeates the dry flour layer, completing the starch hydration process we discussed earlier. The proteins in the egg and the gluten network in the flour interlock, transforming from three separate, distinct layers (flour, egg, crumb) into a single, cohesive, gel-like matrix. This matrix effectively shrink-wraps itself around the protein fibers of the chicken.
If you skip this step and rush to the stove, the layers remain separate, and the violent, boiling action of the frying oil will easily tear them apart. Give the glue time to dry. Have a glass of wine. Chop some parsley. Load the dishwasher. Just do not touch that chicken for fifteen minutes.
Frying Dynamics: Heat, Oil, and Safe Kitchenware
We need to talk about your hardware, because bad pans ruin good food. I have zero patience for pretentious chef-speak, but I have even less patience for toxic, peeling kitchenware. If you are still trying to fry chicken in a scratched, warped, ten-year-old non-stick pan that you have repeatedly ruined with the dangers of cooking spray, throw it in the garbage immediately. You deserve better.
Ditching Toxic Gear for High-Quality Pans
Cheap Teflon and mystery-metal non-stick coatings cannot handle the sustained, high heat required for proper pan-frying. When they inevitably degrade, they leach forever chemicals and toxic fumes into your food and your home. You need a pan with serious thermal mass—something heavy and dense that can hold onto heat when a cold, dense chicken breast is dropped into it.
I strongly advocate for a heavy cast iron skillet, a thick multi-clad stainless steel pan, or a beautifully polymerized carbon steel skillet. If you are diligent about seasoning carbon steel pans, they will provide a naturally non-stick, chemical-free surface that sears like an absolute dream. If you are using stainless steel, simply preheat the pan properly over medium heat and use the water drop test (where a bead of water glides and dances across the surface like mercury without evaporating instantly) to ensure the metal has expanded enough to prevent sticking.
Oil Temperature and Thermal Mass
You are not deep-frying here; you are shallow pan-frying. You only need enough neutral cooking oil (like canola oil, grapeseed oil, or peanut oil) to come halfway up the side of the cutlet—usually about a quarter to a half-inch deep in the pan. Do not use extra virgin olive oil for this; its smoke point is far too low, and it will break down and turn your beautiful chicken into an acrid, bitter disaster.
Temperature control is your absolute best friend. The oil needs to be between 350°F and 375°F (175°C – 190°C) before the chicken ever goes in. If the oil is too cold, the breading will act exactly like a kitchen sponge, soaking up the grease and becoming a soggy, heavy mess that slides right off the meat. If the oil is too hot, the delicate breadcrumbs will instantly scorch and turn black before the inside of the chicken is even close to being cooked.
When you add the chicken, the temperature of the oil will immediately drop. This is why having a heavy pan with high thermal mass is so incredibly important—it retains heat and helps the oil recover its optimal temperature quickly. Do not crowd the pan. If you put too many cutlets in at once, the oil temperature will plummet, and you will end up boiling your chicken in a sad pool of lukewarm grease. Fry in small batches.
The “Don’t Touch It” Rule
Once you gently lay the cutlet into the hot oil (always lay it down dropping away from your body so the hot oil does not splash toward you), back away from the stove. Do not nudge it. Do not peek underneath it. Do not aggressively shake the pan like you are on a television cooking show.
The crust needs uninterrupted contact with the heat to set, dehydrate, and undergo the Maillard reaction. If you try to move it before a solid crust has formed, the mechanical friction will tear the delicate, semi-hydrated breading right off the meat. Leaving the protein completely alone for the first three to four minutes is the absolute easiest way to stop food from sticking to the pan. When the edges turn a deep, golden brown and you can see a solid crust forming, carefully slide a thin, flexible fish spatula underneath and confidently flip it once.
Troubleshooting Common Breading Disasters
Even with the best science and the highest quality pans, things can occasionally go sideways in the kitchen. Here is a rapid-fire troubleshooting guide to help you identify and fix the most common rookie mistakes so you never have to eat a ruined dinner again.
The Bottom Got Soggy After Cooking
You successfully fried the chicken, it looked beautiful in the pan, but five minutes later, the bottom crust turned into mush and slid off. This happens because you let the hot chicken rest on a flat, solid surface (like a plate, a cutting board, or a stack of paper towels). The residual heat from the chicken generates steam, and with nowhere to escape, that steam condenses right back into the bottom layer of your breading. Always rest your freshly fried cutlets on a wire cooling rack so air can circulate underneath them, allowing the crust to remain perfectly crisp.
The Breading Burned but the Chicken is Raw
This is a classic symptom of oil that is way too hot, combined with a chicken breast that was way too thick. If you find yourself in this panic-inducing situation, immediately remove the chicken from the hot oil, place it on a wire rack over a baking sheet, and finish cooking it in a 350°F (175°C) oven. The gentle, ambient heat of the oven will cook the inside of the meat perfectly without further scorching the exterior crust. Next time, remember to pound the meat thinner and monitor your oil temperature more closely.
The Breading is Too Thick and Doughy
You were too heavy-handed with the flour and the egg wash. Remember, the goal of the Standard Breading Procedure is to create thin, interlocking micro-layers, not to wrap the chicken in a thick, dense pancake batter. When the flour layer is too thick, the moisture from the egg wash cannot penetrate all the way through, leaving a layer of dry, raw flour trapped against the chicken. Next time, aggressively shake off the excess flour, and let the excess egg wash drip away completely before moving to the breadcrumb station.
Clean-Up and Final Thoughts
Cooking incredible, restaurant-quality food at home does not require magic, expensive culinary school tuition, or unnecessary stress. It requires respecting the ingredients, understanding the basic physics of heat and moisture, and having the patience to let the chemistry do its job.
By ensuring your protein is bone-dry, meticulously following the flour-egg-crumb procedure, and giving that matrix a mandatory 15-minute resting phase to properly hydrate, you will permanently banish bald, patchy chicken cutlets from your kitchen. You now possess the exact scientific knowledge to guarantee a perfect, golden crust every single time you turn on the stove.
So, put away the takeout menus, pour yourself that glass of wine, set up your dredging stations with confidence, and show that poultry who is boss. You have got this.






