Grab a spatula and listen up, because we need to have a serious intervention about how you are starting your dinners. If you are blindly following the very first step of almost every weeknight recipe published on the internet, you are actively sabotaging your food before the main ingredients even hit the pan. I am talking about the culinary equivalent of an urban legend: the ubiquitous, dinner-ruining instruction to “sauté onions and garlic together for five minutes.”
It is a lie. A pervasive, fundamental lie that has been copy-pasted across food blogs, magazine spreads, and bestselling cookbooks for decades.
If you have ever wondered why your kitchen smells like acrid smoke instead of a rustic Italian trattoria, or why your homemade tomato sauce has a harsh, bitter undertone that no amount of simmering or added sugar can mask, I have the exact answer. It is because you are treating two fundamentally different botanical ingredients as if they obey the same laws of physics and thermodynamics. They absolutely do not.
Today, we are diving deep into the thermodynamic differences between these two foundational aromatics. We are going to break down the cellular chemistry, the moisture levels, the sugar concentrations, and the exact sequence you need to follow to stop ruining your flavor bases. We are going to explore exactly why your garlic always burns, and how you can fix this widespread error right now without needing an expensive culinary degree or a commercial kitchen setup.
The Greatest Lie in Modern Recipe Writing
Let’s set the scene. It is a Tuesday night. You just got home from work, you are exhausted, but you are trying to be a responsible adult and cook a meal from scratch instead of ordering takeout. You chop your aromatics, heat up a glug of olive oil in your skillet, and toss the diced onions and minced garlic into the pan at the exact same time, just like the recipe told you to. Within sixty seconds, the onions are barely starting to soften, but the minced garlic has turned into microscopic, blackened pebbles of despair.
You just committed one of the classic seven rookie kitchen mistakes, and it wasn’t even your fault. You were set up to fail by lazy recipe formatting.
The “Sauté Onions and Garlic for 5 Minutes” Myth
Why do recipe writers do this? It boils down to a mix of editorial laziness and historical constraints. Decades ago, when recipes were printed in physical magazines and newspapers, editors had strict word counts and limited column space. It was significantly easier and shorter to write “add onions and garlic to the pan and sauté until soft” than it was to explain the nuanced, staggered sequencing required to cook them properly.
Unfortunately, this editorial shortcut became the industry standard. It assumes that both ingredients cook at the same rate and respond to heat in the exact same manner. In reality, putting them in the pan simultaneously is a thermodynamic disaster waiting to happen. You are forcing a water-logged vegetable and a sugar-dense, dry aromatic to share the same thermal environment, which guarantees that one will burn before the other is even cooked.
The Thermodynamics of the Sauté Pan
To understand why this is such a catastrophic error, we need to look at the thermodynamics of a hot sauté pan. When you drop food into hot oil, heat transfers from the metal of the pan, through the cooking fat, and into the ingredient. The rate at which that ingredient cooks—and eventually browns—depends entirely on its internal moisture content, its cellular density, and its sugar concentration. Heat energy will always take the path of least resistance. If an ingredient lacks the internal moisture to buffer that incoming heat, its temperature will skyrocket instantly.
The Science of Aromatics: Onions vs. Garlic
If you want to cook like a professional chef in a standard home kitchen, you have to understand your ingredients on a structural, biological level. You do not need a lab coat or a degree in organic chemistry, just a basic, working grasp of what happens when intense stovetop heat meets raw plant cells.
Water Content: The Built-In Coolant
The single most critical difference between an onion and a clove of garlic is their water content. In the culinary world, water acts as a built-in thermal buffer. Because of the physics of latent heat of vaporization, as long as water is actively evaporating from the surface of a vegetable, the external temperature of that vegetable cannot significantly exceed the boiling point of water (212°F or 100°C).
A standard yellow storage onion is incredibly watery. By weight, an onion is composed of roughly 89% water. When you drop a pile of diced onions into a hot skillet, they immediately begin to release this massive volume of moisture. In culinary terms, they “sweat.” This massive release of water creates a localized steam effect in the pan, actively cooling the surface of the onions and keeping their temperature relatively low for several minutes. They physically cannot begin to brown or caramelize until a significant portion of that moisture has boiled off and evaporated.
Garlic, on the other hand, is a completely different botanical beast. A typical garlic clove contains only about 59% to 65% water. Because it lacks that massive built-in moisture buffer, its internal temperature skyrockets the moment it makes contact with the hot fat. While the onions are leisurely taking a gentle steam bath at 212°F, the garlic is rapidly absorbing the full 350°F heat of the oil. It is effectively being deep-fried.
The Sugar Factor: Fructose and Fructans
The second piece of the scientific puzzle is sugar concentration. Browning in the kitchen is primarily driven by two distinct chemical reactions: caramelization (the thermal breakdown of pure sugars) and the Maillard reaction (the complex chemical reaction between amino acids and reducing sugars).
Most home cooks assume that onions are sweeter and therefore contain more sugar than pungent garlic. This is completely false. Garlic is surprisingly dense in complex carbohydrates. While a standard onion contains about 9 grams of carbohydrates per 100 grams, garlic packs a staggering 33 grams of carbohydrates per the same 100-gram serving.
A large portion of these carbohydrates in garlic are in the form of fructans—which are essentially long chains of fructose molecules. When subjected to high heat, these dense, concentrated sugars undergo the Maillard reaction at a terrifyingly accelerated rate. Because there is very little water to slow the process down, the fructose and amino acids rapidly convert into melanoidins, the brown pigments that give seared food its color.
The Maillard Reaction on Fast-Forward
The Maillard reaction is widely considered the holy grail of savory cooking. Discovered by French chemist Louis Camille Maillard in 1912, it is the chemical process that makes a seared ribeye steak taste complex, what gives a roasted chicken its deeply savory golden crust, and what makes toasted bread infinitely more delicious than raw dough. But the Maillard reaction has a dark, volatile side when it is allowed to progress unchecked.
Pyrolysis: When Browning Becomes Burning
The Maillard reaction typically kicks into high gear between 280°F and 330°F (140°C to 165°C). Because garlic has such an exceptionally low water content and a high concentration of reactive sugars, it breaches this critical temperature threshold in a matter of seconds, especially if you are cooking over medium-high heat on a standard residential stove.
If you do not intervene immediately, the Maillard reaction violently crosses the line into pyrolysis. Pyrolysis is the thermal decomposition of organic material at elevated temperatures in the absence of significant moisture. In blunt, everyday terms: it is burning. The complex sugars carbonize, the amino acids degrade, and the beautiful, golden, aromatic bits turn into bitter black ash.
If you want to master the precise heat control required to prevent this rapid transition from browning to burning, you should take the time to study carbon steel skillet thermodynamics. Different pan materials retain, distribute, and radiate heat in wildly different ways, and understanding your pan’s thermal mass is the key to controlling high-speed chemical reactions.
The Bitter Chemistry of Scorched Allicin
But why does burnt garlic taste so aggressively terrible compared to a slightly burnt onion or a charred piece of bread? The answer lies in a highly volatile, sulfur-based defense compound called allicin.
When a clove of garlic is whole and intact, it actually has almost no smell. The culinary magic only happens when the cellular walls are physically damaged by chopping, crushing, or mincing. Inside the garlic cells, an amino acid derivative called alliin is stored in the cytoplasm, while an enzyme called alliinase is stored separately in the vacuoles. When the cell walls are ruptured, the enzyme and the amino acid mix, instantly creating allicin. Allicin is the exact compound responsible for that pungent, spicy, unmistakable garlic aroma. It evolved as a natural botanical defense mechanism to deter pests from eating the bulb.
Allicin is incredibly chemically unstable. When exposed to gentle, moderate heat, it mellows out, transforming into sweeter, softer, and more complex flavor compounds. But when subjected to the intense, rapid heat of pyrolysis (temperatures soaring above 300°F / 150°C), allicin and its related sulfur compounds rapidly degrade into harsh, acrid polymers. The diallyl disulfide breaks down, and you are essentially creating bitter carbon and degraded sulfur right in the middle of your pan. This is exactly why a single scorched clove can completely ruin an entire pot of chili, a delicate pasta sauce, or a hearty stew.
The Surface Area Trap: Why Mincing Accelerates the Burn
We have firmly established that garlic is chemically and biologically predisposed to burning much faster than onions. But the way you physically prepare it on your cutting board makes the problem exponentially worse.
The Enzyme Reaction and Physical Size
The finer you chop your garlic, the more individual cell walls you rupture. The more cell walls you rupture, the more allicin is produced, resulting in a significantly stronger, more pungent flavor profile. But mincing also drastically alters the physical geometry of the ingredient. It massively increases the surface area of the garlic relative to its overall volume.
When you drop a finely minced, almost paste-like pile of garlic into hot oil, the heat penetrates the tiny, microscopic pieces instantly. There is absolutely no thermal mass left to slow down the cooking process. A whole, intact garlic clove might take ten to fifteen minutes to brown and soften in hot oil; a finely minced clove will blacken and pyrolyze in under forty-five seconds.
Why the Tool Matters
This is exactly where your choice of kitchen prep tools becomes absolutely critical to your success or failure. If you are using a cheap, blunt blade, you are not cleanly slicing through the delicate cell walls; you are violently crushing and mangling them. This brute-force trauma presses out the precious little moisture the clove actually has, creating an uneven, wet paste that burns erratically and rapidly. In fact, just as a dull knife is to blame for your uncontrollable tears when chopping onions, it is also the primary culprit behind unevenly sized garlic bits that scorch at wildly different rates in the pan.
Furthermore, if you are relying on a mechanical garlic press, you are setting yourself up for failure when sautéing. A press aggressively extracts maximum liquid and leaves behind a highly fibrous, dry pulp. This extruded pulp has maximum surface area and almost zero moisture left to protect it from the heat. It is practically culinary kindling. This rapid-burn dynamic is the exact scientific reason why a garlic press makes food bitter when the resulting pulp is subjected to high-heat sautéing. Instead, stick to a razor-sharp chef’s knife and practice a clean, uniform, deliberate mince.
The Delayed-Addition Technique: A Masterclass in Sequencing
Now that we fully understand the thermodynamics, the vast differences in water content, and the volatile chemistry of allicin, the solution to this widespread culinary problem is blindingly obvious. You must entirely decouple the cooking times of your foundational aromatics.
If you take only one piece of actionable advice from this entire masterclass, let it be this: stop adding garlic first. You must employ the delayed-addition technique. Here is the exact, foolproof, three-step sequence you should memorize and use for every savory dish you make from this day forward.
Step 1: Sweating the Onions First
Place your skillet on the stove, turn the heat to medium, and add your chosen cooking fat (whether that is a high-quality extra virgin olive oil, unsalted butter, or rendered animal fat). Once the fat is shimmering, add your diced onions. Do not add the garlic. Leave it on the cutting board.
Let the onions cook, stirring them occasionally with a wooden spoon or a silicone spatula. Because of their massive 89% water content, they will take anywhere from 5 to 8 minutes just to soften, turn translucent, and begin to develop a slight, sweet golden color around the edges. During this entire phase, the onions are actively releasing their moisture, and the overall temperature of the pan is stabilizing at a safe, moderate level.
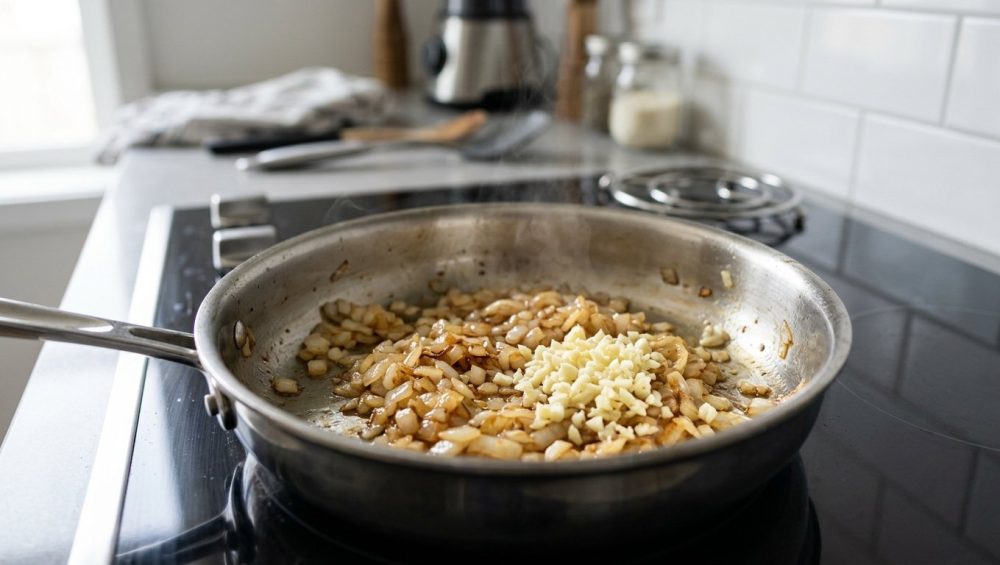
Step 2: The 30-to-45-Second Rule for Garlic
Once the onions are perfectly cooked to your exact liking—whether you want them just barely softened for a quick weeknight pasta or deeply, darkly caramelized for a rich stew—it is finally time for the garlic to make its entrance.
Use your spatula to push the onions slightly to the outer edges of the pan, or simply drop your cleanly minced garlic right into the center of the skillet. Stir it vigorously and continuously into the hot fat and the surrounding onions.
You only need 30 to 45 seconds. That is it. Do not walk away. Do not check your phone. Do not turn your back to chop another vegetable.
Within half a minute, the raw, harsh bite of the volatile allicin will be neutralized by the heat, and the garlic will rapidly release its beautiful, fat-soluble aromatic oils into the pan. You are looking for a state of high fragrance, not visual browning. The exact moment you can smell that intoxicating, sweet garlic aroma wafting up from the pan, the chemical reaction is complete. It is done.
Step 3: Halting the Cooking Process
The residual thermal energy stored in the heavy metal of the pan will continue to aggressively cook the garlic even if you physically turn off the burner. You must immediately halt the cooking process by adding your next ingredients to quench the heat.
If you are making a sauce, immediately pour in your crushed canned tomatoes, your splash of white wine, or your cold chicken broth. The sudden introduction of a cold or room-temperature liquid will instantly drop the overall temperature of the pan well below the 300°F (150°C) pyrolysis danger zone. This rapid cooling stops the Maillard reaction dead in its tracks, locking in the perfect flavor and permanently protecting your delicate aromatics from burning. If you are cooking a dry stir-fry, this is the exact moment to toss in your cold proteins or your bulky, moisture-rich vegetables.
Stop Cooking on Toxic Trash: A Crucial Detour
I need to take a brief, highly necessary detour here, because all the advanced thermodynamic knowledge in the world will not save your dinner if you are cooking on absolute garbage equipment.
As a home cook, your tools dictate your ability to control heat. If you are trying to execute a precise, 30-second delayed-addition technique on a scratched, peeling, incredibly thin $15 non-stick pan that you bought at a discount store five years ago, you are fighting a losing battle against physics.
The Danger of Cheap Non-Stick
Cheap non-stick pans are notorious for having severe hot spots. Because they are typically stamped from thin, low-grade aluminum, they lack the physical mass required to distribute heat evenly across the cooking surface. You will frequently have one side of the pan sitting at a sluggish 200°F while the center is scorching at a violent 400°F. This makes it literally impossible to control the Maillard reaction. Your onions will steam and sweat on one side of the skillet while your garlic turns to bitter ash in the middle.
Worse yet, when these cheap, degraded Teflon coatings overheat, they begin to break down on a molecular level, releasing toxic fumes into your kitchen and potentially leaching forever chemicals into your food. I am incredibly militant about banishing toxic kitchen gear from my home, and you should be equally ruthless. There is absolutely no valid reason to expose your family’s food to mystery chemical coatings when far superior, safer, and more durable options exist.
The Safe Alternatives
If you truly want professional-level heat control, you need cookware with proper thermal mass and reliable conductivity. A heavy-bottomed, multi-clad stainless steel skillet, an enameled cast iron Dutch oven, or a well-seasoned carbon steel pan will absorb and distribute heat perfectly evenly, entirely eliminating the erratic hot spots that cause localized burning.
If you are intimidated by the prospect of cooking on uncoated metal because you are terrified your food will stick, do not be. You simply need to learn proper temperature management. For example, learning and mastering the water drop test will teach you exactly when your bare metal pan has reached the optimal temperature for searing and sautéing without sticking. Once you understand the underlying physics of your cookware, you will never want to go back to flimsy non-stick. If you take the time to learn how to use stainless steel pans correctly, they will easily outlast you, never release toxic fumes, and provide vastly superior, deeply developed flavor in every single meal.
Advanced Aromatic Techniques for the Home Cook
The delayed-addition technique is your reliable, foolproof weekday workhorse. But on the weekends, when you have the luxury of time to be an absolute culinary perfectionist, there are other, more advanced methods to extract incredible garlic flavor without ever risking a bitter burn.
The Cold Oil Start
If you are making a dish where garlic is the undisputed star of the show—like a classic, minimalist Spaghetti aglio e olio—you should utilize the cold oil start technique.
Instead of dropping minced garlic into a pan of already hot fat, place your cleanly sliced or minced garlic directly into a cold pan and pour the room-temperature extra virgin olive oil over it. Only then do you turn the heat on to medium-low. As the heavy pan slowly and gently heats up, the garlic gradually infuses the oil. Because the temperature rises so incrementally, the water inside the garlic evaporates slowly, and the harsh allicin mellows out into a sweet, nutty profile without ever crossing the threshold into pyrolysis.
This technique is incredibly similar to the concept of handling whole, raw spices. If you want to extract complex, fat-soluble flavor compounds from cumin seeds, mustard seeds, or red pepper flakes, you get vastly superior results by gently blooming them in oil over low, controlled heat, rather than scorching them to death in a blazing hot pan. The cold oil start treats garlic with the exact same level of respect.
The Whole Clove Infusion Method
If you want the deep, aromatic essence of garlic in a braise, a stew, or a tomato sauce without the constant anxiety of burning tiny minced pieces, use the whole clove infusion method.
Take two or three whole, peeled garlic cloves and place them on your cutting board. Place the flat side of your chef’s knife over them and give them a firm, gentle smack with the heel of your hand. You want to lightly smash them—rupturing just enough internal cell walls to trigger the alliinase enzyme reaction—but leaving the physical clove entirely intact.
Drop these smashed, whole cloves into your hot oil right alongside your diced onions. Because the whole cloves have a massive volume-to-surface-area ratio, they can withstand the heat. They will slowly brown, soften, and sweeten over ten to fifteen minutes without ever burning. Once they are deeply golden and have completely infused the cooking fat with their flavor, you simply fish them out with a pair of tongs and discard them before adding your liquids. You get all the incredible flavor, with zero risk of burnt, bitter bits floating in your sauce.
Rescuing a Ruined Base: Can You Save Burnt Garlic?
We have all been there. You are a busy person. The phone rings, the dog starts barking at the mail carrier, your kid asks you a question, and you turn your back on the stove for ten seconds. When you turn back, it has happened. The garlic is black. The unmistakable smell of acrid, burnt sulfur fills the kitchen air. Can you save it?
The Harsh Truth
I am going to give it to you straight, with absolutely no sugar-coating: No. You cannot save burnt garlic.
Once the allicin has thermally degraded and the high-density fructans have carbonized into ash, the chemical reaction is strictly irreversible. The bitter, acrid compounds have already leached out and deeply infused into the cooking fat. If you stubbornly proceed with the recipe and pour in your expensive, imported San Marzano tomatoes, your carefully reduced homemade chicken stock, or your premium cuts of meat, you will not dilute the burnt flavor. You will simply magnify that bitter, scorched taste across a much larger volume of expensive food.
The “Start Over” Protocol
Do not fall victim to the sunk-cost fallacy. If your garlic burns, take the pan off the heat immediately. Carry it to the sink or the trash can and dump the entire contents out. Wipe the pan completely clean with a dry paper towel. Wash it with soap and water if you have to.
Yes, it is incredibly annoying and slightly painful to throw away a perfectly good diced onion, a tablespoon of quality olive oil, and three cloves of garlic. But it is vastly more painful to spend the next hour meticulously cooking a complex meal, only to sit down at the dinner table, take your first bite, and realize the entire dish tastes like a tire fire. Time is money, but your main ingredients are also money. Ruining thirty dollars worth of beautiful short ribs or fresh seafood because you stubbornly refused to chop a new fifty-cent onion is the ultimate rookie mistake. Accept the loss, clean the pan, and start over.
Conclusion: Reclaiming Your Kitchen Confidence
Cooking is not magic; it is applied physics, botany, and chemistry. The moment you stop blindly following poorly written, overly compressed recipe instructions and start actively understanding why your ingredients behave the way they do under heat, you will immediately elevate your daily food from mediocre to mind-blowing.
Garlic is undoubtedly one of the most powerful, delicious, and transformative ingredients in your culinary arsenal. But its unique biological makeup demands respect. It does not want to be boiled in a pool of watery onion sweat, and it certainly does not want to be incinerated in blazing hot oil for five minutes before the rest of the meal is ready.
Respect its low water content. Respect its surprisingly high sugar concentration. Hold it back on your cutting board until the final 30 to 45 seconds of your sauté phase. By making this one incredibly simple, scientifically sound adjustment to your stovetop sequencing, you will permanently banish bitter, harsh flavors from your foundational bases.
You have the knowledge now. You understand the thermodynamics. Now get out of here, go sharpen your chef’s knife, heat up a proper, heavy-bottomed pan, and go make something spectacular for dinner. Just remember the golden rule: the garlic always goes in last.


