The year is 2026, and the stuffy, overly formal, twelve-course restaurant tasting menu is officially on life support. According to recent hospitality data, diners are fatigued by rigid dining experiences, and there has been a massive resurgence in home entertaining, ushering in what industry experts are calling the “Dinner Party Era”. People are craving genuine, intimate connection, and frankly, we are all tired of paying exorbitant prices for a thimble of foam balanced on a ceramic slate. You’ve decided to embrace this cultural shift. You’ve invited your favorite people over for a cozy, interactive evening. You want to host a relaxed dinner party where the wine flows, the laughter is loud, and you aren’t trapped in the kitchen sweating over a temperamental soufflé while your guests mingle without you.
So, you decide on a communal Potato Bar. It’s brilliant. It’s comforting. It’s highly interactive, naturally accommodates picky eaters, and serves as the ultimate crowd-pleaser. You confidently boil a massive pot of spuds, throw them into the food processor to save yourself some manual labor, dump in a glug of cold milk straight from the fridge, and hit the puree button.
And then, tragedy strikes.
You dip your wooden spoon into the bowl to taste your culinary creation, and instead of fluffy, cloud-like peaks of potato perfection, your spoon gets stuck. You pull it up, and a long, elastic, gummy string of potato follows it, stretching into the air like melted mozzarella cheese. You haven’t made mashed potatoes; you’ve made wallpaper paste. You’ve created a dense, gluey monolith that could probably be used to patch the drywall in your hallway.
I have zero patience for pretentious chef-speak, but I also have zero patience for ruined side dishes. As a home cook who learned by trial, error, and setting off the smoke detector more times than I care to admit, I can tell you that this textural nightmare is one of the most common—and most heartbreaking—kitchen disasters. But here is the incredibly good news: you do not need a culinary degree from Le Cordon Bleu to fix this. You just need a basic understanding of food science, the right tools, and a little bit of patience.
Today, we are going completely scorched-earth on bad mashed potatoes. We are going to examine the exact cellular biology of a spud, the thermodynamic principles of starch gelatinization, the absolute necessity of proper kitchen gear, and the foolproof, step-by-step masterclass method to achieving professional-level, Michelin-worthy fluff in your own home kitchen. By the end of this exhaustively detailed guide, you will be equipped to construct a Mindful Potato Bar that will leave your guests weeping with joy, all while you sip your Pinot Noir in total, unbothered peace.
The Science of the Spud: Why Mashed Potatoes Turn into Wallpaper Paste
To understand why your potatoes turned into a sticky, inedible adhesive, we have to put on our lab coats and look at the microscopic anatomy of the potato itself. Cooking is just chemistry for hungry people, and mastering this concept is the key to avoiding the most frustrating beginner cooking mistakes.
The Anatomy of a Potato Starch Cell (Amyloplasts)
A raw potato is essentially a complex matrix of water and starch cells known as amyloplasts. These tiny cellular sacks are packed tightly with two types of starch molecules: amylose (a straight-chain polymer) and amylopectin (a highly branched polymer). In their raw state, these starch granules are hard, compact, and completely inedible.
When you apply heat and water—by boiling the potatoes—a magical transformation occurs. The heat causes the tight bonds within the starch granules to relax. As they relax, they act like microscopic sponges, absorbing the surrounding water and swelling to several times their original size.
Temperature Matters: The Gelatinization Trap
This swelling process is known as starch gelatinization. For potato starch, this gelatinization process typically begins at a relatively low temperature range of 58ºC to 65ºC (136ºF to 150ºF). As the temperature increases, the cells reach their maximum swelling capacity. At this stage, the potato is fully cooked. The swollen cells are delicate, plump, and loosely held together by a fragile network of pectins.
If you treat these swollen cells gently, they will separate from one another while remaining intact, resulting in a light, airy, fluffy texture upon your palate. But if you abuse them, you trigger a chemical disaster.
The Cardinal Sin: Overworking the Starch
The absolute worst thing you can do to a cooked potato is apply excessive shear force. When you aggressively mash, whip, or blend potatoes, you violently rupture those delicate, swollen amyloplast sacks. When the cell walls break open, they release all of that gelatinized amylose and amylopectin directly into the surrounding liquid.
Once liberated from their cells, these long, sticky starch molecules immediately bind with the water and dairy in your pot, creating a thick, cohesive, gummy paste. The more you mix, the more cells you rupture, and the more glue you produce. It happens incredibly fast. High-speed blades can generate localized heat exceeding 170°F in under two seconds, causing an instantaneous starch gel explosion and irreversible gumminess within 90 seconds. You cannot reverse this process. Once the starch is out of the bag, your side dish is ruined.
Choosing Your Fighter: The Great Potato Debate
Not all potatoes are created equal, and choosing the wrong variety is a guaranteed one-way ticket to a culinary disaster. Potatoes are generally categorized by their ratio of starch to moisture. When you are throwing together simple weeknight dinners, you might grab whatever random sack of tubers is sitting in your pantry, but for a show-stopping weekend Potato Bar, you must be intentional.
High-Starch vs. Waxy: Know the Difference
Waxy potatoes—such as red potatoes, new potatoes, and fingerlings—have a high moisture content and a low starch content. Their cellular structure is incredibly dense, which makes them fantastic for holding their shape in a potato salad, a hearty stew, or a roasting pan. However, this exact quality makes them a nightmare for mashing. Because they resist breaking down, you have to work them much harder to achieve a smooth puree. As we just learned, overworking equals ruptured cells, which equals glue. Never mash a waxy potato.
Why Russets Are the Undisputed Kings of Fluff
If you want the lightest, fluffiest, most cloud-like mashed potatoes imaginable, the Russet (or Idaho) potato is your undisputed champion. Russets boast a very high starch content (around 20-22%) and a very low moisture content,. Because they are so dry and starchy, their cells naturally want to separate from one another as soon as they are cooked. They practically fall apart on their own, requiring minimal mechanical mashing. Furthermore, their low moisture content means they act like dry sponges, ready to soak up massive amounts of butter and cream without becoming watery.
The Yukon Gold Compromise
If you prefer a denser, creamier, more buttery mouthfeel rather than pure airy fluff, the Yukon Gold is your best friend. Developed in the 1960s at the University of Guelph by crossbreeding a North American russet with a wild South American yellow potato, the Yukon Gold sits right in the middle of the spectrum. It has a medium starch content and a medium moisture content. It yields a stunning, naturally yellow mash with an inherently buttery flavor.
The Sassy Sous-Chef Pro-Tip: For the ultimate crowd-pleasing Potato Bar, use a 50/50 split of Russets and Yukon Golds. You get the structural fluff of the Russet combined with the rich, creamy flavor of the Yukon. It is a flawless combination.
The Gear: Throw Out Your Food Processor
I firmly believe that anyone can cook like an expert without a culinary degree, but you cannot do it if you are sabotaging yourself with the wrong equipment.
The Absolute Worst Tools for Mashed Potatoes
Listen to me very carefully: your food processor is a magnificent machine for blitzing pesto, emulsifying hummus, and pulverizing graham crackers. It is an absolute weapon of mass destruction when it comes to mashed potatoes. As food critic Jeffrey Steingarten famously implied, any cookbook that sanctions the use of a blender or food processor for mashing should be carefully shredded.
Immersion blenders, stand mixers on high speed, and food processors utilize rapidly spinning metal blades that slice and obliterate the potato’s cellular structure, unleashing a torrent of starch,. Even standard electric hand mixers are incredibly risky; their rapidly spinning tines incorporate excessive air, which can oxidize butterfat and accelerate rancidity while simultaneously beating the starch into a gummy frenzy. If you want to succeed, you must ditch the hand mixer immediately.
The Magic of the Potato Ricer and Food Mill
If you want perfectly smooth, lump-free, restaurant-quality potatoes, you need to rely on the magic of a potato ricer. First patented in 1909, a potato ricer looks like a giant garlic press,. You place the boiled potato chunks into the hopper and squeeze the handles together, extruding the potato through a perforated metal plate.
Why is this the holy grail of potato gear? Because it forces the potato through the holes using localized compression rather than high-speed shearing. The potato is broken down into tiny, uniform, rice-like strands in a single, gentle motion. The starch cells remain beautifully intact. A food mill operates on a similar principle, using a hand-cranked blade to gently press the food through a sieve-like bottom layer. Both tools guarantee a velvety, lump-free texture with zero risk of glueiness.
A Warning on Toxic Tools: Ditch the Peeling Non-Stick Mashers
As your resident kitchen advocate, I have a strict “No-Go” rule when it comes to toxic, low-quality gear. I am absolutely ruthless about banishing toxic kitchen gear from my home, and you should be too. I absolutely despise cheap plastic potato mashers that bend under pressure and actively shed microplastics into your hot food. Even worse are the flimsy metal mashers coated in mystery non-stick chemicals that inevitably scratch, peel, and flake black Teflon chips into your pristine white potatoes. Do not poison your dinner party guests with cheap polymers. Invest in a solid, heavy-duty, 100% stainless steel potato ricer or a high-quality stainless steel wire masher. They are completely food-safe, indestructible, and will last you a lifetime.
The Masterclass Method: Step-by-Step to Cloud-Like Perfection
Now that we understand the science, the spuds, and the tools, it is time to execute. This is the definitive, no-nonsense masterclass on creating the perfect base for your Mindful Potato Bar.
Step 1: Prep and Peeling
Peel your Russets and Yukon Golds completely. While rustic, skin-on mashed potatoes have their time and place, potato skins will clog the tiny holes of your potato ricer and ruin the smooth, elegant texture we are aiming for. Cut the peeled potatoes into uniform 1.5-inch to 2-inch chunks. Uniformity is critical; if you have massive chunks and tiny pieces in the same pot, the small pieces will overcook and disintegrate into mush before the large pieces are tender.
Step 2: The Cold Water Protocol
Place your potato chunks into a large, heavy-bottomed pot and cover them with cold water. Do not drop raw potatoes into a pot of rapidly boiling water. If you drop them into boiling water, the extreme heat will instantly overcook the exterior of the potato, causing it to slough off and disintegrate while the dense center remains raw and crunchy. starting in cold water allows the temperature of the potato to rise gradually alongside the water, ensuring perfectly even cooking from edge to edge. Add a generous handful of kosher salt to the water—this is your only chance to season the actual interior of the potato.
Step 3: The Gentle Simmer
Bring the pot to a boil, then immediately reduce the heat to maintain a gentle simmer. A violent, rolling boil will physically smash the potatoes against each other, breaking them apart and waterlogging them. Simmer until a paring knife slides into the thickest chunk with absolutely zero resistance (usually 15 to 20 minutes).
Step 4: The Drying Phase (Crucial!)
Drain the potatoes thoroughly in a colander. Now, perform the step that 90% of amateur cooks skip: put the drained potatoes back into the hot, empty pot and set it over low heat for about two minutes. Gently shake the pot. You will see steam rising from the potatoes. You are evaporating the excess surface moisture. Water is the enemy of fluffy mashed potatoes; if your potatoes are waterlogged, they won’t be able to absorb the butter and cream.
Step 5: The Extrusion
Working quickly while the potatoes are still piping hot, press them through your stainless steel potato ricer into a large, warm mixing bowl. Do not let the potatoes cool down; cold potatoes become stiff and are much more prone to turning gummy when mixed.
Step 6: The Fat and Liquid Equation (Butter First!)
This is where you elevate your cooking to the true art of the kitchen. Never, ever add cold dairy to hot potatoes. Cold dairy shocks the starch, drops the temperature of the dish, and forces you to over-mix to incorporate it. Gently warm your whole milk or heavy cream in a small saucepan.
More importantly: Add your melted butter first. Do not add the milk and butter at the same time. When you fold the melted butter into the riced potatoes first, the fat molecules coat the individual starch cells. This layer of fat acts as a waterproof lubricant. When you subsequently add your warmed milk or cream, the fat barrier prevents the water in the dairy from interacting too aggressively with the starch, drastically reducing the risk of glueiness. Gently fold the liquid in with a silicone spatula just until combined. Stop mixing the second it comes together. Season with additional salt and a pinch of white pepper.
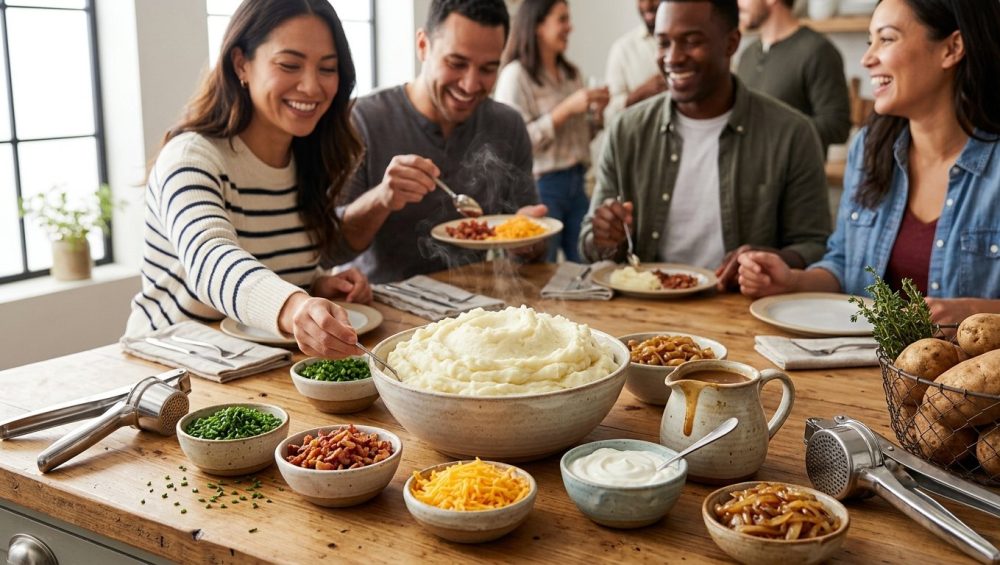
The Mindful Potato Bar: Hosting Without the Kitchen Trap
You’ve successfully created a massive batch of flawless, cloud-like mashed potatoes. Now, let’s talk about execution.
Why a Communal Potato Bar is the Ultimate Hosting Hack
As we navigate the 2026 hosting landscape, the focus is entirely on shared experiences and emotional inclusion. In fact, recent data shows that 93% of Americans expect to cook at home as much or more this year, and they are trading expensive restaurant reservations for comfortable, acoustic-friendly home environments where they can actually hear each other speak.
A communal Potato Bar is the pinnacle of this trend. It is inherently democratic. It accommodates the gluten-free guest, the vegetarian, and the unapologetic carnivore all at the same time. Most importantly, it allows you to eliminate kitchen chaos. Because the entire meal is prepped in advance and served buffet-style, you are free to actually participate in your own party.
Thermal Holding: Keeping Potatoes Warm Without Drying Them Out
The greatest logistical hurdle of a Potato Bar is temperature control. Mashed potatoes must be served hot; as they cool, the starch retrogrades, turning the fluffy mash into a dense, stodgy cement,.
Do not try to keep them warm in a chafing dish over an open Sterno flame—the direct bottom heat will scorch the dairy and create a burnt crust. Do not leave them in a warm oven for hours, as the dry ambient heat will evaporate the moisture and ruin the texture.
The scientifically superior method for thermal holding is the slow cooker,. Here is the exact protocol:
- Generously butter the ceramic insert of your slow cooker to prevent sticking.
- Transfer your freshly made, piping-hot mashed potatoes into the insert.
- Stir in a small splash of heavy cream or chicken broth to generate a humid environment.
- Dot the top of the potatoes with a few extra pats of butter to create a moisture-locking seal.
- Set the slow cooker to the “Warm” setting and place the lid on top.
This enclosed, gently heated environment will keep your potatoes perfectly creamy and hot for up to two hours. Just give them a very gentle fold every 30 minutes to ensure the heat is evenly distributed.
Curating the Ultimate Toppings Station
With your pristine potato base securely holding temperature in the slow cooker, you can focus on the fun part: the toppings. Arrange these in a series of beautiful, mismatched ceramic bowls along your dining table or kitchen island.
To elevate the experience from basic to spectacular, curate distinct flavor profiles for your guests to explore:
- The Steakhouse Classic: Crumbled thick-cut bacon, sharp aged cheddar cheese, sour cream, and freshly snipped chives.
- The French Onion: Deeply caramelized onions, shredded Gruyère cheese, and a drizzle of rich beef demi-glace.
- The Truffle Mushroom: Sautéed wild mushrooms, a conservative drizzle of high-quality white truffle oil, and shaved Parmesan.
- The Compound Butter Flight: Offer three types of homemade compound butter (e.g., roasted garlic and rosemary, Calabrian chili and honey, and classic maître d’hôtel butter with parsley and lemon).
Troubleshooting: Can You Save Gluey Mashed Potatoes?
I am your biggest cheerleader, but I am also a realist who believes in tough love. If you ignored my advice, threw your potatoes into a blender, and are currently staring at a bowl of translucent, sticky paste, I need to deliver some hard news.
The Hard Truth: You Cannot Un-Rupture a Starch Cell
You cannot save them. You cannot reverse the chemical process of starch gelatinization and cellular rupture. Do not try to “thin them out” by adding more milk or chicken broth; you will not make them fluffy, you will simply transform your thick glue into a watery, soupy glue. Do not try to bake them into submission. They are structurally compromised.
Repurposing the Paste: Croquettes, Waffles, and Thickening Soups
However, a ruined side dish does not mean a ruined evening. If you have the time to boil a fresh batch of potatoes for your guests, do it. But do not throw the gluey batch in the trash. This is an excellent opportunity for ditching takeout and learning the invaluable culinary skill of pivoting.
Gluey mashed potatoes are an incredible binding agent. The exact sticky quality that makes them terrible to eat on their own makes them structurally perfect for other applications:
- Potato Croquettes: Let the gluey potatoes cool completely in the fridge. Mix in an egg yolk, some shredded cheese, and a handful of flour. Roll the mixture into small cylinders, coat them in Panko breadcrumbs, and deep fry them. The sticky starch holds the croquette together beautifully in the hot oil, yielding a crispy exterior and a molten center.
- Savory Potato Waffles: Mix the over-mashed potatoes with eggs, buttermilk, flour, and baking powder, and press the batter into a hot, greased waffle iron. The high starch content creates an incredibly crispy, golden-brown waffle that serves as a brilliant base for smoked salmon and crème fraîche.
- Soup Thickener: Freeze the gluey mash in ice cube trays. The next time you make a thin vegetable soup or a watery beef stew, drop a few of these potato cubes into the simmering broth. The liberated starch will melt into the liquid, acting as a powerful natural thickening agent without the need for a flour roux.
Cooking is not about achieving absolute perfection on your first try; it is about understanding the materials you are working with, respecting the science of the process, and having the confidence to adapt when things go sideways. Armed with a potato ricer, a bag of high-starch Russets, and a slow cooker, your next dinner party is guaranteed to be a textural triumph. Now go pour yourself that glass of wine, prep your toppings, and get ready to host the most stress-free, mind-blowing Potato Bar your friends have ever experienced.


