Listen, we need to have a serious conversation about your chicken wings. If you are currently buying those sad, flabby, frozen wings that you microwave until they resemble a damp sponge, or if you are ordering overpriced, lukewarm takeout wings that arrive swimming in a puddle of condensation, I am staging an intervention right here, right now. You deserve better. Your taste buds deserve better. And frankly, your weekend culinary hobbyist pride deserves better.
I know exactly what you are thinking. You are thinking that the only way to achieve that glorious, shatteringly crisp, restaurant-quality wing is to deep-fry it. You are imagining hauling out a massive vat of boiling, terrifying oil. You are picturing the grease splatters ruining your favorite shirt, the lingering smell of a fast-food kitchen haunting your house for the next six days, and the absolute nightmare of figuring out how to safely dispose of a gallon of used peanut oil.
As a busy professional who learned to cook through sheer trial, error, and setting off the smoke detector more times than I care to admit, I am here to tell you that deep-frying at home is a sucker’s game. It is messy, it is dangerous, and unless you are running a commercial kitchen, it is completely unnecessary.
You can achieve mind-blowing, deep-fried-level crunch in a standard home oven. You don’t need a culinary degree. You don’t need a commercial deep fryer. You don’t even need to stand over a hot stove babysitting a sputtering pot of oil. All you need is a ridiculously simple, scientifically proven kitchen hack that is probably sitting in your pantry right this very second.
We are talking about baking powder.
Yes, the exact same white powder you use to make your Sunday morning pancakes fluffy is the ultimate secret weapon for savory, crispy poultry. It sounds like a gimmick, I know. The first time I heard about it, I rolled my eyes so hard I nearly sprained an optic nerve. But then I tried it. And then I understood the hype. This isn’t just some viral internet trend; it is a fundamental shift in kitchen chemistry that transforms ordinary chicken skin into a crackling, golden masterpiece.
Grab a cup of coffee (or a glass of wine, I won’t judge), and let’s dive into the definitive masterclass on how to completely revolutionize your wing game.
The Deep-Frying Dilemma (And Why We’re Skipping It)
Let’s be brutally honest for a second: deep-frying at home is the culinary equivalent of adopting a puppy. It sounds like a fantastic, fun idea on a Friday night, but by Saturday morning, you are exhausted, covered in messes you don’t want to clean up, and questioning all of your life choices.
When we talk about weekday meals, my philosophy is simple: time is money. Efficiency is everything. We want maximum flavor with minimum active labor. Even on the weekends, when I have the luxury of being an absolute perfectionist with my elaborate cooking projects, I refuse to waste my precious free time scrubbing microscopic grease droplets off my kitchen backsplash.
Traditional deep-frying requires constant vigilance. You have to monitor the oil temperature with hawkeye precision. If it drops too low, your wings absorb the oil and become a greasy, heavy mess. If it gets too hot, the outside burns to a bitter crisp while the meat near the bone remains dangerously raw. You have to fry in tiny batches, meaning you spend an hour standing over the stove while your guests are in the living room having fun without you.
Oven-baking is the obvious alternative, but historically, baked wings have a terrible reputation. Without the intense, rapid heat transfer of boiling oil, chicken skin in the oven tends to steam in its own juices. The result is a rubbery, flabby, sad excuse for a wing that slides right off the meat when you bite into it. People try to fix this by dredging the wings in flour, which just creates a pasty, gummy coating that tastes like raw dough.
We need the hands-off convenience of the oven, but the shattering crunch of the fryer. That is where our pantry hero steps in to bridge the gap.
The Science of the Crunch: Why Baking Powder is Your Secret Weapon
I promised you no pretentious chef-speak, and I intend to keep that promise. But we do need to put on our lab coats for just a minute to understand exactly why this technique works. This isn’t magic; it is thermodynamics and chemistry. Food science legends like J. Kenji López-Alt and the obsessive testers at Cook’s Illustrated popularized this method for a reason: the science is bulletproof.
When you coat chicken wings in a precise mixture of kosher salt and baking powder, and then let them rest in the refrigerator, you are triggering a series of chemical reactions that fundamentally alter the structure of the poultry skin.
The pH Shift: Alkalinity and Peptide Bonds
The secret lies in the pH scale. Chicken skin is naturally slightly acidic. Baking powder, on the other hand, is alkaline (basic). When you dust the wings with baking powder, you are actively raising the pH level of the skin.
Why does this matter? Because proteins in the skin (specifically, the peptide bonds holding those proteins together) break down much faster and more efficiently in an alkaline environment. As these proteins break down, they become primed for the Maillard reaction.
The Maillard reaction is the chemical process responsible for the browning and the complex, savory flavors that develop when proteins and sugars are exposed to high heat. By raising the pH, the baking powder essentially hits the fast-forward button on the Maillard reaction. Your wings will brown faster, deeper, and more evenly than they ever could on their own, giving you that gorgeous mahogany color without having to leave them in the oven until the meat turns to dust.
The Micro-Blister Effect
But color is only half the battle; we are here for the crunch. This is where the leavening properties of baking powder come into play.
Baking powder is formulated to release carbon dioxide gas when it comes into contact with moisture and heat. As your wings sit in the fridge, the salt draws out the natural juices from the chicken skin. The baking powder reacts with this moisture, creating thousands of microscopic carbon dioxide bubbles on the surface of the skin.
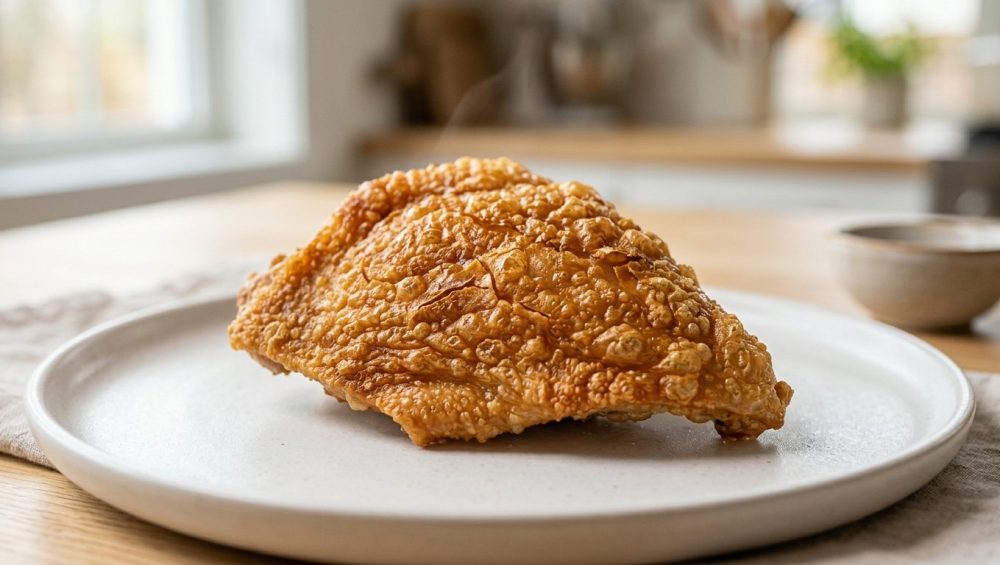
When you blast these wings with high heat in the oven, these tiny bubbles expand and solidify, creating a landscape of micro-blisters. Think of the bumpy, craggy surface of a perfectly fried piece of chicken. Those crags increase the overall surface area of the skin. More surface area means the fat renders out faster, the moisture evaporates quicker, and the resulting texture is incredibly thick and crunchy. You are literally baking tiny, crispy air pockets into the skin.
Baking Powder vs. Baking Soda: A Crucial Distinction
If you take absolutely nothing else away from this masterclass, please burn this rule into your brain: baking powder and baking soda are not the same thing. Do not, under any circumstances, swap them out.
Baking soda is pure sodium bicarbonate. It is intensely alkaline. If you coat your wings in straight baking soda, they will taste like a mouthful of bitter, metallic soap. It will ruin your dinner, and you will be ordering emergency pizza.
Baking powder is a complete leavening agent. It contains sodium bicarbonate (the base), but it also contains a powdered acid (like cream of tartar) and a starch (like cornstarch) to keep them separated until they get wet. The acid buffers the harshness of the base, giving you the chemical reaction you need without the horrific soapy aftertaste.
Furthermore, you must check your pantry and ensure you are using aluminum-free baking powder. Many commercial baking powders use sodium aluminum sulfate as their acid component because it is cheap and reacts at high temperatures. However, when used as a dry coating on meat, that aluminum can impart a distinct, highly unpleasant tinny flavor. Brands like Rumford or Bob’s Red Mill are naturally aluminum-free (they use monocalcium phosphate instead). Check the label. Your taste buds will thank you.
The Essential Gear for Baked Wing Perfection
I have a very strict “no-go” rule in my kitchen when it comes to cheap, toxic gear. You cannot expect professional-level results if you are working with equipment that is actively fighting against you. If you want to dive into the essential tools every beginner needs, you have to start by auditing your bakeware.
Ditching the Toxic Non-Stick
If you are planning to roast these wings on a flimsy, scratched-up, mystery-metal baking sheet coated in peeling non-stick Teflon, stop right now. I absolutely despise toxic kitchenware. Not only do those cheap coatings degrade and release horrifying chemicals into your food at high temperatures, but the pans themselves are so thin that they warp and buckle the second they go into a hot oven. It is time to banish toxic kitchen gear from your life forever.
For this method, you need a heavy-duty, commercial-grade rimmed baking sheet (often called a half-sheet pan). Look for bare aluminized steel or pure, thick-gauge aluminum. These materials conduct heat beautifully, they won’t warp under the intense heat required for crisping, and they will last you a lifetime. If you want to stop your baking sheets warping mid-roast, invest in a pan that actually has some weight to it.
The Wire Rack: Elevation is Everything
You cannot bake crispy wings directly on the surface of a baking sheet. If you do, the fat will render out of the chicken, pool around the meat, and the wings will spend the next forty minutes boiling in their own grease. You will end up with flabby bottoms and copious amounts of smoke.
You must elevate the wings to allow the hot oven air to circulate 360 degrees around the meat. This requires a wire cooling rack that fits snugly inside your rimmed baking sheet.
Do yourself a massive favor and buy a 100% stainless steel wire rack. Avoid the cheap, chrome-plated racks that are sold in most big-box grocery stores. The chrome plating inevitably flakes off into your food, and they rust the second they look at a dishwasher. Furthermore, do not spray your beautiful stainless rack with aerosol cooking spray. Those sprays contain propellants and emulsifiers (like soy lecithin) that bake into a sticky, polymerized lacquer, ultimately ruining your nonstick pans and making your wire racks permanently tacky. Just brush the rack lightly with a high-smoke-point liquid oil, or let the rendering chicken fat do the lubricating for you.
The Masterclass Method: Step-by-Step to Crispy Baked Wings
We have the science. We have the gear. Now let’s execute. This process requires a bit of advanced planning, but the actual active labor is less than ten minutes.
Step 1: The Great Drying (Moisture is the Enemy)
If you buy whole wings, you will need to separate the drumettes from the flats and discard the wing tips (or save them in a freezer bag for homemade chicken stock). Please use a sharp chef’s knife or heavy-duty poultry shears for this. Using a dull knife on slippery raw chicken is a fantastic way to end up in the emergency room, and frankly, it is the fastest way of ruining your expensive kitchen knives by hacking wildly at the joints.
Once your wings are separated, you must aggressively dry them. Moisture is the mortal enemy of crispy skin. If the wings go into the oven wet, the heat energy will be entirely wasted on evaporating that surface water (steaming the meat) rather than crisping the skin. Take paper towels and pat every single wing completely dry. Do not skip this step.
Step 2: The Magic Ratio (Baking Powder and Salt)
The ratio here is critical. For every 2 to 3 pounds of chicken wings, you will need:
- 1 tablespoon of Kosher salt (Diamond Crystal preferred; if using Morton’s or fine table salt, cut this amount in half because the granules are denser).
- 1 teaspoon of aluminum-free baking powder.
- (Optional) 1/2 teaspoon of freshly cracked black pepper or garlic powder.
Do not use more baking powder than this. You do not want a thick, cakey batter on the wings. You just want an invisible, microscopic dusting. Toss the dried wings in a large bowl, sprinkle the mixture over the top, and use your hands to massage the dry rub into the skin until every wing is evenly coated.
Step 3: The Resting Period (Dry Brining)
Place your stainless steel wire rack into your heavy-duty baking sheet. Arrange the wings on the rack in a single layer, ensuring they are not touching each other. They need personal space so the air can circulate.
Now, place the entire tray uncovered in the refrigerator for a minimum of 8 hours, though 18 to 24 hours is the sweet spot.
This resting period is essentially a dry brine. As the wings sit in the cold, dry environment of the fridge, the salt draws moisture to the surface. The moisture mixes with the baking powder, forming those crucial micro-blisters, and then the dry air evaporates the excess liquid. Simultaneously, the salt absorbs back into the meat, seasoning it all the way to the bone and preventing dry and stringy meat during the cooking process. If you have never experienced the magic of dry brining, this step alone will completely change the way you cook poultry.
When you pull the wings out of the fridge the next day, the skin will look translucent, tight, and completely leathery. That is exactly what you want.
Step 4: The Two-Stage Baking Process (Rendering and Crisping)
Most recipes tell you to blast the wings at 400°F for an hour. That is a rookie mistake. Chicken wings have a massive amount of subcutaneous fat trapped just beneath the skin. If you blast them with high heat immediately, the outside will burn before that fat has a chance to render out, leaving you with a flabby, greasy layer underneath the crust.
We are going to use a two-stage cooking method.
Stage 1: The Render. Preheat your oven to 250°F (120°C). Place the tray of cold wings on the lower-middle rack and bake for 30 minutes. This low, gentle heat slowly melts the fat under the skin without burning the exterior. The fat drips away, leaving the skin paper-thin and ready to crisp.
Stage 2: The Crisp. After 30 minutes, do not take the wings out of the oven. Simply crank the heat up to 425°F (220°C) and move the tray to the upper-middle rack. Bake for another 40 to 50 minutes. As the oven temperature surges, the Maillard reaction kicks into overdrive. The micro-blisters solidify, the skin turns a deep, gorgeous golden brown, and the meat inside finishes cooking.
You don’t even need to flip them, thanks to the wire rack. Just let the oven do the heavy lifting. When they are done, tap the skin with a pair of metal tongs. You should hear a distinct, hollow, hard “thwack.” That is the sound of absolute victory. If you are ever in doubt about the internal temperature, invest in a meat thermometer and ensure the thickest part of the meat registers at least 165°F (though wings are incredibly forgiving and often taste better and more tender when pushed to 175°F to 185°F, as the collagen breaks down into rich gelatin).
Troubleshooting Your Wing Woes
Even with bulletproof science, things can occasionally go sideways. Here are the most common pitfalls and how to avoid them.
Why Are My Wings Gummy or Powdery?
If you bite into a wing and it feels like you are chewing on wet chalk, you committed one of two cardinal sins. First, you might have used way too much baking powder. Remember, one teaspoon per two to three pounds of meat. It is a chemical catalyst, not a breading. Second, you didn’t dry the wings properly before applying the powder, or you skipped the overnight resting phase. The baking powder needs time to react and the moisture needs time to evaporate. If you rush the process, you end up with a gummy paste.
Why Did My Kitchen Fill With Smoke?
As the fat renders out of the wings during the high-heat phase, it drips down onto the hot baking sheet. At 425°F, chicken fat can occasionally reach its smoke point, turning your kitchen into a hazy, alarm-blaring disaster zone.
To prevent this, line the bottom of your baking sheet (underneath the wire rack) with heavy-duty aluminum foil before you start. The foil makes cleanup a breeze and helps diffuse the heat slightly. If your oven runs notoriously hot and you are still getting smoke, you can carefully pour a few tablespoons of water onto the foil-lined baking sheet right as you crank the heat to 425°F. The water will catch the dripping fat and prevent it from smoking. Just don’t add too much water, or you will create a steam bath that ruins your crispy skin. Understanding how to manage your oven’s quirks is exactly how I stopped burning dinner every night.
Why Did My Pan Make a Terrifying Banging Noise?
If you are using a cheap, thin baking sheet, the sudden shift from 250°F to 425°F will cause the metal to expand unevenly, resulting in a loud “pop” or “bang” as the pan aggressively warps. If you want to know why baking sheets suddenly pop, it is all about thermal shock on thin-gauge metal. This is exactly why I harp on using commercial-grade aluminized steel. A warped pan will cause the wings to slide into a corner and cook unevenly.
Can I Use Frozen Wings?
Absolutely not. Do not even think about it. Frozen wings hold a massive amount of water weight in the form of ice crystals. If you try to toss frozen wings in baking powder and throw them in the oven, they will release a biblical flood of liquid as they thaw, washing away your seasoning and boiling the meat. If you bought a bag of frozen wings, you must let them thaw completely in the refrigerator for 24 hours, drain all the purge liquid, and pat them aggressively dry before you even look at the baking powder.
Flavor Bombing: Sauces and Seasonings
You have achieved textural perfection. Now, it is time to dress them up. The beauty of this method is that the skin is so robust and crispy that it can hold up to aggressive saucing without immediately turning to mush.
The Golden Rule of Saucing
Never sauce your wings until the exact moment you are ready to eat. If you toss them in a wet sauce and let them sit on the counter for twenty minutes while you finish making a salad, you are disrespecting the science. The moisture in the sauce will eventually penetrate the micro-blisters and soften the crunch.
When the wings come out of the oven, let them rest on the wire rack for exactly five minutes. This allows the boiling fat under the skin to settle and the crust to fully harden. Then, transfer them to a large stainless steel mixing bowl, pour your warm sauce over the perimeter of the bowl (not directly on the wings), and flick your wrist to toss them gently until coated. Serve immediately.
Classic Buffalo: The Only Recipe You Need
You do not need to buy overpriced, shelf-stable, preservative-laden bottled wing sauce. Authentic Buffalo sauce is a masterful emulsion of just two primary ingredients, and it takes ninety seconds to make.
In a small saucepan over low heat, melt half a cup (one stick) of high-quality unsalted butter. Once melted, whisk in two-thirds of a cup of Frank’s RedHot Original Cayenne Pepper Sauce. (It must be Frank’s. This is non-negotiable for authentic Buffalo flavor).
Whisk vigorously until the butter and the hot sauce emulsify into a glossy, vibrant orange liquid. If you want to elevate it, whisk in a tablespoon of white vinegar for extra tang, a pinch of garlic powder, and a tiny dash of Worcestershire sauce for umami depth. Keep the sauce warm on the stove until the wings are ready. If the sauce gets cold, the butter will solidify and the emulsion will break, leaving you with a greasy mess.
Dry Rubs: For the Purists
If you want to preserve the absolute maximum amount of crunch, skip the wet sauce entirely and go for a dry rub. Because you already salted the wings during the dry-brine phase, you need to ensure your finishing rub is salt-free (or very low sodium) to avoid over-seasoning.
A classic Lemon Pepper dry rub is phenomenal here. Zest two whole lemons and spread the zest out on a paper towel to dry for an hour. Mix the dried zest with a tablespoon of freshly cracked black pepper, a teaspoon of garlic powder, and a pinch of cayenne. Toss the hot wings in a tiny drizzle of melted butter or olive oil just to give the spices something to adhere to, then sprinkle the dry rub over the top.
Alternatively, a Garlic Parmesan coating provides a luxurious, savory finish. Toss the hot wings in melted butter, then aggressively dust them with freshly grated Parmigiano-Reggiano (use a microplane so the cheese melts instantly into the crevices of the skin) and a heavy pinch of roasted garlic powder.
Conclusion: Reclaiming Your Weekend Wing Night
Cooking should never feel like an exhausting, stressful chore, and you shouldn’t have to rely on a deep fryer to enjoy restaurant-quality comfort food in your own home. By leveraging a little bit of basic kitchen chemistry, respecting the power of the dry brine, and utilizing the right heavy-duty equipment, you can pull off culinary miracles on a standard Tuesday night.
The baking powder method is the ultimate proof that you don’t need a culinary degree to cook like an absolute pro. You just need to understand the ‘why’ behind the recipe. So go ahead, reclaim your weekend wing night. Ditch the terrifying vat of boiling oil, banish the soggy microwave takeout, and get ready to experience a crunch so loud it will wake up your neighbors. You’ve got this. Now get into the kitchen and show those wings who’s boss.


