Picture this: It is a chilly Sunday afternoon, and you have decided to channel your inner rustic artisan. You are making a gorgeous, soul-warming Tuscan ribollita, or perhaps a deeply spiced Texas chili. You did everything right. You bought the beautiful heirloom beans, you soaked them overnight, and you have been gently simmering them on the stove for what feels like three geological eras. The kitchen smells divine. You dip a wooden spoon into the pot, scoop out a single, plump bean, blow on it, and take a bite.
It shatters against your molars like a gravel pebble.
You simmer them for another hour. Still crunchy. You add more water and crank up the heat. Two hours later, the surrounding liquid has reduced to a thick sludge, yet the beans themselves remain defiantly, aggressively hard. You are frustrated, hungry, and ready to order takeout.
Listen to me, my beautiful, ambitious home cooks: you are not cursed, and you are not a bad cook. You have simply fallen victim to the invisible, ruthless laws of cellular biochemistry. As your resident Sassy Sous-Chef, I am here to tell you that professional-level results are completely achievable in your standard home kitchen, but only if we stop relying on old wives’ tales and start respecting the science of our food. Today, we are stripping away the pretentious chef-speak and diving deep into the microscopic anatomy of legumes. We are going to explore exactly why your dried beans refuse to soften, the chemical villains responsible for ruining your dinner, and the foolproof, science-backed methods to fix it permanently.
The Anatomy of a Bean: Biochemistry for the Home Cook
To understand why a bean stays hard, we first have to understand what a bean actually is. You do not need a culinary degree to grasp this, but you do need to pay attention, because this is where the magic happens.
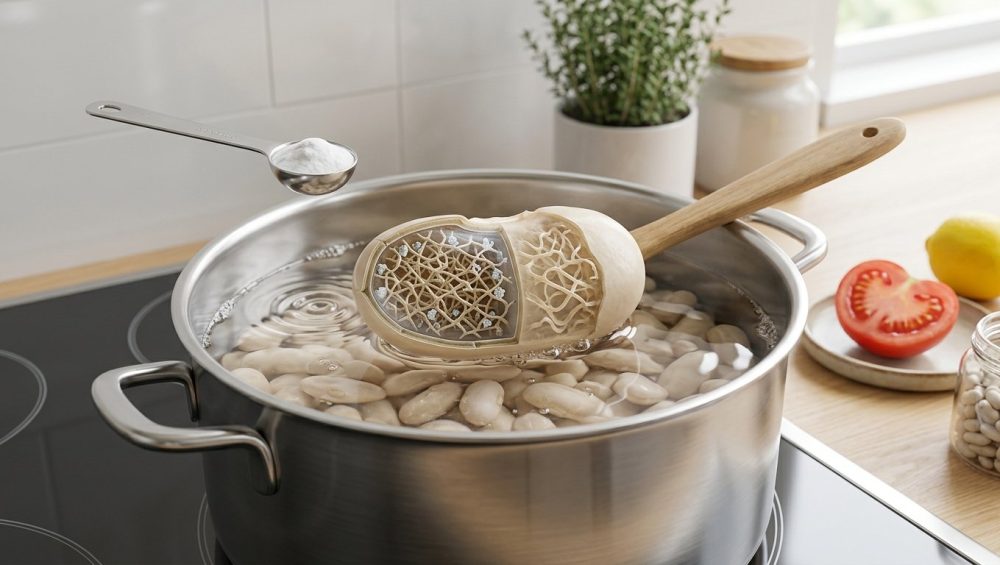
A dried bean is essentially a dormant seed. It consists of a protective outer seed coat and inner cotyledons, which are packed tight with complex carbohydrates (starch granules) and proteins. When a bean is raw and dried, its cellular structure is locked in a dehydrated, crystalline state.
Cooking a bean is not just about making it hot; it is about achieving a process called starch gelatinization. Starch gelatinization is the irreversible loss of the molecular order of the starch granules. When exposed to heat and excess water, these tight starch granules begin to absorb moisture, swell up, and eventually lose their crystalline structure, transforming into the creamy, tender texture we all crave. This gelatinization process typically kicks off between 60°C and 90°C (140°F to 194°F).
But here is the catch: before the hot water can reach the starch granules to work its gelatinizing magic, it has to get past the bouncer at the door. That bouncer is the plant cell wall.
The cell walls of a bean are held together by a complex polysaccharide “glue” known as pectin. In a neutral, happy cooking environment, prolonged heat gradually breaks down and dissolves this pectin. As the pectin glue melts away, the individual cells separate, allowing water to flood in, swell the starches, and render the bean wonderfully soft.
However, pectin is a highly temperamental polymer. It reacts aggressively to its chemical environment. If you introduce the wrong elements into your cooking pot at the wrong time, that pectin glue will not dissolve. Instead, it will chemically reinforce itself, locking the cell walls into an impenetrable fortress that no amount of boiling water can breach. Let’s meet the culprits.
Culprit #1: The Acid Trap
This is the number one mistake I see weekend culinary hobbyists make, and it breaks my heart every single time. You are making a chili, so you dump a large can of crushed tomatoes into the pot with your raw beans. Or perhaps you are making a French stew, so you pour in a generous splash of white wine.
You have just chemically guaranteed that your beans will never, ever soften.
Pectin is extraordinarily sensitive to pH levels. When you cook beans in a neutral environment (a pH around 7.0), the heat easily weakens the plant-cell glue. But the moment you introduce an acidic ingredient—like tomatoes, wine, vinegar, or citrus—you drop the pH of the cooking liquid. In an acidic environment (specifically a pH below 5.5), the methyl-esterified bonds within the pectin matrix become highly stable.
Instead of dissolving, the pectin shifts into a tightly bound state. The acid promotes the cross-linking of these polysaccharides, tightening the cellular glue into a highly heat-resistant network. You are essentially shrink-wrapping the starch granules inside a web of reinforced polymers. Once this acidic cross-linking occurs, the water cannot penetrate the cell walls, and the starch cannot gelatinize.
This is exactly why adding tomatoes too early is a death sentence for your legumes. Now, do not misunderstand me. I am not saying you should avoid acid altogether. In fact, your dinner actually needs acid to brighten the dish and balance the rich, earthy flavors of the beans. The secret is not elimination; it is timing. We will get to the solution shortly.
Culprit #2: The Hard Water Conspiracy
Let’s say you were a good student. You didn’t add any tomatoes. You didn’t add any wine. You just boiled your beans in plain old tap water, and yet, four hours later, they are still crunchy. What gives?
The answer might be flowing right out of your kitchen faucet.
If you live in an area with “hard water,” your tap water is loaded with dissolved minerals, specifically divalent cations like calcium and magnesium. While these minerals are perfectly fine for your health, they are an absolute menace to the pectin in your beans.
When calcium ions enter the cooking pot, they seek out the free carboxylic groups of the pectin molecules. The calcium acts as a bridge, linking adjacent pectin polymers together to form what chemists call insoluble calcium-pectates. Think of the pectin as a brick wall, and the calcium as high-strength industrial cement.
As the heat of the stove activates an enzyme in the beans called pectin methylesterase (PME), the pectin is de-methoxylated, which only accelerates and promotes the formation of these rigid calcium-pectin complexes. This cross-linking renders the bean cells incredibly resistant to water absorption. The adjacent cells completely fail to separate upon cooking, leaving you with a pot of impenetrable, hard little stones.
Culprit #3: The “Hard-to-Cook” (HTC) Defect
Sometimes, the fault does not lie with your cooking liquid at all. Sometimes, the beans were doomed before you even opened the bag.
In the world of food science, there is a well-documented phenomenon known as the “Hard-to-Cook” (HTC) defect. This textural defect occurs when dried legumes are stored for prolonged periods in adverse conditions, specifically environments with high temperatures (above 25°C or 77°F) and high relative humidity (above 65%). If that bag of navy beans has been sitting in the back of your sweltering pantry for three years, they have likely developed the HTC defect.
When beans age poorly, a cascade of disastrous biochemical reactions takes place inside the seed. First, lipid oxidation and membrane degradation occur, meaning the internal cellular membranes break down. This allows stored phytic acid to degrade. Normally, phytic acid safely holds onto minerals like calcium and magnesium inside the bean. But when the phytate breaks down, those cations migrate directly to the cotyledon cell walls.
Simultaneously, phenolic acids (like caffeic and ferulic acids) begin to accumulate and bind heavily to the water-soluble pectin fraction—often at levels twice as high as in fresh beans.
The result? The calcium and magnesium naturally present inside the bean form massive cross-links with the pectin, while the phenolic compounds waterproof the exterior. The beans become structurally petrified. No matter how long you boil an HTC bean, it will never achieve a creamy texture because its internal architecture has been permanently altered.
The Master Solutions: Hacking the Chemistry
Alright, enough doom and gloom. We are home cooks, but we are resourceful, and we are about to use chemistry to bend these legumes to our will. If you want consistently creamy, mind-blowing beans without spending your entire weekend hovering over a stove, you must follow these precise, verified solutions.
Solution 1: The Alkaline Advantage (The Baking Soda Hack)
If acidic environments (low pH) reinforce pectin and prevent softening, what happens if we do the exact opposite? What happens if we create an alkaline environment (high pH)?
Magic happens, that’s what.
Pectin’s methyl-esterified bonds hydrolyze rapidly in alkaline conditions (a pH above 8.0). By slightly raising the alkalinity of your cooking water, you radically accelerate the breakdown of the pectin matrix and the hemicellulose in the cell walls.
To achieve this, you need a common pantry staple: sodium bicarbonate, better known as baking soda. Adding exactly 0.25 teaspoons of baking soda per pound of dried beans to your soaking or cooking water is the ultimate game-changer. This tiny adjustment raises the pH just enough to rapidly dissolve the cellular glue, allowing the water to rush in and gelatinize the starches in a fraction of the normal time. It is the exact same biochemical principle behind the secret to tender meat used in traditional restaurant velveting techniques.
A word of caution: do not exceed the 0.25 teaspoon ratio. If you dump a whole tablespoon of baking soda into the pot, you will raise the pH too high, which will saponify the fats, destroy essential B-vitamins like thiamin, and leave your beans tasting like a bar of soap. Precision is key.
Solution 2: The Sodium Displacement Theory (Brining Your Beans)
For decades, old-school culinary wisdom dictated that you should never salt your beans until they are fully cooked, lest the salt make the skins tough. I am here to tell you that this is a complete myth, and science proves it.
Salt does not make beans tough; it actually helps them soften.
Remember our enemy, the divalent calcium cation, which builds those rigid salt bridges in the pectin? Table salt is sodium chloride. Sodium is a monovalent cation, meaning it only has a single positive charge. When you soak or cook your beans in salty water, the abundant sodium ions actively compete with and displace the calcium and magnesium ions in the bean skins. Because sodium only has one charge, it cannot form the strong cross-links that calcium does.
By replacing the calcium with sodium, the pectin matrix is weakened, allowing the beans to hydrate faster and cook more evenly. So please, salt your bean water. It seasons the legume from the inside out and actively prevents the skins from blowing out while the interior cooks.
Solution 3: Strategic Ingredient Sequencing
We have established that acid is the enemy of pectin breakdown. Therefore, you must practice strict ingredient sequencing.
You must delay the integration of all acidic ingredients—tomatoes, wine, vinegar, citrus juice, and even molasses (which is both acidic and rich in calcium)—until after primary starch gelatinization has occurred.
You must test your beans by tasting them. Only when they are completely tender and creamy all the way through should you add your acid. Once the starches are gelatinized and the beans are soft, adding acid is actually highly beneficial! The sudden drop in pH will lock the remaining pectin in place, preventing the beans from turning into a mushy paste as they continue to simmer in your chili or stew.
Gear Check: The Sassy Sous-Chef’s Stance on Cookware
We need to have a serious talk about your equipment. You cannot expect to execute precise thermodynamic and chemical reactions in a flimsy, warped pot you bought at a grocery store ten years ago. Starch gelatinization requires consistent, even heat. If your pot has hot spots, half your beans will turn to mush while the other half remain crunchy.
I am absolutely militant about banishing toxic kitchen gear from the home. I have zero patience for cheap, peeling non-stick coatings that off-gas chemicals into your food and warp the moment they look at a burner.
For cooking beans, you need thermal mass. You need a heavy-bottomed, multi-clad stainless steel pot, or a high-quality enameled cast-iron Dutch oven. These materials retain heat beautifully, ensuring the cooking liquid maintains the gentle, steady simmer required for even gelatinization. Furthermore, enameled cast iron and stainless steel are non-reactive. If you try to simmer an acidic bean stew in an unlined aluminum pot, the acid will strip the metal, and suddenly your tomato sauce tastes metallic and ruined.
If you are serious about cooking legumes from scratch, a stovetop or electric pressure cooker is also a phenomenal investment. The high-pressure environment drives water into the starch granules rapidly, cutting cooking times down by 70% and muscling past even the most stubborn pectin networks. These are the core beginner kitchen tools that will instantly elevate your cooking from amateur hour to kitchen artistry.
The Foolproof Bean Protocol: Step-by-Step
Now that you are armed with the biochemistry, let’s put it into practice. Here is my definitive, no-nonsense protocol for perfectly tender dried beans, every single time.
Step 1: The Sort and Rinse
Do not skip this. Spread your dried beans on a baking sheet and pick out any shriveled, discolored beans, and the inevitable tiny rocks that snuck into the bag. Rinse them thoroughly in a colander to remove surface dust.
Step 2: The Brine (The Weekend Method)
If you have the time, brining is superior to plain water soaking. Dissolve 3 tablespoons of kosher salt in 4 quarts of water. Submerge your beans and let them soak at room temperature for 8 to 12 hours. The sodium will displace the calcium in the skins, ensuring they cook evenly without bursting. Drain and rinse the beans before cooking.
Step 3: The Simmer and The Baking Soda Hack
Place your beans in your heavy-bottomed Dutch oven. Cover them with at least two inches of fresh water or unsalted broth. If you know you have hard tap water, or if you skipped the brining step, add exactly 0.25 teaspoons of baking soda per pound of beans right now.
Bring the pot to a rolling boil for 10 minutes. This neutralizes certain toxins found in raw beans (like phytohaemagglutinin in kidney beans). Then, reduce the heat to a gentle simmer. Keep a close eye on the heat level so you don’t end up in a situation where your pasta pot boils over—baking soda can cause the bean liquid to foam up slightly at first.
Step 4: The Aromatic Infusion
Add your aromatics now: half an onion, whole cloves of garlic, a bay leaf, or a parmesan rind. Do not add tomatoes, wine, or vinegar. Cover the pot with a tight-fitting lid, leaving it slightly cracked to allow a tiny bit of steam to escape.
Step 5: The Acid Finish
Check your beans after 45 minutes, and then every 15 minutes thereafter. Once they are completely creamy and tender to the bite, you may finally add your acidic ingredients. Stir in your crushed tomatoes, your splash of sherry vinegar, or your wine, and let the pot simmer for another 15 minutes so the flavors can marry.
This structured, scientific approach is exactly how you master simple weeknight dinners without relying on sodium-packed canned goods.
Troubleshooting: Rescuing the Uncookable
Let’s address the elephant in the room. What if you are reading this article while standing over a pot of beans that you have already ruined? What if you already added the tomatoes, the beans have been boiling for five hours, and they are still hard?
I am going to give it to you straight: you cannot easily reverse calcium-pectate cross-linking once it has been locked in by acid and prolonged heat. The chemical bridges have been built, and the starch granules are trapped. Adding baking soda at this late stage will just make your acidic broth taste like a science experiment gone wrong.
But we do not throw away food in this kitchen. surviving kitchen disasters is a rite of passage, and it teaches you resilience.
If your beans are stubbornly crunchy, pivot your menu. Drain the beans (reserve the liquid), throw them into a food processor, and blend them into a rustic dip or spread. The mechanical sheer force of the food processor blades will physically shatter the rigid cell walls that the heat could not dissolve. Add plenty of olive oil, garlic, and lemon juice, and serve it with toasted pita.
Alternatively, if you own a pressure cooker, you can transfer the stubborn beans into it and blast them at high pressure for 30 minutes. The extreme temperature (which exceeds the boiling point of water) and intense pressure can sometimes force the starch to gelatinize despite the fortified pectin walls.
Failing to soften legumes is one of the most classic beginner cooking mistakes, so do not beat yourself up over it. You have just learned a profound lesson in food chemistry.
The Final Word
Cooking is often romanticized as an intuitive art form, passed down through generations of grandmothers measuring ingredients by the handful. And while there is absolute truth to the soulfulness of cooking, the foundation of every great meal is hard, undeniable science.
Your kitchen is a laboratory. The ingredients are your reagents, your stove is your Bunsen burner, and you are the head chemist. When you understand the cellular structure of your food—when you know that pectin tightens in acid and dissolves in alkalinity, and that calcium builds walls while sodium breaks them down—you stop guessing. You stop hoping the recipe works, and you start knowing it will.
You do not need a Michelin star or a fancy culinary degree to make mind-blowing food. You just need a little bit of patience, a healthy dose of snark, and the willingness to respect the biochemistry of your ingredients. Now get out there, sort your legumes, measure out your baking soda, and show those beans who is boss.