The Wallpaper Paste Problem: Why Your Oatmeal Currently Sucks
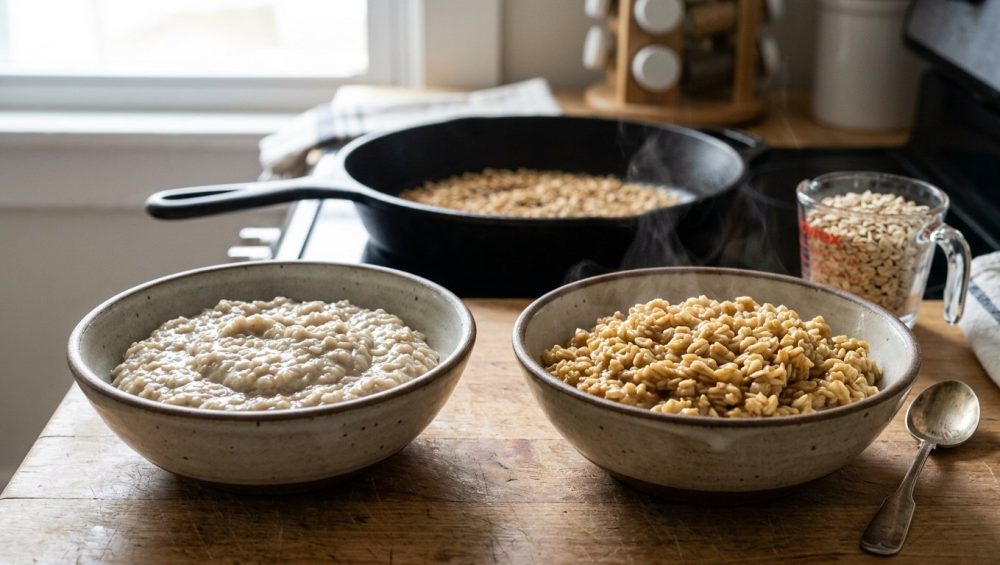
Listen up, weekend warriors. We need to have a serious conversation about your breakfast. I know exactly what is happening in your kitchen on a Tuesday morning. You are staring down a bowl of gray, gelatinous sludge that looks less like a nourishing meal and more like it belongs on the back of a vintage roll of wallpaper. You followed the package directions, you boiled the water, you dumped in the oats, and somehow, you ended up with a sticky, gummy, unappetizing mess that coats the roof of your mouth like industrial spackle.
You force it down because it is “healthy,” but let us be brutally honest: it is a culinary tragedy. I firmly believe that anyone can cook like an expert without a culinary degree, but that requires understanding the ingredients you are working with. You cannot just throw raw grains into boiling water and hope for the best. To fix this tragedy, we first have to understand the cellular biology of the oat and the physics of what happens when it hits hot water. If you are tired of making rookie kitchen mistakes before you have even had your first cup of coffee, it is time to rethink your entire approach to this humble grain.
The Anatomy of an Oat Groat
To understand why your oatmeal is turning into glue, you have to look at the anatomy of the oat groat itself. A whole oat groat consists of three main parts: the bran, the endosperm, and the germ. The bran is the fibrous outer layer, packed with antioxidants and B vitamins. The germ is the reproductive core, containing healthy fats. But the endosperm—the massive middle layer—is where our textural problems begin and end.
The endosperm is essentially a massive storage locker for carbohydrates. It is packed full of starch granules and a very specific type of soluble fiber called beta-glucan. Beta-glucan is an absolute superstar for your cardiovascular health—it binds to cholesterol and helps sweep it out of your body. However, from a culinary perspective, beta-glucan is a nightmare. It is a non-starch polysaccharide that, when exposed to water, forms a highly viscous, shear-thinning mucilage. In plain English? It turns into slime. It is the exact same biological mechanism that makes okra slimy.
The Science of Slime: Starch Gelatinization
But beta-glucan is only half the battle. The real culprit behind your gummy breakfast is a process called starch gelatinization. The starches inside the oat’s endosperm are composed of two distinct molecules: amylose and amylopectin. Amylose is a linear, tightly packed molecule, while amylopectin is highly branched.
When you drop raw oats into hot liquid, the starch granules act like microscopic sponges. For oat starch, this gelatinization process kicks off at an incredibly low temperature—usually between 55°C and 60°C (131°F to 140°F). As the water heats up, the granules absorb the liquid and begin to swell rapidly. Eventually, the structural integrity of the granule collapses. It bursts open, violently expelling its amylose content directly into the surrounding water.
This creates a highly viscous, sticky web that thickens the liquid. The longer you cook it, and the hotter it gets, the more it thickens, with the viscosity peaking at around 95°C (203°F). In the culinary world, this advanced stage of gelatinization is known as “pasting.” Pasting is great if you are trying to thicken a gravy, but it is an absolute disaster if you want distinct, chewy grains in your breakfast bowl. You are essentially eating a bowl of ruptured starch balloons suspended in beta-glucan mucilage. No wonder you want to skip breakfast.
The Two-Minute Fix: Why Toasting Your Oats Changes Everything
I am a busy professional. During the week, my mantra is that time is money. I survive on efficiency, clever shortcuts, and rigorous meal planning. I do not have time for overly complicated, multi-step morning routines. But I will gladly sacrifice exactly two minutes of my morning to perform a technique that fundamentally alters the chemical structure of my breakfast.
The secret to perfect, restaurant-quality oatmeal is shockingly simple: you must toast your raw oats in a skillet before any liquid ever touches them. This is not a frivolous extra step; it is a scientifically backed preparation method that fixes the pain point of slimy oatmeal permanently. Understanding the science behind this will instantly cure cooking anxiety and give you total control over the texture of your food.
Dextrinization: The Magic of Dry Heat
When you apply dry heat to a starch, you trigger a transformative chemical reaction known as dextrinization. As you toss your raw oats in a hot skillet, the surface temperature of the grain rapidly climbs to between 140°C and 165°C (280°F to 330°F). At these high temperatures, the intense thermal energy begins to aggressively attack the complex starch molecules on the surface of the oat.
The heat literally breaks the alpha-1,4 glycosidic bonds that hold the massive amylose and amylopectin chains together. These long, complex starches are shattered into much smaller, simpler fragments called dextrins. Why does this matter to your Tuesday morning breakfast? Because dextrins behave entirely differently in water than intact starches do.
Dextrins do not have the structural capacity to absorb massive amounts of water, swell, and burst. By toasting the oats in a skillet, you are essentially “locking” the exterior of the grain. You are building a protective, dextrinized armor around the oat. When you finally introduce the boiling water, this armor prevents the oat from instantly disintegrating into mush. The water is forced to absorb much more slowly, resulting in an oat that maintains its structural integrity. It becomes satisfyingly chewy, distinct, and robust, rather than dissolving into a homogenous, gluey paste.
The Maillard Reaction: Unlocking Hidden Flavor Compounds
We are not just dextrinizing starches for the sake of texture; we are also chasing flavor. Raw oats taste like dusty cardboard. They are a blank, uninspiring canvas. But when you apply dry heat, you initiate the Maillard reaction.
This is the exact same complex, non-enzymatic browning process that gives a seared ribeye steak its savory crust, turns pale dough into golden bread, and makes roasted coffee smell divine. It occurs when amino acids (proteins) react with reducing sugars in the presence of heat. Just like mastering the maillard reaction when searing a piece of meat, browning your grains unlocks a completely different dimension of culinary potential.
As the oats toss in the hot skillet, hundreds of brand-new flavor compounds are rapidly generated. The pale, beige flakes transform into a rich, golden tan. Your kitchen will suddenly fill with the intoxicating aroma of toasted nuts, warm butterscotch, and deep caramel. You are taking a bland, utilitarian staple and turning it into a gourmet ingredient with zero extra effort.
The Lipid Barrier: Why Butter is Your Best Friend
You can certainly dry-toast your oats in a bare skillet, and the dextrinization will work perfectly fine. But if you want to eat like a weekend culinary hobbyist who knows their way around a kitchen, you need to introduce a little bit of fat. Specifically, you need butter.
Melting a tablespoon of unsalted butter into the skillet before adding the oats accomplishes two vital things. First, the butter itself undergoes a chemical transformation. Standard American butter is roughly 80% butterfat, 18% water, and 2% milk proteins and sugars. When it hits the hot pan, the water boils off, and the milk solids begin to fry in the butterfat. This creates beurre noisette, or brown butter, layering complex, nutty, caramelized notes directly into the oats.
Second, and more importantly for our texture, the melted butterfat coats the exterior of every single oat. Lipids are hydrophobic—they repel water. By wrapping the dextrinized oats in a microscopic layer of fat, you are creating a secondary barrier against moisture. When you finally add the simmering liquid, the fat coating acts as a speed bump, slowing down the hydration process even further. This guarantees an incredibly firm, chewy, distinct texture that will make you completely rethink what oatmeal can be.
The “No-Go” Rule: Ditch the Toxic Cookware
Before you eagerly run to your stove to start toasting, we need to have a serious talk about your equipment. If you have read any of my previous reviews, you know I have a strict, uncompromising “No-Go” rule when it comes to cheap, toxic kitchenware. I absolutely despise it, and I will not let you ruin your health or your breakfast by using garbage tools.
The Dark Side of Cheap Non-Stick Pans
If you are planning to toast your oats in a lightweight, scratched-up Teflon pan that you bought at a discount store five years ago, stop immediately. Throw it in the trash. I am fiercely passionate about banishing toxic kitchen gear from your home, because the science is terrifying.
Traditional non-stick pans are coated with polytetrafluoroethylene (PTFE). When you use a pan for normal, wet cooking (like boiling soup), the temperature rarely exceeds the boiling point of water (100°C / 212°F). But when you are dry-toasting ingredients like oats, the surface temperature of the pan can spike incredibly fast. Above 260°C (500°F), PTFE coatings begin to rapidly degrade and break down.
When this happens, the pan off-gasses toxic, invisible fumes. These fumes are so lethal they can instantly kill pet birds kept in the same room, and they cause a condition in humans known as “polymer fume fever” or “Teflon flu,” characterized by severe chills, headaches, and fever. Furthermore, as these cheap pans age, the chemical coating begins to blister and peel, flaking microscopic bits of mystery plastics directly into your food. We do not tolerate forever chemicals in this kitchen. You deserve better.
Carbon Steel: The Culinary Workhorse
To safely dry-toast oats at high temperatures, you need cookware that can handle the heat without throwing a chemical temper tantrum. My absolute favorite tool for this job is a carbon steel skillet.
Carbon steel is the unsung hero of the professional kitchen. It is relatively lightweight, highly responsive to temperature changes, and possesses incredible thermal conductivity. Best of all, when properly seasoned with polymerized oil, it develops a completely natural, chemical-free, non-stick patina. Once you learn the basic thermodynamic tricks for preventing protein adhesion on natural metals, you will realize you never needed those cheap synthetic coatings in the first place. Carbon steel gets screaming hot, holds the heat beautifully, and toasts oats to golden perfection in minutes.
Cast Iron and Tri-Ply Stainless: The Heavy Hitters
If you do not have carbon steel, a traditional cast iron skillet is your next best option. Cast iron has massive thermal mass. It takes a few minutes to properly preheat, but once it gets hot, it stays hot. It radiates heat incredibly evenly, ensuring that your oats toast uniformly without scorching in hot spots.
Alternatively, a high-quality, fully clad tri-ply stainless steel skillet is a phenomenal choice. It will not give you the non-stick properties of seasoned iron, but for the dry-toasting phase, it does not matter. Stainless steel is indestructible, non-reactive, and perfectly safe at high temperatures.
Choosing Your Fighter: A Masterclass in Oat Varieties
You can have the best technique and the most expensive carbon steel skillet in the world, but if you start with the wrong raw ingredients, your breakfast is doomed. Not all oats are created equal. The industrial milling process drastically alters how the grain behaves in your kitchen. Stocking your pantry with the correct, high-quality whole grains is just as critical as having the essential tools every beginner needs for success.
The Absolute Ban on Instant Oats
Let me be unequivocally clear: instant oats (also marketed as “quick oats”) are permanently banned from my kitchen, and they should be banned from yours. Instant oats are a highly processed convenience food masquerading as health food.
During manufacturing, these oats are heavily steamed to fully gelatinize their starches in the factory. They are then run through massive industrial rollers that press them paper-thin, and finally, they are dehydrated. Because their cellular structure has already been decimated, they are designed to instantly dissolve into a mushy paste the second hot water touches them. You cannot save them. If you try to toast instant oats in a skillet, their paper-thin profile will cause them to burn to a bitter, blackened crisp in seconds. Leave them on the supermarket shelf.
Rolled Oats (Old Fashioned)
Rolled oats, often labeled as “old fashioned oats,” are the standard workhorse of the baking and breakfast world. These are whole oat groats that have been lightly steamed to make them pliable, and then rolled flat. However, unlike instant oats, they are rolled relatively thick, leaving much of their cellular structure intact.
Because they still have some structural integrity, rolled oats hold up beautifully to the skillet toasting method. The dextrinization process works perfectly on their broad, flat surfaces. When cooked, toasted rolled oats will yield a bowl that is pleasantly creamy but still retains a distinct, satisfying chew.
Steel-Cut Oats
If you are a true texture fanatic, steel-cut oats are the undisputed king of the breakfast table. These are whole, unrolled oat groats that have simply been chopped into two or three pieces with a massive steel blade. They have never been steamed, and they have never been flattened.
Because they are so dense, steel-cut oats take significantly longer to cook (usually 20 to 30 minutes on the stovetop). But the payoff is immense. Toasting steel-cut oats takes them from “pretty good” to “mind-blowing.” The dry heat penetrates the dense little nuggets, enhancing their naturally robust flavor. When finally simmered, they do not turn into a porridge at all. Instead, they remain distinct, caviar-like pearls that pop beautifully between your teeth.
The Masterclass: How to Toast and Cook Oats Like a Pro
Now that we understand the science of dextrinization, the chemistry of the Maillard reaction, and the importance of safe cookware, it is time to execute. This workflow is highly optimized. It is the exact same mindset I apply to simple weeknight dinners: maximize the flavor output while strictly minimizing the active labor time. Here is the foolproof, step-by-step masterclass.
Step 1: The Skillet Preparation and The Melt
Place your carbon steel, cast iron, or stainless steel skillet over medium heat. Do not crank the dial to high; we want controlled, even heat to prevent scorching. Add one tablespoon of unsalted butter (or coconut oil, if you are strictly dairy-free) for every one cup of dry oats you plan to cook.
Allow the butter to melt completely. You want to see it begin to foam gently as the water content boils off. Do not let the butter brown on its own just yet—we want the milk solids to brown simultaneously with the oats so the flavors marry perfectly.
Step 2: The Active Toasting Phase
The moment the butter is foaming, dump in your rolled or steel-cut oats. Immediately grab a silicone spatula or a wooden spoon and start moving them around. You must keep the oats in near-constant motion. The skillet is hot, and if the oats sit stationary for too long, the ones touching the metal will scorch while the ones on top remain raw.
Watch them like a hawk. You are relying on two primary sensory cues here: visual and olfactory. Visually, you will watch the pale, dusty oats transform. The edges will darken, and the entire batch will take on a rich, golden, sandy hue.
But the true indicator of success is the smell. Suddenly, usually around the three-to-five-minute mark, your kitchen will be hit with a massive wave of aroma. It will smell intensely of toasted pecans, warm baking spices, and caramelized butter. The second you smell that intoxicating fragrance, the dextrinization is complete. Pull the skillet off the heat immediately.
Step 3: The Liquid Ratio and Temperature Shock Prevention
Here is where 90% of home cooks ruin their hard work. Do not, under any circumstances, take your screaming hot, perfectly toasted oats and dump them into a pot of cold tap water. The violent temperature shock will cause the starches to seize, leading to uneven, unpredictable cooking times.
Instead, you should have your cooking liquid already simmering in a separate saucepan while you were toasting the oats. You can use water, whole milk, almond milk, or a 50/50 split of water and milk. The standard ratio is 1:2 (one part oats to two parts liquid) for rolled oats, and 1:3 for steel-cut oats.
Before adding the oats, add a generous pinch of kosher salt to the simmering liquid. I cannot stress this enough: oatmeal cooked without salt is a bland, tragic crime against flavor. Salt enhances the perception of sweetness and amplifies the nutty, toasted notes you just worked so hard to build.
Step 4: The Science of the Gentle Simmer
Carefully pour the hot, toasted oats into the simmering liquid. Be cautious, as the hot fat on the oats may cause the liquid to sputter aggressively for a second. Give it one gentle stir to ensure nothing is sticking to the bottom of the pot.
Now, lower the heat to the absolute lowest setting that maintains a gentle, lazy bubble. Cover the pot with a tight-fitting lid. Do not subject the oats to a violent, rolling boil. A furious boil creates massive kinetic agitation, physically smashing the oats against each other and the walls of the pot. This physical trauma will break through your carefully crafted dextrinized barrier, forcing the starches to leak out and causing the oatmeal to turn gummy anyway.
Let them simmer in peace. For rolled oats, this will take about 10 to 12 minutes. For steel-cut oats, expect 20 to 25 minutes. Once the liquid is absorbed and the oats are tender but chewy, remove the pot from the heat and let it rest, covered, for three minutes. This resting period allows the remaining surface moisture to redistribute evenly.
Troubleshooting Your Morning Bowl
Even with a flawless technique, the kitchen is a dynamic environment. If things go slightly sideways, you need to know how to diagnose the problem.
Burnt Oats vs. Toasted Oats
There is a razor-thin line between deeply toasted and burnt. If your oats start to smoke in the skillet, or if they smell acrid and bitter rather than sweet and nutty, you have pushed the temperature too high. Burnt oats cannot be saved; the carbonized flavor will permeate the entire pot of water. If you burn them, throw them out, wipe the skillet, and start over. It is only two minutes and fifty cents worth of grains. Lower your heat next time.
The Hard Water Factor
If you live in an area with extremely hard tap water, you might notice that your oats take significantly longer to soften, even when simmered properly. This is not your fault; it is chemistry. The high levels of calcium and magnesium in hard water physically cross-link with the pectins and starches in the oat’s cell walls, reinforcing them and making them highly resistant to breaking down. If you find your oats are constantly too tough, try cooking them with filtered water, or add a tiny splash of lemon juice to the simmering liquid. The slight acidity helps break down those mineral bonds.
Elevating the Bowl: Advanced Flavor Architecture
Once you have mastered the texture, you have a perfect, nutty, chewy canvas. Now it is time to build flavor architecture. Taking an extra thirty seconds to arrange your toppings beautifully is a fantastic way to practice the art of food plating before you even start your busy day.
The Sweet and Acidic Balance
Because your toasted oats already possess deep notes of caramel and butterscotch from the Maillard reaction, you do not need to drown them in refined white sugar. They are naturally complex.
Instead, focus on balancing that deep richness with brightness and acidity.
- The Berry Bomb: Top your bowl with fresh, tart raspberries or blackberries, a dollop of unsweetened Greek yogurt, and a sprinkle of raw chia seeds. The sharp, lactic tang of the yogurt and the bright acidity of the berries perfectly cut through the heavy, buttery richness of the toasted oats.
- The Classic Maple: If you want pure comfort, use a light drizzle of real, 100% pure maple syrup (throw away the high-fructose corn syrup imitation brands), a splash of heavy cream, and a handful of dry-toasted pecans to double down on the nutty flavor profile.
The Savory Oatmeal Revolution
If you have never experienced savory oatmeal, your culinary life is about to change forever. Because toasted oats retain their chewy, distinct texture, they act remarkably similar to a hearty risotto, farro, or barley. They are begging for umami.
- The Umami Bowl: Top your freshly cooked, toasted oats with a crispy, olive-oil-fried egg. Add a generous drizzle of spicy chili crisp, a handful of thinly sliced scallions, and a tiny splash of high-quality soy sauce. When you break the egg, the rich, runny yolk coats the chewy oats, creating a luxurious, savory sauce that is completely out of this world.
- The Italian: Stir a handful of freshly grated Parmigiano-Reggiano and a heavy crack of black pepper directly into the hot oats. Top with blistered cherry tomatoes and torn fresh basil. It is essentially a ten-minute breakfast risotto.
Beyond the Morning Bowl: Advanced Toasting Applications
Bulk Meal Prep and Oven Toasting Mechanics
I hear the complaints already: “But I don’t have five minutes to stand over a hot skillet on a Wednesday morning!” I completely understand. The beauty of dextrinization is that it is a permanent, stable chemical change. You do not have to toast your oats immediately before cooking them. You can batch-toast them on a Sunday afternoon and reap the rewards all week long.
To batch-toast, preheat your oven to 175°C (350°F). Take an entire large bag of rolled or steel-cut oats and spread them out in an even layer across a large, rimmed aluminum baking sheet. If you want the fat coating, you can toss the raw oats in a mixing bowl with a few tablespoons of melted butter or neutral oil before spreading them out.
Bake them in the oven for 10 to 15 minutes. You must pull the pan out halfway through and stir them thoroughly to ensure the oats on the edges don’t burn while the center remains raw. Once they are golden and your kitchen smells incredible, remove them from the oven and let them cool completely on the tray. When transferring the massive batch of cooled oats from the baking sheet to your storage jars, a trusty bench scraper makes scooping them up entirely effortless. Store them in an airtight glass container in your pantry, and they will stay fresh, toasty, and ready to boil for weeks.
Solving the Overnight Oats Slime Problem
Overnight oats have taken the meal-prep world by storm, but let us be brutally honest for a moment: they are frequently disgusting. When you soak raw, unprocessed oats in cold milk and yogurt for 12 to 24 hours, the liquid slowly and methodically leaches out that beta-glucan starch. Because there is no heat to evaporate the water, you are left with a cold, gelatinous, gluey slime that drips off the spoon in a deeply unappetizing way.
Toasting your oats before making overnight oats is the ultimate, transformative hack. Because the dextrinization process permanently alters the surface starches, the oats lose their ability to rapidly turn into slime, even when submerged in cold liquid for extended periods.
When you use pre-toasted oats for your overnight recipe, they will still absorb the milk and soften beautifully in the fridge, but they will maintain a distinct, slightly chewy bite. The texture is night and day. Furthermore, the nutty, caramelized flavor of the toasted grain infuses into the cold milk, creating a flavor profile that tastes like an expensive bakery treat. Having a batch of perfect, non-slimy overnight oats waiting in the fridge is the ultimate strategy for breaking your takeout habit and skipping the overpriced coffee shop pastries on your way to work.
The Final Verdict: Reclaiming Your Breakfast
Cooking is not about blindly following the vague, uninspired instructions printed on the back of a cardboard box. It is about understanding your ingredients, respecting the underlying science, and utilizing simple, accessible techniques to elevate the mundane into the extraordinary.
By taking exactly two minutes to toast your raw oats in a hot skillet, you are taking absolute control of the starch gelatinization process. You are actively preventing the dreaded wallpaper paste texture that has ruined so many breakfasts. You are building complex, nutty, buttery flavors through the magic of the Maillard reaction. And most importantly, you are proving to yourself that professional-level culinary results are absolutely achievable in a standard home kitchen.
Stop settling for mediocre, slimy oatmeal. You do not have to eat gray sludge in the name of health. Grab your favorite skillet, melt a pat of butter, and start toasting. Respect the grain, respect the science, and your breakfast will never be the same again.


