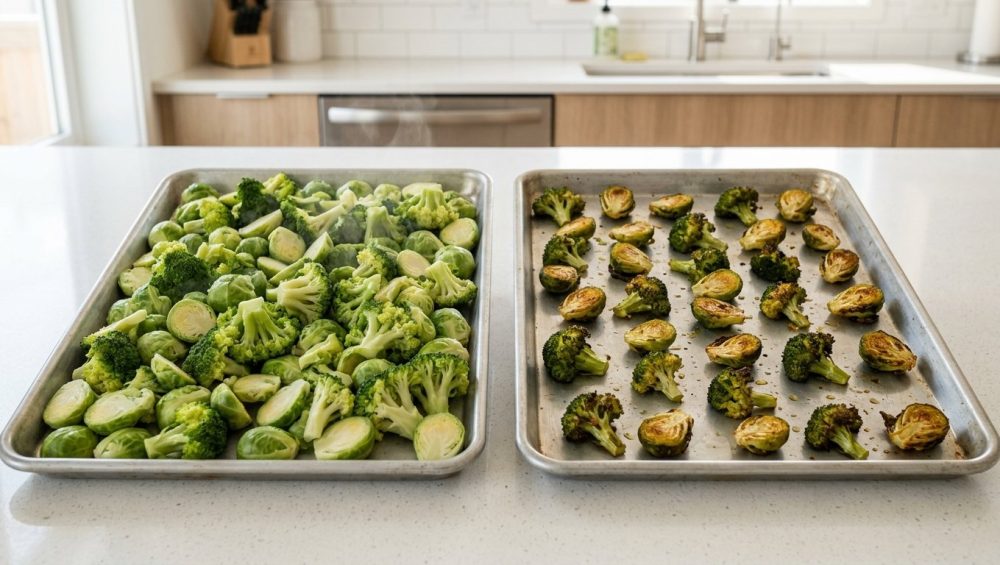
We need to talk about the sad, gray, limp elephant in the room. You know exactly what I am talking about. You come home after a long day, chop up some gorgeous, vibrant broccoli or zucchini, toss it on a baking sheet, and thirty minutes later, you pull out a tray of depressing, waterlogged mush. It is a tragedy. It is an insult to the vegetable kingdom. And honestly? It is one of the seven rookie kitchen mistakes that I see happen constantly.
But here is the good news: you do not lack culinary talent. You do not need a degree from Le Cordon Bleu to fix this. You just need a basic understanding of thermodynamics. Yes, we are going to talk about science today, but I promise to keep it highly practical and completely free of pretentious chef-speak. We are going to permanently solve the frustrating pain point of soggy side dishes, giving you the power to create restaurant-quality, blistered, caramelized vegetables right in your own kitchen. Let’s get into the precise food science of why your roasted veggies are currently failing, and the exact, actionable techniques you need to achieve perfect crunch every single time.
The Physics of the Mush: Why Your Pan is a Steam Room
Let’s start with a hard, undeniable biological fact: vegetables are essentially just delicious little water balloons. When you look at a zucchini, you might see a solid piece of produce, but from a molecular standpoint, you are looking at something that is over 92% water. Broccoli? About 90% water. Even seemingly dense root vegetables like potatoes and carrots are packed with moisture.
When you introduce these water-logged vegetables to the heat of your oven, that internal moisture rapidly heats up and begins to evaporate. This is where the physics of cooking comes into play. Water evaporates and turns into steam at 212°F (100°C). As long as liquid water is present on the surface of your vegetables, the temperature of that surface physically cannot exceed 212°F. The energy from the oven is entirely consumed by the phase change of turning water into vapor.
Now, why does this matter? Because the gorgeous, golden-brown crust you are trying to achieve—the flavor profile that makes roasted vegetables actually taste good—requires a chemical process called the Maillard reaction. And the Maillard reaction does not even begin to kick off until the surface temperature reaches roughly 285°F (140°C).
Do you see the conflict here? If your vegetables are trapped in a cloud of their own evaporating moisture, their surface temperature is hard-capped at 212°F. They are quite literally steaming themselves. You are not roasting; you are facilitating a vegetable sauna. Until that moisture is completely gone, your vegetables will remain pale, flabby, and thoroughly unappetizing. This is the exact moment when many home cooks give up and decide they just hate vegetables, when in reality, they just need to master a few simple weeknight dinners techniques to manage that moisture.
The 212°F vs. 285°F Battleground
To put it bluntly: steam is the ultimate enemy of browning. When you toss a mountain of wet broccoli onto a baking sheet, you are creating a microclimate of high humidity right on the surface of the pan. The oven might be set to 400°F, but the localized environment immediately surrounding your food is stuck at 212°F.
If you want to win this battle, your primary goal as a cook is to evacuate that water vapor as quickly and aggressively as possible. You need the surface of the vegetable to dry out so the temperature can spike past the 285°F threshold and trigger the Maillard reaction. Everything we do from this point forward—from the pan we choose to the way we chop—is entirely focused on winning this thermal battle.
The Maillard Reaction: The Holy Grail of Flavor
Before we get into the practical steps, we need to briefly worship at the altar of the Maillard reaction. Named after the French chemist Louis-Camille Maillard who first described it in 1912, this is the chemical reaction that occurs between amino acids (proteins) and reducing sugars when exposed to high heat.
When the surface temperature of your food surpasses 285°F, these proteins and sugars rapidly reorganize themselves into hundreds of brand-new, highly complex flavor compounds. It is the exact same reaction that gives a seared steak its savory crust, turns pale dough into a golden loaf of bread, and transforms raw coffee beans into a rich, aromatic morning brew.
When applied to vegetables, the Maillard reaction takes the natural, sometimes bitter or bland compounds of the plant and transforms them into deep, nutty, savory, and caramelized notes. It is the difference between a sad, boiled Brussels sprout that smells like a damp basement, and a crispy, charred, restaurant-style Brussels sprout that you cannot stop eating. If you want to cure cooking anxiety, mastering this single chemical reaction will do more for your confidence than a hundred complicated recipes.
The Crowding Catastrophe: Airflow is Everything
The single most common reason your vegetables are turning to mush is that you are aggressively overcrowding the baking sheet. I see it all the time: a home cook tries to save time by dumping two massive heads of chopped broccoli onto a single, standard-sized pan. The florets are shoulder-to-shoulder, overlapping, and practically suffocating each other.
Remember our lesson on steam? When vegetables are packed tightly together, the moisture evaporating from one piece immediately collides with the piece next to it. The steam gets trapped in the dense canopy of produce. There is no airflow to carry the vapor away, so the entire pan becomes a stagnant pool of 212°F humidity.
The Spatial Ratio Rule
If you want perfect crunch, you must respect the spatial ratio. Your vegetables need personal space. As a strict rule, you should aim to leave at least 25% to 50% of the baking sheet completely visible and empty. Every individual piece of vegetable should be surrounded by a buffer of hot, dry air.
This airflow acts as a ventilation system, immediately sweeping away the water vapor as it escapes the vegetable. With the steam gone, the dry heat of the oven can rapidly raise the surface temperature of the food past 285°F, initiating that beautiful browning process.
Yes, this means you might have to use two baking sheets instead of one. Yes, it means you might have to wash an extra pan. But remember my philosophy: time is money, and efficiency is key. It is infinitely more efficient to wash one extra pan than to spend forty-five minutes cooking a tray of garbage that ends up in the trash anyway. If you find yourself constantly throwing out spoiled produce because your roasting attempts failed, learning this spacing trick is the easiest way to stop throwing away sad veggies and actually enjoy eating them.
The “No-Go” Rule: Banishing Toxic Gear and Warped Pans
Now we arrive at my absolute biggest pet peeve in the culinary world. We need to talk about your equipment. If you are trying to roast vegetables on a cheap, flimsy, scratched-up non-stick baking sheet that you bought at a discount store five years ago, you are not just sabotaging your dinner—you are actively endangering your health.
I have a strict “No-Go” rule when it comes to toxic kitchenware, and I will not compromise on this. Traditional non-stick coatings are made from polytetrafluoroethylene (PTFE), commonly known by the brand name Teflon. While these coatings are heavily marketed for their convenience, they have a dark, highly toxic secret when exposed to the high heat required for proper roasting.
The Danger of Degradation
When a PTFE-coated pan is heated above 500°F (260°C), the chemical structure of the coating begins to break down. As it degrades, it releases toxic fumes into the air. Inhaling these invisible, odorless fumes can cause a condition literally known as “polymer fume fever” or the “Teflon flu,” which manifests as severe chills, headaches, fevers, and chest tightness. These fumes are so incredibly toxic that they are famously known to be immediately fatal to pet birds kept in the same house.
Furthermore, when these cheap pans are scratched by metal spatulas or abrasive sponges, the protective layer is compromised, allowing microplastics and potentially harmful underlying compounds to flake directly into your food. If you have ever wondered why your non-stick pans keep losing their slip, it is because the coating is literally degrading and ending up in your meals.
The Flimsy Pan Problem
Beyond the toxicity, cheap baking sheets are structurally deficient. They are made from extremely thin, low-gauge metal. When exposed to the high heat of a 425°F oven, the metal undergoes rapid thermal expansion. Because the pan is so thin, it cannot handle the stress, causing it to violently warp and “pop” in the oven.
When a pan warps, it is no longer flat. The oil and juices immediately run to the lowest corners of the pan, leaving the vegetables in the center completely dry and prone to burning, while the vegetables in the corners boil in a pool of liquid. If you are tired of wondering why your baking sheets keep warping, the answer is simple: they lack the thermal mass and structural integrity required for serious cooking.
The Heavy-Gauge Aluminum Advantage
So, if toxic non-stick is out, and cheap flimsy metal is out, what is the solution? The answer is the undisputed champion of the professional kitchen: the heavy-gauge, bare aluminum commercial half-sheet pan.
If you want to build a collection of beginner cooking essentials, a heavy-duty bare aluminum pan should be at the absolute top of your list. Here is the science of why aluminum is superior for roasting vegetables:
Superior Thermal Conductivity
Metals transfer heat at different rates. Aluminum has an exceptionally high thermal conductivity—roughly four times higher than stainless steel. This means that aluminum absorbs heat from the oven incredibly fast and distributes it evenly across the entire surface of the pan.
When you place a room-temperature vegetable onto a hot aluminum pan, the pan violently transfers its stored heat energy directly into the food. This rapid transfer jumpstarts the evaporation process, quickly boiling off the surface moisture so the Maillard reaction can begin.
Stainless steel, while incredibly durable and wonderfully non-toxic, is a poor conductor of heat. It takes much longer to heat up, which means your vegetables sit in a lukewarm environment for longer, slowly weeping their moisture and steaming themselves before the pan ever gets hot enough to sear them. And please, never try to roast vegetables at high heat in a glass casserole dish. Glass is an insulator, not a conductor, and thermal shock is the exact reason why your glass baking dish shattered the last time you tried to deglaze it.
A heavy-gauge aluminum pan (usually 18-gauge or 13-gauge) provides the perfect balance. It has enough thickness (thermal mass) to hold onto heat and resist warping, while possessing the conductive properties necessary to give your vegetables a blistering, restaurant-quality sear.
The 425°F Sweet Spot: Temperature Mastery
We have established that the Maillard reaction needs at least 285°F to occur. But you cannot just set your oven to 285°F and expect miracles. The ambient air in the oven needs to be significantly hotter to overcome the cooling effect of the evaporating water.
For the vast majority of roasting applications, 425°F (220°C) is the absolute sweet spot.
Why 425°F? It is a game of thermal balance. If you roast at 350°F, the oven is not hot enough to evaporate the escaping moisture quickly. The vegetables will slowly dehydrate, turning shriveled and mushy long before they ever develop a crust.
If you crank the oven to 500°F, you run into the opposite problem. The intense heat will aggressively char and burn the outside of the vegetable before the dense interior has time to cook through. You will end up with broccoli that is reduced to bitter, black ash on the outside, but remains raw and crunchy on the inside.
At 425°F, you hit the Goldilocks zone. It is hot enough to rapidly flash off moisture and trigger deep, savory browning, but gentle enough to allow the radiant heat to penetrate the vegetable, breaking down its tough cellular structure and rendering the inside tender and creamy.
The Preheating Power Move
Here is one of the most powerful, time-saving tricks in my arsenal, and it requires zero extra effort. While your oven is preheating to 425°F, place your empty heavy-gauge aluminum baking sheet inside the oven.
By preheating the pan, you are turning it into a thermal battery. When you finally toss your oiled vegetables onto the pan, you will immediately hear a loud, aggressive sizzle. That is the sound of the surface moisture instantly vaporizing on contact. You are giving the browning process a massive head start, completely bypassing the awkward, lukewarm steaming phase. This technique alone will drastically elevate your food and is one of the steps to culinary artistry that separates home cooks from professionals.
The Moisture Management Protocol
We have talked about how to handle moisture once the vegetables are in the oven, but your battle actually begins at the cutting board. If your vegetables are dripping wet before they even see a drop of oil, you have already lost.
The Drying Phase
After you wash your produce, you must dry it ruthlessly. I am not talking about a gentle pat. I mean you need to take a clean, lint-free kitchen towel or a paper towel and aggressively buff the water off your broccoli florets, bell peppers, and carrots.
Oil and water are sworn enemies. If a vegetable is wet, the roasting oil will simply slide off the surface and pool at the bottom of the bowl. The water will act as a physical barrier, preventing the hot oil from making contact with the plant tissue. Dry your vegetables like your dinner depends on it—because it does.
The Salting Strategy for High-Water Veggies
For extreme high-moisture vegetables like zucchini, eggplant, and summer squash (which, as we discussed, are over 92% water), simple towel-drying is not enough. You need to pull the moisture out from the inside.
This is where the magic of osmosis comes in. About ten to fifteen minutes before you plan to roast, chop your zucchini and toss it generously with kosher salt. Place it in a colander in the sink. The salt will draw the internal liquid to the surface. After ten minutes, you will see beads of sweat covering the vegetables. Take your towel and firmly blot all of that extracted moisture away. By removing this excess water weight beforehand, you guarantee a crispier, firmer final texture.
And while we are on the subject of seasoning, remember that salt is only half the equation. If your finished dish tastes flat or heavy, you don’t need more sodium. You need brightness. Learning to stop reaching for the salt and instead finishing your roasted veggies with a squeeze of fresh lemon juice or a dash of high-quality vinegar will completely transform the flavor profile.
Fat as a Thermal Conductor
Let’s clear up a massive misconception: we do not toss vegetables in oil just to make them taste good or to prevent them from sticking. In the context of roasting, oil serves a vital mechanical purpose: it is a thermal conductor.
Air is actually a remarkably poor conductor of heat. If you put a completely dry, un-oiled piece of potato onto a hot baking sheet, only the microscopic points of the potato that physically touch the metal will brown. The rest of the potato, surrounded only by hot oven air, will remain pale and dry.
When you coat a vegetable in a thin, even layer of oil, that liquid fat fills in all the microscopic crevices on the surface of the food. Fat can be heated to much higher temperatures than water without evaporating. It acts as a liquid bridge, efficiently transferring the intense heat of the aluminum pan and the ambient oven air directly into the cellular structure of the vegetable.
The Coating Technique
However, more oil does not equal more crunch. If you drown your vegetables in olive oil, they will essentially deep-fry in a shallow, greasy pool, becoming heavy and limp. If you use too little, you get dry, leathery patches.
The goal is a microscopic, uniform sheen. Place your thoroughly dried, chopped vegetables into a large mixing bowl. Drizzle a high-heat stable fat (like avocado oil, light olive oil, or melted ghee) over the top. Use your hands—yes, get your hands dirty—to massage the oil into the vegetables. You want every single surface, every floret, and every cut edge to be lightly glistening. As you build your collection of essential kitchen tools, a set of massive stainless steel mixing bowls is non-negotiable specifically for this tossing process.
The Perfect Chop: Surface Area and Uniformity
The way you wield your chef’s knife has a direct impact on the thermodynamic efficiency of your roast. We need to maximize surface area and ensure uniform cooking times.
Maximizing Contact
The most intense browning will always occur where the vegetable makes direct physical contact with the screaming-hot aluminum pan. Therefore, you want to create as much flat surface area as possible.
Do not just roughly hack a potato into jagged, uneven boulders. Slice it so that it has distinct, flat faces. When you place a Brussels sprout on the pan, do not let it roll around aimlessly. Take the extra thirty seconds to manually flip every single sprout so the flat, cut side is facing down, pressed firmly against the metal. That flat side is going to absorb the conductive heat of the pan and develop a glorious, caramelized crust.
The Rule of Uniformity
Furthermore, your pieces must be uniform in size. If you have some carrots chopped into tiny half-inch cubes and others left as massive two-inch chunks, you are setting yourself up for disaster. The tiny pieces will burn to a crisp before the large pieces are even remotely tender.
Take your time at the cutting board. Aim for bite-sized, uniform pieces. If you are mixing different types of vegetables, you have to account for their density. A dense, starchy sweet potato takes significantly longer to cook than a delicate bell pepper. If you want to roast them on the same pan, you must cut the sweet potato into much smaller cubes than the pepper to equalize their cooking times.
Troubleshooting Your Roasting Disasters
Even with all this science, things can occasionally go sideways. Here is a rapid-fire troubleshooting guide to fix your issues on the fly:
Symptom: The bottoms are black and burning, but the insides are raw.
The Science: Your oven rack is too low, placing the pan too close to the heating element, or your oven runs hotter than the dial says.
The Fix: Move the rack to the middle or upper-middle position. If they are already burning, pull the pan out, splash a tiny tablespoon of water onto the tray, and immediately cover it tightly with foil. The trapped steam will halt the browning and rapidly cook the interior.
Symptom: They are pale, soft, and weeping liquid.
The Science: You crowded the pan, or your oven temperature is too low.
The Fix: Immediately take the pan out of the oven. Use tongs to transfer half the vegetables to a second preheated pan. Crank the oven up by 25 degrees. Give them space to breathe.
Symptom: They are dry, shriveled, and leathery.
The Science: You did not use enough oil to conduct the heat, or you roasted a low-moisture vegetable for too long.
The Fix: Toss them with a little more oil and a splash of stock or citrus juice to rehydrate them slightly, then return them to the oven for a few minutes.
The Final Sear
Cooking is not magic; it is applied physics, chemistry, and a little bit of attitude. When you understand the basic rules of the universe—that water boils at 212°F, that proteins brown at 285°F, and that cheap, toxic non-stick pans are an absolute abomination—you take total control over your kitchen.
You no longer have to cross your fingers and hope your side dishes turn out well. By utilizing a heavy-gauge bare aluminum pan, giving your ingredients the spatial respect they deserve, and harnessing the blistering power of a 425°F oven, you guarantee perfect, mind-blowing crunch every single time.
So go buy some broccoli. Dry it ruthlessly. Give it some space. And let the science of the Maillard reaction do the heavy lifting. You’ve got this.


