Listen up, home cooks. We need to have a serious, slightly uncomfortable intervention about that bottom drawer in your refrigerator. You know the one. The crisper drawer. Or, as I like to call it, the place where aspirational, expensive organic vegetables go to die a slow, tragic, and entirely preventable death.
Let’s be real for a second. We’ve all been there. You hit the farmer’s market or the grocery store on a Sunday morning, fueled by a sudden, intense desire to “eat clean” and “meal prep like a wellness influencer.” You buy gorgeous, vibrant bundles of kale, perky celery stalks, and radishes that look like they belong in a still-life painting. Fast forward to Thursday evening. You open the fridge after a long, exhausting day, and what do you find? A limp, pathetic, floppy tragedy of a celery stalk that looks less like food and more like a deflated sad balloon.
Your immediate instinct is to toss it in the trash. But wait. Before you condemn that sad spinach to the landfill, I am here to tell you that you are throwing away perfectly good food—and by extension, your hard-earned money. You do not need a culinary degree or a Michelin star to cook like a pro. You just need a little bit of science, a large bowl, and some ice.
Today, we are diving deep into the absolute masterclass of vegetable resurrection. I am going to teach you exactly how to reverse wilting, restore the cellular structure of your produce, and bring those sad veggies back to life. No fluff, no pretentious chef-speak. Just pure, unadulterated kitchen wizardry that actually works.
The Graveyard in Your Crisper Drawer (And Why We Need to Stop)
Before we get to the fun part where we play Dr. Frankenstein with a wilted carrot, we need to address the sheer scale of the food waste problem. This isn’t just about feeling guilty over a forgotten bag of arugula; it is a massive, global crisis.
According to the 2024 United Nations Environment Programme (UNEP) Food Waste Index Report, a staggering 1.05 billion tonnes of food were wasted globally in 2022 alone. If you think this is mostly the fault of restaurants and supermarkets, think again. The report explicitly states that households generate an overwhelming 60% of all food waste. That equates to roughly 631 million tonnes of food tossed directly from our homes. To put that into a painful financial perspective, the average person wastes about 79 kilograms of food every single year.
When we look specifically at what we are throwing away, the statistics get even more frustrating. Roughly 40% of all the food wasted by households consists of fruits and vegetables. That is a staggering amount of money quite literally rotting in our trash cans. Beyond the financial hit to your grocery budget, this waste has catastrophic environmental consequences. Food loss and waste generate up to 10% of global greenhouse gas emissions. Rotting food in landfills is a primary contributor to methane emissions, a greenhouse gas that is over 80 times more potent than carbon dioxide over a 20-year period.
So, when fixing rookie kitchen mistakes like improper storage, you aren’t just saving a few dollars; you are actively refusing to participate in a broken system. You are taking control of your kitchen.
The Science of the Sag: What is Turgor Pressure?
To understand how to fix a wilted vegetable, you have to understand why it wilted in the first place. Don’t panic; I promised no high school biology trauma, and I intend to keep that promise. But one of my favorite foolproof cooking secrets is understanding basic food science so you can manipulate your ingredients to do exactly what you want them to do.
Vegetables are mostly water. A cucumber is roughly 96% water, lettuce is about 95% water, and even dense broccoli is around 89% water. Plant cells are surrounded by rigid cell walls made of cellulose. Inside these cells is fluid. When the cells are full of water, that fluid pushes outward against the rigid cell walls. This internal pressure is called turgor pressure.
Think of a plant cell like a water balloon stuffed inside a cardboard box. When the water balloon is filled to the absolute brim, it presses hard against the inside of the box, making the entire structure incredibly firm, heavy, and rigid. This high turgor pressure is what gives fresh vegetables their satisfying, loud crunch.
The Plant Cell Wall vs. the Refrigerator
When a vegetable is harvested, its water supply is abruptly cut off. The moment you place that vegetable in your refrigerator, a new microscopic battle begins. Refrigerators are cold, but they are also incredibly dry. They act like giant dehumidifiers.
In physics, there is a concept called the vapour pressure deficit (VPD). This is the difference between the amount of moisture inside the vegetable (which is very high) and the amount of moisture in the cold air of your fridge (which is very low). Because nature loves equilibrium, the moisture inside your vegetables slowly evaporates through the semi-permeable plant membranes and escapes into the dry refrigerator air.
As the water leaves the cells, the “water balloon” inside the “cardboard box” deflates. The turgor pressure drops to zero. The cells collapse inward, and suddenly, your once-proud celery stalk is as limp as a wet noodle. The vegetable hasn’t spoiled; it hasn’t rotted. It is just severely dehydrated.
Why Some Veggies Wilt Faster Than Others
You’ve probably noticed that a bunch of cilantro will turn into a tragic, droopy mess in 48 hours, while a whole carrot can sit in the drawer for weeks before getting bendy. This comes down to the surface-area-to-volume ratio.
Leafy greens and delicate herbs have massive surface areas and very little volume, meaning they have thousands of tiny pores exposed to the dry air, allowing water to evaporate incredibly fast. Root vegetables, on the other hand, are dense and have thicker outer skins that act as a barrier, slowing down moisture loss. But eventually, the vapour pressure deficit comes for them all.
The Miracle Cure: The 32°F Osmotic Hydration Method
Now that we know the enemy is dehydration and a loss of turgor pressure, the solution is beautifully simple: we just need to put the water back inside the cells. This brings us to the exact, foolproof technique that will save your produce.
What is Osmosis (Minus the High School Biology Trauma)?
Osmosis is the process by which water moves through a semi-permeable membrane from an area of low solute concentration to an area of higher solute concentration. Solutes are just dissolved substances like sugars, acids, and minerals.
The inside of a plant cell is packed with these natural sugars and minerals (high solute concentration). Tap water has very few of these (low solute concentration). Therefore, if you submerge a dehydrated vegetable in water, the laws of physics dictate that the water will aggressively rush into the plant cells to try and balance out the concentration. The key to unlocking kitchen creativity is having fresh ingredients, and osmosis is the invisible force that will give you your fresh ingredients back.
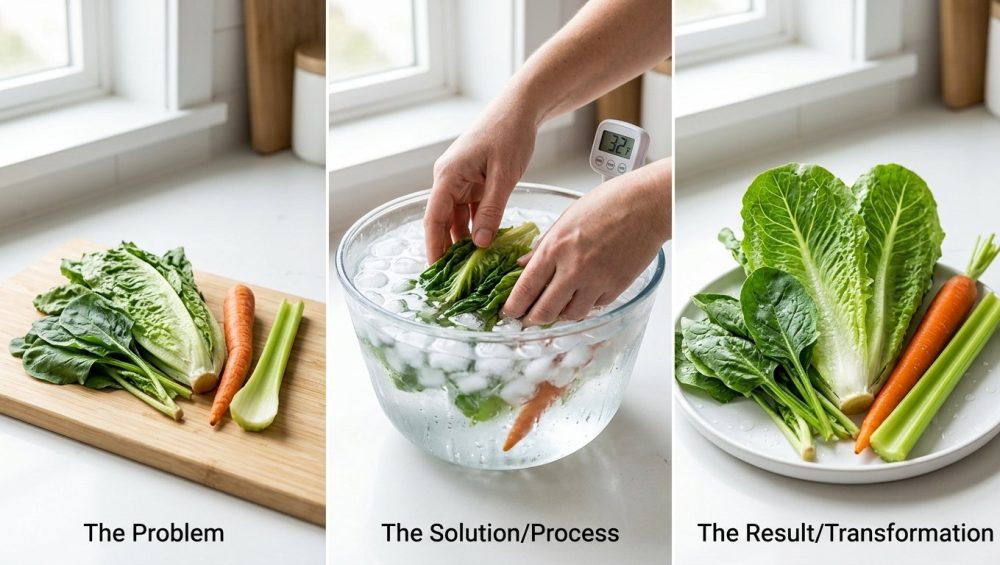
The Exact Step-by-Step Ice Bath Revival Technique
You cannot just run a limp carrot under the faucet for three seconds and expect a miracle. You need to execute an osmotic hydration bath. Here is the exact, step-by-step masterclass method.
Step 1: The Trim
If you are reviving stalky vegetables like celery, asparagus, or broccoli, you need to give them a fresh cut. Trim about half an inch off the bottom of the stalks at a 45-degree angle. This exposes the fresh xylem (the microscopic tubes that transport water up the plant), removing any dried-out, calloused ends that might block water absorption. For leafy greens like lettuce or Swiss chard, separate the leaves or cut the base to ensure the stems are fully exposed.
Step 2: Prepare the 32°F Bath
Fill the largest bowl you own with cold tap water. Now, dump in a generous amount of ice cubes. You want the water temperature to be as close to 32°F (0°C) as possible. Why ice water and not room temperature? Cold water works instantly to shock the plant cells; the low temperature helps the cellular structure close up and rapidly retain the water it absorbs, maximizing that crisp, snappy texture.
Step 3: Total Submersion
Plunge your sad, wilted vegetables into the ice bath. They must be completely submerged. If they keep floating to the top, weigh them down with a heavy plate or a smaller bowl. Every exposed surface area needs to be in contact with the freezing water for osmosis to work efficiently.
Step 4: The Waiting Game
Walk away. Let the physics happen. These simple kitchen fixes will save your grocery budget, but they do require a tiny bit of patience.
The “Goldilocks” Timing: 15 to 30 Minutes
Timing is actually critical here. You want to leave the vegetables in the ice bath for a minimum of 15 minutes, up to a maximum of about 30 minutes for most greens. Root vegetables like carrots or potatoes might need up to an hour because of their density.
However, do not leave them in the water overnight. If the osmotic process goes on for too long, the cells will take on too much water. The result is swelling, cracking, and a waterlogged vegetable that loses its flavor and texture. Thirty minutes is the sweet spot. Once the timer dings, pull them out, shake off the excess water, and dry them thoroughly with a clean towel or a salad spinner. If you skip the drying step, the surface moisture will breed bacteria and cause rapid rotting in the fridge.
Which Veggies Can You Resurrect? (The Master List)
Not all produce is created equal, and when it comes to surviving kitchen disasters, knowing how to pivot and which ingredients can actually be saved is half the battle. Here is your definitive master list of what you can revive.
The Leafy Greens (Lettuce, Spinach, Kale, Herbs)
These are the prime candidates for the ice bath. Because they are so thin, they lose turgor pressure rapidly, but they also regain it rapidly. Romaine, spinach, arugula, Swiss chard, and herbs like parsley, cilantro, and dill will bounce back beautifully. Basil is the only exception—basil hates the cold and will turn black if you put it in ice water. Keep basil at room temperature in a glass of water like a bouquet of flowers.
The Root Veggies (Carrots, Radishes, Beets, Potatoes)
When a carrot gets bendy, it feels like a lost cause, but it is actually just begging for a drink. Root vegetables have a highly concentrated solute level inside their cells, meaning they pull water in very effectively. You can revive a rubbery carrot or a squishy radish, but you may need to leave them in the ice bath for closer to an hour.
The Stalks (Celery, Asparagus, Broccoli, Green Beans)
These structural vegetables respond incredibly well to the 45-degree stem trim followed by an ice bath. Broccoli crowns that have gone slightly soft will crisp right back up, and asparagus spears will regain their snap.
The Point of No Return (When to Actually Toss Them)
Let me be very clear: the ice bath method reverses dehydration; it does not reverse decomposition. If your spinach has turned into a dark, slimy puddle at the bottom of the bag, throw it away. If your zucchini is weeping liquid and smells like a swamp, toss it. Vegetables that rot rather than shrivel (like tomatoes, zucchini, squash, and cucumbers) generally do not benefit from this method. If you see mold, severe yellowing, or structural mushiness, say your goodbyes and send it to the compost bin.
Stop the Sag Before It Starts: Pro-Level Storage Hacks
Reviving sad vegetables is a great party trick, but preventing them from getting sad in the first place is what separates the amateurs from the pros. Proper storage is about controlling moisture and airflow. And this brings me to one of my absolute strictest rules in the kitchen.
Ditch the Toxic Plastic: Why Your Storage Gear Matters
Listen to me very carefully: we are banishing toxic kitchen gear from our homes permanently. I have absolutely zero patience for cheap, peeling, chemical-laden plastic storage containers.
You might think that storing your fresh, organic vegetables in that stained plastic tub you’ve had for five years is harmless, but the science says otherwise. A January 2025 report from Toxic-Free Future highlighted that food packaging made from synthetic plastics is actively contaminating our food with PFAS (forever chemicals), phthalates, and bisphenols (like BPA). These are known endocrine-disrupting chemicals linked to severe health issues, including hormone disruption and developmental delays.
Furthermore, a 2024 study published in the scientific journal Chemosphere found hazardous flame retardants in 85% of black plastic take-out containers sampled. And don’t even get me started on the “microwave safe” label. “Microwave safe” simply means the plastic won’t visibly melt into a puddle in your microwave; it absolutely does not mean it won’t leach microplastics and chemical additives into your food when exposed to heat or acidic ingredients.
If you care about the quality of the food you are cooking, you must care about what you store it in. High-quality, durable glass containers are essential tools every beginner needs in their arsenal. Glass is non-porous, completely inert, and will never leach hormone-disrupting chemicals into your freshly revived spinach. Stainless steel containers are another fantastic, indestructible option for the fridge. Stop wrapping your beautiful produce in toxic garbage.
Humidity Control: The Crisper Drawer Demystified
If you want to eliminate kitchen chaos for good, you need a system, and that system starts with understanding your refrigerator’s crisper drawers.
Most modern fridges have adjustable humidity sliders on the drawers. This is not a decorative feature.
- High Humidity Drawer (Closed Vent): This traps moisture inside the drawer. Use this for things that wilt easily and lose moisture quickly—leafy greens, herbs, carrots, broccoli, and celery.
- Low Humidity Drawer (Open Vent): This allows ethylene gas (a ripening hormone produced by certain fruits) to escape. Use this for things that rot easily rather than wilt—apples, pears, peppers, and avocados.
Never mix your high-ethylene producers (like apples) with your ethylene-sensitive greens (like spinach), or your greens will turn yellow and rot in record time, no matter how much ice water you throw at them.
Cooking with Revived Veggies: Weeknight Efficiency
Okay, so you’ve successfully executed the ice bath. Your celery is snapping, your kale is vibrant, and your carrots are rigid. Now what? Because my philosophy for weekdays is that time is money, we need to talk about efficiency.
To pull off simple weeknight dinners without the stress, you have to use your ingredients smartly. Revived vegetables are perfectly safe and delicious to eat raw in a salad, but because their cellular structure has been slightly stressed by the dehydration and rehydration process, they are absolutely phenomenal candidates for high-heat cooking.
Roasting, Sautéing, and Blending Your Rescued Produce
When you roast a revived root vegetable, the high heat of the oven rapidly evaporates the surface moisture, concentrating the natural sugars that were left behind during the osmotic process. Toss those resurrected carrots and radishes in olive oil, salt, and a heavy pinch of smoked paprika, and roast them at 425°F until the edges are beautifully caramelized and blistered.
For revived leafy greens like spinach or Swiss chard, a quick, aggressive sauté is your best friend. A screaming hot stainless steel skillet, a glug of good olive oil, and three cloves of smashed garlic. Toss the greens in, let them wilt down for exactly sixty seconds, hit them with a squeeze of fresh lemon juice, and pull them off the heat.
If you have revived a massive amount of herbs or greens that you know you won’t be able to chew through in a few days, break out the blender. Creating simple meals for mindful moments requires preparation, and having a jar of homemade pesto or chimichurri in the fridge is a weeknight lifesaver. Blend those revived herbs with garlic, nuts, parmesan, and olive oil, and you instantly have a vibrant, flavor-packed sauce that will elevate a boring piece of chicken or a bowl of pasta into something spectacular.
The Bottom Line: Saving Your Wallet and Your Sanity
Cooking should never be a source of stress, and opening your refrigerator should not fill you with guilt over wasted produce. The culinary world is full of pretentious rules and overly complicated techniques, but at the end of the day, the best home cooks are simply resourceful.
By understanding the basic science of turgor pressure and mastering the 32°F osmotic hydration method, you are doing more than just saving a floppy piece of celery. You are taking a stand against a massive global food waste crisis, you are stretching your hard-earned grocery budget further than ever before, and you are proving to yourself that you have the skills to handle whatever the kitchen throws at you.
So the next time you find a sad, wilted vegetable hiding in the back of the crisper drawer, don’t you dare throw it in the trash. Get out your largest bowl, fill it with ice, and bring that produce back to life. You’ve got this.


