
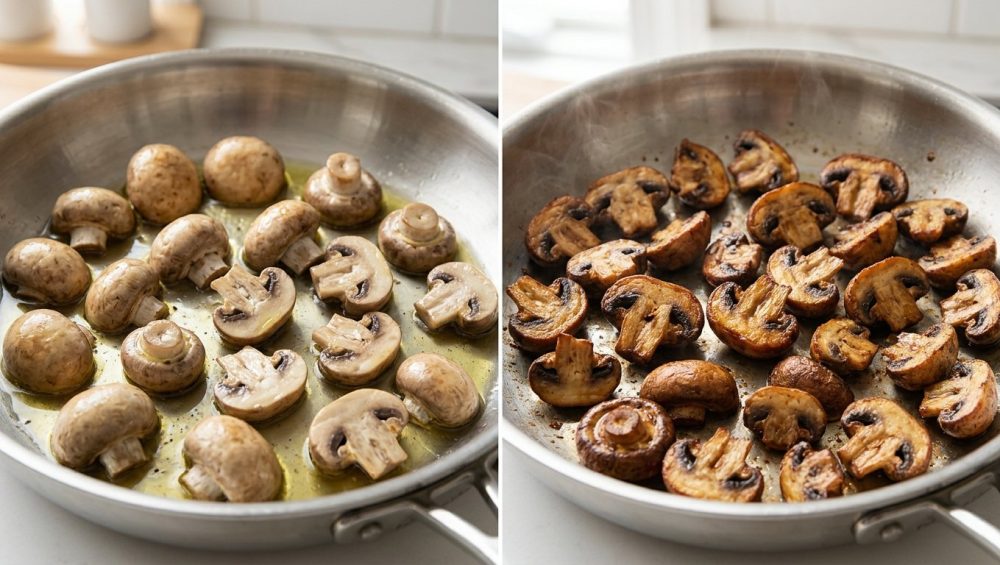
Listen, we need to have a serious intervention about what is happening in your skillet. If you are like ninety percent of weekend culinary hobbyists, you are currently committing a crime against fungi. You buy a beautiful, expensive pint of cremini or oyster mushrooms, bring them home, slice them up, and toss them directly into a screaming hot pan full of olive oil.
And what happens? Instantly, the oil vanishes. The mushrooms turn into sad, squeaky, gray little sponges that steam in their own juices. You panic, add more oil, and watch in horror as they absorb that too, resulting in a greasy, rubbery mess that tastes like an old tire.
I have zero patience for pretentious chef-speak, but I have even less patience for bad food that is easily preventable. You do not need a culinary degree to fix this; you just need a basic understanding of food science. If you want a perfectly browned, deeply savory, meaty texture, you need to radically change your approach. This is why you should actually boil them first before a single drop of fat ever touches the pan.
Yes, you read that correctly. We are going to cook them in water. Grab your favorite skillet, pour yourself a glass of wine, and let’s dive into the definitive, no-nonsense masterclass on why water is the ultimate secret weapon for restaurant-quality mushrooms.
The Anatomy of a Kitchen Disaster: Why Your Mushrooms Suck (and Soak Up Oil)
To understand why tossing raw mushrooms into hot fat is a guaranteed disaster, we have to look at what a mushroom actually is. Spoiler alert: it is not a vegetable. It is a fungus, and it behaves completely differently under heat than a carrot or a potato.
The Sponge Effect: Air, Water, and Chitin
Mushrooms are incredibly deceptive. They look solid, but they are actually composed of 85 to 92 percent water by weight. The remaining solid mass is predominantly made up of a complex, nitrogen-containing polysaccharide called chitin. If that word sounds familiar, it is because chitin is the exact same structural compound that makes up the rigid exoskeletons of crabs, lobsters, and beetles.
Unlike the cellulose found in standard vegetables, chitin is highly hydrophilic (water-loving) and extremely thermally stable, easily withstanding temperatures up to 220°C (428°F) without breaking down. Woven into this tough chitin network are millions of microscopic air pockets. When a mushroom is raw, it is essentially a highly porous, water-logged biological sponge.
The Oil Trap: Why Searing Raw Fungi Fails
When you drop a raw, porous mushroom into a pan of hot cooking oil, a catastrophic chain reaction occurs. The sudden blast of heat causes the microscopic air pockets inside the mushroom to rapidly expand and collapse. As these pockets collapse, they create a vacuum effect. Because chitin is highly absorbent, the mushroom immediately acts like a dry kitchen sponge, deciding to soak up all the oil in the pan.
Once the oil is trapped deep inside the cellular matrix of the mushroom, it is insulated from the direct heat of the pan. Meanwhile, the massive amount of internal water begins to seep out. Because water boils at 212°F (100°C), the temperature of your skillet immediately plummets. You are no longer searing; you are aggressively boiling your mushrooms in a miserable mixture of their own extruded liquid and trapped fat. By the time the water finally evaporates, the mushrooms are heavily waterlogged, completely saturated with grease, and physically incapable of forming a crisp exterior.
The Counterintuitive Cure: Why Water is the Secret Weapon
If oil is the enemy of the raw mushroom, water is its best friend. By intentionally starting your mushrooms in a shallow pool of water, you completely bypass the sponge effect and manipulate the chitin structure to your advantage.
The Science of the Simmer: Breaking Down Cell Walls
When you add water to the pan and bring it to a simmer, you are creating a controlled, fat-free environment. The boiling water penetrates the tough chitin fibers, gently softening them. More importantly, the heat from the simmering water forces the mushroom’s internal air pockets to collapse permanently, while simultaneously drawing out the mushroom’s natural moisture.
Because there is no oil in the pan during this phase, the mushroom cannot absorb any fat. Instead, it shrinks down, condensing its cellular structure into a dense, meaty nugget. You are effectively blanching the fungus in its own deeply flavorful juices, concentrating its earthy umami profile without diluting it with unnecessary cooking oil.
The Evaporation Phase: Making Way for the Maillard Reaction
As the simmering continues, the water in the pan will eventually boil off completely. This is the critical transition phase. The mushrooms have already released their internal moisture, their air pockets are gone, and their cellular structure has collapsed into a dense, non-porous state.
Once the pan is bone dry, the temperature can finally rise above the 212°F boiling point of water. This dense surface is perfectly primed for accelerating the Maillard reaction—the complex chemical process between amino acids and reducing sugars that creates that highly desirable, golden-brown crust. Because the mushroom is no longer a sponge, any fat you add at this exact moment will remain strictly on the exterior surface, effectively frying the outside to a perfect crisp while leaving the inside tender and meaty.
The Masterclass Technique: How to Water-Sauté Mushrooms Perfectly
Understanding the science is only half the battle. Now we need to execute it. This technique is completely foolproof, highly efficient, and will permanently change the way you approach stovetop vegetables.
Step 1: The Prep (And Why You Shouldn’t Fear Washing Them)
Let us immediately debunk one of the most persistent and annoying myths in the culinary world: the idea that you should never wash mushrooms and must instead lovingly brush the dirt off each individual cap with a specialized little brush. I do not have time for that nonsense, and neither do you.
Remember, mushrooms are already over 85 percent water. Giving them a quick, vigorous rinse in a colander under cold water is not going to magically turn them into water balloons. Wash your mushrooms. Get the dirt off. Pat them dry with a kitchen towel, and slice them uniformly. Consistency in size ensures they cook at the exact same rate.
Step 2: The Water Bath (Simmering to Success)
Place your sliced mushrooms into a wide skillet. You want plenty of surface area; crowding the pan is generally a sin in cooking, but during the water phase, you actually have a little more leeway because you want them to release moisture.
Add just enough water to barely coat the bottom of the pan—usually about a quarter cup of water for every pound of mushrooms. Turn the burner to medium-high heat. As the water comes to a boil, you will notice the mushrooms rapidly shrinking and releasing their own dark, flavorful liquid. Stir them occasionally. This is the phase where patience pays off. You must wait for absolutely every drop of liquid to evaporate.
Step 3: The Sizzle (When the Oil Finally Meets the Pan)
Pay close attention to the sound of the pan. It will shift from a wet, bubbling simmer to a sharp, aggressive sizzle. This auditory cue is your green light. The water is gone, and the pan is getting hot.
Now, and only now, do you add your fat. Because the mushrooms have lost their porosity, you only need a fraction of the oil or butter you would normally use—just a tablespoon or two. Toss the mushrooms to coat them in the fat, spread them out into a single even layer, and leave them alone. Just like when you are preheating the pan for roasting vegetables, a proper sear requires uninterrupted contact with the hot metal. Let them fry undisturbed for two to three minutes until a deep, mahogany crust forms on the bottom, then flip and repeat.
Step 4: The Finishing Touches (Patience is a Virtue)
Do not add your salt until the very end of the cooking process. I cannot emphasize enough how salting too early will completely ruin your sear. Salt acts as a powerful osmotic agent, aggressively drawing moisture out of the cell walls. If you salt them while they are trying to brown, you will instantly trigger another wave of moisture release, dropping the pan temperature and halting the Maillard reaction in its tracks. Wait until they are beautifully browned and off the heat before showering them with flaky sea salt.
The Gear Check: Ditch the Toxic Pans for a Proper Sear
We need to have a serious talk about your cookware. If you are trying to execute a high-heat sear on a cheap, scratched-up non-stick skillet you bought at a big-box store five years ago, you are setting yourself up for failure. Worse, you are actively putting your health at risk.
Why Cheap Non-Stick is Ruining Your Health and Your Food
I have a strict “No-Go” rule when it comes to toxic kitchenware. Most conventional non-stick pans are coated in PTFE (polytetrafluoroethylene), which belongs to a family of thousands of synthetic “forever chemicals” known as PFAS. These chemicals do not break down in the environment or in the human body, and they are linked to a terrifying laundry list of health issues.
The danger peaks when you try to sear food. To get a proper crust on a mushroom, your pan needs to hit temperatures well above 400°F. When a cheap PTFE pan is heated past 500°F, the chemical coating physically begins to degrade, off-gassing toxic fumes that can cause a flu-like illness literally known in the medical community as “Teflon flu”.
This isn’t just an overcautious blogger rant; it is a regulatory reality. In 2025, Minnesota became the first US state to completely ban the sale of PFAS-coated cookware, and Colorado’s identical ban kicked in on January 1, 2026. You are actively ruining your nonstick pans by exposing them to high heat, and they are ruining your food in return because they physically cannot hold the thermal mass required for a hard sear.
The Safe Alternatives: Carbon Steel and Stainless Steel
I am completely committed to banishing toxic kitchen gear from my home, and you should be too. If you want restaurant-quality results, you need to cook on the materials that restaurants actually use: stainless steel, carbon steel, or cast iron.
If you are terrified that everything sticks to your stainless steel pan, it is only because you are not heating it correctly. By allowing the pan to preheat thoroughly, you utilize the Leidenfrost effect, where moisture instantly vaporizes and creates a microscopic barrier of steam that prevents food from adhering to the metal.
Alternatively, a heavy-gauge carbon steel skillet is an absolute dream for the water-sauté method. Once you understand the science behind seasoning cast iron and carbon steel, you create a naturally polymerized, non-toxic, non-stick surface that can withstand blasting heat without releasing a single chemical fume. These heavy-duty pans hold their thermal mass, meaning when the water evaporates and you add your oil, the pan’s temperature won’t plummet, guaranteeing an aggressive, perfect sear.
Know Your Fungi: How Different Varieties Respond to the Water Method
Not all mushrooms are created equal, and while the water method works universally to break down chitin and prevent oil absorption, you should slightly tweak your approach based on the specific variety you brought home from the market.
The Everyday Heroes: White Button and Cremini
These are the workhorses of the home kitchen. Because they are incredibly dense and hold a massive amount of water, they benefit the most from the water-sauté method. Do not be afraid to let them simmer vigorously. They will shrink to about half their original size, which is exactly what you want. The more they condense, the meatier and more flavorful they become.
The Meaty Giants: Portobellos
Portobellos are just mature cremini mushrooms, but their massive surface area requires a bit of finesse. If you are cooking them whole to use as a burger substitute, you can still use the water method. Add a splash of water to the pan, cover it with a tight-fitting lid to trap the steam, and let the chitin soften for about five minutes. Remove the lid, let the water evaporate completely, and then sear them hard in a splash of high-quality olive oil.
The Delicate Wildcards: Oyster, Shiitake, and Maitake
Wild and specialty mushrooms have a slightly different cellular structure. Oyster and maitake (Hen of the Woods) mushrooms have thinner, more delicate fronds, while shiitakes have a lower overall moisture content and incredibly tough stems (which you should always remove and save for stock).
For these varieties, you still want to start with water, but use a much lighter hand. A couple of tablespoons of water is usually enough to kickstart the chitin breakdown without turning delicate oyster mushrooms to mush. Let the water flash off quickly, then proceed immediately to the high-heat sear.
Flavor Upgrades: Elevating Your Perfectly Browned Mushrooms
Once you have mastered the foundational technique of the water-sauté, you have essentially created a blank canvas of concentrated umami. Now it is time to build complex flavor profiles that will make your guests think you spent years in culinary school.
The Deglaze: Liquid Gold
After the mushrooms have achieved a deep, mahogany sear, you will notice a layer of browned, caramelized bits stuck to the bottom of your stainless steel or carbon steel skillet. In the culinary world, this is called the fond, and it is pure flavor.
Do not wash this down the sink. Instead, deglaze the pan. While the skillet is still screaming hot, pour in a splash of dry white wine, a glug of chicken stock, or a spoonful of sherry vinegar. The liquid will boil instantly, allowing you to use a wooden spoon to scrape up all those caramelized bits. The liquid will reduce into a glossy, rich pan sauce that coats the mushrooms beautifully.
Aromatics and Umami Boosters
Timing is everything when adding aromatics. If you add minced garlic or delicate herbs to the pan at the beginning of the searing phase, they will burn to a bitter, acrid crisp long before the mushrooms finish browning.
Instead, wait until the mushrooms are perfectly seared. Kill the heat, and while the pan is still hot, toss in a knob of cold butter, a smashed clove of garlic, and a sprig of fresh thyme. The residual heat will melt the butter and gently bloom the aromatics, infusing the fat without scorching the garlic.
If you want to push the savory notes into the stratosphere, introduce complementary umami bombs during the final toss. A tiny splash of soy sauce, a dash of Worcestershire, or a half-teaspoon of white miso paste stirred into the residual butter will amplify the natural glutamates in the mushrooms, creating a ridiculously addictive side dish.
Troubleshooting the Water Method
Even with a foolproof method, the realities of a home kitchen can sometimes throw a wrench in the works. If your mushrooms aren’t turning out like culinary gold, you are likely making one of these easily fixable errors.
Did I Add Too Much Water?
If your mushrooms are swimming in a jacuzzi of water and it is taking twenty minutes to evaporate, you were too heavy-handed with the tap. It is not the end of the world—the mushrooms will not be ruined—but you are wasting valuable time. Remember, the mushrooms are going to release their own liquid. You only need a tiny splash (about a quarter cup per pound) just to get the simmering process started. If you accidentally flood the pan, carefully carefully ladle some of the excess liquid out and save it; it is essentially a quick mushroom broth that you can use in soups or risotto.
Why Are They Still Squeaky?
If you bite into your finished mushroom and it squeaks against your teeth like a piece of rubber, you failed to cook off all the internal water. You either rushed the simmering phase, or you crowded the pan so severely during the searing phase that the mushrooms steamed instead of frying. Be patient. Let the water evaporate completely, and ensure the pan is hot enough to trigger a sharp sizzle when the fat is added.
Why Aren’t They Browning?
If the water is gone, the oil is in, and the mushrooms are just sitting there looking pale and sad, your pan is too cold. This usually happens when you use a flimsy, thin-bottomed pan that loses all its heat the moment the water evaporates. This is why heavy-gauge carbon steel or multi-clad stainless steel is mandatory. If you find yourself in this situation, crank the heat, do not stir the mushrooms, and give the pan time to recover its temperature.
The Weeknight Efficiency Factor: Batch Cooking and Storing
I firmly believe that time is money, and I refuse to spend my Tuesday evenings stressing over a hot stove for longer than absolutely necessary. When you are trying to throw together simple weeknight dinners after a long day, the water-sauté method offers a brilliant opportunity for meal prep.
Pre-Boiling for the Busy Cook
Because the water method is split into two distinct phases—the simmer and the sear—you can easily separate them to save time during the week. On a lazy Sunday afternoon, buy two pounds of mushrooms. Wash them, slice them, and do the water bath phase. Simmer them until their air pockets collapse, their internal moisture is released, and the pan goes dry.
Stop right there. Do not add the oil. Do not sear them. Let the condensed, boiled mushrooms cool completely, and store them in an airtight container in the refrigerator. They will happily sit there for up to four days.
Reviving Batch-Cooked Mushrooms
When Wednesday night rolls around and you need a lightning-fast side dish or a topping for a weeknight steak, your prep work is already done. Pull your pre-boiled mushrooms out of the fridge. Because the chitin is already broken down and the water is already gone, they are primed and ready for the skillet.
Get your carbon steel pan ripping hot, add a tablespoon of butter or olive oil, and toss in the cold mushrooms. Because they are completely dense and dry, they will sear beautifully in under three minutes. Toss them with some garlic and parsley, hit them with a pinch of salt, and you have a gourmet, deeply browned vegetable side dish on the table faster than you can microwave a frozen dinner.
Final Thoughts: Respect the Fungi
Cooking is not about blindly following inherited rules; it is about understanding the ingredients in front of you. For decades, we have been told to treat mushrooms like delicate sponges that must be kept away from water at all costs. But by understanding the unique biology of chitin and the physics of evaporation, we can flip the script entirely.
Stop fighting the sponge effect and start using it to your advantage. Ditch the toxic non-stick pans, embrace the simmer, and hold the salt until the end. By mastering the water-sauté method, you will permanently banish soggy, oil-logged fungi from your kitchen and unlock the deep, meaty, caramelized potential that has been hiding in your skillet all along. Now get back to the stove and show those mushrooms who is boss.






