
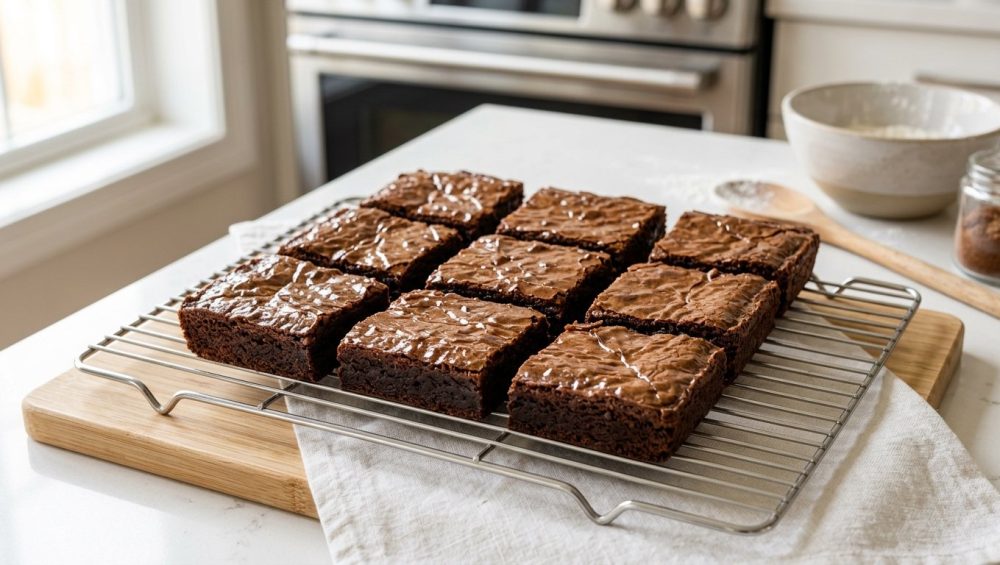
The Holy Grail of Baking: The Glossy Brownie Crust
Let us get one thing straight right out of the gate: a brownie without a shiny, crinkly, tissue-thin crust is just a sad, dense piece of flat chocolate cake. If you are pulling pans out of the oven and staring at a dull, matte, porous surface, you are committing a culinary tragedy. When you are focused on surviving kitchen disasters, a matte dessert might seem like a minor offense, but in the realm of weekend baking, it is the ultimate mark of an amateur.
I firmly believe that any home cook can produce bakery-level, mind-blowing food without a culinary degree. But to do that, you have to stop blindly following decades-old recipe cards and start understanding the actual chemistry happening in your mixing bowl. Baking is not magic; it is an exact, unforgiving science. The difference between a mediocre, dull brownie and a professional-grade masterpiece with a mirror-like, crackly skin comes down to one fundamental, non-negotiable scientific principle: fully dissolving your sucrose.
If you are just dumping cold eggs, granular sugar, and room-temperature butter into a bowl and giving it a lazy stir, you are setting yourself up for failure. Put down the whisk, grab a cup of coffee, and pay attention. We are about to take a deep, exhaustive dive into the thermodynamic and chemical mechanics of the perfect brownie crust. By the end of this masterclass, you will permanently eliminate matte finishes from your kitchen repertoire.
The Anatomy of a Brownie: A Chemical Balancing Act
Before we can fix your dull crust, you need to understand what a brownie actually is. Unlike a traditional cake, which relies on chemical leavening agents (like baking powder or baking soda) to create a light, airy crumb, a classic fudgy brownie contains zero leaveners. It is essentially a baked emulsion of fat, sugar, and chocolate, held together by a minimal amount of flour and the structural integrity of eggs.
Because there is no baking powder creating massive carbon dioxide air pockets, the texture of a brownie is dense. The all-purpose flour used in most recipes provides just enough gluten to give the batter elasticity and structure, but the high fat content from the butter and chocolate coats the flour proteins, severely inhibiting massive gluten development. This is why brownies are chewy and fudgy rather than bread-like.
The eggs act as the grand unifiers in this dense mixture. The egg yolks contain lecithin, a powerful emulsifier with a hydrophilic (water-loving) head and a hydrophobic (water-hating) tail. This lecithin forces the water content of the eggs and butter to play nicely with the heavy fats of the chocolate and oil, creating a cohesive, homogenous batter.
But while the yolks are busy emulsifying the fats, the egg whites are doing something entirely different. They are preparing to build your crust.
The Meringue Illusion: What the Crust Actually Is
Here is the brutal truth that most home bakers do not realize: that highly coveted, glossy, tissue-thin brownie crust is not actually a layer of baked brownie batter. It is a microscopic, ultra-delicate meringue.
Food scientists, including Dr. Pia Sörensen at Harvard University, have extensively studied the physical composition of the brownie skin. Their research reveals that the glossy top is essentially a fragile film of egg proteins and crystallized sugar that separates from the rest of the batter and bakes into a distinct layer on the surface.
When you whip eggs and sugar together, you are creating a foam—a dispersion of gas (air) suspended in a liquid (the water from the egg whites). The mechanical shearing force of your whisk causes the proteins in the egg whites to denature, meaning their tightly coiled molecular structures physically unfold.
There are two primary proteins at work here: ovalbumin and ovomucin. Ovalbumin is the heavy lifter that provides the initial volume, trapping the air bubbles you are beating into the mixture. Ovomucin, on the other hand, acts like microscopic elastic bands. It provides the stretch and flexibility needed to hold onto those air bubbles as they rapidly expand under the intense heat of the oven.
However, an egg foam on its own is incredibly fragile. If you just whip egg whites and bake them, the bubbles will burst, the water will evaporate, and the structure will collapse into a rubbery, depressing mess. To turn that fragile protein network into a stable, glossy crust, you need a stabilizing agent. You need sucrose.
The Chemistry of Sucrose and Foam Stabilization
Sugar is not just in your brownie recipe to make it sweet. In the context of the glossy crust, sugar acts as a critical structural engineer.
When sugar is introduced to the egg foam, it dissolves into the water content of the egg whites. This dissolved sugar drastically increases the viscosity of the liquid surrounding the trapped air bubbles. By thickening the water, the dissolved sucrose physically prevents the liquid from draining away from the air bubbles, effectively locking the egg proteins in place and stabilizing the foam.
But here is the catch—and the exact reason why your brownies are turning out dull and matte: the sugar MUST be completely dissolved.
If you lazily mix granular sugar into cold eggs and room-temperature butter, the sugar crystals remain solid. Solid sugar crystals cannot interact with the egg proteins on a molecular level. Worse, these heavy, undissolved crystals act as tiny wrecking balls. Their physical weight drags down the delicate egg foam, popping the air bubbles and deflating the meringue before it even makes it into the oven.
Just as you have likely discovered that resting your dough changes everything for the texture of chocolate chip cookies, manipulating the physical state of your sugar changes the entire chemical outcome of your brownie batter. If the sucrose remains suspended as a solid crystal, it will bake directly into the crumb of the brownie, leaving the surface porous, dull, and completely matte.
The Thermodynamics of the Bake
To fully appreciate why dissolving the sugar is non-negotiable, you must understand the violent thermodynamic reactions happening inside your oven.
When you slide that pan into a 350°F (175°C) oven, the batter rapidly begins to absorb heat. The water trapped inside the batter—primarily from the eggs and the butter—hits its boiling point and transitions from a liquid into a gas (steam).
Because fudgy brownies lack chemical leaveners, this expanding steam is the primary force causing the batter to rise. As the steam violently pushes its way upward to escape the pan, it acts as an elevator. It carries the fully dissolved sugar and the denatured egg proteins along with it, pushing them to the absolute surface of the batter.
Once this dissolved sugar-protein matrix hits the surface, the heat of the oven evaporates the remaining moisture in the foam. The egg proteins coagulate and harden, trapping the tiny air bubbles in a solid matrix. Simultaneously, the dissolved sucrose that was carried to the top begins to recrystallize into a microscopic, glass-like sheet.
As the surface temperature pushes past 300°F (150°C), two crucial chemical reactions occur: the Maillard reaction and caramelization. The Maillard reaction occurs when the amino acids from the egg proteins react with the reducing sugars, creating hundreds of complex flavor compounds and turning the crust a rich, deep brown. Shortly after, at around 320°F (160°C), the pure sucrose undergoes caramelization—a process of pyrolysis where the sugar molecules break down and rearrange, creating that signature shiny, brittle, mirror-like finish.
When the brownie finishes baking and begins to cool, the dense, fudgy interior settles and sinks slightly. The rigid, glass-like sugar crust on top cannot shrink with it, so it stretches and shatters, creating those glorious, tissue-thin crinkles.
If your sugar was not dissolved in the first place, it never hitches a ride to the surface with the steam. No dissolved sugar at the surface means no recrystallization, no fragile glass-like sheet, and no glossy crinkles. You just get a dull, baked sponge.
The Masterclass Techniques: How to Force Sugar to Dissolve
Now that you understand the chemistry, let us talk about execution. As a home cook who heavily prioritizes efficiency during the week, I am all about shortcuts. But when it comes to weekend baking, I am a ruthless perfectionist. You cannot rush the dissolution of sucrose. Here are the three mandatory techniques you must employ to guarantee a glossy crust.
Technique 1: The Hot Butter Bath
Sugar dissolves significantly faster and more completely in a warm liquid than in a cold one. Most amateur recipes tell you to cream room-temperature butter with sugar. That works for cookies, but it is a death sentence for a brownie crust.
Instead, you need to melt your butter (and your chocolate, if you are using chopped bars instead of just cocoa powder) until it is aggressively hot. I am talking about pulling it right off the stove or out of the microwave when it is practically bubbling. Immediately dump your granulated sugar directly into this hot fat and water mixture. The thermal energy from the hot butter will rapidly break down the crystalline structure of the sucrose, forcing it to dissolve into the ambient moisture of the butter.
Technique 2: The Vigorous Egg Whip (The Ribbon Stage)
Once your hot butter and sugar mixture has cooled slightly (so you do not accidentally scramble your eggs), you must introduce the eggs. This is where the magic happens. You need to beat the eggs and the sugar mixture together mercilessly.
You do not need a massive commercial stand mixer for this; standard beginner kitchen tools like a sturdy balloon whisk will work perfectly fine, provided you have the arm stamina. You must whisk the mixture for a solid three to five minutes until it transforms into a pale, thick, incredibly foamy batter.
This vigorous mechanical agitation serves two purposes: it denatures the egg proteins to build the meringue foam, and the constant friction forces any remaining stubborn sugar crystals to fully dissolve into the egg’s water content. You will know you have achieved victory when you lift your whisk and the batter falls back into the bowl in thick, continuous ribbons that sit on the surface for a few seconds before sinking. This is known in pastry kitchens as the “ribbon stage.”
Technique 3: The Hydration Rest
If you are using a particularly coarse granulated sugar, or if you just want an absolute ironclad guarantee of a glossy crust, employ the hydration rest. After you have aggressively whisked your eggs, sugar, and hot butter, walk away. Leave the bowl on the counter for 10 to 15 minutes.
This resting period gives the sucrose ample time to fully hydrate and dissolve into the liquid matrix without requiring you to break your arm whisking. After the rest, give it one more vigorous whip for 30 seconds to re-aerate the foam before folding in your dry ingredients.
The Ingredient Matrix: Choosing Your Players
You cannot build a structurally sound house with cheap materials, and you cannot build a perfect brownie crust with the wrong ingredients.
The Sugar: You must use refined white granulated sugar or caster sugar for the bulk of the recipe. White sugar is pure sucrose, which crystallizes cleanly to form that brittle, shiny crust. While brown sugar adds incredible depth, chewiness, and moisture (thanks to the molasses), it is highly hygroscopic (water-attracting) and inhibits clean crystallization. If you want a glossy top, your sugar ratio must heavily favor pure white granulated sugar.
The Eggs: Use room-temperature eggs. If you pull eggs directly out of a 36°F refrigerator and dump them into your warm butter/sugar mixture, you will instantly drop the temperature of the batter. A sudden drop in temperature causes the melted butter to seize and solidify, and it immediately halts the dissolution of the sugar. Place your cold eggs in a bowl of warm tap water for ten minutes before cracking them.
The Flour: Stick to standard all-purpose flour. Cake flour lacks the protein needed to give the brownie chew, and bread flour will develop too much gluten, resulting in a tough, rubbery brick. When you finally add the flour, do it gently. Use a high-quality tool for folding. If you have ever wondered why your silicone spatulas taste like soap, it is because cheap synthetic rubbers absorb dishwasher detergents and oils. Use a premium, non-porous silicone spatula and fold the flour in just until the white streaks disappear. Overmixing at this stage will deflate the beautiful egg foam you just spent five minutes building.
The Sassy Sous-Chef’s No-Go Gear Warning
Listen to me carefully: you can execute the chemistry flawlessly, dissolve your sugar to perfection, and build a magnificent meringue foam, only to completely destroy your brownies by pouring the batter into garbage kitchenware. I have zero patience for toxic, cheap, or scientifically flawed baking pans.
Line the pan with parchment paper. I have told you before why cooking spray is the enemy to your bakeware—the soy lecithin in aerosol sprays polymerizes under high heat, leaving a sticky, permanent brown residue that ruins pans. Use unbleached parchment paper with a slight overhang so you can lift the entire brownie slab out effortlessly.
Now, let us talk about the vessel itself.
Before you pour that liquid gold into a cheap vessel, remember the flaw in dark nonstick pans. Dark metal absorbs and radiates heat far more aggressively than light metal. A dark, cheap, peeling Teflon pan will incinerate the edges and bottom of your brownies, turning them into dry, bitter rocks before the center has even had a chance to set. Worse, those toxic non-stick coatings begin to degrade and off-gas when exposed to high oven temperatures over time. Throw them in the trash where they belong.
What about glass? Glass is an insulator, which is why I constantly preach about the danger of glass baking pans. Glass takes a very long time to heat up. By the time the glass gets hot enough to transfer thermal energy to the center of your brownie batter, the outer edges have been baking for far too long and have turned dry and crumbly. Furthermore, glass is susceptible to thermal shock. Nobody wants to spend their weekend Googling why their glass baking dish shattered in the oven because they accidentally set a cold bowl of batter into a preheated Pyrex dish.
The absolute best tool for baking brownies is a light-colored, heavy-gauge anodized aluminum pan. Aluminum is an exceptional conductor of heat. It heats up quickly and evenly, ensuring that the steam is generated uniformly across the entire batter, pushing that dissolved sugar to the surface evenly to create a flawless, edge-to-edge glossy crust. Invest in heavy-gauge anodized aluminum so you aren’t left wondering why your baking sheets keep warping and popping under high heat. This philosophy is exactly how you build a minimalist kitchen setup that actually functions—buying one high-quality, thermally conductive metal pan instead of hoarding stacks of cheap, toxic, or insulating garbage.
The Step-by-Step Execution: Putting the Science into Practice
If you want to bake like a professional without going to culinary school, you just need to follow the rules of chemistry. Here is the exact, bulletproof order of operations to achieve the ultimate glossy brownie crust:
- Preheat and Prep: Preheat your oven to 350°F (175°C). Line an 8×8-inch light-colored aluminum baking pan with parchment paper, leaving an overhang on two sides. Do not use aerosol spray.
- The Hot Melt: In a microwave-safe bowl (or over a double boiler), melt your butter and chopped high-quality chocolate. Get it hot.
- The Sugar Dissolution: Immediately pour your white granulated sugar into the hot butter and chocolate mixture. Stir vigorously. The heat will begin breaking down the sucrose crystals.
- The Temperature Check: Let the mixture sit for about 3 to 5 minutes until it is warm, but no longer scalding hot. You want it warm enough to continue dissolving sugar, but cool enough that it won’t cook the raw eggs upon contact.
- The Foam Build (Ribbon Stage): Add your room-temperature eggs and a splash of vanilla extract. Grab your whisk and beat the absolute life out of the batter. Do not stop for at least three minutes. You are looking for a pale, thick, highly aerated batter that falls in ribbons.
- The Hydration Rest (Optional but Recommended): Let the bowl sit on the counter for 10 minutes to allow the last stubborn sugar crystals to fully dissolve into the egg moisture.
- The Dry Fold: Sift in your all-purpose flour, cocoa powder, and a generous pinch of kosher salt. Using a high-quality silicone spatula, gently fold the dry ingredients into the wet. Stop mixing the exact second the last streak of flour disappears.
- The Bake: Pour the batter into your prepared aluminum pan. Smooth the top gently. Bake for 25 to 30 minutes.
- The Cooling Phase: This is the hardest part, but it is chemically necessary. When you pull the brownies out, the crust will be puffed up. As it cools, the steam dissipates, the interior crumb settles, and the rigid sugar crust stretches and fractures into those beautiful, glossy crinkles. Do not slice into them while they are hot, or you will tear the delicate meringue skin and ruin the fudgy texture of the interior crumb. Let them cool completely.
Troubleshooting: Why Did My Crust Still Fail?
If you followed the science and still ended up with a dull, matte finish, you likely committed one of these three baking sins:
1. You Altered the Sugar Ratio: If you decided to “make it healthier” by cutting the sugar in half, or substituting it with a liquid sweetener like maple syrup or honey, you destroyed the chemistry. Liquid sweeteners contain invert sugars and excess water that fundamentally alter the vapor pressure and prevent a brittle sucrose crust from forming. If you reduce the granulated sugar, there is not enough sucrose to stabilize the egg foam. You get a matte cake.
2. You Overmixed the Flour: If you vigorously stirred the batter after adding the flour, you developed massive amounts of gluten and simultaneously knocked all the trapped air out of your carefully constructed egg foam. Without the air bubbles, the meringue collapses, the sugar sinks, and the crust disappears.
3. Your Oven Temperature Was Inaccurate: If your oven runs cold (which many home ovens do), the water in the batter will not convert to steam rapidly enough. Without that aggressive upward push of steam, the dissolved sugar and proteins will not migrate to the surface in high enough concentrations to form a continuous glossy sheet. Always use an independent internal oven thermometer to verify you are actually baking at 350°F.
The Final Word
Baking is not about luck, and it is certainly not about having the most expensive stand mixer on the market. It is about respecting the ingredients and understanding the molecular reactions that occur when you apply heat and friction.
The glossy, crinkly, tissue-thin brownie crust is a testament to the beautiful, delicate science of the meringue. By taking the time to fully dissolve your sucrose, utilizing the thermal energy of hot butter, and aggressively aerating your egg proteins, you are taking complete control over the chemical outcome of your dessert.
Stop settling for dull, matte, disappointing baked goods. Respect the chemistry, ditch the toxic non-stick pans, whisk those eggs until your arm burns, and claim your rightful title as the master of the home kitchen. Happy baking.






