You know the scenario. It is 6:30 PM on a Tuesday. You are exhausted, staring at a recipe that nonchalantly instructs you to “caramelize the onions (about 10 minutes).” I am here to tell you, with the fiery passion of a thousand burning suns, that this is the biggest lie in the culinary world. Caramelizing onions in ten minutes without a chemical intervention is structurally, thermodynamically, and scientifically impossible. Unless you have discovered a way to bend the space-time continuum, you are not getting deep, jammy, mahogany-brown onions in the time it takes to boil a pot of water.
Instead of throwing your hands up in defeat and relying on greasy takeout, you need a strategy. You are a busy person. Time is money, and weeknight dinners require ruthless efficiency. We do not have time for culinary romanticism on a Tuesday.
Today, we are going to hack the system. We are going to use a tiny pinch of household chemistry to force those stubborn alliums to surrender their sweet, complex flavors in a fraction of the time. Grab your apron, pour yourself a generous glass of wine, and let’s talk about the magic of baking soda.
The Great Culinary Lie: “Caramelized in 10 Minutes”
Why Recipe Writers Lie to You
Let’s address the elephant in the room. Why do food bloggers and cookbook authors constantly lie about how long it takes to caramelize onions? It all comes down to approachability. If a recipe tells you that you need to stand over a hot stove for 45 to 60 minutes, constantly stirring a pile of shrinking vegetables, you are going to flip the page and find something else to cook.
Publishers know that modern home cooks want fast, easy, 30-minute meals. So, they massage the truth. They tell you that a quick sauté over medium-high heat will yield “caramelized” results. But let’s be brutally honest: what you get after 10 minutes of standard cooking is not caramelized. It is merely sautéed. It is limp, translucent, and perhaps slightly browned on the edges, but it lacks the profound, candy-like sweetness and jammy texture of the real deal. True caramelization is a labor of love. It requires patience, low heat, and a willingness to babysit a skillet while the onions slowly release their water, break down, and undergo complex molecular transformations.
The Reality of the Weeknight Hustle
I firmly believe that you do not need a culinary degree to make mind-blowing food in a standard home kitchen. You just need to understand the rules of the game so you can figure out how to break them effectively. I have spent years learning through trial, error, and setting off my smoke detector more times than I care to admit.
When you are trying to get a meal on the table before 7 PM, a 45-minute stovetop commitment is an absolute dealbreaker. But skipping the flavor-building steps is exactly what ends up ruining your weeknight meals and making them taste flat, boring, and uninspired. We need the rich, savory depth of caramelized onions for our weeknight burgers, quick pan sauces, and savory tarts, but we need it in 15 minutes. To achieve this, we have to look past traditional culinary arts and step into the realm of food science.
The Science of the Sizzle: What Actually Happens in the Pan
Breaking Down the Onion’s Defenses
To defeat your enemy, you must first understand it. An onion is essentially a water balloon held together by a rigid network of plant cells. These cell walls are reinforced by a complex carbohydrate called pectin. Think of pectin as the structural glue that gives a raw onion its firm, crisp crunch. Inside those cells are vacuoles filled with water, sugars, and the notorious sulfur compounds (specifically syn-propanethial-S-oxide) that make you weep when you chop them.
When you drop sliced onions into a hot pan, the first phase of cooking is entirely about water management. A raw onion is roughly 90% water by weight. Before any browning can even think about occurring, that massive volume of intracellular liquid has to be drawn out of the cell walls and evaporated. This is why onions shrink so dramatically as they cook. You start with a mountain of raw slices that threatens to overflow your largest skillet, and 20 minutes later, you are left with a pathetic, lonely little puddle of aromatics. The heat breaks down the cell walls, the water escapes, the harsh sulfur compounds mellow into sweet bisulfides, and the onion collapses.
Caramelization vs. The Maillard Reaction
Here is where we need to banish some pretentious chef-speak and get our facts straight. The culinary world uses the term “caramelized onions” universally, but chemically speaking, it is a bit of a misnomer. The deep, savory, roasted flavor you love is actually the result of two distinct chemical processes happening simultaneously: the Maillard reaction and true caramelization.
The Maillard reaction, named after French chemist Louis-Camille Maillard who described it in 1912, is the undisputed king of flavor. It is a complex chemical dance between amino acids (the building blocks of proteins) and reducing sugars. When exposed to heat (typically starting around 285°F or 140°C), these molecules rapidly react. The process happens in three stages: initiation (forming glycosylamine), the Amadori rearrangement (where things get structurally chaotic), and finally Strecker degradation and polymerization. This creates hundreds of brand-new, highly complex flavor compounds and dark brown pigments called melanoidins. This is the exact same reaction that gives a seared steak its crust, baked bread its golden exterior, and roasted coffee its bitter depth.
Caramelization, on the other hand, is the pyrolysis (heat-induced breakdown) of pure sugars in the absence of proteins. This process requires significantly higher temperatures, usually kicking in around 330°F (165°C). As the natural sucrose, glucose, and fructose in the onions heat up, they break down into volatile chemicals like diacetyl (which tastes like butter) and maltol (which tastes toasty and sweet). So, when you “caramelize” onions, you are actually orchestrating a beautiful symphony of both Maillard browning and sugar caramelization.
The Enemy of Browning: Water
There is one massive roadblock to these beautiful chemical reactions: water. The Maillard reaction and caramelization require temperatures well above the boiling point of water (212°F or 100°C).
As long as there is liquid water in your skillet, the temperature of the onions cannot exceed 212°F. The thermal energy from your stove is entirely consumed by the phase change of turning liquid water into steam. The onions will steam, soften, and sweat, but they absolutely will not brown. This is why traditional caramelization takes an eternity. You have to wait for the onions to slowly release their ocean of internal moisture, wait for that moisture to evaporate, and only then can the temperature of the onion tissue rise high enough to trigger the Maillard reaction. We need a way to fast-track this process.
The Secret Weapon: Why Baking Soda Changes Everything
The Power of the pH Scale
Enter the humble hero of our story: sodium bicarbonate, universally known as baking soda. This inexpensive white powder sitting in the back of your pantry is the ultimate biological hacking tool for the home cook.
To understand why baking soda accelerates browning, we have to talk about the pH scale. The pH scale measures how acidic or alkaline a substance is, ranging from 0 (highly acidic) to 14 (highly alkaline), with 7 being perfectly neutral. Raw onions are naturally slightly acidic, sitting around a pH of 5.5. When you add a tiny pinch of baking soda to your cooking onions, you instantly neutralize that natural acidity and raise the pH of the entire environment, making the pan slightly alkaline. This single, microscopic chemical shift changes the entire trajectory of your cooking process.
Pectin Breakdown: Softening the Blow
The first miraculous thing an alkaline environment does is launch a direct attack on the onion’s structural integrity. Remember pectin, the cellular glue we talked about earlier? Pectin is highly sensitive to pH levels.
In an acidic environment, pectin remains rigid and stable. This is why tomatoes take forever to break down into a smooth sauce, and why beans cooked with acidic ingredients will stay hard for hours. But in an alkaline environment, pectin degrades and dissolves at an astonishingly rapid rate. By raising the pH with baking soda, you are essentially dissolving the onion’s cell walls on contact. The onions collapse, soften, and release their internal water content exponentially faster than they would on their own. What normally takes 25 minutes of patient sweating happens in a mere 5 minutes.
Supercharging the Maillard Reaction
But the magic doesn’t stop at texture. The Maillard reaction is also profoundly influenced by pH levels. In an acidic environment, the amino acids are protonated, meaning they hold onto an extra hydrogen ion, which makes them highly unreactive.
When you introduce baking soda and push the pH into the alkaline zone, those amino acids lose that extra proton (a process called deprotonation). Suddenly, they become highly reactive nucleophiles, desperately seeking out reducing sugars to bond with. The result? The Maillard reaction goes into absolute overdrive. The browning process that normally takes 40 minutes at a low, slow heat will now occur aggressively in just 10 to 15 minutes. It is the culinary equivalent of putting a sports car into hyperdrive. (This, by the way, is the exact same science behind dipping pretzels in lye or baked baking soda before baking to achieve that dark, mahogany crust).
The Dark Side of Chemistry: Avoiding the “Soapy Sludge”
The Crucial Ratio: Do Not Improvise
Now, before you go dumping a tablespoon of Arm & Hammer into your skillet, we need to have a very serious conversation about restraint. Baking soda is a powerful chemical reagent, and with great power comes great responsibility.
If you use too much baking soda, you will completely ruin your food. High alkalinity tastes inherently bitter, metallic, and profoundly soapy. There is nothing worse than taking a bite of what looks like a beautiful French onion soup, only to feel like you just gargled with dish detergent. The ratio is non-negotiable: you should use no more than 1/8 to 1/4 teaspoon of baking soda per pound of raw onions. I highly recommend starting with just 1/8 teaspoon. It is a visually pathetic amount of powder. You will look at it and think, “This can’t possibly be enough.” Trust the science. It is enough. Do not improvise.
The Texture Trade-Off
We also have to discuss the physical consequences of rapid pectin degradation. Because baking soda destroys the cellular glue so aggressively, your onions are not going to hold their shape perfectly.
Traditional caramelized onions, cooked low and slow for an hour, maintain a slight structural integrity. You can still identify individual, distinct strips of onion. Baking soda onions, however, tend to melt into a soft, jammy, almost puree-like consistency. For 90% of weeknight applications—spreading on a burger, mixing into a dip, folding into a pasta sauce, or layering into a grilled cheese—this jammy, spreadable texture is actually vastly superior. But if you are plating a highly structural dish where you want distinct, beautiful ribbons of intact onion, this hack might not be the right choice. You have to weigh the texture trade-off against the massive time savings.
The Sassy Sous-Chef’s Mandatory Cookware Rant
Ditch the Toxic Non-Stick Garbage
I cannot in good conscience teach you a high-heat browning technique without addressing the equipment you are using. I have a strict “no-go” rule on cheap, toxic kitchenware, and I will shout it from the rooftops until every home cook listens.
If you are trying to caramelize onions in a scratched, peeling Teflon pan you bought at a big-box store five years ago, you need to stop immediately. Those cheap non-stick coatings are not designed for the sustained heat required for proper Maillard browning. Worse, when they degrade, they leach PFAS (forever chemicals) and mystery metals directly into your food. You absolutely must prioritize ditching cheap toxic kitchenware if you want to cook safely and effectively.
Furthermore, non-stick surfaces actively prevent the formation of “fond”—those glorious, sticky, browned bits of caramelized sugars and proteins that adhere to the bottom of the pan. Fond is pure, concentrated flavor, and you need a pan that allows it to develop. And please, do not even get me started on aerosol cooking sprays that leave a sticky, polymerized residue that ruins whatever slip your pan actually had left.
The Best Pans for the Job
To do this right, you need cookware with serious thermal mass and a safe, uncoated surface. My top recommendations are heavy-bottomed multi-clad stainless steel, well-seasoned carbon steel, or enameled cast iron.
Stainless steel is fantastic because its light-colored surface allows you to easily monitor the color of the fond, ensuring you don’t cross the line from beautifully browned to acrid and burnt. Carbon steel and cast iron hold heat incredibly well, providing the even, consistent temperatures necessary to drive the moisture out of the onions quickly without dropping in temperature the second the cold vegetables hit the pan. If you are terrified of your food sticking to uncoated metal, the solution is temperature control. By properly preheating your pan before adding your fat and your ingredients, you trigger the Leidenfrost effect, creating a natural non-stick barrier that makes cooking a breeze.
The Definitive 15-Minute Masterclass Method
Step 1: The Prep and the Tear-Free Slice
Start with two to three large yellow onions (about one and a half pounds). Yellow onions have the perfect balance of moisture, sugar, and pungency for caramelization. Red onions turn a muddy grey color when exposed to alkaline baking soda, and sweet onions (like Vidalias) have so much moisture they take even longer to cook down. Slice the onions evenly. I prefer slicing “pole-to-pole” (from the root to the stem) rather than across the equator. Pole-to-pole slices rupture fewer cells, release fewer crying-inducing sulfur compounds, and hold their shape slightly better during the aggressive chemical breakdown we are about to unleash.
If you find yourself weeping uncontrollably at the cutting board, the problem isn’t the onion; it’s you using a dull knife. A dull blade crushes the cell walls rather than slicing them, spraying those volatile sulfur gases directly into your eyeballs. Sharpen your knife.
Also, please stop using a warped, cracked wooden cutting board that traps bacteria in its crevices. Invest in a solid, end-grain board. Once your onions are beautifully sliced, scoop them all up efficiently with a trusty stainless bench scraper and head over to the stove.
Step 2: The Fat and the Heat
Place your heavy skillet over medium-high heat. We are starting hot to aggressively drive off the initial water content. For the fat, I highly recommend a combination of butter and olive oil.
Butter brings incredible flavor and milk solids that assist in the browning process, while the olive oil raises the overall smoke point to prevent butter from burning during the high-heat phases. Use about one tablespoon of unsalted butter and one tablespoon of a good quality extra-virgin olive oil. Let the butter melt until the foaming subsides. This tells you the water in the butter has evaporated and the pan is perfectly hot and ready to receive the payload.
Step 3: The Sizzle and the Baking Soda Drop
Add the mountain of sliced onions to the pan. It will look like too much. It will sizzle aggressively. Toss them well to coat every slice in the fat. Immediately sprinkle in a generous pinch of kosher salt. Salt draws out moisture through osmosis, accelerating the sweating phase.
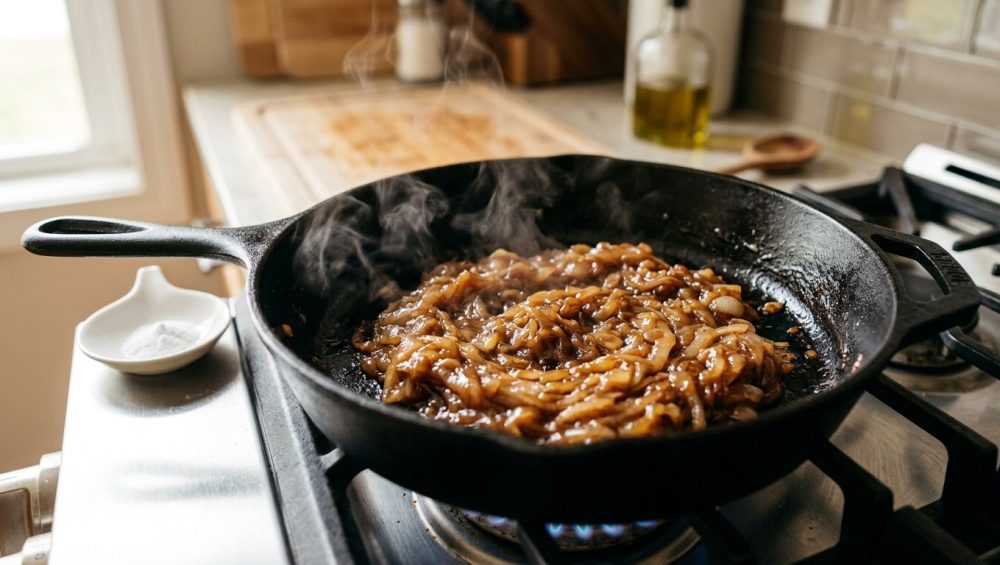
Now, sprinkle in exactly 1/8 teaspoon of baking soda. Stir continuously. Within two to three minutes, you will witness a culinary miracle. The onions will rapidly collapse, turning a vibrant yellow and releasing a pool of liquid. As that liquid evaporates, the Maillard reaction will kick in with terrifying speed. Keep the onions moving so they brown evenly and don’t scorch.
Step 4: The Deglaze
Around the 10 to 12-minute mark, the onions will be deeply browned, and a dark, sticky fond will have formed on the bottom of the pan. If you let this go any further, it will burn. It is time to deglaze.
Pour in a splash of liquid—about two tablespoons of water, chicken broth, dry white wine, or even a splash of balsamic vinegar. The liquid will instantly boil and steam. Use a sturdy wooden spoon or spatula to aggressively scrape the bottom of the pan, lifting all that incredible browned flavor and incorporating it back into the onions. While a sloped saucier pan is unparalleled for whisking delicate emulsions and gravies, a wide, flat skillet is your best friend here, maximizing the surface area for rapid evaporation. Continue cooking for another two to three minutes until the liquid has completely reduced and the onions are a glossy, dark mahogany jam. Turn off the heat. You are done.
Troubleshooting Your Onion Woes
My Onions Are Burning, Not Browning
If your onions are turning black and smelling acrid before they turn sweet and brown, your heat is simply too high, or you aren’t stirring frequently enough. The baking soda accelerates everything, including the transition from perfectly browned to horribly burnt.
If you see the fond getting too dark too quickly, don’t panic. Just drop the heat to medium-low and add a tiny splash of water to immediately halt the cooking process and cool the pan. This buys you time and lifts the fond before it turns into carbon.
My Onions Taste Like a Science Experiment
If you take a bite and are hit with a soapy, metallic, bitter aftertaste, you didn’t listen to my warning. You used too much baking soda.
While you can’t completely reverse a heavy-handed chemical dump, you can mitigate the damage by re-introducing acidity to neutralize the alkaline baking soda. Stir in a teaspoon of balsamic vinegar, apple cider vinegar, or fresh lemon juice. The acid will react with the remaining baking soda, balancing the pH and masking the soapy flavor with a bright, tangy counterpoint.
My Onions Are Still Crunchy
If your onions are browned on the outside but still raw and crunchy on the inside, you either overcrowded the pan or you used a pan that doesn’t retain heat well.
When you pile three pounds of onions into a tiny 8-inch skillet, they will steam indefinitely. The water can’t escape fast enough because the surface area is too small. Always use your widest pan—a 12-inch skillet is ideal for a standard batch. If you must cook a massive quantity, do it in batches, or accept that the baking soda trick can only do so much against a towering mountain of wet vegetables.
Storing and Using Your Liquid Gold
Weeknight Dinner Upgrades
Now that you have unlocked the secret to 15-minute caramelized onions, your weeknight dinners will never be the same. This jammy, savory condiment is the ultimate flavor booster.
Slather it onto a brioche bun before adding a smashed beef patty for the greatest weeknight burger of your life. Fold it into a basic béchamel sauce with Gruyère cheese for a mind-blowing macaroni and cheese. Spread it over store-bought puff pastry, top with goat cheese and thyme, and bake for a rustic tart that looks like it took hours to prepare. You can even stir it directly into a simple vinaigrette to add a deep, roasted sweetness to an otherwise boring Tuesday night salad. The applications are literally endless when you aren’t exhausted from standing at the stove for an hour.
Proper Storage Techniques
Because this method is so fast, I highly recommend making a double batch (using two wide skillets if necessary) on a Sunday afternoon.
Allow the caramelized onions to cool completely to room temperature, then transfer them to an airtight glass container. They will keep beautifully in the refrigerator for up to a week. For longer storage, you can freeze them in an ice cube tray, popping out individual flavor bombs to drop directly into soups, stews, and pan sauces all month long.
Cooking shouldn’t be a chore, and it certainly shouldn’t require you to suspend reality. By embracing a little bit of science and ditching the pretentious culinary myths, you can absolutely cook like an expert on your own schedule. Now go forth, grab that baking soda, and show those onions who is boss.