Grab a glass of whatever gets you through the week, because we need to have a serious, uncompromising intervention about the foil-wrapped atrocities you have been passing off as baked potatoes. I have zero patience for pretentious chef-speak, but I have even less patience for a ruined spud.
If you are like most everyday home cooks, you were probably taught that wrapping a potato in aluminum foil is just “what you do.” You were told it cooks faster, keeps the potato hot, and is the standard procedure for dinner side dishes. I am here to tell you that this culinary myth is not only entirely false, but it is the exact reason your baked potatoes turn out dense, heavy, and texturally reminiscent of wallpaper paste.
Time is money during the week, which is why we rely on clever, lightning-fast hacks to survive Monday through Friday. But the weekend? The weekend is when we put on our aprons, pour a generous glass of wine, and get down to the absolute science of culinary perfection. You do not need a culinary degree to make mind-blowing food, but you do need to understand the basic thermal dynamics of what is happening inside your oven.
Today, we are going to tear down everything you thought you knew about the humble potato. We are going to explore the starch chemistry of the Russet, the thermodynamics of a 400°F oven, and the exact internal temperature required for flawless, steakhouse-quality fluffiness. Then, we are going to take that newfound knowledge and build a blueprint for an interactive, loaded, stress-free potato bar that will make you the undisputed champion of weekend hosting.
The Great Foil Conspiracy: Why Your Baked Potatoes Are Actually Steamed
Let us get straight to the science. To understand why a potato behaves the way it does in the oven, you have to look at what it is actually made of. A raw potato is essentially a matrix of water and complex carbohydrates, specifically two types of starch molecules: amylose and amylopectin.
The Anatomy of a Potato and Starch Chemistry
When a raw potato sits on your counter, its starches are tightly packed into microscopic granules. As the internal temperature of the potato climbs past 135°F in the oven, these granules begin to vigorously absorb the potato’s natural water content. By the time the internal temperature hits around 150°F, these water-logged starch granules swell to their maximum capacity and literally burst open. This process is known in the culinary science world as starch gelatinization.
If the water inside the potato is allowed to turn into steam and escape through the porous skin of the potato, the gelatinized starch is left behind as a delicate, airy, dehydrated network of molecules. This is what creates that incredibly light, snowy, fluffy interior that absorbs butter like a sponge.
The Moisture Trap
This brings us to the tragedy of aluminum foil. When you tightly wrap a potato in metal, you are creating a miniature, impenetrable sauna. As the potato heats up and attempts to release its internal water as steam, the foil traps every single drop of that moisture against the skin and forces it right back into the flesh.
You are not baking a potato; you are boiling it in its own sweat.
Because the steam has absolutely nowhere to go, the starch granules drown. Instead of dehydrating into a fluffy network, they congeal into a wet, heavy, gummy paste. Furthermore, the trapped moisture completely destroys any chance of the skin crisping up, leaving you with a leathery, soggy exterior. This is why the Idaho Potato Commission itself practically begs consumers to stop wrapping them in foil. If you want a steamed, wet potato, use the microwave. If you want a baked potato, let it breathe.
The Toxic Truth About Cheap Bakeware
Since we are on the subject of foil and baking, we need to address the absolute state of your kitchen equipment. I firmly believe in advocating for the home cook, which means I will never tell you to spend $400 on a single pan. However, I have a strict, non-negotiable “no-go” rule when it comes to cheap, toxic kitchenware.
Do not even think about placing your pristine, carefully prepped potatoes on a scratched, peeling non-stick baking sheet. The FDA did not update their heavy metal leaching warnings in late 2025 just for us to ignore them. When cheap non-stick coatings (often laden with PFAS forever chemicals) degrade, or when mystery-metal aluminum alloys are exposed to heat and salt, they can leach directly into your food.
I am deeply committed to banishing toxic kitchen gear from your home. You need durable, safe equipment. For baking potatoes, you should be using a bare, heavy-gauge stainless steel baking sheet, a cast-iron skillet, or simply placing the potatoes directly on the oven racks. If you are constantly wondering why your cheap baking sheets keep warping in a 400°F oven, it is because they are made of dangerously thin, low-quality materials that cannot handle basic thermal expansion. Invest in bare stainless steel or commercial-grade uncoated aluminum, and stop using aerosol cooking sprays that leave a polymerized, sticky residue, which is the primary culprit behind ruining your nonstick pans in the first place.
The Science of the Flawless Russet: A Thermal Masterclass
Now that we have banished the foil and thrown away the peeling baking sheets, it is time to execute the perfect bake. Baking a potato requires precision, but it is a hands-off precision that anyone can master.
Why the Russet Reigns Supreme
Not all potatoes are created equal, and choosing the wrong variety is the first step toward failure. Potatoes exist on a spectrum from “starchy” to “waxy.” Waxy potatoes, like red potatoes and fingerlings, have low starch content and high moisture content. They hold their shape beautifully when boiled for potato salad, but if you try to bake them, their low amylose content means they will never achieve a fluffy interior.
The Russet potato is the undisputed king of the oven. It is a high-starch, low-moisture tuber with a thick, robust skin. That thick skin acts as a natural pressure cooker during the baking process, allowing the interior to get incredibly hot while protecting the flesh from drying out completely. Always choose Russets that are uniform in size so they finish cooking at the exact same time. Give them a vigorous scrub under cold water to remove the dirt, and dry them completely. If you skip the drying step, the residual surface water will steam the skin during the first twenty minutes of baking.
The 400°F Sweet Spot
Temperature control is everything. If you bake a potato at 300°F, the heat penetrates too slowly. The skin will dehydrate and turn into tough leather long before the center is cooked. If you blast the potato at 450°F or 500°F, the skin will scorch and burn before the heat has time to reach the core, leaving you with a charred hockey puck that is raw in the middle.
The absolute sweet spot for a Russet potato is 400°F. At this temperature, the ambient heat of the oven transfers energy through the thick skin at the perfect rate. The skin has time to render out its moisture and crisp up beautifully, while the interior starch granules have the exact amount of time they need to absorb water, swell, and burst into fluffy perfection.
The Magic Number: 205°F Internal Temperature
How do you know when a baked potato is actually done? Most rookie cooks rely on the “squeeze test” or poke it with a fork. This is culinary guesswork, and we do not do guesswork when we are aiming for perfection. A potato might feel soft on the outside but still be dense and waxy in the very center.
The secret to absolute, foolproof perfection is thermal measurement. You need an instant-read digital thermometer. If you are still using an old, uncalibrated analog dial dial gauge, your meat thermometer is lying to you, and it is time for an upgrade.
Insert the probe directly into the dead center of the largest potato. You are looking for an exact internal temperature of 205°F (up to 210°F is acceptable). Why 205°F? Because culinary science dictates that this is the precise temperature at which the maximum amount of starch gelatinization has occurred, and the maximum amount of internal water has converted to steam, without crossing the threshold into burning the sugars. Pull the potatoes at 190°F, and they will be gummy. Let them go to 215°F, and they will be dry and chalky. 205°F is the magic number.
The Salt Jacket Technique
If you want to elevate your potato from “good” to “restaurant quality,” you need to treat the skin with the respect it deserves. Once your potatoes are washed, dried, and pierced several times with a fork (to create steam vents so they do not literally explode in your oven), you are going to create a salt jacket.
Lightly coat the exterior of the dry potato with a high-heat fat. I prefer a neutral oil like avocado oil, or even melted beef tallow if you want to be decadent. Do not use butter for this step; the milk solids in butter will burn at 400°F and give your potato a bitter, acrid taste. Once coated in oil, roll the potato generously in coarse kosher salt.
The salt jacket does two things. First, it actively draws moisture out of the skin as it bakes, accelerating the crisping process. Second, it seasons the skin deeply, turning what is normally a discarded wrapper into the best part of the meal.
The Mindful Potato Bar: Hosting Without the Headache
Now that you possess the knowledge to bake the perfect Russet, it is time to put it to use. We are going to build a Mindful Potato Bar.
The Philosophy of the Potato Bar
Hosting a weekend gathering should be joyful, not a chaotic marathon of stress that leaves you sweating over a hot stove while your guests are in the other room. If you want to host a relaxed dinner party, you have to engineer a menu that does the heavy lifting for you.
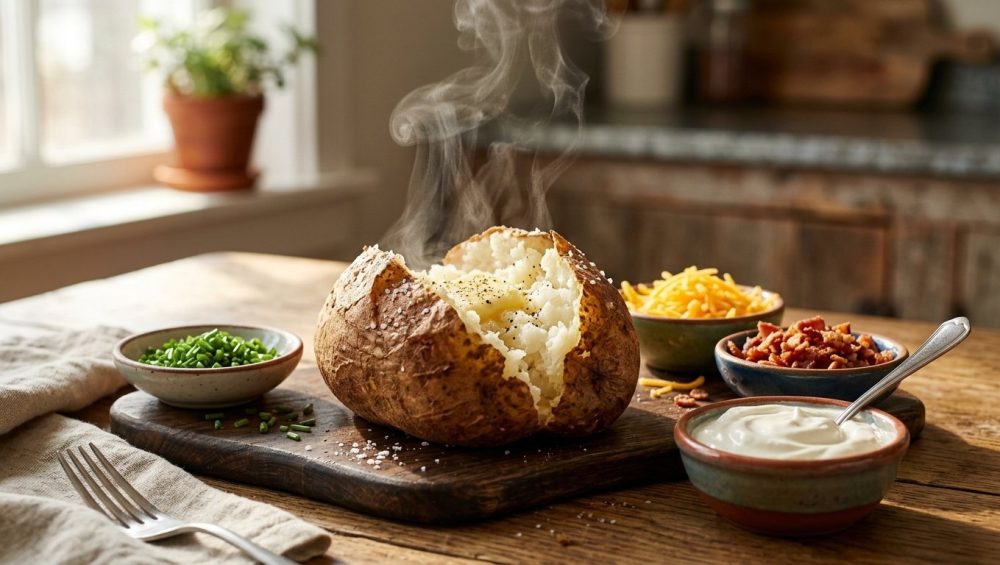
The baked potato bar is the ultimate hosting hack for the everyday home cook. It is incredibly affordable, it scales effortlessly whether you are feeding four people or fourteen, and it is inherently customizable. Have a guest who is gluten-free? A baked potato is naturally safe. Vegan friends? Provide plant-based toppings. Carnivores? Load up the pulled pork. It is a communal, interactive dining experience that looks wildly impressive but requires almost zero active cooking during the actual party.
Strategic Timing and Prep
The downfall of most home hosts is a lack of staging. Trying to chop chives, fry bacon, and grate cheese while your guests are arriving is a guaranteed recipe for ruining your dinners. The beauty of the potato bar is that 100% of the toppings can be prepped days in advance and stored in airtight containers in the fridge.
When your guests arrive, the only thing you should be doing is pulling a tray of 205°F potatoes out of the oven, slicing them open, and directing people to the topping station.
Elevating the Toppings: From Sad Sour Cream to Culinary Artistry
A flawless potato is a blank canvas. If you serve it with a tub of low-fat sour cream and a shaker of imitation bacon bits, you have entirely missed the point. We are elevating this to culinary artistry. You want to offer a curated selection of toppings that hit every flavor profile: fat, protein, acid, and crunch.
The Fat Foundation: Butter and Beyond
The moment a perfectly baked potato is sliced open, it needs a fat to melt into the fluffy starch matrix. Standard unsalted butter is fine, but we can do better.
Take ten minutes on a weeknight to whip up a compound butter. Let two sticks of high-quality, European-style butter come to room temperature. Whip it with a fork and fold in roasted garlic, a heavy pinch of flaky sea salt, and cracked black pepper. Roll it into a log using parchment paper and chill it. When your guests slice a coin of roasted garlic butter onto their steaming 205°F potato, they will lose their minds.
For the sour cream lovers, ditch the watery, low-fat versions. Buy full-fat, cultured sour cream, or better yet, use authentic Mexican crema or a high-quality crème fraîche. The richness of the dairy is necessary to cut through the heavy starch of the potato.
The Protein Punch
To turn a side dish into a main course, you need substantial proteins. This is a great opportunity to use leftover pulled pork or brisket from a previous weekend project. If you are starting from scratch, a deeply savory, slow-simmered beef and bean chili is the classic choice. Keep the chili warm in a slow cooker at the end of the potato bar line.
If you are doing bacon, do not insult your guests with store-bought crumbles. Buy thick-cut, high-quality bacon. Lay it flat on a bare stainless steel baking sheet and bake it at 400°F until perfectly rendered and crispy. Drain the grease, chop it into substantial chunks, and serve it at room temperature.
The Cheese Factor
Let me be brutally clear about this: pre-shredded cheese in a bag is a culinary crime. Those bags are coated in cellulose and anti-caking agents (like potato starch or wood pulp) to prevent the shreds from sticking together in transit. That same anti-caking agent prevents the cheese from melting smoothly, leaving you with a grainy, oily, clumped mess.
Buy block cheese. It takes exactly two minutes to grate a block of sharp aged cheddar, a nutty Gruyère, or a creamy Fontina. If you find that your block cheese crumbles when sliced or grated, it is likely because it is too warm; always grate your cheese straight out of the refrigerator while it is firm. Place the freshly grated cheese in beautiful ceramic bowls. If you want to go the extra mile, you can even build a mindful charcuterie board as a side appetizer, utilizing the leftover artisanal cheeses you didn’t grate for the potatoes.
The Acid and Crunch Factors
A loaded baked potato is heavy. It is rich, starchy, and fatty. To balance the palate, you desperately need acid and crunch.
This is where the fresh garnishes come into play. Finely chopped chives and thinly sliced scallions (green onions) are mandatory. However, if you chop them days in advance and store them improperly, you will quickly discover why your fresh herbs turn slimy in the fridge. To prevent this, line your airtight storage container with a slightly damp paper towel to regulate the humidity, and keep them in the crisper drawer.
For a massive pop of acid, quick-pickled red onions are an absolute game-changer on a baked potato. Thinly slice a red onion, toss it in a jar with a cup of white vinegar, a tablespoon of sugar, and a teaspoon of salt. Let it sit in the fridge overnight. The bright, acidic bite of the pickled onion cuts directly through the rich sour cream and sharp cheddar, balancing the entire flavor profile of the dish.
Do not forget the crunch. Crispy fried onions, toasted pumpkin seeds (pepitas), or even crushed kettle-cooked potato chips add a necessary textural contrast to the soft, fluffy interior of the potato.
The Step-by-Step Blueprint for the Ultimate Potato Gathering
To ensure you are actually enjoying your own party, you must follow a strict timeline. Here is your foolproof, stress-free blueprint for executing the Mindful Potato Bar.
Two Days Before
This is your prep window. You are going to do all the annoying chopping and mixing now so you do not have to look at a cutting board on the day of the party.
- Make the Compound Butter: Whip your room-temperature butter with roasted garlic and salt, roll it, and stash it in the fridge.
- Pickle the Onions: Slice your red onions, submerge them in the vinegar brine, and refrigerate.
- Cook the Bacon: Bake your thick-cut bacon, chop it, and store it in an airtight container.
- Grate the Cheese: Grate your blocks of cheddar and Gruyère. Store them in zip-top bags in the fridge.
The Morning Of
- Prep the Potatoes: Select uniform Russet potatoes. Scrub them aggressively under cold water to remove all dirt. Dry them completely with a clean kitchen towel. Do not oil or salt them yet.
- Prep the Fresh Herbs: Chop your chives and scallions. Store them in a container lined with a damp paper towel.
- Set the Stage: Arrange your serving station. Put out the serving bowls, serving spoons, napkins, and plates. Figure out the flow of traffic so guests can naturally move from the potatoes, to the fats, to the proteins, to the garnishes.
One Hour Before Serving
- Preheat the Oven: Set your oven to exactly 400°F. Allow it to preheat fully for at least 15 minutes.
- Jacket the Potatoes: Take a fork and pierce each dried Russet potato 6 to 8 times. This is non-negotiable; steam must escape or the potato will burst. Rub each potato lightly with avocado oil, then roll generously in coarse kosher salt.
- The Bake: Place the potatoes directly on the middle oven rack (place a foil-lined baking sheet on the bottom rack to catch any dripping oil, keeping the foil far away from the potatoes themselves).
- Set Out the Toppings: Pull your compound butter, sour cream, cheese, bacon, and herbs out of the fridge and transfer them to your display bowls. Let the butter and cheese come to room temperature for optimal melting.
- The Temperature Check: After 45 minutes, begin checking the internal temperature of the largest potato with your instant-read digital thermometer. You are hunting for exactly 205°F.
- The Squeeze: Once they hit 205°F, pull them from the oven. Immediately take a paring knife and slice a deep slit down the center of each potato. Using a kitchen towel to protect your hands, push the ends of the potato inward to force the center to blossom open. This allows the final blast of steam to escape, locking in that fluffy texture.
Troubleshooting Potato Disasters
Even with a masterclass, things can go sideways if you lose focus. Here is how to diagnose and fix the most common beginner baked potato mistakes.
The Leathery Skin
If your potato skin is impossibly tough and leathery, you baked it at too low of a temperature for too long. A 300°F or 350°F oven dehydrates the skin without crisping it. Always ensure your oven is fully preheated to 400°F before the potatoes go in. Additionally, if you skipped the oil and salt jacket, the skin will not crisp properly.
The Exploding Potato
If you hear a muffled pop from your oven and open the door to find potato shrapnel everywhere, you forgot to pierce the skin. The thick skin of a Russet is incredibly strong. As the water inside turns to steam, the pressure builds exponentially. If there are no fork holes to vent that pressure, the potato becomes a starchy hand grenade. Always pierce your potatoes.
The Cold Center
If the outside of your potato is beautifully browned but the center is hard and waxy, you pulled it out of the oven too early. This usually happens when people try to rush the process or rely on the “squeeze test” instead of a thermometer. A potato is not done until the dead center reaches 205°F. If you are short on time, do not crank the oven to 500°F (you will just burn the skin). Instead, you can microwave the potatoes for 5 minutes to jump-start the internal heating process, then transfer them to the 400°F oven to finish baking and crisp the skin.
The Final Word
Cooking does not have to be a stressful, pretentious endeavor, and you absolutely do not need to rely on cheap shortcuts that ruin your food. By understanding the basic starch chemistry of a Russet potato, ditching the toxic aluminum foil moisture-trap, and utilizing precise thermal control, you can produce a steakhouse-quality baked potato in a standard home kitchen every single time.
A Mindful Potato Bar is the ultimate testament to the smart home cook. It proves that with a little bit of science, some strategic prep work, and a commitment to high-quality ingredients, you can host an unforgettable, customizable feast without losing your mind in the process. Now go preheat your oven, grab your digital thermometer, and let those potatoes breathe.