Listen here, my little chickpea. We need to have a serious, sit-down conversation about that four-dollar plastic tub of gritty, overly-acidic sadness currently sitting on the middle shelf of your refrigerator. You know exactly the one I am talking about. It claims to be hummus on the label, but in reality, it tastes like beige spackle mixed with a healthy dose of potassium sorbate and regret. You deserve better than this. Your weekend dinner guests deserve better than this. And frankly, the noble, ancient garbanzo bean deserves a lot better than this.
As a home cook who spends Monday through Friday relying on clever, lightning-fast shortcuts to survive the corporate grind, I guard my weekend cooking time fiercely. The weekend is when we get to slow down, pour a generously sized glass of wine, and turn into absolute perfectionists. I have made it my personal mission to banish mediocre, store-bought dips from our lives forever. I firmly believe that you do not need a fancy culinary degree to make mind-blowing food. You just need a little bit of accessible food science, a dash of patience, and the willingness to realize that true ultra-smooth hummus is entirely within your grasp.
Today, we are going to dive incredibly deep into the food science behind mastering tahini emulsions and ice water techniques. We are going to debunk the myths, skip the pretentious chef-speak, and pair our newfound dip-making prowess with a foolproof blueprint for setting up a low-stress, highly customizable Mediterranean spread. Welcome to the masterclass.
The Anatomy of a Chickpea: Why Your Hummus Tastes Like Wet Sand
If you have ever attempted to make hummus at home and ended up with a coarse, grainy paste that feels like wet sand on your tongue, take a deep breath. You are not alone, and the culprit is not your lack of culinary skill. The real villain here is the structural biology of the garbanzo bean itself.
To understand why hummus gets gritty, we have to look at the anatomy of the chickpea. Chickpea skins are incredibly tough, composed primarily of cellulose and pectin. When you toss whole chickpeas into a food processor and hit the pulse button, those fibrous skins do not magically dissolve into a creamy puree. Instead, the blades cause them to shatter into thousands of microscopic, rigid fragments. This micro-graininess is exactly what separates a sad, homemade attempt from the velvety, cloud-like hummus served at high-end Mediterranean and Israeli restaurants.
For decades, the accepted culinary wisdom was that if you wanted smooth hummus, you had to manually pinch and peel the skin off of every single chickpea. I don’t know about you, but my time is money. I refuse to spend forty-five minutes standing over my kitchen sink, meticulously undressing legumes like some sort of culinary masochist. We need a solution that works for the everyday home cook who wants professional results without losing their sanity. Thankfully, basic chemistry has our back.
The Baking Soda Miracle: Chemistry in the Kitchen
Enter sodium bicarbonate, better known to you and me as baking soda. This humble pantry staple is the ultimate, scientifically backed hack for bypassing the tedious peeling process altogether. When you add baking soda to your cooking water—whether you are starting with dried chickpeas soaked overnight or simply boiling canned chickpeas to soften them further—you are fundamentally altering the pH of the cooking environment.
By making the water highly alkaline, baking soda rapidly accelerates the breakdown of the pectin that holds the chickpea skins together. Pectin is essentially the biological glue that gives plant cells their structure. When exposed to an alkaline environment and heat, that glue dissolves. The baking soda weakens the cellular structure of the cellulose, effectively turning those stubborn, rigid skins to absolute mush.
As brilliant culinary minds and chefs like Yotam Ottolenghi have long championed, this alkaline boiling method allows the chickpeas to become incredibly soft, tender, and structurally compromised. When these hyper-softened beans finally hit the spinning blades of your food processor, the skins do not shatter into gritty fragments. Instead, they yield entirely, blending seamlessly into the starchy interior of the bean to create a continuous, luxurious paste.
To execute this trick with zero stress, simply toss your rinsed, canned chickpeas into a saucepan, cover them with a few inches of water, add about half a teaspoon of baking soda, and boil them aggressively for 15 to 20 minutes until they are practically falling apart. It is a completely hands-off step that transforms your chaotic cooking routine into a peaceful daily habit.
The Tahini Trap: Understanding Emulsion Science
Now that we have scientifically handled the beans, we have to talk about the real diva of the hummus world: tahini. If you think tahini is just a minor flavor additive, you are sorely mistaken. Tahini is the structural backbone of your dip. It is a rich paste made from toasted, ground sesame seeds, and on a molecular level, it consists of a delicate suspension of carbohydrates and proteins floating in sesame oil.
Here is where the science gets fascinating—and incredibly frustrating for beginners. When you add a small amount of liquid, like lemon juice or water, to a bowl of tahini, it seizes. It instantly clumps up into a stiff, ugly, unworkable mortar that looks like a tragic kitchen disaster.
Why does this happen? The carbohydrates in the ground sesame seeds are highly hydrophilic (water-loving). The moment water is introduced to the environment, those dry carbohydrate particles are intensely drawn to it. They aggressively clump together to absorb the moisture, completely separating from the hydrophobic (water-fearing) sesame oil.
Why Tahini Seizes (and How to Tame It)
This seizing phenomenon is chemically identical to what happens when you accidentally get a drop of water into a bowl of melted chocolate. The emulsion breaks. But unlike chocolate, which is permanently ruined once it seizes, tahini is forgiving. It can be forced into a beautiful, stable emulsion if you just have the confidence to push through the awkward, clumpy phase.
As you continue to add liquid and apply intense mechanical force (via your blender or food processor), you eventually provide enough water to satisfy all of those thirsty, hydrophilic particles. The natural lecithins found in the sesame paste act as brilliant emulsifiers, binding the water and the oil together into a smooth, homogenized, creamy sauce.
This is exactly why you must ALWAYS blend your tahini, lemon juice, and garlic together first, before the chickpeas even enter the chat. You are creating a stable, aerated emulsion base. If you just throw everything into the food processor at once, the tahini will seize around the chickpea starches, and you will end up with a dense, heavy brick of a dip.
And a quick, sassy note on garlic: if you frequently find that raw garlic tastes harsh and overpowers your delicate dips, you need to neutralize it. Blend your minced garlic with your lemon juice first and let it sit for ten minutes before adding the tahini. The acid in the lemon juice deactivates the alliinase enzyme, which is the compound responsible for that aggressive, burning garlic bite. Science is your best friend.
The Ice Water Revelation: Whipping Up Perfection
So, your chickpeas are alkaline-boiled to a state of total surrender, and your tahini is perfectly emulsified with your lemon and garlic. The final secret to achieving that gravity-defying, cloud-like texture is strict temperature control. Specifically, the strategic use of ice water.
Even Hollywood celebrities are catching on to this. Ryan Gosling famously shared in an interview that he learned from a Moroccan chef to add ice cubes to the blender instead of plain water to make hummus exceptionally creamy. But why does this actually work? Is it just a culinary wives’ tale, or is there real science behind the ice?
Aeration and Temperature Control
First, let’s look at the physics of friction. Your food processor or high-speed blender generates a massive amount of heat as those metal blades spin at thousands of revolutions per minute. If the hummus gets too warm during this extended blending process, the starches inside the chickpeas can gelatinize and become gummy. Furthermore, the delicate tahini emulsion we worked so hard to build can break under the heat, leaking oil and turning your dip into a greasy mess. Adding ice water drops the temperature of the mixture rapidly, keeping the starches relaxed and the emulsion perfectly stable.
Second, we have to talk about aeration. Ice cubes contain tiny pockets of trapped air. As the heavy metal blades crush the ice, that air is forcefully injected and whipped into the hummus matrix. Just like churning ice cream or beating egg whites into a meringue, you are mechanically folding microscopic air bubbles into the dip, resulting in a significantly lighter, fluffier mouthfeel. If your food processor has a weaker motor and struggles with whole ice cubes, using heavily chilled ice water (strained of the actual cubes) will still provide the crucial thermal benefits needed to prevent the starches from seizing.
Gear Talk: The Sassy Sous-Chef’s Non-Toxic Mandates
I absolutely cannot write a definitive masterclass without addressing the elephant in the kitchen: your equipment. I have zero patience for cheap, toxic kitchenware, and as a home cook who cares about what goes into their body, neither should you. We are banishing toxic kitchen gear from our lives, starting today.
If you are blending boiling-hot chickpeas and highly acidic lemon juice in a scratched, cloudy, ten-year-old plastic food processor bowl that you bought for fifteen dollars at a big-box discount store, we have a major problem. You are likely leaching endocrine-disrupting chemicals, BPAs, phthalates, and microplastics straight into your beautiful, organic dip. Acid and heat are the two biggest catalysts for chemical leaching in cheap, degraded plastics.
You must invest in a high-quality food processor with a verified BPA-free, durable Tritan plastic work bowl, or better yet, a heavy glass blender jar if you are using a high-performance blender.
Furthermore, a heavy-duty motor is strictly non-negotiable for this recipe. You need serious torque to crush ice and pulverize chickpea skins into a silky puree. A weak, low-wattage motor will simply spin the thick mixture around in circles, overheating the motor and leaving you with a chunky, unappetizing mess. A dull blade mashes; a sharp blade cuts. Buy high-quality gear once, take care of it, and it will serve you for a lifetime.
The Masterclass Recipe: Silky Smooth Hummus (No Peeling Required)
Alright, enough theory. It is time to put this science into practice. This is the definitive, no-nonsense guide to making the best hummus of your entire life.
The Ingredients:
- 1 can (15 oz) high-quality chickpeas (garbanzo beans)
- 1/2 teaspoon baking soda
- 1/3 cup premium tahini (Make sure it is well-stirred. If it smells rancid, throw it away. Good tahini should smell nutty and rich.)
- 1/4 cup freshly squeezed lemon juice (If your lemon zest tastes bitter when you cook, ensure you are only juicing the flesh and not aggressively pressing the bitter white pith oils into your juice.)
- 1 large garlic clove, roughly chopped
- 1/2 teaspoon ground cumin
- 1/2 teaspoon kosher salt (plus more to taste)
- 2 to 3 tablespoons of ice water (or 2 small ice cubes if your processor can handle it)
- High-quality extra virgin olive oil (For drizzling on top ONLY. Never blend olive oil directly into the hummus, as the high-speed blades will oxidize the oil and make it taste incredibly bitter.)
The Process:
- The Alkaline Boil: Rinse your canned chickpeas thoroughly under cold water to remove the canning liquid (aquafaba). Toss them into a medium saucepan, cover with about two inches of fresh water, and add the baking soda. Bring the pot to a boil, then reduce the heat and simmer aggressively for 15 to 20 minutes. The chickpeas should look bloated, the skins should be falling off, and the beans should be incredibly soft to the touch. Drain them well in a fine-mesh strainer and let them cool slightly.
- The Acid Soak: While the chickpeas are boiling, add your freshly squeezed lemon juice and chopped garlic to your food processor. Process for 30 seconds, then let the mixture sit completely undisturbed for 10 minutes. This acid soak mellows the garlic bite, preventing it from overpowering the dip.
- The Emulsion: Add the high-quality tahini to the lemon-garlic mixture in the food processor. Process for about 1 full minute. The mixture will seize, thicken, and look like a pale, stiff, terrifying paste. Do not panic. Scrape down the sides of the bowl with a silicone spatula.
- The Ice Water Whip: While the machine is running, slowly drizzle in 2 tablespoons of ice water (or drop in your ice cubes). Process for another minute. Watch as the scientific magic happens: the stiff paste will relax, lighten significantly in color, and whip into a creamy, smooth, luxurious sauce.
- The Integration: Add the ground cumin, kosher salt, and your completely softened, baking-soda-boiled chickpeas to the food processor. Blend continuously for a full 3 to 4 minutes. Do not rush this step. Stop to scrape down the sides of the bowl every minute to ensure everything is incorporating evenly.
- The Final Adjustment: If the hummus is still a bit too thick for your liking, add another tablespoon of ice water while the machine is blending. Taste for salt and lemon, adjusting as necessary to hit that perfect balance of nutty, salty, and bright.
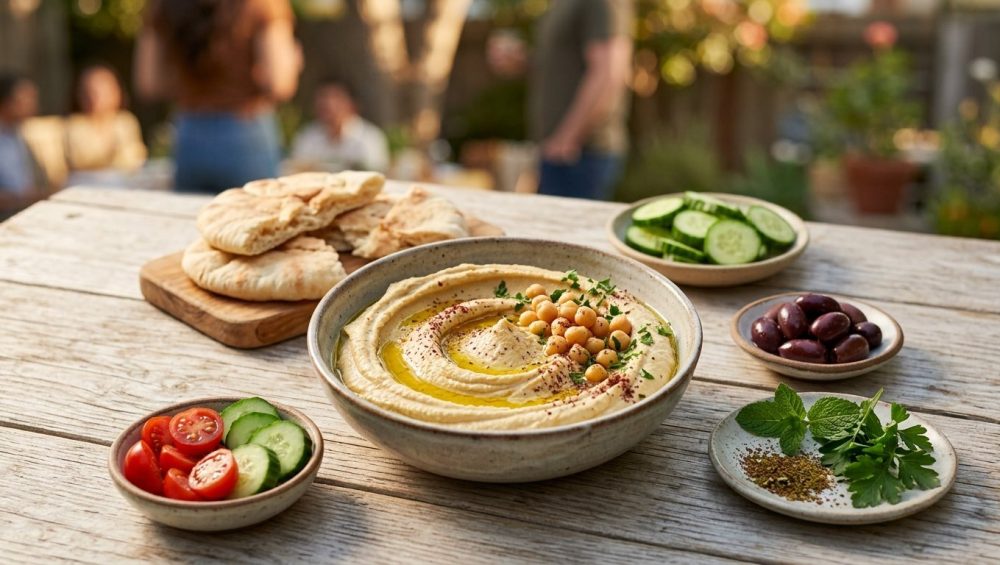
- The Plating: Swoosh the finished hummus onto a shallow, wide ceramic plate, creating deep, dramatic craters with the back of a spoon. Drizzle generously with your absolute best, grassy extra virgin olive oil. Garnish with a sprinkle of paprika, toasted pine nuts, or fresh parsley.
The Mindful Mezze Board: Hosting Without the Meltdown
You have successfully mastered the science of hummus. Now, let’s talk about the art of entertaining. I firmly believe that if you are hosting a gathering, you should actually get to enjoy your own party. If you are sweating profusely over a hot stove, frantically timing four different side dishes while your guests are drinking all your good wine in the living room without you, you are doing it entirely wrong.
This is exactly why I advocate so passionately for the mezze board. A mezze spread is a traditional Mediterranean-style grazing board filled with an abundance of small dishes, dips, fresh vegetables, and finger foods specifically designed for sharing. It completely breaks down the rigid, stressful structure of a formal, sit-down multi-course dinner and replaces it with a relaxed, highly interactive communal experience. It is the absolute ultimate way to host a relaxed dinner party, allowing you to prep almost everything well in advance.
The Prep-Ahead Blueprint
The sheer beauty of a mezze board is that 90% of it can be assembled, wrapped, and stored before anyone even rings your doorbell. Your silky, science-backed hummus can actually be made up to three days in advance (the flavors will meld and improve as it sits in the fridge). The exact same rule applies for marinated olives, tzatziki, and whipped feta dips.
When your guests finally arrive, your only job as the host is to pull the various components out of the refrigerator, arrange them beautifully on a massive wooden board or a series of aesthetic ceramic platters, and warm up the pita bread. This grazing style of eating naturally encourages lively conversation, eliminates the immense pressure of perfectly timed hot courses, and effortlessly caters to a wide variety of dietary restrictions (vegan, gluten-free, dairy-free) without requiring you to cook three entirely different meals.
Curating the Board: Components and Pairings
A truly spectacular mezze board is an exercise in balancing flavor, color, and texture. You want salty, creamy, crunchy, and acidic elements all playing off one another in perfect harmony. If you are looking to mindful charcuterie board with a distinctly Mediterranean twist, here is your essential, fail-proof checklist for building a masterpiece:
1. The Dips (The Anchors)
Your homemade, ultra-smooth hummus is the undisputed star of the show, but every star needs supporting actors. Add a bowl of cool, cucumber-laced tzatziki to provide a refreshing, acidic contrast. A smoky baba ganoush (roasted eggplant dip) or a vibrant, fiery muhammara (a roasted red pepper and walnut dip) adds incredible depth and a massive pop of visual color to the board.
2. The Crunch (The Dippers)
You need serious structural integrity for dipping into these thick purees. Warm, fluffy pita bread cut into generous wedges is non-negotiable. Add some sturdy, twice-baked pita chips for an audible crunch. Then, pile on the fresh, raw vegetables: crisp cucumber spears, bright peppery radishes, sweet cherry tomatoes on the vine, and snappy bell pepper strips.
3. The Brine (The Palate Cleansers)
Acid and salt are absolutely crucial for cutting through the heavy richness of the tahini, whipped cheeses, and olive oil. Scatter several small bowls of marinated Kalamata and Castelvetrano olives, bright pink pickled red onions, and tangy marinated artichoke hearts throughout the board.
4. The Substance (The Proteins)
To elevate the board from a simple snack to a highly satisfying meal, you need to add some substantial protein. Warm falafel is a classic choice, but if you constantly struggle because your falafel always crumbles in the deep fryer, try baking it on a sheet pan instead, or simply serve some grilled halloumi cheese or lemon-herb marinated chicken skewers. A block of high-quality sheep’s milk feta, generously drizzled with hot honey and sprinkled with earthy za’atar, is an absolute showstopper.
5. The Unexpected (The Fillers)
Fill in the empty, awkward gaps on your board with fresh fruit like green grapes, halved fresh figs, or jewel-like pomegranate seeds. Add some toasted Marcona almonds or pistachios for extra crunch and healthy fats. If you are serving roasted veggies alongside the board, ensure they are deeply caramelized and crisp—because nobody wants to eat sad, limp vegetables (and if your roasted vegetables are mushy, you desperately need to start preheating your baking sheet in the oven before the veggies even touch it).
A Final Word from the Sassy Sous-Chef
There you have it. The complete, scientific breakdown of why your past hummus attempts failed, the chemical magic of baking soda and ice water, and the foolproof strategy for hosting a beautiful gathering that doesn’t leave you crying into a pile of dirty dishes at midnight.
Great cooking isn’t about blind luck, and it certainly isn’t about having a natural “gift.” It is about understanding the mechanics of your ingredients and utilizing simple techniques to bend them to your will. The next time you find yourself staring longingly at the deli section of the grocery store, contemplating that sad plastic tub of gritty puree, walk away. You have the knowledge, you have the science, and you have the power to create a velvety, restaurant-quality masterpiece right in your own kitchen.
Now go boil some baking soda water, whip up that tahini emulsion, and show those chickpeas who is really in charge. Oh, and one last tip for your beautiful board: if your fresh herbs turn slimy in the crisper drawer before you can even garnish your masterpiece, remember to store them upright in a glass of water in the fridge with a plastic bag loosely tented over the top, exactly like a bouquet of flowers. You’re welcome. Now go pour that wine and enjoy your weekend.