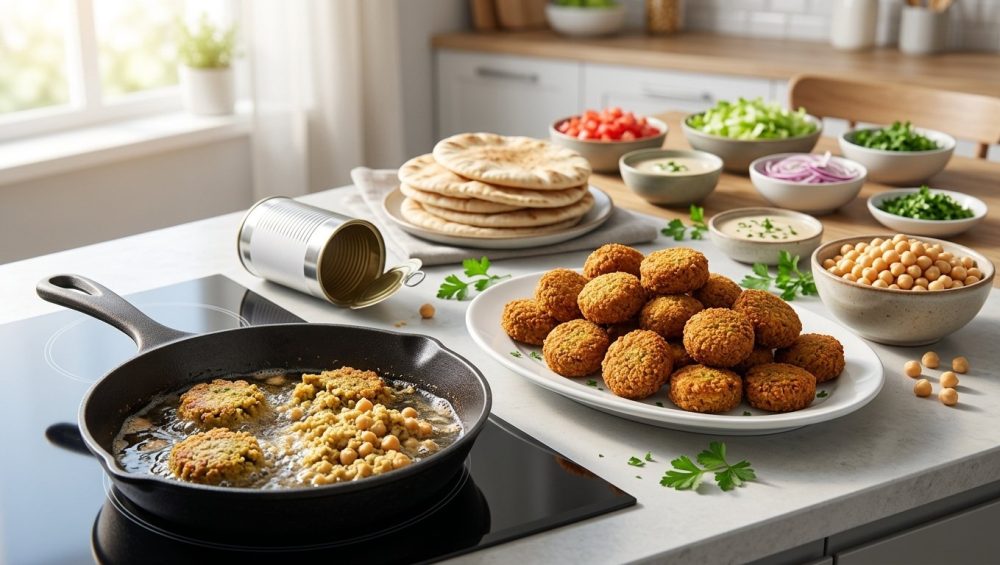
It is the weekend. You have invited a few friends over for a casual Mediterranean night. You want to impress them with a spread of vibrant salads, creamy dips, and the crown jewel of the evening: homemade, golden-brown falafel. You crack open a few cans of chickpeas, toss them into the food processor with a handful of herbs, form them into cute little patties, and gently drop them into a pot of hot oil.
Then, you watch in absolute, soul-crushing horror as your beautiful falafel instantly disintegrates into a cloudy, bubbling, oily mush.
I have been there. You have been there. It is a heartbreaking culinary rite of passage. But today, we stop the madness. As a busy professional, I am the first person to advocate for cutting corners on a chaotic Tuesday night. I will gladly show you how to eliminate kitchen chaos with clever shortcuts when you are just trying to get dinner on the table. But on the weekend? When we are hosting? We do not cut corners with falafel. Falafel demands respect. It demands technique. And most importantly, it demands that you step away from the can opener.
In this exhaustive, no-nonsense masterclass, we are going to dive deep into the food science of why your falafel crumbles, why those convenient canned beans are sabotaging your efforts, and how to execute a flawless, stress-free build-your-own pita bar that will make your guests think you secretly attended a prestigious culinary academy.
The Great Falafel Tragedy: Why Yours Always Disintegrates
Before we can build the perfect falafel, we have to understand why so many home cooks fail at it. The internet is littered with quick-fix recipes promising “easy 15-minute falafel” using pantry staples. These recipes are lying to you. They are setting you up for failure, frustration, and a kitchen that smells like burnt chickpea dust.
The Allure (and Trap) of the Canned Bean
We love canned beans. They are a modern marvel of convenience. For a quick weekday hummus or a high-protein addition to a salad, they are unparalleled. But for traditional, deep-fried falafel, they are an absolute death sentence.
When you use canned chickpeas to make falafel, you are guaranteed to need to rescue a ruined dinner. Why? Because canned chickpeas are essentially boiled inside their tin. During the commercial canning process, they sit in a liquid (which eventually becomes aquafaba) for months. They are heavily processed, completely cooked, and structurally exhausted. As we will explore in the food science section below, the vital starches needed to bind the falafel together have already been cooked out of the bean and washed away into the canning liquid.
Furthermore, canned chickpeas are incredibly waterlogged. A soaked, raw chickpea contains just enough moisture to grind into a workable paste. A canned chickpea is swollen with excess water. When you drop a wet, cooked chickpea mixture into 350°F oil, that excess moisture rapidly turns to steam. The steam expands violently, blowing the falafel patty apart from the inside out. You are left with a disintegrated mess floating in your frying oil.
The Flour Fallacy: A Dense, Heavy Mistake
When recipe developers realize their canned chickpea mixture is too wet to hold its shape, they introduce a crutch: all-purpose flour, breadcrumbs, or even eggs. This is a culinary tragedy.
True, authentic falafel is naturally vegan and gluten-free. It relies solely on the natural starches of the legume to hold it together. When you dump half a cup of flour into your falafel mix to compensate for the soggy canned beans, you fundamentally alter the texture. Instead of a light, airy, crispy fritter, you end up frying a dense, heavy, doughy hockey puck that tastes like raw flour and disappointment. We are not making chickpea-flavored bread; we are making falafel.
The Food Science of the Bind: Starch Gelatinization Explained
To master falafel, you do not need a culinary degree, but you do need a basic understanding of starch mechanics. The secret to a falafel that holds together in a roaring vat of hot oil comes down to a chemical process called starch gelatinization.
Raw vs. Cooked Starches
Chickpeas are packed with complex carbohydrates, specifically in the form of starch granules (composed of amylose and amylopectin). In a dried, raw chickpea, these starch granules are tightly packed and completely intact inside the cell walls.
When you soak dried chickpeas overnight in cold water, they rehydrate, but because there is no heat involved, the starches remain raw and trapped inside the bean. When you grind these soaked, raw chickpeas in a food processor, you create a mixture that is loaded with potential energy.
The magic happens the moment this raw mixture hits the hot frying oil. As the internal temperature of the falafel rapidly rises, those raw starch granules absorb the surrounding moisture, swell up, and burst. This process, known as starch gelatinization, creates a powerful, natural matrix. The newly released starches act as a literal glue, binding the proteins and fibers together instantly while the intense heat of the oil sears the exterior into an impenetrable, crispy crust.
The Moisture Mathematics
Now, let us look at the canned chickpea through this scientific lens. Because canned chickpeas are pre-cooked at high temperatures, their starches have already undergone gelatinization. The granules have already swollen, burst, and released their binding power into the aquafaba.
When you drain a can of chickpeas, you are washing away the very glue you need to hold your falafel together. The beans themselves have zero binding power left. If you grind them and fry them, there is no chemical mechanism remaining to bind the mixture; they simply melt into the oil. Understanding this simple scientific reality will forever cure you of the temptation to use canned beans for falafel.
The Uncompromising Protocol for Perfect Falafel
Now that we understand the science, let us walk through the exact, uncompromising protocol for making authentic, restaurant-quality falafel at home.
Sourcing and The 24-Hour Soak
You must use dried chickpeas. There is no negotiation here. Look for dried chickpeas at a local Middle Eastern market or a grocery store with a high turnover rate to ensure they are relatively fresh. Older beans take much longer to hydrate and can remain stubbornly hard in the center.
You will need to plan ahead. Place your dried chickpeas in a large bowl and cover them with at least three inches of cold water, as they will double in size. I highly recommend using a digital kitchen scale to weigh your dry beans (usually about 250 to 300 grams for a standard batch) so you can precisely scale your aromatics.
Here is a pro-tip from the restaurant industry: add a half teaspoon of baking soda to the soaking water. The alkaline environment created by the baking soda helps to break down the pectin in the tough outer skins of the chickpeas. This results in a much softer, more tender interior crumb once the falafel is fried. Let the beans soak at room temperature for a minimum of 12 hours, but preferably 24 hours. Never, under any circumstances, boil them.
The Grind: Texture is Everything
After 24 hours, drain the chickpeas thoroughly. Shake the colander vigorously and pat the beans dry with a clean kitchen towel. Excess surface moisture is the enemy of a tight bind.
Transfer the beans to a food processor. Do not use a blender. A blender will turn the bottom half of the mixture into a smooth puree while leaving the top half completely whole. We are not making hummus; we are making a textured fritter. Pulse the food processor in short bursts until the mixture resembles coarse, wet sand or fine couscous. If you pinch a handful of the mixture together, it should hold its shape perfectly without feeling mushy or wet.
The Flavor Matrix: Herbs, Alliums, and Spices
Authentic falafel is incredibly herbaceous. It should be bright green on the inside. For a standard batch, you want at least a full cup of packed fresh herbs—usually a 50/50 split of flat-leaf parsley and fresh cilantro. (If you have the soap-gene for cilantro, you can substitute fresh mint or dill).
Next comes the alliums: garlic and onion. Roughly chop a small yellow onion and four to five cloves of garlic. If you find yourself weeping uncontrollably while prepping the onions, your dull knife is crushing the cell walls and releasing volatile sulfur compounds into the air instead of cleanly slicing through them. Keep your blades sharp.
For the dry spices, cumin and coriander are non-negotiable. To elevate your falafel from good to mind-blowing, lightly toast whole cumin and coriander seeds in a dry skillet until fragrant, then grind them fresh. Furthermore, blooming them in oil for just a few seconds before adding them to the food processor will unlock fat-soluble flavor compounds that vastly improve the depth of the final dish.
Add the herbs, alliums, spices, a generous pinch of kosher salt, and a half teaspoon of baking powder (to give the falafel a light, airy lift) into the food processor with the ground chickpeas. Pulse until everything is uniformly incorporated and vibrantly green.
The Crucial Resting Phase
Do not immediately form and fry the patties. Transfer the mixture to an airtight container and let it rest in the refrigerator for at least one hour.
This chilling phase serves two critical purposes. First, it allows the raw starches in the chickpeas to fully hydrate and absorb the moisture from the onions and herbs. Second, it firms up the mixture, making it significantly easier to shape into perfectly uniform balls or patties that will not crumble when you handle them.
Frying Without Fear (and Without Toxic Gear)
Deep-frying at home intimidates many weekend cooks, but it is entirely manageable if you respect the temperature and use the right equipment.
The 2026 Reality Check on Non-Stick Pans
Before we talk about frying, we need to have a serious conversation about your cookware. As your sassy culinary guide, I have a strict, uncompromising rule against cheap, peeling non-stick pans. If you are still trying to sear or fry food in a scratched Teflon skillet from 2015, you need to throw it in the garbage immediately.
The regulatory landscape has finally caught up to the science. As of early 2026, sweeping state laws in places like Maine, Colorado, Connecticut, and Minnesota have officially enacted bans on the sale of cookware and consumer products containing intentionally added PFAS (per- and polyfluoroalkyl substances, commonly known as “forever chemicals”). New York and California are rapidly advancing similar legislation. These chemicals, which provide the “slip” in traditional non-stick coatings, accumulate in the human body and the environment, and they degrade rapidly when exposed to the high heat required for frying.
If state governments are aggressively banning toxic kitchen gear to protect public health, you have absolutely no business submerging your beautiful, scratch-made falafel into a vat of hot oil sitting inside a degrading chemical coating.
Choosing the Right Vessel: Carbon Steel and Enameled Cast Iron
For deep-frying, you need a vessel with exceptional thermal mass—meaning it can hold onto heat and prevent the oil temperature from plummeting when you drop cold food into it.
Your best options are a heavy-duty enameled cast iron Dutch oven or a traditional, well-seasoned carbon steel wok. Both materials are entirely non-toxic, incredibly durable, and capable of maintaining a steady, rolling heat. A heavy stainless steel pot will also work perfectly. Investing in high-quality, lifetime-guaranteed cookware is one of the essential tools every beginner needs to truly elevate their home cooking.
Temperature Control and The Drop
Fill your vessel with about two inches of a neutral, high-smoke-point oil. Canola, grapeseed, sunflower, or avocado oil are all excellent choices. Do not use extra virgin olive oil for deep-frying, as its smoke point is too low and its flavor is too overpowering.
Attach a deep-fry thermometer to the side of the pot. You are aiming for a steady temperature between 350°F and 375°F. If the oil is too cold, the falafel will absorb the grease and become incredibly heavy and soggy. If the oil is too hot, the exterior will burn to a bitter crisp before the raw chickpea starches in the center have a chance to gelatinize and cook through.
Use a specialized falafel scoop (which creates a perfect, slightly domed patty) or a small ice cream scoop to portion the mixture. Gently drop the falafel into the hot oil, working in small batches of four or five at a time. Do not crowd the pan, or the oil temperature will drop drastically. Fry for about 3 to 4 minutes, turning them halfway through, until they are a deep, mahogany brown.
The Cool Down
When you pull the falafel out of the oil, do not make the rookie mistake of dumping them onto a plate lined with paper towels. The paper towels will absorb the hot oil, trap the steam escaping from the falafel, and immediately turn the bottoms of your beautifully fried patties into a soggy, tragic mess.
Instead, transfer them to a wire cooling rack set over a baking sheet. The magic of a wire rack allows the excess oil to drip away while permitting air to circulate a full 360 degrees around the food, locking in that spectacular, hard-earned crunch.
The Mindful Pita Bar: Hosting Without Losing Your Mind
You have conquered the falafel. Now, it is time to build a dining experience around it. Hosting a dinner party does not mean you have to be sequestered in the kitchen sweating over a multi-course plated meal while your guests have all the fun in the living room.
The Philosophy of the Build-Your-Own Bar
According to a 2025 International Food Information Council survey, a staggering 43% of American adults are actively following or aspiring to follow a Mediterranean-style diet—a massive 11 percentage point increase since 2020. The market for Mediterranean fast-casual dining is exploding precisely because it offers fresh, customizable, and vibrant food.
You can harness this trend at home. A build-your-own pita bar is the ultimate strategy for hosting a relaxed dinner party. It is inherently interactive, visually stunning, and effortlessly accommodates various dietary restrictions. Vegans, vegetarians, and omnivores can all build a meal that suits their preferences without you having to cook three separate entrees.
The Prep Timeline: Divide and Conquer
The secret to a stress-free pita bar is aggressive advanced preparation.
Two Days Before:
- Quick-pickle your vegetables. Thinly sliced red onions soaked in red wine vinegar, water, sugar, and salt will develop a brilliant pink hue and a sharp, tangy bite by the time your guests arrive.
The Day Before:
- Start the 24-hour soak for your dried chickpeas.
- Prepare your sauces (Tahini, Amba, Zhug) and store them in the refrigerator.
- Chop the cucumbers and tomatoes for the Israeli salad (but do not dress them yet).
The Day Of:
- Grind the falafel mixture, season it, and let it rest in the fridge.
- Set up the serving station. Lay out your beautiful ceramic bowls, serving spoons, and napkins.
- Right before guests arrive, dress the Israeli salad.
- When everyone is ready to eat, heat the oil, fry the falafel in batches, and warm the pita bread.
The Essential Components of a Masterful Pita Bar
A great falafel sandwich is a masterclass in contrasting textures and temperatures. Here is exactly what you need on your pita bar:
1. The Canvas: Pillowy Pita Bread
Do not serve cold, stiff pita bread straight out of the plastic bag. It will crack and tear the moment your guests try to stuff it. Wrap the pita in a slightly damp kitchen towel and warm them in a 300°F oven for ten minutes. The steam will render them incredibly soft, pliable, and ready to be loaded.
2. The Velvet Binder: Classic Tahini Sauce
Raw tahini paste straight from the jar is bitter and intensely sticky. You must turn it into a sauce. In a bowl, whisk together one cup of high-quality, well-stirred tahini paste with the juice of two lemons, two grated garlic cloves, and a generous pinch of salt. As you whisk, the mixture will suddenly seize up and look like a stiff, broken, grainy clay. Do not panic. This is normal. Slowly drizzle in ice-cold water, whisking vigorously, until the mixture miraculously relaxes and emulsifies into a smooth, luxurious, pale-ivory sauce.
3. The Bright Crunch: Israeli Salad
Falafel is rich and deep-fried; it desperately needs acid and crunch to balance the palate. A classic Israeli salad consists of finely diced Persian cucumbers, ripe Roma tomatoes, and red onions, heavily dressed with extra virgin olive oil, fresh lemon juice, salt, and sumac.
4. The Flavor Bombs: Amba and Zhug
If you want to take your pita bar to the next level, offer these two traditional Middle Eastern condiments. Amba is a tangy, savory, heavily spiced mango pickle sauce that adds a brilliant fermented funk to the sandwich. Zhug is a vibrant, fiery Yemeni green hot sauce made from cilantro, parsley, jalapeños, garlic, cardamom, and cumin.
5. The Briny Finish: Pickles and Cabbage
Offer a bowl of pink pickled turnips, quick-pickled red onions, and thinly shaved red cabbage tossed in a simple vinaigrette. These elements provide the necessary sharp, acidic bite that cuts right through the richness of the fried chickpeas.
The Sassy Sous-Chef’s Falafel Troubleshooting Guide
Even with the best instructions, the kitchen can be a chaotic place. If things go sideways, here is how to diagnose and fix the most common falafel failures.
Problem: The Center is Completely Raw
If your falafel is beautifully browned on the outside but tastes like raw, gritty chickpea paste on the inside, your oil temperature is far too high. The exterior cooked and burned before the heat could penetrate the center to trigger the starch gelatinization. Lower your heat to 350°F, let the oil stabilize, and try again.
Problem: They Are Too Dense and Heavy
If your falafel feels like a lead weight in your stomach, one of three things happened. First, you may have used canned beans and tried to save them with a cup of flour. (We already discussed why this is a crime). Second, you may have forgotten the baking powder, which provides vital lift. Third, you may have packed the mixture too tightly when shaping the balls. Use a light hand; you want the mixture to barely hold together so it remains airy inside.
Problem: The Herbs Turned Brown and Muddy
If the inside of your falafel looks like murky swamp water instead of a vibrant, bright emerald green, you overworked the mixture in the food processor. When you blend herbs into an absolute puree, the cellular walls are completely pulverized, leading to rapid oxidation. Remember: pulse, do not blend. You want distinct, tiny flecks of green, not a green smoothie.
Final Thoughts: Reclaiming Your Kitchen Confidence
Making authentic falafel from scratch is a labor of love, but it is deeply rewarding. It forces you to slow down, respect the ingredients, and understand the simple food science that governs our cooking.
You do not need to be a professional chef to execute a flawless Mediterranean feast. You just need to ditch the shortcuts that actively sabotage your food, invest in safe, high-quality equipment, and give yourself the grace to learn the proper techniques. Once you master the 24-hour soak and the rapid-fry starch gelatinization, you will never look at a can of chickpeas the same way again.
So this weekend, skip the crowded restaurants. Invite your friends over, set up a beautiful, vibrant spread of fresh vegetables and homemade sauces, and start breaking your takeout habit for good. You have the knowledge, you have the science, and you have the sass. Now go fry something spectacular.


