Picture this: It’s Saturday morning. You’ve successfully navigated the chaos of the workweek, you’ve poured yourself a beautiful cup of coffee, and you are finally ready to tackle that ambitious batch of chocolate chip cookies. You gather your ingredients, feeling like an absolute culinary deity. Flour? Check. Butter? Softening perfectly. Brown sugar? You reach into the pantry, grab the bag, and realize you are no longer holding a baking ingredient. You are holding a literal weapon. A geological formation. A rock-solid brick of crystallized despair.
We have all been there. You try to stab it with a fork. You try to chisel away at it with a butter knife, risking a trip to the emergency room just to get a measly half-cup of sugar. Eventually, you give up, toss the whole bag in the trash, and drive to the grocery store in your sweatpants. It’s infuriating, it’s a waste of money, and frankly, I have zero patience for it. Your weekend baking projects should be a source of joy, not a battle of wills against your pantry staples. If you want to avoid baking flat and sad cookies, you need your ingredients to actually cooperate.
But here is the good news: you do not need a culinary degree to outsmart your groceries. You just need a little bit of science and a piece of baked dirt that costs less than your morning latte. I am talking about the terracotta disk. This unassuming, cheap, and infinitely reusable tool is the ultimate secret to keeping your brown sugar perfectly scoopable, day in and day out. Today, we are going to dive deep into the fascinating science of why your sugar turns into a brick, why the terracotta disk is a literal micro-humidifier, and how to permanently banish hardened sugar from your kitchen.
The Anatomy of Brown Sugar: What Actually Is It?
Before we can fix the problem, we have to understand what we are actually dealing with. A lot of weekend bakers assume brown sugar is just a less refined version of white sugar. While that is historically how it started out, the modern brown sugar sitting in your pantry is actually a carefully engineered blend.
Commercial brown sugar is simply refined white granulated sugar (sucrose) that has had a very specific amount of molasses added back into it. During the sugar cane refinement process, the cane juice is boiled down until sugar crystals form. The thick, dark, syrupy byproduct left behind is molasses. Manufacturers separate the two to create the pure white sugar we all know, and then they meticulously mix that molasses back into the white sugar to create brown sugar. This ensures a consistent product every single time.
The Molasses Magic
Molasses is the undisputed MVP of brown sugar. It is what gives the sugar its distinct, warm, caramel-like flavor, its slightly acidic pH (which is crucial for reacting with baking soda in your recipes), and its soft, sandy texture. More importantly, molasses is highly hygroscopic. In non-pretentious chef-speak, that means it loves water. It actively attracts and holds onto moisture from the surrounding environment. This moisture is what makes brown sugar feel wet to the touch and allows it to pack tightly into a measuring cup.
Light vs. Dark Brown Sugar: A Moisture Breakdown
When you are standing in the baking aisle trying to decipher the difference between light and dark brown sugar, it all comes down to the molasses percentage. Light brown sugar typically contains about 3.5% molasses. It has a delicate, subtle caramel flavor and just enough moisture to keep it soft. Dark brown sugar, on the other hand, contains nearly double that amount—hovering around 6.5% molasses.
Because of this higher molasses content, dark brown sugar is noticeably wetter, stickier, and boasts a much deeper, more complex flavor profile with prominent notes of toffee and even a hint of smoke. While they are often interchangeable in a pinch, using dark brown sugar will inject more moisture into your baked goods. This is exactly why using a digital kitchen scale is so much more accurate than volume measuring; the moisture content vastly changes how tightly the sugar packs into a cup.
The Science of the Brick: Why Brown Sugar Hardens
So, if molasses is so great at holding onto moisture, why does your brown sugar inevitably turn into a cinder block? The answer lies in the unforgiving laws of evaporation and crystallization.
Evaporation and Crystallization Explained
When you open a fresh bag of brown sugar, the molasses coating each individual sucrose crystal is perfectly hydrated. However, the moment that sugar is exposed to the air—whether because you left the bag open, transferred it to a leaky container, or just live in a dry climate—the clock starts ticking.
The ambient air begins to steal the moisture from the molasses. As the water evaporates, the thin, syrupy film of molasses that once kept the sugar crystals separated and lubricated begins to dry out. When this happens, the molasses transforms from a flexible, moisturizing barrier into a rigid, sticky glue. The individual sugar crystals literally fuse together. As more and more moisture escapes, this crystallization process cascades through the entire bag, locking the thousands of tiny granules into one massive, impenetrable boulder. It is the exact same scientific principle that results in your spices turning into hard bricks if you leave them sitting over a steaming stove.
The Myth of “Bad” Sugar
Let me be perfectly clear: your rock-hard brown sugar has not gone bad. It is not expired, it is not spoiled, and it absolutely does not need to be thrown away. Sugar is a natural preservative; bacteria and mold cannot easily grow in it because the high osmotic pressure dehydrates microbes. The only thing wrong with your sugar block is that it is dehydrated. If you can put the water back into the molasses without dissolving the sugar crystals, the brick will miraculously revert to its soft, scoopable state.
Enter the Hero: The Genius of the Terracotta Disk
This brings us to the star of the show. You don’t need expensive gadgets, chemical softeners, or complicated machinery to keep your sugar soft. You just need a terracotta disk. This humble little piece of clay is one of the most brilliant, scientifically sound tools you can have in your pantry.
What is Terracotta, Anyway?
Terracotta translates to “baked earth” in Italian. It is a type of ceramic made from relatively coarse, porous clay that is fired at a lower temperature than porcelain or stoneware. Because it is unglazed (meaning it lacks the shiny, glass-like coating found on your dinner plates), the clay remains incredibly porous. If you were to look at a piece of unglazed terracotta under a microscope, you would see a vast network of tiny, interconnected capillary channels and microscopic air pockets.
The Micro-Humidifier Effect: How It Works
When you soak a terracotta disk in water, those microscopic pores act like a sponge, drawing water deep into the core of the clay through capillary action. The disk can hold a surprising amount of water without actually dripping or feeling soggy on the outside.
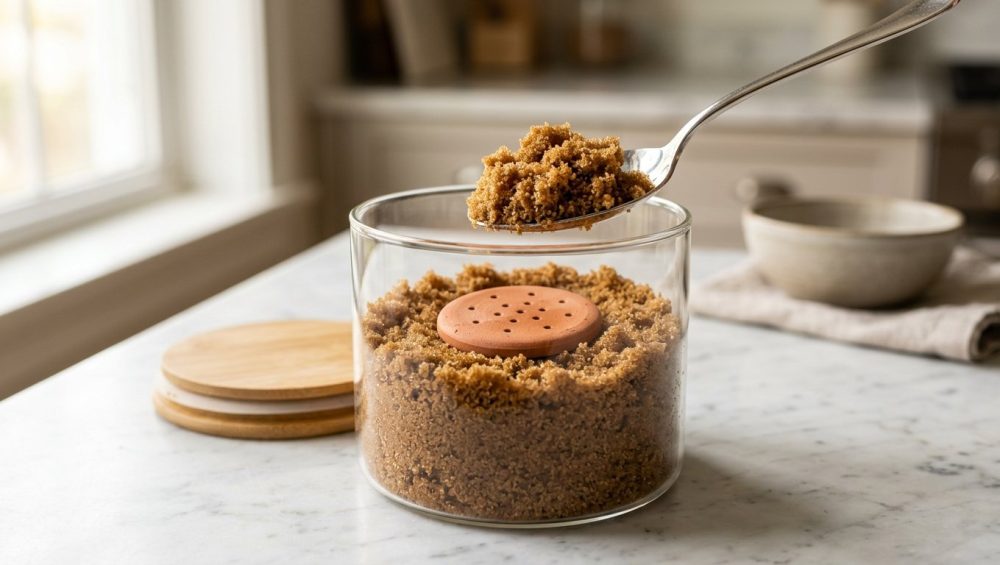
When you place this soaked disk into a sealed, airtight container with your brown sugar, a beautiful thermodynamic exchange occurs. The dry environment inside the container (caused by the dehydrated sugar) pulls the moisture out of the terracotta. The disk slowly, steadily releases water vapor into the trapped air. The hygroscopic molasses on the sugar crystals eagerly absorbs this ambient humidity. Over the course of a few hours to a day, the molasses rehydrates, the crystalline bonds break down, and the sugar softens completely. It acts as a continuous micro-humidifier, maintaining the perfect equilibrium of moisture for months at a time. It is a flawless, natural, zero-effort system.
How to Properly Use Your Terracotta Disk
While using a terracotta disk is delightfully simple, there is a right way and a wrong way to do it. If you mess this up, you risk either doing absolutely nothing, or worse, melting your sugar into a puddle of syrup.
Step 1: The Soak
Take your clean, dry terracotta disk and submerge it completely in a bowl of clean, cold water. You want to leave it in there for about 15 to 20 minutes. Do not rush this step. Time is money, yes, but if you only dunk it for three seconds, the water won’t penetrate the inner capillaries of the clay. It needs time to drink. You will actually see tiny bubbles escaping from the clay as the water displaces the air inside the pores.
Step 2: The Pat Down
This is the most critical step. Once the 20 minutes are up, remove the disk from the water and thoroughly pat it dry with a clean kitchen towel or paper towel. The surface of the disk should feel damp and cool to the touch, but it should absolutely not be dripping wet. If there is standing water on the outside of the disk when you put it in the sugar, that water will instantly dissolve the sugar crystals it touches, creating a localized puddle of liquid syrup that will eventually dry into an even harder, glass-like chunk. We want to introduce water vapor into the air, not liquid water into the sugar.
Step 3: The Airtight Seal
You can have the most perfectly soaked terracotta disk in the world, but if you throw it into a flimsy, half-rolled-up plastic bag secured with a weak binder clip, it will not work. The moisture will simply escape into your kitchen air. You must use a truly airtight container. I highly recommend a heavy-duty glass jar with a rubber gasket and a metal latch, or a high-quality, rigid acrylic container with a silicone seal. Do not use cheap, greasy plastic storage containers that have warped lids and compromised seals. Place the damp disk directly into the sugar, lock the lid down tight, and let science do the rest.
Terracotta vs. The Old Wives’ Tales
If you mention hard brown sugar to anyone, they will inevitably offer up a “brilliant” hack passed down from their grandmother. While these old wives’ tales are rooted in the same basic science (introducing moisture to a sealed environment), they are vastly inferior to terracotta. In fact, some of them are downright gross.
The Bread Slice Trick (Mold City)
The most common advice is to throw a slice of sandwich bread into the container. Yes, the moisture from the bread will transfer to the sugar and soften it. But you know what else transfers? Yeast. And mold spores. Bread is highly perishable. If you forget about that slice of bread for a few weeks, you will open your sugar to find a fuzzy, green, terrifying science experiment. You will have to throw the entire batch away. Furthermore, if you are baking gluten-free, cross-contamination is a serious hazard. We already know how fast bread goes stale so fast on the counter; putting it in your sugar is just asking for a mess.
The Apple Slice Method (Fruity Sugar)
Another classic trick is tossing a wedge of apple into the jar. Again, the moisture transfer works. But apples contain enzymes, acids, and strong aromatic compounds. Not only does the apple slice run the risk of rotting and fermenting (hello, accidental cider), but it will also impart a distinct, fruity flavor to your sugar. Unless you specifically want your chocolate chip cookies to taste like an orchard, keep the fruit out of the pantry. You already have to worry about how your berries get moldy so fast in the fridge; don’t bring that rot anxiety into your dry goods.
The Marshmallow Hack (Just… Why?)
Some people swear by throwing a few large marshmallows into the sugar container. While marshmallows do contain moisture, they are also packed with corn syrup, gelatin, and artificial stabilizers. Over time, the marshmallows will dry out, shrivel up, and become hard little rocks themselves, requiring you to constantly replace them. It is a temporary, sticky band-aid, not a permanent solution.
The Sassy Sous-Chef’s Guide to Rescuing an Already Hardened Brick
Okay, so you didn’t have a terracotta disk, and now you are staring down a three-pound boulder of brown sugar that you need for a recipe right now. You don’t have 24 hours to wait for a micro-humidifier to do its job. Here is how you violently, yet effectively, rescue your sugar in an emergency.
The Microwave Method (For Immediate Emergencies)
If you need soft sugar in the next two minutes, the microwave is your best friend. Place the brick of sugar in a microwave-safe bowl. Take a paper towel, run it under the sink, and wring it out completely so it is barely damp. Drape the damp paper towel over the bowl, ensuring it does not directly touch the sugar. Microwave it on medium power in 15-second bursts. After each burst, use a fork to aggressively break apart the softened outer layers.
A massive warning here: Do not overdo it. If you microwave it for too long, the sugar will literally melt, caramelize, and turn into boiling hot liquid candy that will severely burn you and ruin your baked goods. Also, note that microwaved sugar will harden into an even more impenetrable rock once it cools down, so only soften exactly what you need for the recipe.
The Oven Method (Low and Slow)
If you have a larger amount of sugar to soften and a little more time, the oven works beautifully. Preheat your oven to a very low 250°F (120°C). Place the hard sugar on a sturdy baking sheet with raised edges. (Please, for the love of all things culinary, do not use those flimsy, warped and ruined baking sheets that pop and twist in the heat). Bake the sugar for about 5 to 10 minutes, checking it constantly. The gentle heat will relax the crystallized molasses bonds just enough for you to smash the brick apart with a wooden spoon. Again, use it immediately, as it will re-harden upon cooling.
The Food Processor Trick (Aggressive but Effective)
If you are completely out of patience and just want to smash things, you can use mechanical force. Break the brick into slightly smaller chunks (using a rolling pin or a meat mallet) and throw them into a high-powered food processor. Pulse the machine repeatedly until the sugar is pulverized back into a sandy texture. Be aware that this is incredibly loud, and the friction can slightly heat the sugar. It also doesn’t actually rehydrate the molasses, it just breaks the crystals apart, so you will need to add a soaked terracotta disk to the container immediately afterward to keep it soft.
The “No-Go” Rule: Avoiding Toxic Kitchen Gimmicks
As your resident Sassy Sous-Chef, you know I have a strict, non-negotiable rule when it comes to kitchen equipment: I absolutely despise cheap, toxic gear. And unfortunately, the market for “sugar savers” is riddled with garbage that you need to avoid at all costs. I am fiercely passionate about ditching toxic kitchen gear, and this tiny pantry tool is no exception.
The Dangers of Glazed or Painted Ceramics
When shopping for a brown sugar saver, you must ensure it is 100% natural, unglazed, food-safe terracotta. Do not buy cute, brightly painted ceramic disks from discount bins or unregulated overseas sellers. Historically, and even in some modern unregulated manufacturing, lead and cadmium are used as fluxes in ceramic glazes and paints to lower the melting point and create vibrant colors.
If you put a lead-glazed piece of ceramic into a slightly acidic, moist environment (which is exactly what brown sugar is), those heavy metals can leach directly into your food. There is no safe level of lead exposure. It is toxic, cumulative, and entirely avoidable. Stick to plain, unpainted, unglazed, earthy-orange terracotta from reputable kitchenware brands that explicitly state their products are food-safe.
Ditching Flimsy Plastic Alternatives
You will also see plastic “hydro-stones” or synthetic sponges marketed as sugar savers. Skip them. Cheap plastics can off-gas, imparting a chemical, plasticky odor to your sugar. Furthermore, synthetic sponges are absolute breeding grounds for bacteria if left in a sealed container at room temperature. Natural terracotta is naturally antimicrobial due to its structure and is infinitely reusable. If it ever gets dirty, you just boil it in plain water to sterilize it. No plastic, no waste, no weird smells.
Other Brilliant Uses for Your Terracotta Disk
Once you realize the magic of this little clay disk, you will want to buy a dozen of them. Their utility extends far beyond the brown sugar jar.
Keeping Baked Goods Soft
If you have ever baked a gorgeous batch of chewy snickerdoodles only to find them rock-hard the next day, terracotta is your savior. Place a soaked and patted-dry disk into the cookie jar or Tupperware with your baked goods. The slow release of humidity will keep cookies, brownies, and muffins bakery-fresh and incredibly soft for days. (Just make sure the disk doesn’t directly touch the cookies, or you’ll get a soggy spot).
Reviving Stale Marshmallows and Dried Fruit
Did you find a bag of raisins in the back of the pantry that look and feel like gravel? Or a bag of marshmallows that have petrified into chalk? Toss them into an airtight container with a soaked terracotta disk for 24 hours. The ambient moisture will gently plump the dried fruit back to its chewy glory and resurrect the marshmallows to their original squishy state.
Conclusion: Work Smarter, Not Harder in the Kitchen
Cooking and baking should be an enjoyable escape, not an exercise in frustration. You do not have time to battle a brick of sugar on a Saturday morning. By understanding the simple science of molasses evaporation and harnessing the natural, micro-humidifying power of a food-safe terracotta disk, you can permanently eliminate this ridiculous kitchen hurdle.
So, do yourself a favor: ditch the moldy bread slices, step away from the toxic painted ceramics, and invest a few dollars in a genuine terracotta disk. Soak it, dry it, seal it, and never chip away at a sugar boulder again. Trust me, when you are effortlessly scooping perfectly soft, moist brown sugar for your next batch of cookies, you will feel like an absolute kitchen genius. And honestly? You should. Now go forth, conquer your pantry, and remember that chilling your cookie dough is just as important as keeping your sugar soft. Happy baking!