Listen up, buttercup. We need to have a serious, sit-down conversation about your muffins. You’ve spent your hard-earned weekend morning meticulously measuring flour, zesting lemons, and gently melting butter on the stove. You pop your lovingly crafted batter into the oven, pouring yourself a well-deserved cup of coffee, dreaming of bakery-style, sky-high, tender-crumbed beauties. But what actually emerges from your oven thirty minutes later? Dense, rubbery little hockey pucks that require a gallon of milk just to choke down. Sound familiar? We’ve all been there. I’ve certainly set off my smoke detector and thrown out my fair share of leaden baked goods before figuring out the mechanics of what was actually going wrong in my mixing bowl.
You might think the problem is your recipe, your oven calibration, or the fact that you just don’t have a fancy culinary degree. Nonsense. I firmly believe that anyone can bake like an absolute pro in a standard home kitchen without spending years in pastry school. You just need to understand a little bit of fundamental kitchen science, and you need to own the right tools. More specifically, you need to understand exactly why you are overworking your batter, and you need to throw a bizarre-looking, brilliant little tool called a Danish dough whisk into your utensil crock immediately.
The Science of Quick Breads: A Chemistry Lesson Without the Pretense
Let’s start with the absolute basics. Muffins, along with banana bread, scones, biscuits, and pancakes, belong to a category of baked goods affectionately known in the culinary world as “quick breads.” They are called “quick” because, unlike traditional artisan yeast breads that require hours of proofing, resting, and complex flavor development, these treats rely entirely on chemical leaveners—namely baking soda and baking powder—to achieve their rise.
Because we are dealing with chemical leaveners that react almost instantly when exposed to moisture and heat, time is money. For weekday cooking, I am all about ruthless efficiency. Even on the weekends when we have the luxury of time to be absolute perfectionists with our elaborate baking projects, the chemistry of quick breads demands that we move with purpose.
The very second your wet ingredients hit your dry ingredients, a ticking clock begins. The chemical leaveners start releasing carbon dioxide gas, creating millions of tiny, fragile bubbles in your batter. Your goal as a baker is to get that batter into the muffin tin and into the hot oven while those bubbles are still actively expanding, without accidentally building a protein structure so strong that it traps the bubbles and turns your tender muffin into a chewy, dense mess. This delicate balance of speed and structural integrity is the core of what bakers call the “Muffin Method.”
Gluten: The Hero of Sourdough, The Villain of Muffins
To understand why your muffins are turning out dense, you have to understand the mechanics of gluten. When people talk about gluten, they often think of it as a tangible ingredient you can just pour out of a bag. It’s not. Standard wheat flour contains two specific, naturally occurring proteins: gliadin and glutenin. In their dry, powdery state sitting in your pantry, they are completely inactive. But the moment you introduce a liquid (like milk, water, buttermilk, or eggs), these two proteins wake up, seek each other out, and bond together to form a complex, elastic network known as gluten.
Gliadin is the protein responsible for extensibility, which allows dough to stretch out without tearing. Glutenin is the protein responsible for elasticity, which gives dough the ability to snap back into place like a rubber band. Together, they form an incredibly strong, microscopic web.
In the world of artisan sourdough, chewy pizza crusts, or rustic baguettes, gluten is your absolute best friend. We knead bread dough vigorously for ten to fifteen minutes specifically to encourage these proteins to align, forming a strong, stretchy web that can capture the massive amounts of gas produced by yeast over several hours. We want that chew. We want that robust structure.
But in a muffin? In a delicate blueberry scone? Gluten is the ultimate villain.
When you are making a quick bread, you want a tender, delicate, cake-like crumb that practically melts in your mouth. You want the absolute minimum amount of gluten development possible—just enough to keep the muffin from crumbling into a pile of dust when you peel off the paper wrapper, but not a single bit more.
Anatomy of a Baking Disaster: Why Overmixing Ruins Everything
Here is where the tragedy occurs in most home kitchens. Every single time you stir, fold, whisk, or mix your batter, you are mechanically applying shear force to the dough. This shear force actively encourages those glutenin and gliadin proteins to link up. The more you mix, the stronger and tighter the gluten network becomes. If you sit there aggressively stirring your muffin batter until it looks perfectly smooth and uniform, you have already lost the battle before the pan even hits the oven rack.
What exactly happens inside the oven when you bake an overmixed, gluten-heavy batter? The chemical leaveners do their job and produce carbon dioxide gas, but the strong, elastic gluten network fights back. Instead of expanding gently and evenly into a fluffy crumb, the gas bubbles struggle to push through the tough, rubbery web. They merge together, forcing their way upward in desperate little tornadoes, creating long, vertical tunnels through your baked goods.
This phenomenon is known in the culinary world as “tunneling.” If you ever bite into a muffin and see long, worm-like holes running from the bottom of the crumb all the way to the top, congratulations: you overmixed it. The resulting texture around those tunnels is invariably dense, heavy, chewy, and entirely depressing.
Why Your Current Kitchen Tools Are Sabotaging You
Now, I know exactly what you’re thinking right now. “But Sassy Sous-Chef, if I don’t mix the batter until it’s smooth, there will be dry lumps of flour left in the bowl!”
Yes. Exactly. That is the entire point. The golden rule of the Muffin Method is to mix the wet and dry ingredients just until they are combined. We are talking ten to fifteen strokes, tops. If there are a few pea-sized lumps of flour remaining in the bowl, leave them alone. Do not touch them. They will hydrate on their own in the oven.
The real problem is that the tools you are currently using are actively sabotaging your ability to follow this rule. Let’s look at the usual suspects that are ruining your weekend baking.
The Standard Balloon Whisk
A balloon whisk is a wonderful, essential tool for whipping air into egg whites, creating a light-as-air meringue, or emulsifying a beautiful mustard vinaigrette. But for a thick, heavy quick bread batter? It is an absolute nightmare. The multiple thin, flexible wires act like a cage. When you plunge a balloon whisk into muffin batter, the thick mixture immediately clumps inside the center of the wires. You end up with a giant, heavy ball of dough trapped inside your whisk, forcing you to bang it aggressively against the side of the bowl, stir more to dislodge it, and ultimately overwork the gluten. Plus, nobody wants to spend twenty minutes cleaning that mess out of the tines. (And if you’ve ever wondered why your cheap whisk leaks dishwater from the handle, it’s because water gets trapped in the poorly sealed ferrule during your frantic scrubbing).
The Trusty Wooden Spoon
What about a wooden spoon? A wooden spoon has a massive, solid surface area. When you drag it through a thick, hydrated batter, it pushes the ingredients around rather than cutting through them. To fully incorporate the wet and dry ingredients with a wooden spoon, you have to use a lot of sheer force and a lot of repetitive strokes. By the time you’ve smashed all the hidden pockets of dry flour against the side of the bowl to get them wet, you’ve easily exceeded your fifteen-stroke limit.
The Flimsy Silicone Spatula
And please, don’t get me started on cheap spatulas. You know the ones—the flimsy tools that bend backward under the slightest pressure, or worse, you wonder why your silicone spatulas taste soapy after a few washes because they absorb dishwasher detergent. They smear the batter instead of efficiently folding it, requiring twice as much manipulation to get the dry ingredients incorporated.
Enter the Brodpisker: The Genius of the Danish Dough Whisk
If you want to bake like an expert, you need the right gear. Enter the Danish dough whisk, also traditionally known in Scandinavia as a brodpisker.
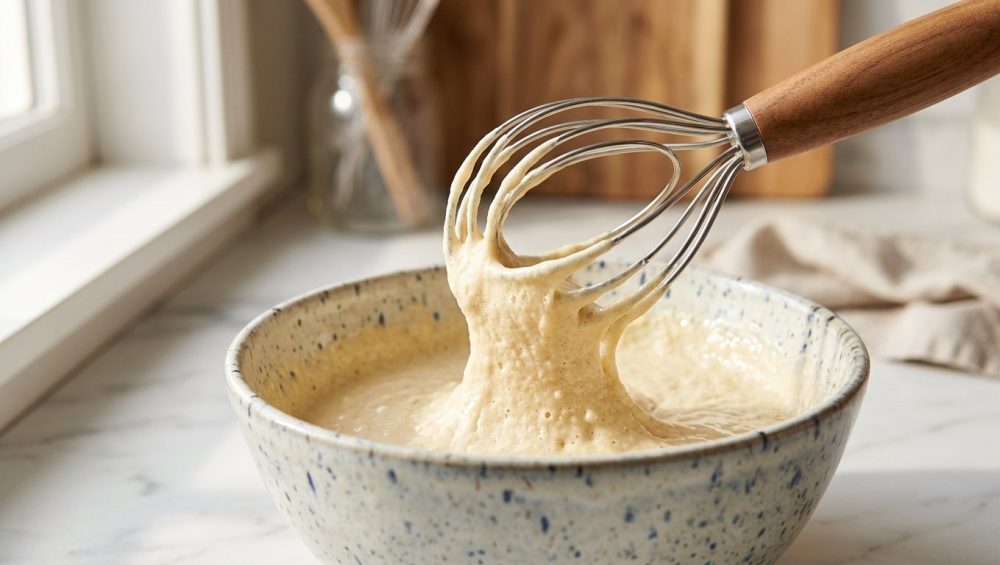
At first glance, this tool looks like a medieval torture device, or perhaps a bent coat hanger attached to a broomstick. It typically features a long, sturdy wooden handle and a flat, heavy-gauge stainless steel wire head formed into three concentric loops (often resembling an ‘@’ symbol). It is a masterclass in minimalist, highly functional design, and it is about to completely change your baking life.
The history of the brodpisker is rooted in practicality. Scandinavian bakers needed a tool that could handle incredibly dense, heavy rye bread doughs—doughs that would easily snap a wooden spoon in half or hopelessly mangle a delicate wire whisk. They needed something rigid, durable, and highly efficient.
Why is it so brilliant for your delicate muffin batter? It all comes down to fluid dynamics and surface area.
Unlike a balloon whisk, the Danish dough whisk is essentially two-dimensional. It doesn’t have a three-dimensional cage to trap thick ingredients. The heavy-gauge stainless steel loops are rigid, meaning they do not flex, bounce, or bend when they encounter a stiff dough. Because the wire itself is relatively thin compared to the broad, flat face of a wooden spoon, it slices cleanly through the batter rather than plowing it.
When you drag a brodpisker through a bowl of wet and dry ingredients, the batter is forced to pass through the concentric loops. This creates high-shear mixing with incredibly low friction. The loops act like a series of blunt blades, breaking up hidden flour pockets and hydrating the dry ingredients almost instantly.
Because of this unparalleled mechanical efficiency, a Danish dough whisk can bring a muffin batter together in a fraction of the time and with a fraction of the strokes required by any other tool. You can literally watch a shaggy, dry mess transform into a cohesive batter in three or four gentle folds. It is the ultimate weapon against gluten over-development.
The “No-Go” Rule: Ditching Toxic and Flimsy Kitchen Gear
Before we go any further into our muffin masterclass, we need to have a serious heart-to-heart about the materials in your kitchen. If you’ve read my articles before, you know my strict “No-Go” rule: I absolutely despise cheap, toxic kitchenware. I have zero patience for gear that flakes, peels, leaches chemicals into your food, or falls apart after three uses.
When you are buying a Danish dough whisk (or literally any baking equipment), you must pay attention to the materials. Look for a whisk made with high-quality, food-grade, heavy-gauge stainless steel (ideally 304 or 316 grade). Do not buy a cheap knockoff made of mystery metals or coated in some flimsy non-stick paint that will inevitably chip off into your batter. The beauty of a true stainless steel brodpisker is its rugged durability; it will not rust, it will not bend out of shape, and it will last you a lifetime of weekend baking.
This strict philosophy extends to your baking pans as well. You can mix the absolute perfect, scientifically flawless batter, but if you pour it into a cheap, scratched, peeling Teflon muffin tin, you are doing yourself a massive disservice. Those cheap, toxic non-stick coatings degrade under high heat, releasing fumes and PFAS (forever chemicals) that you do not want anywhere near your family’s breakfast. Upgrade to a heavy-duty aluminized steel or pure, uncoated stainless steel muffin pan. (This is the exact same reason why your thin, cheap baking sheets keep warping in the oven—poor quality metals simply cannot handle thermal shock).
By upgrading your equipment and banishing toxic kitchen gear from your cabinets, you are setting yourself up for a lifetime of culinary success and peace of mind.
Mastering the Muffin Method: A Step-by-Step Guide for the Weekend Baker
Now that you understand the molecular science of gluten and you have your shiny new, heavy-gauge stainless steel Danish dough whisk in hand, let’s walk through the definitive masterclass on executing the perfect batch of muffins. This is the exact process I use in my own kitchen when I’m treating myself to a slow, intentional weekend baking session.
Step 1: Prep Like a Professional
Even on a relaxed Saturday morning, precision is key. Baking is a science, and science requires accuracy. If you are still scooping your flour by jamming a measuring cup into a compacted bag, we need to talk. Doing this packs far too much flour into the cup, throwing off the delicate hydration ratio of your batter and resulting in dry, crumbly baked goods. Do yourself a massive favor and invest in a digital kitchen scale. (Seriously, if you find that your cakes are too dense, a lack of a scale is usually the primary culprit).
Weigh your dry ingredients—your all-purpose flour, granulated sugar, baking powder, baking soda, salt, and any dry spices—into a large, wide mixing bowl. Whisk them together thoroughly. (Yes, the standard balloon whisk is allowed here, because we are only dealing with dry powders and we want to aerate them).
In a separate, smaller bowl, combine all of your wet ingredients. This usually includes your room-temperature eggs, milk or buttermilk, melted butter or neutral oil, and vanilla extract. Whisk these together aggressively until they are completely homogenous. You want the eggs completely broken down and the fat emulsified with the liquid before they ever touch the flour.
Step 2: The Critical Temperature Check
Before you combine anything, check your oven. Is it preheated? I don’t mean “did the oven just beep?” I mean, has it been preheating for at least twenty to thirty minutes? Home ovens are notorious liars. The beep just means the air immediately surrounding the temperature sensor has reached the target heat, but the heavy metal walls of the oven are likely still cold. If you put your muffins in too early, they won’t get the intense initial blast of heat they need to activate the baking powder and create that beautiful, bakery-style domed top. If you are tired of baking flat muffins, this is your wake-up call to properly preheat your oven.
Step 3: The Fold (Enter the Brodpisker)
This is the moment of truth. Pour your thoroughly mixed wet ingredients into the center of your dry ingredients all at once.
Take your Danish dough whisk and scrape it down the side of the bowl, pulling it across the bottom, and lifting it up through the center of the batter. Do not stir in rapid, frantic circles like you are scrambling eggs. Use large, sweeping, deliberate folds.
As you pull the brodpisker through the mixture, you will see the concentric stainless steel loops effortlessly slicing through the hydration barrier. The wet and dry ingredients will begin to mesh instantly. Count your strokes. One, two, three…
By the time you hit stroke ten, the batter should be mostly cohesive. By stroke fifteen, you absolutely must stop. Drop the whisk. Step away from the bowl.
Is the batter a little lumpy? Yes. Are there a few tiny streaks of dry flour visible? Good. Leave them alone. I promise you, they will disappear in the oven as the butter melts and the starches gelatinize. If you are fighting sticky dough and your instinct is to keep stirring until it looks like a perfectly smooth, uniform cake batter, you must fight that urge with every fiber of your being. A smooth muffin batter guarantees a tough, dense muffin.
Step 4: The Strategic Rest Period
Here is a brilliant, time-saving cooking hack that doubles as a scientific trick for vastly superior texture. Once your batter is mixed (lumps and all), let it sit undisturbed on the counter for 15 to 20 minutes before you scoop it into your pan.
Why? During this resting phase, two magical things happen. First, the starches in the flour have time to absorb the liquids fully. Those little dry lumps of flour you were so worried about will quietly hydrate on their own, without you having to apply any mechanical shear (which, as we know, develops the dreaded gluten). Second, the double-acting baking powder gets a head start on its first chemical reaction, creating a network of tiny air bubbles that will give your muffins a lighter, fluffier texture. (This is the exact same reason why your pancakes are rubbery if you cook them immediately after mixing rather than letting the batter rest).
Step 5: The High-Heat Bake and Oven Spring
After the rest period, gently scoop your batter into your high-quality, non-toxic muffin tin. Use a spring-loaded ice cream scoop to ensure even portioning without deflating the batter. Fill the cups almost all the way to the top if you want those glorious, overflowing bakery-style crowns.
Now, for the final secret to the perfect texture: thermodynamic manipulation. If you want to know why your muffins are flat, it is usually because they were baked at a low, uniform temperature for the entire duration. To get a spectacular rise, you need a phenomenon called “oven spring.”
Bake your muffins at a blistering 425°F (218°C) for the first 5 to 7 minutes. This intense initial blast of heat rapidly turns the moisture in the batter into steam and supercharges the second reaction of the baking powder, forcing the batter to shoot rapidly upward. The high heat also sets the outside edges of the muffin quickly, forcing the remaining expanding batter to push up through the center, creating that signature dome.
After 5 to 7 minutes, leave the muffins in the oven, but turn the temperature down to 350°F (175°C) for the remainder of the baking time. This allows the dense center of the muffin to bake through gently without burning the outside crust.
The Cleanup: Another Resounding Win for the Brodpisker
Let’s talk about the aftermath of your baking project. We all know the sheer dread of carrying a batter-caked balloon whisk to the sink. By the time you finish your morning coffee and finally get around to doing the dishes, that residual batter has turned into industrial-grade cement, clinging desperately to the inner wires.
The Danish dough whisk, on the other hand, is an absolute dream to clean. Because it consists of a single, thick wire with no overlapping joints, no hidden crevices, and no internal cage, there is literally nowhere for the batter to hide. A quick rinse under warm tap water, a gentle swipe with a soapy sponge, and it is completely spotless. It respects your time, allowing you to get back to enjoying your weekend rather than scrubbing dishes over the sink.
Final Thoughts for the Culinary Hobbyist
Baking doesn’t have to be intimidating, and you certainly don’t need to settle for mediocre, dense results in your home kitchen. The difference between a heavy, disappointing hockey puck and a tender, melt-in-your-mouth masterpiece often comes down to simply understanding the invisible forces at play—like gluten development, hydration, and thermodynamics—and using the right tool for the job.
The Danish dough whisk is so much more than just a quirky-looking, vintage utensil; it is a scientifically sound solution to one of the most common baking pitfalls in the modern kitchen. It eliminates the friction that causes tough dough, cuts through hidden flour pockets with unparalleled ease, and practically forces you to stop overmixing.
So the next time you decide to whip up a batch of lemon poppyseed muffins or a loaf of pumpkin bread, put the wooden spoon down. Step away from the balloon whisk. Grab your brodpisker, embrace the lumps in your batter, and prepare to be amazed at just how light, tender, and fluffy your weekend baking projects can truly be. You’ve got this, chef. Now go preheat that oven.