
Welcome to another weekend culinary therapy session. You bought the gorgeous brioche buns. You shelled out for the good cheese. You formed what looked like the perfect, wide, flat beef patties. But the moment they hit the grill or the skillet, they rebelled. They seized up, puffed out, and transformed from a beautiful flat disk into a dense, sad little meatball floating in a sea of bread. If you’re tired of watching your burgers shrink into meatballs, you’ve come to the right place.
I have zero patience for pretentious chef-speak, but we do need to get a little nerdy to fix this. Making a professional-level burger in a standard home kitchen is entirely achievable, provided you understand the basic physics of ground beef. We’re going to break down the science of protein coagulation, fat rendering, and muscle fiber contraction. More importantly, I’m going to give you foolproof, time-saving techniques to stop the shrinkage once and for all. Let’s get to work.
The Science of the Shrink: Why Your Meat is Rebelling
To stop the dreaded burger bulge, we first have to understand why it happens. Shrinkage isn’t just a random act of culinary cruelty; it’s a guaranteed biological and thermodynamic response to heat.
The Protein Contraction (Myosin and Actin)
Ground beef is essentially a matrix of muscle fibers, connective tissue, water, and fat. When you expose this matrix to heat, the proteins within the muscle fibers—specifically myosin and actin—begin to denature and coagulate. Think of these muscle fibers like tiny, tightly wound springs or skinny balloons. As the temperature rises, the heat causes these proteins to aggressively contract and tighten. This contraction physically squeezes the moisture and rendered fat out of the muscle fibers, like wringing out a wet sponge.
When the proteins tighten, the overall footprint of the patty pulls inward. According to food science data, it is completely normal for meat to lose about 20% to 25% of its weight and size during the cooking process. But here is the kicker: the patty doesn’t shrink evenly.
The Geometry of the Bulge
Why does the burger puff up in the center instead of just getting uniformly smaller? It comes down to basic thermodynamics and geometry. The edges of your burger patty are exposed to the ambient heat of the pan or grill from multiple sides (the bottom, the top, and the outer rim). Because the edges cook significantly faster than the insulated center, the proteins on the perimeter contract first.
As this outer ring of meat tightens and shrinks like a culinary corset, it acts like a belt pulling tight around a soft middle. The raw, less-contracted meat in the center has nowhere to go but up. The steam and rendering fat trying to escape from the middle of the patty push upward as well, exacerbating the dome effect. Before you know it, you are staring at a baseball instead of a burger.
Fat Rendering and Moisture Loss
Raw beef is roughly 70% water by weight. As the internal temperature climbs, that water turns to steam. Simultaneously, the solid white flecks of fat begin to melt (render) into a liquid. While we want this fat to render—it’s what gives the burger its juicy, beefy flavor—the physical volume of the patty decreases as the fat and water leak out. If your ground beef steams in its own juices instead of searing, you’re going to lose even more volume and end up with a gray, rubbery puck. We’ll talk about how to fix that shortly.
The Meat Matters: Setting Yourself Up for Success
If you start with the wrong raw materials, no amount of technique will save your dinner. The foundation of a perfect burger is the beef itself.
The Golden Ratio: 80/20
I see so many well-intentioned home cooks buying 90/10 or even 93/7 ground beef for their weekend cookouts. Stop doing this. I get it, you want to be healthy, but ultra-lean beef makes terrible burgers. Because lean meat has less fat to lubricate the protein strands, the intense protein contraction we just talked about results in a dry, tough, hockey-puck texture.
The undisputed champion of burger blends is 80% lean meat to 20% fat (80/20). This ratio provides enough fat to keep the muscle fibers tender as they cook, basting the meat from the inside out. The fat also disrupts the tight protein network, meaning the burger is physically less capable of shrinking into a tight little knot. If you are feeling particularly decadent, a 75/25 blend (often found in specific cuts like ground chuck) is phenomenal for burgers where you want lacy, crispy edges.
The Danger of Overworking the Grind
Here is a brutal truth: how you handle the meat is just as important as the fat ratio. When you knead, aggressively mix, or tightly pack ground beef, you are causing a chemical reaction called myosin cross-linking.
Myosin is a sticky protein. When you mash the ground beef together, you release more myosin, which acts like meat glue. If you overwork the meat, this myosin cross-links, binding the meat fibers together tightly. When this heavily cross-linked meat hits the heat, the contraction is violently strong, resulting in massive shrinkage and a rubbery, sausage-like texture.
To prevent this, handle the meat like it’s a live explosive. Gently coax it into a patty shape using just your fingertips. Do not pack it tightly. You want the patty to be loose and airy, holding together just enough to survive the flip. The less you touch it, the better it will taste.
The “Dimple Method”: Your Mechanical Insurance Policy
Now that we know why the edges contract and push the center up, we can outsmart the physics. Enter the simplest, most effective trick in the culinary playbook: the Dimple Method.
What is the Dimple Method?
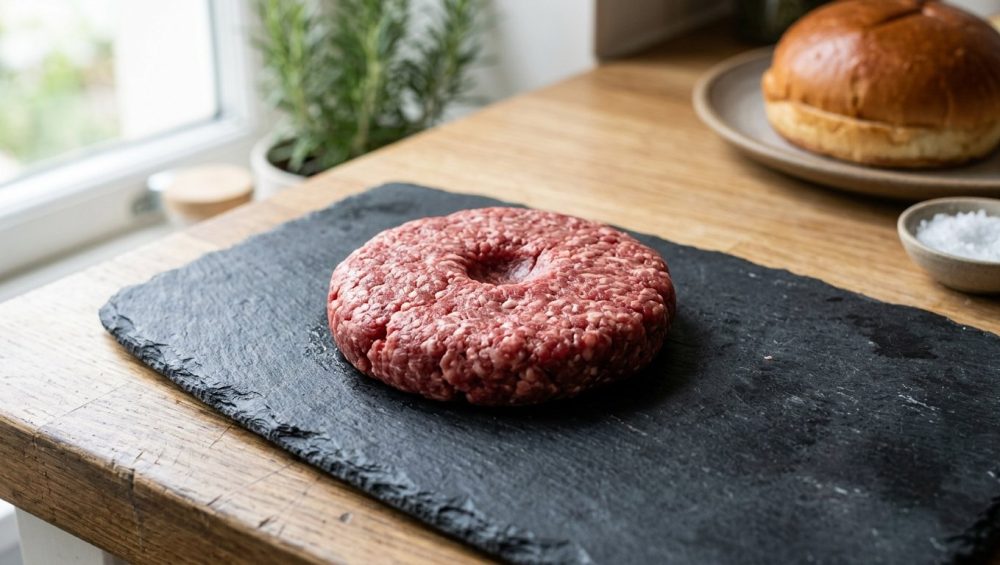
The dimple method is exactly what it sounds like. After you have gently formed your patty, you use your thumb or the back of a spoon to press a shallow indentation into the center of the raw meat. You want the dimple to be about the size of a quarter and roughly half an inch deep. It should look like a shallow crater.
Why the magic of a thumbprint Works
By intentionally making the center of the burger thinner than the edges, you are mathematically compensating for the inevitable shrinkage. When the edges of the patty cook and contract, they still squeeze the center upward. But because you created a depression in the middle, the center merely puffs up to become level with the edges.
Instead of a baseball, you get a perfectly flat, evenly thick patty that cooks at the same rate from edge to edge. This also solves the nightmare of trying to stack tomatoes and pickles on a domed surface where everything slides off. It takes two seconds, costs zero dollars, and works every single time.
Sizing and Shaping: The Overshoot Strategy
Even with the dimple method, your burger is still going to lose about 20% to 25% of its overall diameter due to moisture loss and fat rendering. If you form your raw patty to be the exact same size as your bun, it will shrink during cooking, leaving you with a tragic two-inch margin of dry bread around your meat.
The Rule of Thumb for Sizing
Always form your raw patties to be at least one inch wider than the bun you plan to serve them on. It looks comically large when raw, but trust the process. As the fat renders and the proteins tighten, the patty will shrink perfectly into the footprint of the bread.
Keep It Cold
When shaping your burgers, your hands are actively transferring body heat to the meat. If the fat in the ground beef gets too warm, it begins to melt and smear before it even hits the pan. Smeared fat coats the protein fibers, resulting in a dense, mushy texture rather than a loose, juicy bite.
If you are prepping for a weekend cookout, shape your dimpled, oversized patties and immediately put them back in the refrigerator for at least 20 to 30 minutes. Cooking the meat cold ensures the fat stays solid until it hits the high heat of the pan, which is crucial for a good sear and proper rendering.
The Salting Rule: Timing is Everything
I have a strict rule in my kitchen, and if you break it, you ruin the burger. Never, ever mix salt into your ground beef before forming the patties, and never salt the exterior until the exact moment before cooking.
If you are guilty of salting ground beef too early, you are chemically altering the meat. Salt is a powerful solvent. When it sits on ground meat, it begins to dissolve the muscle proteins (specifically our old friend myosin), drawing out moisture and creating a sticky, cross-linked protein gel. This is the exact scientific process used to make sausage bouncy and dense.
We want our burgers tender and crumbly, not bouncy. Form your patties, dimple them, chill them, and only hit them with a generous shower of kosher salt literal seconds before they go onto the heat.
Cooking Gear: Banish the Toxic Pans
We need to have a serious talk about your cookware. If you are trying to sear a burger in a scratched, peeling, lightweight non-stick skillet, we cannot be friends. I despise cheap, toxic kitchenware. Not only does the mystery chemical coating flake off into your food, but non-stick pans are physically incapable of holding the high thermal mass required to get a proper crust on a burger. Furthermore, relying on aerosol sprays ruins nonstick pans by creating an impenetrable, sticky polymer layer that destroys the coating anyway.
The Only Pans You Need
To get a professional, steakhouse-level sear that locks in shape and flavor, you need heavy, durable, safe metals.
- Cast Iron: The undisputed king of the burger sear. It takes a while to heat up, but once it’s hot, it stays hot. The intense, even heat vaporizes the rendered fat instantly, creating a crust that is out of this world.
- Carbon Steel: The lighter, smoother cousin to cast iron. It seasons beautifully and offers incredible temperature control.
- Heavy-Clad Stainless Steel: Don’t be afraid of sticking. If you preheat your pan properly, you can utilize the water drop test to ensure the pan is at the exact right temperature (around 350°F to 400°F). At this heat, the meat will sear and release naturally without sticking.
Also, please stop cutting your vegetables and prepping your meat on splintering, dulling surfaces. The reason you hate prep work is likely because bamboo cutting boards are destroying your knife edges. Invest in a solid end-grain wood or high-quality rubberized board.
The Smashburger Exception
We’ve spent this entire masterclass talking about thick, pub-style burgers. But what about smashburgers? The rules of shrinkage apply differently here because we are using brute mechanical force to override the protein contraction.
With a smashburger, you don’t form a patty at all. You start with a cold, loosely packed sphere of meat (usually about 2 to 3 ounces). You place it on a screaming hot cast iron griddle and immediately smash it flat with a heavy, stiff spatula.
The Science of the Smash
When you smash the meat flat during the first 30 seconds of cooking, the fat hasn’t rendered yet, and the proteins haven’t fully tightened. By applying extreme pressure against a high-heat surface, you force the meat into a thin layer and maximize the Maillard reaction (the chemical browning of amino acids and sugars).
Because the patty is so incredibly thin, the proteins don’t have the leverage to pull the edges inward and create a bulge. The intense heat cooks the meat so fast that the shape is locked in place almost instantly. Just remember: you only smash once, right at the beginning. If you start stirring your ground beef or pressing down on a burger after it has been cooking for a few minutes, all you are doing is squeezing the delicious juices out into the pan, leaving you with dry meat.
Advanced Techniques for the Perfect Cook
You have the right meat, the right shape, the dimple, and the right pan. Let’s execute.
The Flip and the Cheese
Place your chilled, salted patty into the hot skillet. Let it sear undisturbed. You will know it is time to flip when you see a deep, mahogany crust forming on the bottom edges and small pools of liquid beginning to form on the top surface.
Once you flip, it is a race against time to melt the cheese without overcooking the meat. This is where a stainless steel melting dome becomes your best friend. Place your cheese on the patty, squirt a tiny splash of water into the hot pan (away from the meat), and immediately cover it with the dome. The trapped steam will melt the cheese into a gooey, cascading blanket in less than 15 seconds, saving your burger from drying out on the heat.
Temperature Control and Resting
Do not guess when your meat is done. If you think your cheap, grocery-store meat thermometer is lying to you, it probably is. Invest in a high-quality, instant-read digital thermometer. For a juicy medium burger, pull the meat off the heat when the center hits 135°F to 140°F.
And yes, even burgers need to rest. Give them three to five minutes on a wire rack before putting them on the bun. This allows the agitated, heated juices to redistribute through the meat fibers rather than immediately soaking into your bottom bun and turning it to mush.
Summary: The Foolproof Checklist
Let’s review the non-negotiable rules for stopping burger shrinkage:
- Use 80/20 Ground Beef: Fat is flavor, moisture, and structural insurance.
- Handle with Care: Do not overwork the meat. Keep it loose to prevent myosin cross-linking.
- Size Up: Form the raw patty at least one inch wider than the bun.
- Use the Dimple Method: Press a shallow crater into the center of the patty to compensate for the edges contracting.
- Keep it Cold: Chill the patties before cooking to prevent fat smearing.
- Salt at the Last Second: Never mix salt into the meat; only salt the outside right before cooking.
- Use High-Quality Cookware: Cast iron, carbon steel, or heavy stainless steel. No toxic non-stick nonsense.
- Don’t Squeeze: Never press down on a cooking burger (unless you are making a smashburger in the first 30 seconds).
Cooking a flawless, flat, juicy burger at home doesn’t require a culinary degree, just a basic respect for the ingredients and a little bit of science. Stop fighting your food and start outsmarting it. Now go fire up that skillet, dimple those patties, and show that beef who is boss.






