
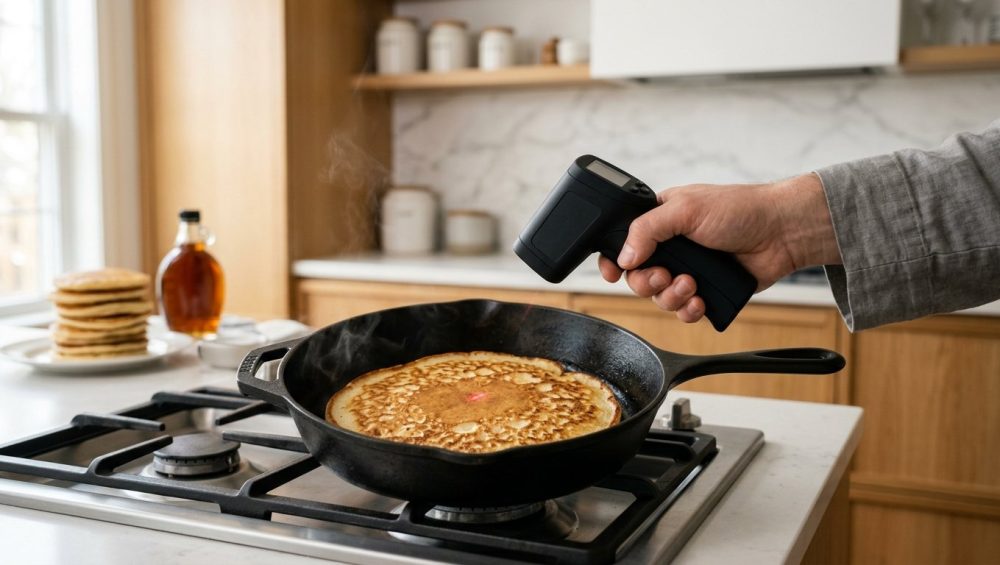
Listen, we need to have a serious talk about your weekend breakfast routine. You wake up on a Sunday, ambitious and caffeinated. You whisk your dry ingredients, gently fold in the wet, and heat up your favorite skillet. You hover your hand over the pan like a culinary Jedi, trying to sense the heat. You flick a drop of water into the pan. It sizzles. You confidently pour the first ladle of batter.
Three minutes later, you flip it. The bottom is scorched black, yet the center is oozing raw batter. You sigh, toss it in the trash (or perhaps to the dog), and mumble the universal home cook’s prayer: “The first pancake is always a sacrifice.”
But why? Why do we accept this culinary tragedy as an inevitable fact of life? You do not need a degree from Le Cordon Bleu to fix this. You just need to stop guessing and start measuring. The reason your first pancake always sucks is that you are relying on vibes. You are depending on unreliable visual cues, outdated wives’ tales, and your own wildly inaccurate internal thermostat to gauge the surface temperature of a piece of metal. It is absolute madness.
Professional kitchens do not operate on intuition; they operate on precision, consistency, and hard data. And while you might not have a commercial flat-top griddle in your galley kitchen, you can absolutely achieve professional-level heat management with one inexpensive, game-changing gadget: the infrared thermometer.
Today, we are ending the stovetop guessing game. We are going to break down the exact thermodynamics of pan-frying, debunk the myths surrounding heat management, and teach you how to use a point-and-shoot laser thermometer to achieve flawless, golden results every single time.
What Exactly Is an Infrared Thermometer? (And Why Do You Need One?)
If you have never used one, an infrared thermometer looks a bit like a plastic radar gun. You pull the trigger, a little red laser shoots out, and a digital screen instantly tells you the temperature of whatever you are pointing at. But how does it actually work?
Every object in your kitchen—your cast iron skillet, your cutting board, your own hand—contains atoms and molecules that are constantly in motion. This kinetic energy produces infrared radiation. While this radiation operates on a wavelength that is completely invisible to the naked human eye, an infrared (IR) thermometer is equipped with a specialized lens that captures these waves, focuses them onto an internal detector called a thermopile, and translates that thermal energy into a precise temperature reading on your digital display.
In plain English: It reads the heat radiating off the surface of your pan instantly, without ever having to touch it.
Why is this necessary? Because your stovetop dials are filthy liars. Setting your burner to “Medium” means absolutely nothing in the real world. “Medium” on a weak electric coil might barely melt butter, while “Medium” on a high-BTU gas burner could quickly turn your olive oil into a smoking, acrid hazard. The dial on your stove controls the energy output, not the pan temperature. The only way to know the actual temperature of your cooking surface is to measure it objectively.
The Laser Is Just a Pointer (Don’t Be Basic)
Let’s clear up a massive misconception right now: The little red laser beam does absolutely nothing to measure the temperature.
The laser is not a magical heat-sensing beam; it is literally just a cheap visual guide designed to show you the center of the area that the internal lens is measuring. The actual infrared sensor is located behind the lens, reading the invisible radiation in a cone shape around that laser dot. Do not get hyper-fixated on exactly where the red dot is shining; focus on the distance and the angle of the device itself.
The 375°F Rule: Flawless, Golden Pancakes Every Single Time
Let’s get back to the scene of the crime: your Sunday morning pancake station.
To achieve a pancake with a perfectly even, golden-brown crust and a light, fluffy, fully-cooked interior, your cooking surface needs to be exactly 375°F.
Why 375°F? At this precise temperature, the heat is high enough to immediately activate the leavening agents (like baking powder or baking soda) in your batter, creating rapid steam expansion that forces the pancake to rise. Simultaneously, the surface temperature is hot enough to trigger the Maillard reaction—the chemical browning process—at a controlled rate.
If your pan is hovering around 325°F, your pancakes will spread out too much, resulting in thin, sad, pale disks. If your pan is screaming hot at 425°F or above, the exterior sugars will caramelize and burn long before the heat can penetrate the center to cook the raw flour and egg. You already know that resting your pancake batter is non-negotiable for fluffy results, but if you drop that perfectly rested batter onto a 450°F skillet, you are still going to end up with a charred hockey puck.
Why the First Pancake Always Sucks (Until Now)
The “sacrificial first pancake” phenomenon happens because of thermal mass and uneven preheating. When you put a cold pan on a hot burner, the heat does not distribute instantly. The center of the pan directly above the flame might reach 400°F, while the outer edges are still sitting at 250°F. When you flick water into the center of the pan, it sizzles, tricking you into thinking the entire skillet is ready.
You pour the batter. The cold batter immediately absorbs the heat from the pan, causing the pan’s surface temperature to plummet. If the pan wasn’t thoroughly and evenly preheated, the temperature drops too low to properly brown the exterior, resulting in a pale, gummy mess.
With an infrared thermometer, you can scan the entire surface of the pan. You can check the center, the left edge, and the right edge. You can wait until the entire cooking surface has stabilized at a uniform 375°F before a single drop of batter hits the metal. If you are lucky enough to own a large outdoor flat-top griddle, the infrared thermometer is practically mandatory. You can create distinct thermal zones—keeping the left side at a gentle 300°F for delicate scrambled eggs, the middle at 375°F for your flawless pancakes, and the right side at 425°F for sizzling bacon.
The Batter Breakdown: Chemistry Meets Heat
When 375°F heat hits the batter, a beautiful chemical symphony occurs. The heat rapidly sets the protein structure of the egg and the gluten network of the flour just as the carbon dioxide bubbles reach their maximum expansion. This locks the airy structure into place. By using your IR thermometer to rigorously maintain that 375°F sweet spot, every single pancake in the batch will be identical to the last.
Beyond Breakfast: Searing Proteins Like a Michelin-Starred Boss
If you think this gadget is just for breakfast, you are sorely mistaken. The infrared thermometer is your ultimate weapon for conquering the most intimidating task in the home kitchen: searing lean proteins. Whether you are cooking a thick-cut ribeye, a delicate filet of salmon, or a humble chicken breast, the goal is always the same: a deeply browned, flavorful, crispy crust.
The Maillard Reaction Needs Respect (and Data)
That beautiful crust is the result of the Maillard reaction, a complex chemical process where amino acids and reducing sugars transform under heat to create hundreds of new, savory flavor compounds.
Here is the culinary science you need to memorize: The Maillard reaction begins to occur rapidly at around 285°F (140°C), but it reaches its absolute peak efficiency between 330°F and 390°F (165°C to 200°C).
When you place a piece of meat in a pan, a violent thermodynamic battle begins. Raw meat is roughly 70% water. Water evaporates at 212°F (100°C). As long as there is liquid water on the surface of that steak, the temperature of the meat’s surface cannot exceed 212°F. The massive amount of heat energy from your pan is being entirely consumed by the process of boiling off that surface moisture.
Only after the surface is completely dehydrated can the temperature finally climb into the magic Maillard zone of 285°F to 390°F. Aside from patting your steak dry before it hits the pan, ensuring your skillet is sitting squarely in the 400°F range before the meat drops is the single most important step for a perfect sear. Your infrared thermometer removes the guesswork. You wait for the digital readout to hit the target, you add your high-heat oil, you wait a few seconds for the oil to shimmer, and you drop the protein. Perfection, every time.
Ditching the Unreliable Water Drop Test
For decades, culinary instructors have taught home cooks to use the “water drop test” to determine if a stainless steel pan is hot enough to prevent food from sticking. The theory is based on the Leidenfrost effect—a physics phenomenon where a liquid comes into contact with a surface significantly hotter than its boiling point, instantly creating a microscopic, insulating layer of vapor that allows the water droplet to glide around the pan like a mercury ball.
If you are constantly battling food sticking to stainless steel, you absolutely need to understand the Leidenfrost effect. When a stainless steel pan is properly heated, the metal expands, smoothing out microscopic pores, and the heat creates a steam barrier between the metal and your food, acting as a natural non-stick surface.
Here is the problem: The water drop test is frustratingly vague. Water will exhibit the Leidenfrost effect anywhere between 370°F and 450°F. If your pan is 380°F, the water drop test works, and your chicken sears beautifully. But if your pan is a screaming 500°F, the water drop test still works, but the moment you add your oil, it will instantly smoke, combust, and leave your kitchen smelling like a tire fire.
Recent precision testing has revealed that the absolute perfect temperature for the Leidenfrost effect in a stainless steel skillet is roughly 437°F (225°C). Why rely on flicking water and guessing if the pan is 370°F or 550°F when you can just point a laser at it and wait for it to hit exactly 435°F?
Navigating the Pitfalls of Pan Materials and Emissivity
Now, before you run out and start blasting your cookware with a laser, we need to talk about the limitations of the technology, the physics of different metals, and my absolute favorite topic: why you need to throw away your cheap, scratched non-stick pans.
The Truth About Toxic Non-Stick Coatings
I am a massive advocate for banishing toxic kitchen gear from your home, and nothing raises my blood pressure quite like peeling, degraded Teflon (PTFE) cookware.
Traditional non-stick coatings are convenient for cooking eggs on low heat, but they are absolutely strictly forbidden for high-heat searing. When PTFE is heated above 500°F, the chemical coating begins to break down, releasing invisible, toxic fumes that can cause polymer fume fever in humans and are notoriously fatal to pet birds.
And don’t even get me started on the danger of aerosol cooking sprays, which contain soy lecithin and propellants that bake into the non-stick coating, creating an impenetrable, sticky residue that ruins the pan’s slip forever.
If you are using an infrared thermometer, you will quickly realize how shockingly fast a dry non-stick pan can exceed 500°F on a standard gas burner. If you insist on keeping your non-stick skillets, use your IR thermometer to rigorously ensure they never cross the 400°F threshold. Better yet, upgrade to cast iron or carbon steel.
Cast Iron, Carbon Steel, and Emissivity Quirks
Here is where the science gets slightly nerdy, but you need to pay attention. Infrared thermometers measure a property called emissivity, which is a material’s ability to emit infrared energy. Emissivity is measured on a scale from 0.00 to 1.00. Most standard point-and-shoot thermometers have a fixed emissivity setting of 0.95, which perfectly matches dark, matte, and organic surfaces.
This means your IR thermometer is incredibly accurate when pointed at a dark, well-seasoned cast iron skillet, a black carbon steel wok, or a dark non-stick pan. When you are seasoning carbon steel pans, temperature is everything, and the IR thermometer will give you flawless, highly accurate readings.
However, shiny, reflective metals—like a pristine, uncoated stainless steel skillet or a bright copper pot—have a very low emissivity (around 0.10 to 0.20). Because they are highly reflective, they act as thermal mirrors. Instead of emitting their own temperature to the thermometer, they bounce the ambient room temperature’s infrared radiation back into the thermometer lens. If you point a standard IR thermometer at a bare, dry stainless steel pan that is sitting at 400°F, the digital display might confidently tell you it is only 110°F.
Do not panic. Do not throw the thermometer out the window. There is a brilliantly simple workaround: The Oil Trick.
Cooking oils have an emissivity very close to 0.95. If you are preheating a shiny stainless steel pan, simply add a small splash of cooking oil to the pan. Point the laser directly at the pool of oil rather than the bare metal. The thermometer will accurately read the temperature of the oil, which reflects the temperature of the pan. Problem solved.
Oil Smoke Points: Your New Best Friend
Speaking of oil, your new infrared thermometer is going to force you to actually respect oil smoke points.
An oil’s smoke point is the precise temperature at which the fat begins to break down, oxidize, and release a bluish smoke. Fats are composed of triglycerides. When subjected to high heat, these triglycerides break down into free fatty acids and glycerol. As the heat continues to rise, the glycerol further decomposes into a noxious chemical called acrolein. Acrolein is the exact compound responsible for that stinging, bitter, burnt-tire smell that ruins your food and burns your eyes when you overheat a pan.
If you’ve ever wondered why your butter burns before the food even cooks, it is because whole butter contains milk solids that burn at a measly 350°F. Extra virgin olive oil is not much better, typically smoking around 375°F to 410°F depending on its refinement.
If your IR thermometer says your cast iron skillet is sitting at 450°F for a hard steak sear, and you pour in extra virgin olive oil, you are going to choke out your kitchen. You must match your cooking fat to your target temperature.
For high-heat searing (400°F to 500°F), you need robust, refined oils. Avocado oil is the undisputed king of high heat, boasting a massive smoke point of 520°F. Refined peanut oil and soybean oil hover around 450°F, while standard canola oil taps out around 400°F. By combining the exact surface temperature reading from your IR thermometer with the knowledge of your chosen oil’s smoke point, you eliminate burnt flavors entirely. You are no longer cooking on a wing and a prayer; you are cooking with controlled chemistry.
The Deep Dive: How to Actually Use Your Infrared Thermometer
Owning the tool is only half the battle; using it correctly separates the competent home cooks from the chaotic ones.
Angle, Distance, and The “Spot Size” Ratio
The biggest mistake rookies make is standing three feet away from the stove, pointing the laser at the pan, and assuming they are getting an accurate reading.
Infrared thermometers operate on a Distance-to-Spot (D:S) ratio. If your thermometer has a 12:1 ratio, it means that if you hold the lens 12 inches away from the surface, it is measuring the average temperature of a 1-inch diameter circle. If you hold it 24 inches away, it is measuring a 2-inch circle. If you stand across the kitchen and point it at the stove, you are measuring the average temperature of the pan, the burner, the stovetop, and the wall behind it.
To get an accurate reading of your cooking surface, you must get close. Hold the thermometer about 6 to 10 inches away from the pan. Furthermore, you must measure at a perpendicular angle. Do not shoot the laser at a shallow 30-degree angle from the side; hold it directly over the pan, pointing straight down (as close to a 90-degree angle as possible) to prevent the lens from picking up scattered background radiation.
What It Cannot Do (And Why You Still Need a Probe)
I need to make this abundantly clear: An infrared thermometer measures surface temperature only. It cannot penetrate food. It cannot tell you if the center of your pork chop is safe to eat.
If you aim an IR thermometer at a chicken breast cooking in a pan, it will proudly tell you the chicken is 350°F. That is the temperature of the crispy exterior skin. The inside of that chicken is likely still a salmonella-laden 90°F.
For preventing dry chicken breasts and ensuring food safety, you still absolutely must use a high-quality, instant-read probe thermometer. The IR thermometer manages the environment (the pan, the oil, the griddle); the probe thermometer manages the internal doneness of the food. They are two different tools for two different, equally critical jobs.
Troubleshooting Common Stovetop Disasters with Data
Once you start using an IR thermometer, you will learn terrifying truths about your stovetop. You will discover that your favorite burner has a massive hot spot on the left side. You will realize that your cheap, thin aluminum pan loses 150°F of heat the exact second you drop a cold steak into it.
This data is empowering. By scanning the surface of your pan during the preheat phase, you can visually map out the hot and cold zones. If the center is 400°F but the edges are 250°F, you know you need to lower the burner heat and give the pan another five minutes to conduct that heat evenly out to the rim.
This is also how you prevent frying pans from warping. Warping (thermal shock) occurs when a pan undergoes rapid, uneven temperature changes. Blasting a cold pan with maximum heat causes the center metal to expand violently while the edges remain cold and rigid, resulting in a permanent buckle. By using your thermometer to monitor a slow, gradual preheat, you protect the structural integrity of your expensive cookware.
Just like using a simple oven thermometer saves your baking by revealing your oven’s true temperature, the IR thermometer saves your stovetop cooking by revealing the invisible thermal dynamics of your pans.
The Verdict: Your Kitchen’s Most Underrated Gadget
Cooking should not be a stressful exercise in anxiety and guesswork. You should not have to sacrifice the first pancake to the culinary gods, nor should you have to spend your evenings chiseling burnt salmon skin off the bottom of a stainless steel skillet.
An infrared thermometer is not a pretentious gadget reserved for molecular gastronomy chefs with tweezers. It is a highly practical, inexpensive, and accessible tool that instantly elevates the competence of the everyday home cook. It replaces vague intuition with hard, actionable data.
So, ditch the water drop test. Stop hovering your hand over smoking oil. Invest twenty bucks in a basic infrared thermometer, respect the thermodynamics of your kitchen, and start cooking with the precision of a professional. Your pancakes—and your sanity—will thank you.






